Such paths perform not only a decorative role, but also a functional one. After all, you won’t be moving around the site, jumping from flowerbed to flowerbed - it won’t take long to damage the plants, and besides, such movement is inconvenient.
From this article you will learn how to create a garden path or path from wood cuts with your own hands - with photos and examples of successful options for the site.
Advantages and disadvantages
If every little detail is thought out in the design of a personal plot, the work of the owners of the plot becomes much easier. For example, when it’s time to harvest the crops: how can you move around the site without breaking nearby crops and plantings if there are no paths?
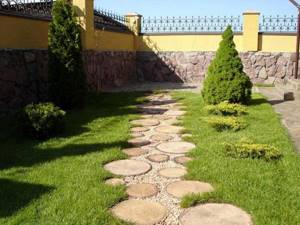
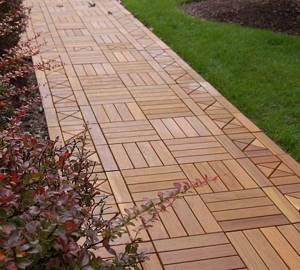
DIY path made from wood cuts. photo
They can be designed from various materials, but it is important to take into account what raw materials the country house and outbuildings are made of, and take into account the features of the style chosen for landscape design. Guided by these points, you can begin to select materials.
Let's consider the main advantages and disadvantages of country paths designed from wood cuts.
Advantages:
- environmental friendliness;
- trees, large branches and firewood cut down during site clearing are affordable materials;
- You can make an unusual path from different types of wood. Each tree has its own unique pattern;
- Paths made from wooden saw cuts are easy to lay; special tools and specialist services are not required. The task of laying paths is not difficult to cope with on your own;
- such trails require minimal maintenance;
- After heavy rainfall, water does not accumulate on the paths, and you can walk to the garden for harvesting without puddles.
Do-it-yourself garden paths made of wood, photo
The disadvantages of such paths include their short service life. Wood is a natural material, it is subject to the process of decay, so after some time the paths will require restoration.
Wood is prone to fire, and after rains such paths slip a lot, so you need to move along them with caution. To eliminate this drawback, the surface of the paths should be treated with coarse sandpaper.
Creative ideas for the original design and landscape design of a small area: examples of arranging a limited area, useful advice from experts.
Read about the features of using Moorish lawn in landscape design in this article.
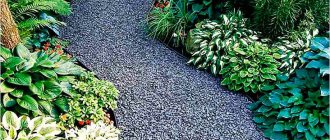
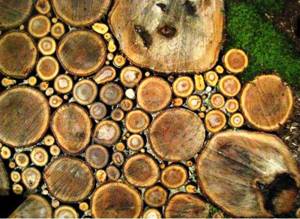
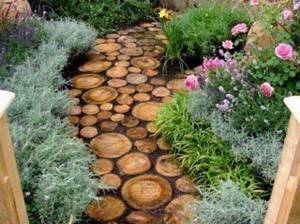
Paths made from wood cuts in the photo
We bring to your attention interesting options for country paths, equipped with wooden saw cuts. Here you will see those options that someone has already been able to implement at their dacha, and perhaps you will draw inspiration for yourself by implementing a similar idea on your own plot of land.
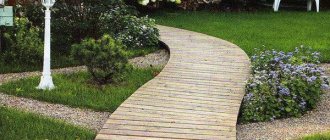
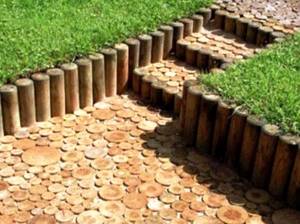
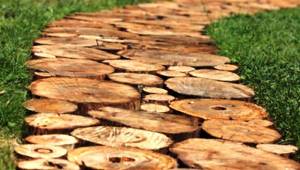
Winding path
An excellent example of a path made from saw cuts, which has become quite original due to its shape: it bends from side to side, like a snake. It is not difficult to notice that initially the path was marked out with peculiar borders made of stumps of approximately the same diameter, after which it was filled with saw cuts of different sizes, which created an individual and unique design in the end.
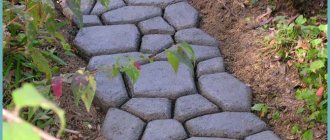
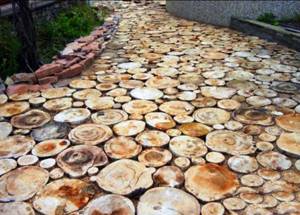
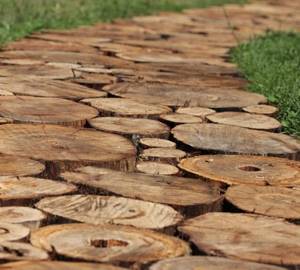
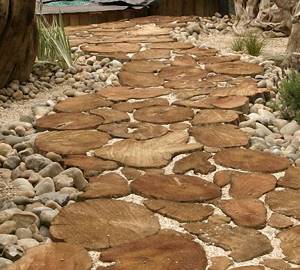
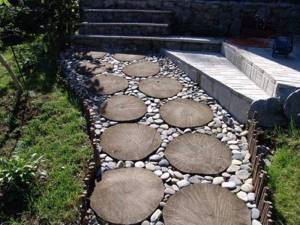
Path made from saw cuts of different diameters
But here is an excellent option, which was made from saw cuts of different diameters, laid very closely to each other. The path itself is quite wide, perhaps even more than 2 meters, and thanks to its light color, it looks simply amazing.
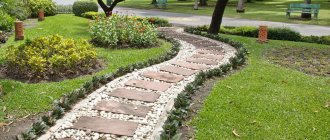
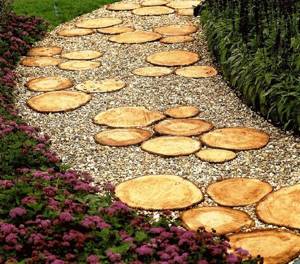
Path with landscaping
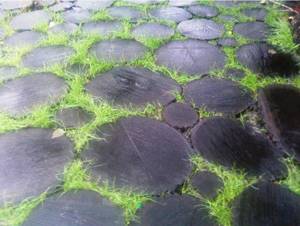
The next option reflects exactly the idea when a mixture of grass seeds is poured into the space between the cuts. The result is a wonderful path with a lawn. It is in this case that the stumps are painted black, which also significantly affects the appearance and elegance of the path.
Option with steps
The next type of track is a whole complex made of saw cuts. Here we see not just a platform completely covered with such small stumps of different shades, but also steps. The log borders stand out clearly, from which it is clearly visible that they were laid first and served as a guide for laying out the rest of the site. As for the steps made of logs, here they are most likely implemented by installing stumps of different heights. Although, the option with a pillow for cuts of different heights is not excluded.
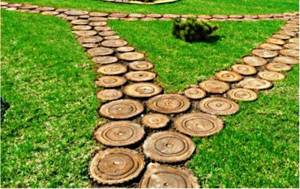
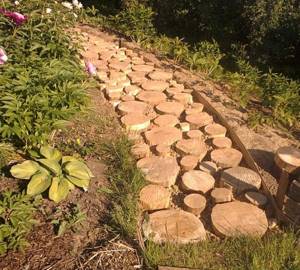
Multiple tracks
As we have already said, the size of your plot, as well as your personal preferences, determines how many paths will be provided in the dacha. For example, in the next photo you can see 3 paths from saw cuts at once, which intersect with each other, apparently, in the middle of the country courtyard. A beautiful and smooth lawn has grown around the paths, which creates a unique exterior. We advise you to take note of it.
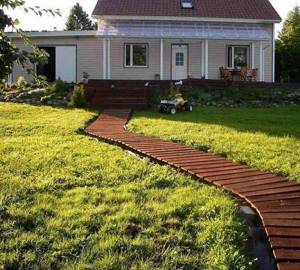
Path from sawed wood in the garden
The last option that we wanted to note is a regular path made from saw cuts, which was laid near the vegetable garden. The borders here were ordinary scaffolding or simply wide wooden planks that enclosed the beds. It is worth admitting that this is an excellent option for a vegetable garden, because it will keep you away from dirt and make working in the garden beds more enjoyable and relaxed.
Tools and materials for work
Despite the fact that the work associated with installing paths on a personal property is considered a simple task, it will be difficult to cope with this task alone.
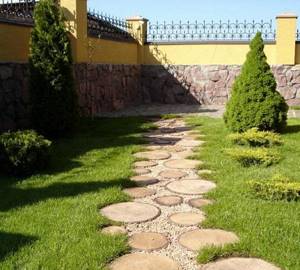
Path made from wood cuts, photo
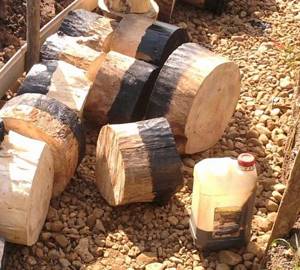
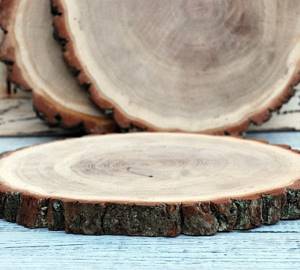
Before you start, you need to prepare your supplies. Paths can be created from simple stumps of small height, from dies, logs or end parts of logs.
So, you will need:
- tree cuts;
- level;
- drying oil and brush;
- mallet;
- spatula and bucket;
- sand and gravel;
- water;
- waterproofing material in rolls.
Having prepared everything that is required, you can begin the preparatory stage - prepare the wood, decide what your path will be like (determine the optimal shape and size.
Wood cuts for paths, photo
An important step is the choice of material to bring your idea to life.
Advice! Don't skimp and buy hardwood. For example, the service life of pine is about 7 years, oak is about 10, and the most durable hardwoods will last about 20-25 years. But if you couldn’t find the right species, you can use the wood that you have at your disposal, or the one that suits the price.
As for the cost of wood cuts, which are a suitable material for creating paths in the country, birch blanks are the cheapest - about 700 rubles. for 100 sq. m, the highest cost of saw cuts from hardwood is about 3,700 rubles.
Naturally, some sections will need to be updated in a few years, and maybe a complete rework of the path. The need for restoration work arises approximately three years from the moment the path was laid, but the period again depends on the type of cut you have chosen. But all this is not so scary, because you will already have experience in designing trails, and in the future you will be able to take into account all the nuances and make a more durable path.
What else should you consider? First of all, the dimensions of all the parts separately. The maximum height of a wooden piece can reach 20 cm, but paths made from 10-centimeter saw cuts are not a very suitable option, since they will not stay securely in the ground. Even with a slight load they will come out of line.
Garden paths made of wood, photo
It is recommended to choose cuts that are identical in width, but you need to adjust the height yourself. After completing the work, all you have to do is remove the bark from each cut. You need to get rid of it, because it does not adhere well to the tree and insects quickly appear in it; Because of this, wooden blanks rot.
Important! Inspect each of the cuts: it is important that the workpieces are solid and without damage. If even one workpiece turns out to be of poor quality, then there is a high probability of damage to the entire structure. Feel sorry for the work put into this matter!
Path made of wooden saw cuts, photo
Building a path from stumps (video)
In addition to saw cuts, hemp is also used as the main element . With their help you can create truly amazing works. To make the path even more impressive, it is recommended to use hemp of different diameters, which will make the path look like a mosaic. Stock up on stumps based on the planned length of the future path, and start laying. Its technology is no different from that used when laying saw cuts. Unless the depth of the trench will be different. If the height of the stumps used is 15 cm, then the depth of the trench will be no less.

The path can be designed in a variety of ways. You can use both large and small hemp cross-sections. You are required to harmoniously combine these dimensions so that the overall path looks organic.
If you are against greenery among the cuts, then it is better to treat the space between them with a special mixture that will not allow weeds to grow - this way you will get an absolutely clean path.
You can generally move away from using round shapes and use regular boards instead of stumps. They can be of different sizes, both medium and long. It is only important to maintain a thickness of at least 5 cm, so as not to worry about the safety of the path after the spring snowmelt.
The simplest option, of course, is a straight path made of boards. The shape of the board itself greatly simplifies the construction of this track geometry. But why do we need simplicity if we suddenly want something more sophisticated? After all, winding paths made of boards are a strong design move, although they require more effort.
Workpiece processing
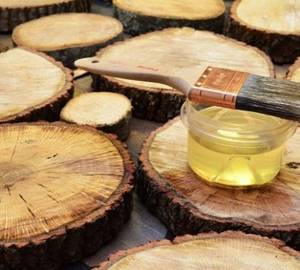
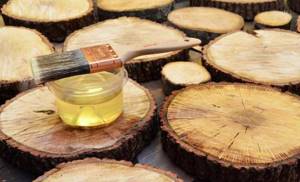
Treating wooden blanks with drying oil will help extend the life of paths.
There is nothing difficult in this matter:
- Heat the drying oil, and as soon as it starts to boil, remove the container from the stove.
- All wooden surfaces should be soaked in heated drying oil - this will protect the workpiece from water and insects.
- Allow the saw cuts to dry completely, placing them in a place protected from moisture.
- After this, treat the area that is in the ground with bitumen. This measure will protect the wood from rotting. Thanks to this, the paths will last longer. Treatment with bitumen is optional, but recommended.
Recommendation: if you want the path to look old, you can achieve this effect by treating wooden blanks with a solution prepared on the basis of copper sulfate. But keep in mind that after processing the shade of the wood will change slightly. In this situation, it is not difficult to achieve the perfect color of all cuts, due to which the path will look more harmonious in the landscape.
All processed workpieces should be dried and then taken to the next stage.

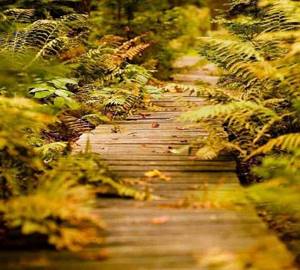
Wooden path. photo
Creating markup
It is best to draw up a diagram on a piece of paper, marking the locations of the paths, indicating their configuration, length and other parameters.
If you find this difficult, just do the usual markings. Decide how many paths you want to create in your dacha. If you are going to make just one path, you should think carefully about everything so that you can easily move around the site without bumping into obstacles in the form of beds. All buildings, including a country house, a shed, and a bathhouse, should be located at the same distance.
The optimal width of the path for a summer cottage is 35 cm: in this case, one person can move along it unhindered. But if there is enough space, increase this value by 15 cm. A path 50 cm wide will be more spacious and perfect for walking around the garden.
Paths at the dacha made of wood, photo
Everything has been thought out, the route has been determined - it’s time to start taking serious action. To make the markings you will need small wooden pegs. Place them at the beginning of the trail at a distance of 30 cm and at the end. Secure the pegs by driving them into the ground, and then stretch a thick thread or rope between them.
If the path is winding, then at each turn you need to drive in pegs for easier orientation and fulfillment of your plans.
Plot
-1 vote
+
Vote for!
—
Vote against!
Almost every home owner has thought about how to make a garden path with your own hands, whether it is worth creating one for your site and how to choose the right design option. Of course, this design deserves to be located on your site, because they will not only perform a decorative role, but will also help you comfortably navigate the garden area. And for other questions, you will find answers directly in the article itself.
Table of contents:
- Why are paths made from saw cuts or lumber so popular?
- Preparing the base
- Where can I get saw cuts?
- Making cuts with your own hands
- Processing workpieces with special solutions
- Installation of paths from saw cuts
- Creating a path from lumber
- Path care
Why are paths made from saw cuts or lumber so popular?
The question for this answer is very simple, people are attracted by the advantages of a wooden walkway:
1. Available to everyone. Of course, prices for wooden products are very high and growing rapidly, but wooden paths are an exception. Their cost is several times lower than that of other options (for example, stone paths, brick paths from paving slabs, etc.). Plus, it is possible to use lumber left over from other repair work or trees felled on your site.
2. Unique texture. It allows you to create extraordinary track designs without putting in any extra effort. In particular, they like to use such designs in eco-style.
3. Easy to use. The construction of this type of path does not require any special construction skills or special tools.
4. Environmentally friendly. Wood is completely safe for human health, and also perfectly combines and interacts with the environment.
As annoying as it may be, this type of path also has its drawbacks. First of all, it is worth noting the susceptibility of the material to mold or fungi. Also, wood can be damaged due to insect activity.
Some note the short service life as a disadvantage. But, in fact, how long the track will last depends on many factors. For example, the type of wood, the correct processing of workpieces, their installation, the reliability of the base. Therefore, if the rules are followed during the work and in the future, the tracks can last up to 40 years.
Preparing the base
Often people encounter problems such as heaving, sinking, overgrowing with weeds and crumbling of the garden path. All these are consequences of improper foundation preparation.
Step-by-step instructions for preparing the bed:
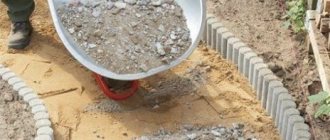
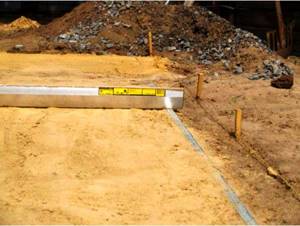
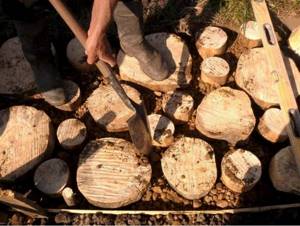
1. We mark the contours of the future path. This stage does not involve any complexity, but still the process itself is labor-intensive. To create markings, you need to do the following: on the site, using a cord stretched over driven rods, we outline the boundaries of future paths. If the area has a flat surface, the rods are installed in increments of 2.5 m; if there are bends, the rods will have to be driven in very often (approximately every 40 cm). Sometimes people have difficulties with this marking method (especially if the path is quite winding), then you can use sand, chalk or lime. When planning a path with curbs, it is necessary, even before marking, to calculate the width of the base in accordance with the required indents.
2. The next step is to dig a trench approximately 25 cm deep. We constantly check that the created ditch does not go beyond the boundaries of the markings, and that its level is the same everywhere. Please note that this stage must be performed exclusively in dry weather, because if the trench is flooded with water, the quality of the bed will noticeably deteriorate.
3. If you plan to install curbs, then you need to pour sand, preferably compacted, and install them, leveling them using a building level.
4. We compact the base and line it with geotextile or a polyethylene film may be suitable. This process will protect the path from overgrowing with weeds and also prevent subsidence.
5. Over the entire bottom area, we lay a drainage layer of gravel or crushed stone (with a fine fraction and having a height of 5-11 cm, the value of which depends on the stability of the earth). The use of sand and gravel mixture (8:2) is also allowed. We compact the drainage layer using a vibrating plate, a roller, or a manual (made with our own hands) tamper.
6. There are types of paths that need a sand cushion, which is laid on the drainage and has the same height. It is poured in stages, layer by layer. At the same time, you must remember to moisturize and compact them well.
Where can I get saw cuts?
Of course, you can purchase ready-made saw cuts from any species at a building materials store. Some manufacturers even offer their products already treated with special solutions, which only need to be installed, following the installation rules. But this option is suitable only if the budget allows it. After all, the purchase will not be cheap.
Let's give an example from the price list of one well-known manufacturer: larch cuts, without pre-treatment, having a diameter of 25 cm and a height of 15 cm cost 150 rubles per piece. That is, one meter of track (50 cm wide) made of this material will cost 8,000 rubles, not counting the cost of delivery and processing solution. But don’t despair, because you can make the cuts yourself.
Making cuts with your own hands
To reduce the cost of the process, you can make the cuts yourself. Ideally, if you or someone you know has a fallen tree on your property, which does nothing but clutter up the place. Then the blanks will be practically free. But not everyone has this opportunity. In this case, you will need to purchase a round timber.
Any type of tree is suitable for cutting, but the best option, of course, is larch. Also, blanks made from pine, oak, alder, hornbeam, and acacia will last a long time. But keep in mind that processing larch and oak is very difficult to do on your own. Another important factor when choosing wood is its dryness. If the wood is wet, the cuts may warp, crack, and the path will simply fall apart.
After the purchase, we begin preparing the necessary tools. Of these, you will need an electric or chainsaw, a tape measure, pencils for markings, templates and a planer for sanding.
To make cuts you will need to perform the following steps:
1. Clear the trunk of all branches that are present on it.
2. Sand the trunk using a planer or scraper (you can sand ready-made cuts, depending on personal preference).
3. Using templates, we mark the trunk in equal parts of 15-25 cm (depending on the thickness of the log, the greater the thickness, the correspondingly greater the height of the cuts). Keep in mind that if the height is less than 15 cm, the path made from saw cuts will not be stable.
4. Open the trunk according to the marks.
At this stage the cuts are ready.
Processing workpieces with special solutions
Before you start laying the trail, you need to process the blanks. It will protect the future path from the appearance of fungus and mold, as well as from harmful insects. Various types of solutions can be used for processing. For example, you can use special antiseptics and impregnations (in this case, you can only use those that have deep penetration and you must follow the instructions for use).
It is also possible to prepare a solution for treatment yourself. To do this, you will need to mix copper sulfate with water in a ratio of 2:8, leave to settle for 2 days, and dry it in the shade for the same amount of time. When using this solution, it is necessary to take into account one important detail: copper sulfate, when interacting with wood, causes it to darken. This will create the effect of “aged” cuts. If you don't like this design solution, try another option.
You can prepare the solution yourself using drying oil; to do this, bring it almost to a boil. You can also use the old-fashioned method: brew larch bark and soak the workpieces with this solution, this will allow the wood to obtain antiseptic properties, as well as a wonderful dark red hue.
In addition to applying the treatment solution, it is necessary to cover the lower part of the workpieces with a waterproofing layer. This is not so easy to do: we melt the bitumen (the melting temperature reaches 200 degrees Celsius), always in a metal vessel, and dip the saw cuts into it. Adding to the complexity of execution is the unsafety of this operation. But there is another way: we place bitumen briquettes in a metal container and fill it with gasoline. Next, you need to leave the solution for a couple of days until a liquefied bitumen mass forms. We dip the lower part of the workpieces into it.
Installation of paths from saw cuts
Let's begin the most creative stage of all our work - creating a trail. Many people are worried about what a path made from saw cuts will look like; we have placed it at the end of the article. So you will not only get rid of your worries, but you will also be able to choose the design you like.
Instructions for making a path from wood cuts:
1. Check the readiness of the cuts and the level of the bed.
2. We begin paving.
3. We install each part in its rightful place, while pressing it into the sand cushion and leveling it, carefully tapping it with a hammer that has a wooden or rubber head.
4. We control the evenness of the cuts so that they are on the same level.
5. We lay out the cuts according to the planned pattern, which depends solely on the plans of the artist and the appearance of the blanks.
6. In the spaces between the cuts, it is necessary to get rid of the void. To do this, we fill these places with sand, crushed stone screenings or small stones mixed with soil.
7. We decorate our path by planting ornamental plants or moss in the spaces.
8. We decorate the edges: decorate with decorative stone, fill with crushed stone, gravel and compact well.
Creating a path from lumber
Sometimes preparing and laying saw cuts seems like a rather difficult and too long process for people, but the idea of making a wooden path on your own is still to their liking. In this case, the solution will be a path made of lumber. The time to create it is much shorter, and the materials used do not require additional processing.
Lumber for a path can be very diverse: beams, boards of various lengths, etc. The easiest and most affordable option is panel flooring; it does not require labor-intensive preparation of the bed. That is why we will consider this version of the track.
Instructions for creating a panel deck:
1. We prepare all the necessary elements: edged boards of the same length, if possible equal to the width, wooden beams, nails. The main tool for a lumber path is a hacksaw, but you will also need a hammer.
2. We mark the trail.
3. Level the ground in the places where the future path will be located (fill the holes, cut off the tubercles, compact the soil).
4. We saw the beams into pieces of equal lengths.
5. Trim the boards.
6. Cover all wooden parts with antiseptic.
7. We treat the lower parts of the boards with bitumen putty, or cover them with kuzbaslak, wait until it hardens completely.
8. Place the bars on the base every one and a half meters, pin boards to them, recessing the nail heads. The best option would be galvanized nails.
9. In places located between the boards, leave gaps of up to 6 mm, this is necessary to ensure ventilation, as well as water drainage.
10. We sew the shields together using beams.
11. Sand the joints using sandpaper.
12. Paint the resulting path using paint used in exterior work.
Another simple trail design is a wooden walking path. In addition to ease of execution, it is famous for its low cost of materials. To create this option you need to do the following:
1. We prepare the base according to the principle described above. The only difference is that the depth of the trench for such a path is 6-8 cm.
2. We cut out sections that have a length equal to the width of the path from the beams.
3. We process them using the same principle that was used during the manufacture of panel flooring.
4. We place the planks over the entire area of the bed at intervals of half a meter, pressing them into the backfill.
5. We paint.
In order to comply with all the rules, we recommend watching how a path is created from lumber. The video is located at the end of this article.
Path care
In order for a wooden walkway to be pleasing to the eye and comfortable to use for a long time, it requires proper care:
1. Once a year, clean the dirt using a metal scraper, then treat the wooden parts with an antiseptic and cover them with drying oil.
2. In a timely manner, get rid of weeds that have the ability to destroy the base of the coating.
3. Be sure to prevent the possibility of flooding or erosion of the coating. To prevent this from happening, you can use the services of special grooves or dig ditches on the sides of the path.
4. In the winter season, remove snow and prevent ice from forming on the wooden surface.
5. Do not use salt or other substances to clean ice, which may cause wood deterioration.
After reading this article, every owner of a summer cottage will be able to independently make a path from saw cuts or lumber, without ruining his wallet, without asking for outside help and without making excessive efforts. Also after the article there are photos of various variations of path design. You can choose the one that fits harmoniously into your garden design.
Preparing the base
The materials have been prepared, the markings have been made, now you need to prepare the area for placing the pegs. One should be identical to the markings and dimensions of the future path.
Please note:
- Path parameters - the platform should not be larger than the size of the path (only when installing sides of 5-10 cm) or smaller.
- The depth of the marking should be equal to the length of the cuts plus 20 cm. This is enough for the path to withstand a certain load without changing the location of the parts.
Using available tools, make a trench:
- Perform waterproofing by laying waterproofing material (thick cellophane film for creating greenhouse complexes) along the bottom of the created base.
- It is recommended to lay the film with a minimum margin, and pour fine crushed stone on top of it.
- Thoroughly distribute the drainage layer and make a sand cushion.
- Check the evenness of the surface using a level.
How to arrange a garden path from transverse cuts of a trunk
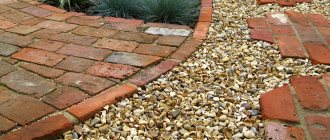
At the stage of creating country paths from transverse cuts of a trunk, you need to install sides that perform a protective function. But this is not a mandatory measure: proceed from your idea and the material used.
Borders are formed from bricks, small stones, blocks of wood, firewood, they can also be plastic or iron. Choose the material at your discretion, but remember that the fences will be conspicuous. To make the path look harmonious, it is better to use materials of natural origin.
Paths and paths made of wood cuts, photo
Having finished with the sides, lay down the “sand” pillow. Due to this material, the height rises slightly. Add sand sequentially, and moisten it with water to compact it.
Read about how you can use border tape when arranging flower beds and paths in the garden: the nuances of installation, choosing sizes, and recommendations for do-it-yourself installation are described.
Read about how to arrange a beautiful ridge of perennials along the path here.
How to beautifully plant roses along paths? For examples in the photo, see the article at:
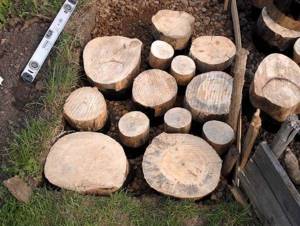
Preparation of cuts
This is one of the most important jobs in the manufacture of wooden paths in the local area. Both their durability and the quality of the path itself depend on how correctly the cuts are prepared.
In order to beautifully decorate the local area with wooden cuts, you can take various materials. But experts recommend pine or oak wood. Larch works well. These materials will be able to withstand heavy loads, and this is an important quality for paths. Experts note that with proper treatment, larch, oak and pine can last up to 20 years!
IN ORDER TO CORRECTLY PREPARE THE CUTS, YOU NEED TO TAKE WHOLE LOGS.
They are cut into pieces no more than 20 cm high. It is worth noting that the height of the cut depends on its diameter. The average size will be 15 cm. This is quite enough to build a high-quality path that will not be afraid of mechanical stress.
After the log is divided into pieces, each element must be cleared of bark. It is fragile and therefore not suitable for use on garden paths. Moreover, the bark quickly begins to rot. This is an unacceptable characteristic for quality material.
When cleaning elements from bark, it is necessary to inspect each cut. Those units that have cracks or chips can be removed immediately, as they are considered defective. If you leave cracked elements, they will very quickly become unusable and crumble under your feet.
The saw cuts, cleared of bark, can continue to be processed. This is necessary in order to protect the elements from rotting, aggressive environmental influences and any troubles that may negatively affect the condition of the wood. Drying oil is best suited for these purposes. Processing can be done in various ways, but in general, drying oil is very easy to work with.
To begin with, it is heated to a boil. Then the wood is generously lubricated with drying oil. Next, you can use an antiseptic. Such bioprotection for wood is very important if it will often be affected by moisture and temperature changes.
AFTER TREATMENT WITH FLOWER AND ANTISEPTIC, THE WOODEN SAWS SHOULD BE LEFT IN THIS CONDITION FOR A COUPLE OF DAYS.
This will be followed by the final stage of processing, which involves the use of bitumen. This is not a mandatory part of the work, but experts recommend not skipping this step. Bitumen should only be used on the side on which the saw cuts will be laid down. In this way you can protect wooden garden paths from rotting.
Working with wood is very interesting. Here you can use many different methods to create a unique design. For example, wooden cuts can be artificially aged. This will give the surrounding area a more peaceful atmosphere. In order to give the elements an antique effect, you need to take copper sulfate.
You can begin further work only after all the hemp is completely dried.
Creating a path from saw cuts
Having completed the preparatory work, proceed to the most important stage. In order to do everything correctly, you need to decide how the wood blanks will be installed. There are a lot of design options: by changing the position of the parts, you can create the desired pattern.
Laying options: close or at a slight distance. Gaps can be left or small crushed stone can be used to fill.
The principle of installation itself is very simple and does not need a detailed description: select one workpiece, place it on the prepared base, deepen it, apply a little force and then tap it well with a rubberized hammer.
After a certain distance, be sure to check how well you did the job of laying the wooden cuts. To do this, use a level; it can be used to level all the parts. The path should turn out to be impeccably level - of course, by level, and not by eye.
Planning a garden path from wooden cuts
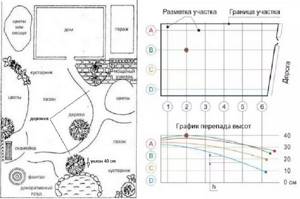
In order to make it convenient to use the paths in the garden plot in the future and not have to redo or move them, you need to think through everything in advance, plan it and sketch it on a diagram of the plot.
First of all, think over the main routes for moving around the site. These may lead to various buildings or areas of the direction, or maybe the path will simply be intended for leisurely walks.
The next thing to consider when planning paths is the look they will give to the site. Straight and angled paths give the site an organized, more orderly and strict appearance (for this, borders made of wood, brick or stone are used). Paths made with smooth curves, winding and of different widths will create a feeling of naturalness and naturalness.
Next, you should take into account the topography of the garden plot. The path will facilitate the flow of water along it during rain or melting snow towards the slope. Therefore, this situation must be taken into account and it is better to direct excess moisture to trees or bushes than to the foundation of a building or to a children's sandbox.
And finally, the width of the track. It is selected mainly based on functionality and expediency. If, for example, a large number of people are planned to be on the site at the same time, then the path should allow two people to separate along it (about 90 cm). If the area is small or there is a limited amount of building material, then wide paths may be superfluous and you can get by with a width of 50-60 cm.
As a result of the entire planning process, a plan for the location of paths on the site should appear. It is a large-scale plan of the site with marked marks with high and low levels of relief, buildings and other elements (trees, shrubs, beds, etc.). A scale diagram of the path network is drawn on this plan. It is worth considering that the bends of the paths on the plan diagram in reality do not look as clearly on the earth’s surface as in the figure.
Care
It’s not enough to simply lay wood blanks to make beautiful paths. It is also necessary to ensure proper care for them. In the first year, it is recommended to fill the voids between the wooden pieces. For filling, you can use fine crushed stone or sand.
A good option is to let nature fill in the cavities. In a year, the grass will turn green between the harvests.
Advice! To prevent the growth of weeds, fill the cavities with fertile soil and sow lawn grass. Decorative plants will fill the voids in a short time, and such a path will look even more unusual.
The wood can be left untouched, aged artificially, or the stumps can be painted in variegated colors. You will get an original path: children will certainly appreciate such a fun design.
Features of care:
- Set aside one day every year to prevent the condition of garden paths - use an iron scraper to clean round timber;
- after cleaning, cover the workpieces with drying oil or paint;
- inspect the wooden blanks: if there are cracks on them, this indicates a rotting process, the damaged parts will have to be replaced.
Recommendation: at the initial stage, when preparing consumables for creating a garden path, put several blanks in the shed in order to replace damaged ones over time.
Photo gallery
Below we have made a small selection of photos with options and ideas for garden paths made from sawn wood and logs, which you can arrange with your own hands: