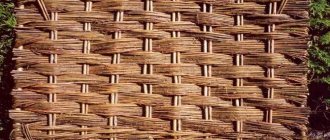
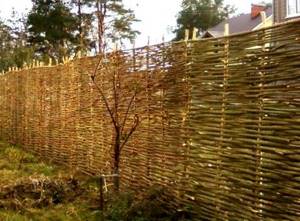
Wicker fences are considered the most inexpensive fencing. It's easy to make a vine fence with your own hands. Basically, it is a fence made of rods intertwined with each other.
An example of a classic vine fence
The material used for such a fence is:
- vine;
- willow;
- hazel.
In other words, any shrub or tree that has many flexible branches will do. To make such a fence from bushes, you first need to drive stakes, usually to a depth of more than 50 cm. The installation of pegs depends on the weight of the rods. The heavier they are, the deeper the stakes are installed. The pegs are intertwined with rods in a horizontal direction. The preparation of rods is usually done in the spring; they are cut along an oblique line.
Pine branches 5 cm thick are suitable for stakes. The stakes become sharper from below and are dug into the ground. To make the wicker fence more reliable, it is advisable to cover the lower part with hot bitumen. To maintain stability, a plank is temporarily nailed between the stakes. The work starts from below.
Return to contents
Material
The most common material for weaving fencing is willow.

This is what the Willow tree from which material for the fence looks like.
It has very strong rods and grows in every region of Russia.
You can buy such rods on the construction market. Willow vines are highly durable, so you can use any variety of willow to make a wicker fence. However, the most suitable for weaving are belotal and willow. The length of the rods for weaving must be at least one and a half meters. The classic vine has several varieties:
- grape;
- willow;
- reed;
- Rozgovaya
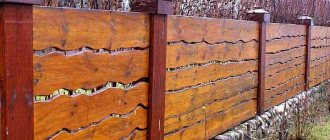
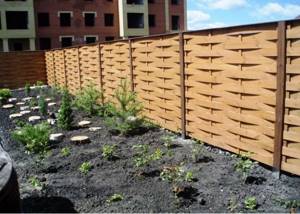
Sometimes, to make a wattle fence with your own hands, flexible slats of wood are used. This DIY fencing looks very dense and has no gaps. This results in a reliable external fencing of the entire perimeter of the site. A wicker fence always has the same outer and inner sides.
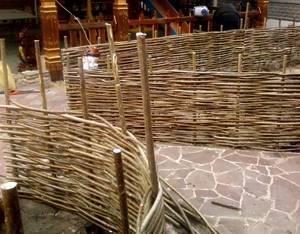
Option for a fence woven from branches
Modern materials have also found application in the manufacture of wicker fences. PVC panels are very often used for wicker fences. The main advantages of such artificial material are:
- Long service life;
- Does not react to aggressive environments;
- Not afraid of atmospheric influences;
- No pests appear.
If we talk about natural wicker, then it is necessary, first of all, to note its positive qualities:
- Low cost;
- Originality;
- Attractive appearance;
- Very easy to install;
- Meets environmental requirements.
Wicker fabric also has several disadvantages:
- Not being repaired;
- Short service life;
- An excellent living environment for pests.
Return to contents
Coloring
Any type of fence (wicker fence made of boards, veneer, rods or reeds) needs processing. Some of the material is coated with special compounds before installation in the ground, for example, pillars. If harvested vine is used, it is also pre-coated with stain and paints after drying.
The finished structure is also processed specially. impregnation, stain. The final finish for wattle is almost always varnish. This allows you to maintain the natural appearance of the fence. One of the ways to process a finished fence with your own hands is with a spray bottle.
Making braided braid
To make a braid using a vine, you must have:
- Steel stakes;
- Willow twigs with a diameter of more than 3 cm;
- Antiseptic substances for treating wood;
- Heavy sledgehammer;
- Secateurs;
- Wire.
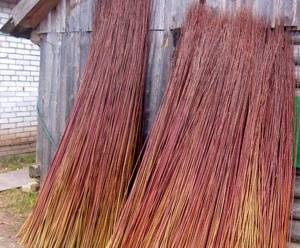
For the fence you need to select healthy branches, preferably straight ones. The collected rods must be dried well and stored tied in bundles. Before starting work, to make a wicker fence, you need to pre-soak the rods. The vine becomes flexible and very plastic, easy to work with.
The vine may be subjected to a “steam bath”. When it dries, the weave will be very durable.
Return to contents
Purpose
Before you start creating a wicker fence, decide what its purpose will be. A wicker structure can serve as a regular fence, be used to place accents or divide personal space for more convenient movement, emphasize a certain style direction, or serve as an original mini-fence for beds and flower beds in the garden.
Based on the purpose, you need to choose from an assortment of materials used for the construction of such structures. If you need a durable and reliable fence, you can make a wicker fence from twigs, branches and vines of trees - willow, hazel, broom, etc.
Let's look at the main pros and cons of decorating a personal garden using such wattle fences.
Drainage works
Holes with a depth of at least 40 cm are dug under the stakes. Dry sand is poured into the holes, thus protecting the wood from rotting. The stakes are installed in 50 cm increments so that the fence is stable and there is no sagging or tilting. This makes it possible to make a decorative fence for the garden, creating an original pattern.
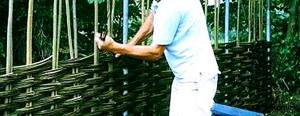
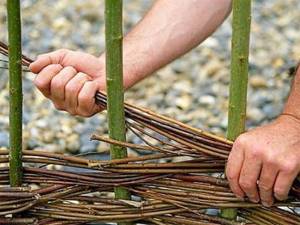
When the installation of the stakes is completed, the weaving of the rods with your own hands begins. To give the vine more flexibility, the ends are dipped in slightly salted water and held for two minutes.
If horizontal weaving is performed, a simple weave is carried out between the stakes.
When a vertical design is made, several rods are woven horizontally with a certain step, and only then vertical weaving is carried out. Return to contents
An alternative is the construction of a living fence from trees
The advantage of this solution is that the sections become stronger every year as the branches grow. In summer it is a solid green wall.
Fence care - trimming excess rods, giving the right direction.

The procedure for creating a living fence is as follows:
- Willow shoots, cut in early spring before buds appear on the trees, are brought indoors and placed in water until roots form. This will take up to 3 weeks.
- Markings are made along the perimeter. Dig a ditch.
- Stick supports from thick branches to a depth of 50 cm.
- Fasten 3 rows of horizontal logs from thinner rods.
- The shoots are planted in a row, deepening them into the ground by 20-30 cm. The distance between each element is up to 30 cm.
As it grows, the living willow wall will become covered with greenery, creating protection for the area from prying eyes.
Frame installation
To make a fence frame, steel rods are driven into the ground at equal distances. These rods are painted in the color of wood so that their metal origin is not visible. Such a steel base is much more reliable than a wooden one, because it will not rot deep underground.
You can, of course, use wooden stakes, however, you must first treat them with an antiseptic. To do this, pour drying oil into the hole. To prevent the wood from rotting, the stakes can be immersed in a steel pipe, or a plastic attachment can be made for them.
Return to contents
Little secrets of weaving
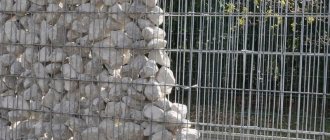
- If opportunities permit, it is better to drive the stakes not into the soil, but into scraps of pipes (plastic or iron) compacted into the ground. This option will make the structure stronger. But there is one caveat: the stake must fit tightly into the pipe without gaps, otherwise rainwater that gets into the gap will still ruin it over time.
- To make the hedge more beautiful and the joints not to be visible, it is better to take vines of different sizes.
- The lowest row is not woven close to the ground. The gap between the soil and the vine will help prevent the accumulation of rainwater, which spoils the material.
- Since the branches for weaving are taken raw, after a while they will dry out and become thinner in diameter. This will cause gaps. To avoid gaps, tap every 2-3 rows with a hammer to compact the branches.
- If the rod is bent and does not fit tightly to the peg, it can be straightened and secured with a nail or wire.
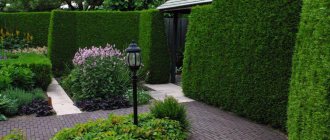
As an option, it is possible to use fast-growing shrubs for hedges, which will harmonize very well in almost any area
Video: how to make a wattle fence with your own hands. Watch, learn and repeat!
Horizontal method
Everything is very simple. The vine twigs intertwine with each other and with buried stakes in the form of a “snake”. Work needs to start from the bottom. Wood tends to dry out over time, so taking this into account, the weave must be made very tight so that there are no gaps.
To create a strong hold, the rods must be tied with strong wire. To give the fence a natural look, the length of the rods must be different. To obtain a dense fence, the rods are pressed with great force. This way, the cracks will disappear and the fence will be stronger and more reliable. All uneven ends extending beyond the stakes are cut off with pruning shears.
The reed vine is most suitable for braiding hair. It has a small diameter and great flexibility.
Willow vines can also be used for the same purpose. The braid is woven from a different number of twigs, it all depends on the class of the craftsman. Return to contents
Fence made of wicker rods and branches
A fence made of branches and twigs is called a wattle fence . It is popular among those who want to install a decorative hedge for beauty on their plot of land. Wicker fences can be used to divide the area into zones. This beautiful tradition even came up with its own design style - “country”. It is popular because of its simplicity.
Decorative items are easy to create with your own hands. Their production does not require precise movements and accuracy, and the appearance of roughness and negligence gives the products the appearance of a forgotten past. One of these products is a wicker fence.
A wicker fence consists of stakes through which tree branches or twigs are intertwined. The material at hand for a wicker fence can be collected on your site, if walnut, apple, cherry, birch and others grow on its territory, from which thin branches can be trimmed. The best material is willow, hazel and vine rods. They bend better, which allows you to braid them into patterns of varying complexity.
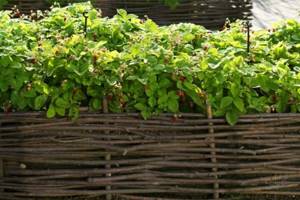
Raspberries in a garden plot, fenced with a fence
If there are no suitable trees for pruning on the site, material for a wicker fence can be purchased at the nearest nature reserve or in special stores.
Material for painting hedges
To make a wicker fence especially attractive and to protect it from dirt, it is necessary to cover it with some material:
- Potassium permanganate;
- Stain;
- Matt varnish;
- Iron sulfate.
Before painting your country wicker fence, you need to remove the bark from the rods. Those who like a natural-looking fence do not need to remove the bark, since painting the fence is not required. To color wattle fence, it is better to use natural dyes. They will extend the life of the fence.
Before starting painting work, the rods must undergo preparatory operations.
To remove the bark, the rods are immersed with the thickened end in water and kept there for seven days, then each one is thoroughly sanded. To obtain a white color, the vine is treated with hydrogen peroxide.
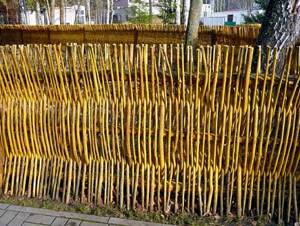
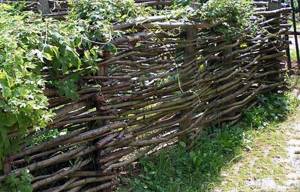
An example of a wicker fence made of thick branches.
Potassium permanganate gives a brown tint, and stain gives the same effect.
Using iron sulfate it is easy to get a gray color. A self-made wicker fence made from branches can become a beautiful decoration for a flower bed. In addition, to add originality to the area, you can make funny garden figurines from twigs - to the delight of children.
Return to contents
Let's take a step-by-step look at the process of creating a fence from branches with your own hands
It is worth preparing the necessary tools and materials in advance:
- hand drill or shovel;
- screwdriver;
- garden pruner;
- willow vine (diameter - up to 3 cm);
- metal wire;
- hammer;
- knife;
- self-tapping screws;
- timber or profiled pipes (for poles).
Let us examine in detail the main points of construction.
Preparation of material
It is allowed to use raw materials in two versions:
- Freshly cut rods. They retain the desired flexibility for a week without additional processing. But to be safe, it is better to soak them in water one day before.
- Old cut branches, vine. The material is soaked in water a week before use.
Thanks to thorough soaking, the bark can be easily removed from the twigs. This is done with a special tool - a pinch. This is a split branch, at the end of which there is a latch. An alternative is wire cutters or pliers.
After cleaning, the material is thoroughly dried. The next stage is protection from moisture. To do this, the raw materials are impregnated with antiseptics and stain.
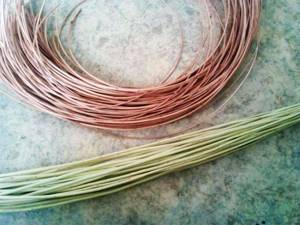
Photo: prepared material for weaving
You will find a list of recommended products and application instructions here: How to soak wood from moisture?
Installation of pillars
Often beams, logs, thick branches or profile pipes are used as supports.
If the choice fell on wood, you should take care in advance about waterproofing and protecting all pillars from moisture, especially their lower part, which will be in constant contact with the ground. You will find detailed recommendations for this procedure here: How to treat wooden fence posts?
The depth of digging of supports depends on the height of the future fence. For a 1.5 m fence, 50 cm is enough; for 1 m, 30 cm is enough. Lightweight fences are fixed in the ground by only 15–20 cm.
The supports are lined up in equal increments from 40 to 50 cm. The last two are placed closer to the edge at a distance of 20 to 25 cm from each other.
Wooden posts are dug into the ground according to the markings, metal posts are spot-concreted.
Weaving sections
When starting to form patterns, it is worth considering several main points:
- Laying the rod begins with the thickened edge, and the thinner part is hidden between other branches.
- The wicker fence should have the same thickness around the entire perimeter, so the material is evenly distributed over the surface.
- If the vine ends on one support, then the next one begins to be laid from the previous support. In this case, the direction of weaving can be changed.
- The lower branch can be secured in 2 ways: by fixing it with wire around the fence frame or by vertically burying it 10 cm into the ground.
- The composition must be compacted every 3 rows. To do this, just tap with a hammer. And after 7-8 rows it is recommended to stretch the wire for reliability.
- The edges and cuts of branches are hidden on the inside of the fence.
- Excess parts of the vine are removed with pruning shears. The top is carefully trimmed or bent, making an arch.
When using reeds, it is better to lay them in bunches of 5 or more stems. Excess edges are trimmed.
An alternative is to purchase already formed wicker sections in a store or order from craftsmen.
The finished structure is varnished and decorated at the request of the owners.
Decoration
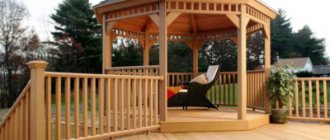
This type of fence fits perfectly into a rustic, country style.
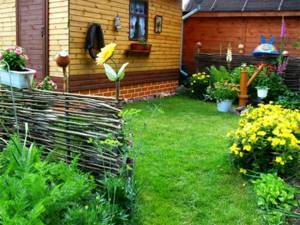
Photo: wattle fence in the landscape design of a summer cottage
Interesting ideas that will complement the wattle fence:
- Plant sunflowers and climbing roses along the perimeter of the fence.
- Hang clay pots, ears of wheat, and a wheel from an old cart on the fence supports. Place a pumpkin nearby.
- Secure wicker baskets with flowers (petunias, border chrysanthemums, violets).
- Lay out a composition of stones around the perimeter.
- Place a bench next to it made of unedged boards or lumps.
If you decide to change the color of the material, then we advise you to familiarize yourself with the main points on its selection and the painting process: What paint is best for a wooden fence?
Varieties of braiding
Today, products made from PVC are of great interest. The work is quite easy, the result looks beautiful.
Wicker fencing, the material of which is PVC, has a number of advantages:
- Easy assembly;
- Quick installation;
- There is no need to make a foundation;
- Long service life;
- High impact resistance;
- Never fades;
- Does not need repair;
- No painting needed.
On the construction market for such a fence the following is offered:
- Plastic mesh;
- Gitter grid;
- Separate sections.
All these products can be installed very quickly.
Return to contents
Types of wicker fencing
Wattle-type fences differ in the method and density of weaving, purpose and height. The rods, reeds or boards in the fence sections can be placed vertically or horizontally.
According to their purpose, such fences are divided into:
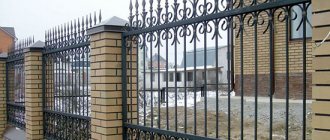
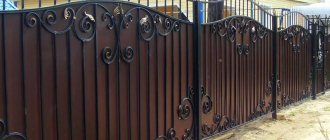
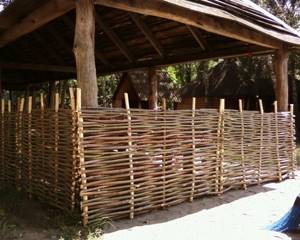
- External. These are capital structures on a strip or columnar foundation with a height of 1.5-2.2 m.
- Internal. Fences 1-1.5 m high are used for zoning the local area.
- Decorative. Low wicker fences up to 0.7 m enclose front gardens, flower beds, beds, and paths.
According to the type of construction, fences made of vines, branches or boards are either continuous or sectional. In the first case, the site is marked out, support pillars and intermediate logs are installed. Then, after installing the base, the installation of twigs or branches is carried out. The second method involves making separate sections and installing them on prepared posts.
The nuances of making a wicker fence
Before starting work, you need to carefully study the technology of working with wood and become familiar with the rules for its preparation. The lifespan of a fence largely depends on the strength of the stakes. It is better to make such posts from a metal pipe; it will securely hold the wicker structure.
To replace damaged branches, you will have to completely disassemble the section and make a new weave. To make the structure more durable, the branches need to be tied with wire in a variety of places.
A simple wicker fence made from various branches.
All protruding ends are cut off with pruning shears. There is no need to immediately install a large fence. It is better to practice on small fences around the front garden. Only after gaining some experience can you install a large structure.
Vertical fence design
In this embodiment, the vine is positioned vertically and the racks horizontally. To make a hazel fence with your own hands, transverse rods are nailed to wooden support posts. Basically, their quantity is taken from 3 to 5 pieces. The first is placed at a height of 10 cm from the ground, and the rest - taking into account the selected step.
The vine is fixed vertically; to do this, one end is pressed into the ground with a slight recess. The rod itself is passed like a “snake” through the horizontal posts, and the end can be secured to the last crossbar. The remaining pieces are woven in mirror image to the previous row. Thus, an alternation is obtained - the lower end of the first vine is located on one side of the fence, and the end of the second on the other .
Since the rods are of unequal thickness along the entire length, they are woven in pairs. First the two thick ends at the bottom, then at the top. This method ensures uniform filling density of the section over the entire span height. The tops of the vine are trimmed with pruning shears to the chosen shape. Installation of pillars is carried out in the same way as with horizontal weaving. The entire structure is covered with protective and decorative paints and varnishes.