Pros and cons of fencing
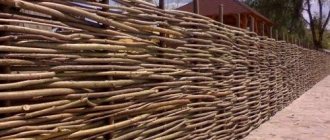
Wicker fences come in various types and shapes. In the old days, almost all houses in rural areas were fenced with them, but with the advent of other materials, wicker fences became obsolete. Were they deservedly forgotten?
Their advantages:
- Beautiful appearance. By building a wicker fence around your house, you can create a unique, original design that will decorate any landscape.
- You can give the fence any curved shape.
- Environmentally friendly, vine is an environmentally friendly material. When constructing a wicker fence, 100% natural materials are used.
- Ease of construction. Such a fence can be built even by one, without using outside help. After all, it does not require pouring a strip foundation or concrete supports.
- Relatively low cost. You don’t have to spend a penny on arranging a fence, since the material for building a vine fence is often prepared independently.
And disadvantages:
- A wicker fence is not a permanent structure and serves more of a decorative function rather than protecting the estate from intruders.
- Suitable only for areas that have a rustic design.
- The fence is a fire hazard.
- Such a structure has a short service life; the fence will last no more than seven years.
- Difficulty of repair. If even one vine is damaged, the entire section of the fence will have to be dismantled.
Design options for wicker fences
A similar weaving technique is called openwork by artisans. Growing a hedge is not easy a priori; creating an openwork weave is doubly difficult. Therefore, this area of work is often performed by professional gardeners. There are several options for weaving design.
- Hedges are fundamental structures intertwined with young vine shoots. There are many options for weaving: braid, zigzag, ladder.
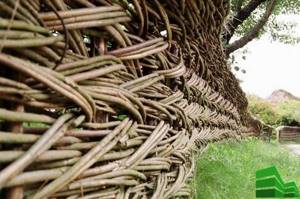
This aspect directly characterizes the quality of the material, how plastic and moldable the shoots are. Young growth is much more pliable, so it is recommended to braid a freshly grown vine. Global plantings can be combined with an installed fence, covering the simplicity of the design, giving a green, fresh, unusual look.
- Much more often, this type of fencing performs a purely decorative function. Often, small wicker plantings enclose patios and zone the space of a personal plot. Such functionality requires more detailed development. Wicker branches located near the walls of the fence will stand steadily, having reliable support. Zoning fences also need to provide additional support by driving in retaining pegs.
It is important to note that a regular wicker fence and a wicker fence are different concepts. Wickerwork is made from special cuttings of vines and soft wood; wicker fencing is made from directly growing trees collected in one braided bush.
Choosing material
The big advantage of a wicker fence is that you don’t have to go to the store for construction materials, so its cost is very low.
To build a wicker fence you will need flexible willow branches . They are the most convenient for weaving. The willow vine is very durable; it grows in abundance in any region of our country. Almost all types of willow are suitable for weaving a fence.
The material is harvested in late autumn or early spring. Typically, willow is cut in low-lying, flooded areas. The rods must be chosen even and elastic, without branches and diseases.
After harvesting, they are tied into small bundles and removed for drying. Drying is carried out on racks under a canopy. When going for branches, you need to prepare a “measurement”. This can be a branch of the right length to cut only those branches that fit.
The fence will also require thick branches for supports . To do this, you need to choose branches more than four centimeters thick and half a meter longer than the height of the fence in order to drive them into the ground. You can also cut thick pine branches for stakes. Their lower ends must be sharpened so that they can be driven into the ground more easily.
Harvesting vines
Although it is recommended to harvest branches in the fall or spring , you can cut them in the summer if you want to urgently make a fence. The rods must be chosen smooth and even.
To prepare them, use a sharp knife and cut the vine diagonally. The cut vine must be tied into a bundle and dried. Dried material can be stored for a long time.
Before use, the vine is steamed in a “steam bath” to give it flexibility; such material will be easier to weave. You can simply release the ends of the vines into water and leave them for a week or two. If the fence is made from freshly cut shoots, the leaves do not need to be removed from them.
The bark must be removed from pine branches for supports. It is better to treat their lower part with an antiseptic or tar to protect them from rapid rotting.
If you are interested in how to make a wicker fence with your own hands, check out this material.
In order to properly install a wicker fence from boards with your own hands, read this article.
You can see photos of a variety of wooden decorative fences for the garden here.
Do-it-yourself wattle manufacturing technology
To make it easier to understand the principle of solving the question of how to make a fence at the dacha with your own hands, we will outline the entire process of making this fence point by point. The very first stage of work is the procurement of material. It can be done as the work progresses, but it is better to prepare the initial quantity of some elements right away. For example, support stakes - thick branches with a diameter of about 50 mm need to be cut to length (about 2 m), peeled of bark and sharpened at one end. When the stakes are ready, you can proceed to the next stage of work.
- Marking. Agree, a straight fence looks much prettier than one installed in zigzags. Therefore, at key points of the fence (turns and the like), you need to install two pins and stretch a thread between them, in relation to which the next stage of work will be carried out.
- Installation of support pegs. We take a crowbar and make indentations in the soil in half-meter increments along the entire length of the fence, focusing on the tightly stretched thread. You should make holes about 300 mm deep - the desired size can be marked directly on the scrap. A little more or less will not play a special role. Next, we insert a stake into each hole and drive it into the ground so that it goes into the ground about half a meter. You need to ensure that the stakes are installed strictly vertically - the fence must be level in all directions.
- Preparing thin branches. Everything is simple here - we cut off the side shoots with pruning shears and remove the bark. It should be noted here that the branches of some tree species have a small number of side shoots - for example, willow. Willow wattle also looks attractive because the branches of this tree are long and at the same time have good flexibility.
- We braid the branches around the stakes. The process is very simple, during which thin branches will have to be passed on one side of the peg, then on the other. In order for the wattle fence to be dense, the branches must be knocked together with a mallet - as if tamped down. The length of the branches is adjusted to the location, that is, they are first braided and then cut behind the post at a distance of about 100-200 mm.
Wattle can be made using several methods. You can weave each branch separately between the stakes, or you can tie them into bundles of several pieces and only then weave them between the stakes. The second option allows you to make a stronger and more reliable fence. In addition, you can combine these two technologies to create a unique woven fence structure.
In conclusion to the topic of how to make a fence with your own hands, I will say a few words about such moments that will allow a wicker fence to live its longest possible life. There aren't many of them. First of all, these are support stakes - so that they do not rot quickly, the part immersed in the soil must be treated with liquid bitumen. That is, dilute the resin in gasoline and soak the edges of the pegs in the resulting liquid. The second point is to reduce the points of contact between the fence and the soil - they should be limited to stakes. The bottom of the wicker part of the fence must be raised above the ground by at least 100 mm. And the third point is the chemical treatment of the fence - antiseptics, as they say, will help you. You charge the liquid into a garden sprayer and treat the finished fence with it - treat it generously and preferably in the evening, so that the composition does not evaporate, but is absorbed as deeply as possible into the wood.
Preparing for weaving
Before weaving, all the bark is also removed from the vine. Many people use a special device for this - a pinch. This is a simple device; it looks like a narrow cone-shaped fork with sharpened inner edges.
You can make a pinch bar yourself; to do this, you need to take a stick made of strong wood and split it into two parts. The split area must be wrapped with rope to secure it. A willow branch is inserted into this gap and pulled towards you with a slight movement.
If the bark is difficult to yield, it should be left soaked for another week or held over steam. After this, the bark should come off easily.
This stage of work is the longest, tedious and tiring. In addition to materials for arranging a vine fence, you will need the following tools and devices:
- wooden poles or metal wire;
- sharp knife or pruning shears;
- mallet;
- pliers;
- pencil;
- ruler;
- brushes;
- stain or solution of iron sulfate.
Organizing the planting of wicker fences
There are several important stages of pre-planting preparation. The material must be freshly cut; if, for example, willow seedlings are taken, only healthy branches should be taken.
- The most important, primary process is revival. Before planting, it is necessary for the material to spend about two days immersed in water. This method will start the movement of sap inside the branch, creating the appearance of vegetative movement. It is important to avoid overexposure; after forty-eight hours, rooting may begin, which is undesirable, because the rhizomes can be damaged during planting. A damaged root system most likely will not take root.
- Different varieties manifest themselves differently. Willow branches are characterized by the appearance of white dots. The dots are future roots, they seem to be slowly breaking through, but remain invisible until they find themselves in the ground.
- It is important to dig a deep single hole about half a meter deep. The branch should sit approximately halfway to its total length.
- After planting, the plantings are covered with mulch, apply it quite generously, maybe in several layers. Mulch can be completely different, for example, old tree bark, sawdust, and very fine crushed stone are perfect. This formation creates the most suitable microclimate, which improves the rooting process of plants. The highest priority type of mulch is formed in the following layers: the first couple of centimeters are old mown grass, the second layer is soil, only applied more densely, about five centimeters. A layer of grass is also placed on top, approximately three centimeters thick. This type of mulch is the simplest and most inexpensive.
- The pattern determines the distance between plants. The average figure reaches twenty centimeters, but it is the subsequent type of weaving and pattern that will tell the gardener the necessary intervals.
- Planting in one straight line is much more convenient than digging separate holes. When digging a single trench, it is necessary to ensure that the seedlings look clearly upward, at an angle of ninety degrees, otherwise some of the reeds will certainly be mowed down.
Final installation
Wicker fences can be divided into three types:
- Low - up to one meter.
- Medium - from one to two meters.
- Tall - two meters and above.
Low fences are widely used to create decorative elements of landscape design; they are used to enclose flower beds, paths, and playgrounds.
Middle fences zone the territory of the site to emphasize the boundaries of space.
High fences are installed along the outer boundaries of the site; they act as a full-fledged fence.
Before starting to build the fence, mark it:
- pegs are driven into the corners of the site;
- pull a cord between them;
- mark the places where intermediate stakes will be installed.
The distance between the intermediate stakes should be about 30-50 cm. The heavier the rods, the farther the pegs can be placed. To prevent them from bending during weaving and to stand straight, it is advisable to fasten the upper ends together with strong and even wooden poles.
The most popular types of weaving are:
- vertical;
- horizontal.
How to carry out horizontal weaving: technology for performing the work
- The vine must first be secured. To do this, take the thick end of the vine in your hands and wrap it around the second stake; the continuation of the rod bends around the first stake.
- Next, the rod is led in a figure eight, bending around the subsequent stakes. It is desirable that one rod overlaps at least three supports.
- After the first rod ends, take the second one and weave from the previous stake. At the same time, the vine grows. The junction is cut with pruning shears and secured with tape or wire.
- The rods of the second row go around the stakes on the other side - in a mirror image.
- After several rows have been woven, the weaving must be compacted. To do this, knock on the rods with a mallet, aligning the weaving horizontally.
- The ends of the rods are brought to the inside and cut off with a sharp knife flush with the fence.
- Some professionals advise weaving with a bunch, but this technique requires a very thin and flexible vine. In this case, the fence will look embossed.
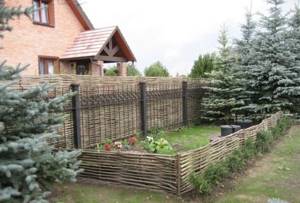
How to carry out vertical weaving: technology for performing the work
- Horizontal supports made of thick rods must be nailed or tied to the stakes driven into the ground, leaving a distance of about 25 cm between them.
- To make the fence look neat, a strip is attached along the top edge, which is removed upon completion of the work.
- The vine is stuck into the ground and intertwined with horizontal supports. Having reached the top, the vine must be trimmed evenly or entwined with the upper horizontal rod.
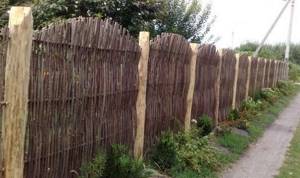
This type of wattle fence is called living. Within two years it will grow greatly and will only become stronger over time. It will be impossible to climb over it. Such a fence must be properly maintained by trimming unnecessary overgrown branches.
It is better to do this in early spring or late autumn. To make the fence “alive”, the vine cannot be treated with anything.
Features, advantages and disadvantages of willow hedges
Why is it worth choosing willow to form a “green fence”:
- Minimum financial costs. Willow seedlings are several times cheaper than, for example, ornamental conifers. Or you can simply go to the nearest body of water and cut cuttings there absolutely free.
- Very simple disembarkation procedure. The cuttings just need to be stuck into the ground. The survival rate with this method of planting is 95–100%.
- High growth rates. Willow grows quickly both in height and breadth. After pruning, it also quickly restores the green mass.
- A wide variety of species and varieties, the opportunity to show imagination by creating openwork patterns from intertwined shoots.
- General unpretentiousness and ease of care. Willow is undemanding in terms of lighting, the quality of the substrate, its acidity, and does not need support. It adapts to the negative features of the local climate, does not suffer from droughts, high humidity, and tolerates frosts down to -30–35°C and a polluted urban atmosphere.
- Decorative throughout the year. In spring, willow decorates the garden with its “catkins”, in summer – with bright and dense foliage. In winter, the fence looks aesthetically pleasing due to the natural texture and shade of the bark and the graceful interweaving of branches. At the same time, a willow fence looks discreet and elegant; it will fit into most landscape design concepts.
- High plant density. Willow may well protect the site from gusts of wind, snow drifts, dust and street noise.
- Possibility of using cut rods for making furniture, baskets, and other decorative items.
- The lifespan of a tree is 20–50 years.
- Improving the quality of the substrate. The willow root system loosens the soil, improving its aeration, preventing erosion and drying out of the soil. Falling leaves, rotting, enrich it with useful microelements.

A willow hedge can be created at minimal cost
There are also certain disadvantages:
- A lot of moisture accumulates in the soil under the willow hedge. Depending on the initial quality of the substrate, this can be a positive thing.
- Without pruning, willow grows strongly, takes up a lot of space and shades nearby plantings. Its root system also develops in breadth, the “soul” of the planting.
- Birds often settle in such a fence, causing the harvest of fruits and berries to suffer. They also produce unwanted noise.
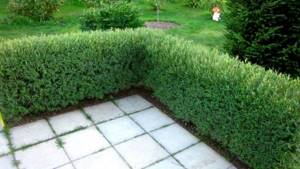
A willow hedge can vary in height, be purely symbolic, and quite dense
Video: benefits of willow hedges
How to decorate a vine fence
The finished wattle fence looks very beautiful, but to give the fence individuality, many people paint it with stain and varnish it .
To paint the rods white, they are treated with hydrogen peroxide and then varnished. You can put clay pots on the stakes; they go well with the wattle fence. Such a fence is often decorated with climbing and climbing plants, which are used to create hedges. A wicker fence with sunflowers growing along it looks very beautiful and original.
In order for the fence to last longer, it must be treated with a special antiseptic intended for wood. It is better to treat the lower part with hot bitumen or vitriol.
Rules for caring for wicker fences
A wicker hedge, similar to a regular planting, requires special care. It is important to correctly carry out all the proper procedures, because the main thing is to maintain the integrity of the structure by ensuring proper molding.
- The pruning process is carried out especially carefully. After the first leaves appear, protruding shoots are trimmed. The first year is very important, so immediately after the buds open, it is necessary to shape the hedge, otherwise unnecessary branching will occur. The first year of growth is the most active.
- After the first year of life, the mulch is changed. The need for replacement is due to the rotting of the grass after winter frosts and thaws. You can make a similar layer cake, or use sawdust or tree bark.
- It is important to organize a competent watering system. It is strictly forbidden to overwater the plantings, so the watering schedule is drawn up based on the plant variety. Different varieties require a certain amount of moisture. If you average the required number of waterings, you can irrigate approximately once or twice a week.
- The plant variety also determines the necessary complementary foods. It is necessary to feed the hedge; the plants will grow much better. Some prefer acidic soils, while others prefer nitrogenous ones. If there is only a weak understanding of the necessary complementary feeding, experienced gardeners advise using complex fertilizers.
- The soil must be loosened before planting. This also needs to be done after disembarkation. Loosening is called dry watering, so if watering is limited to once a week, you should additionally loosen the soil once.
- The number of supporting elements varies relative to the width of the fence. Small areas will require only two: the beginning and end must be well secured, the rest of the space is held in place by the roots naturally.
The young vine weaves together quite simply, so young branches are needed. Older ones that have stood for a long time may break due to slight dryness. The branches must be intact. It is important to carefully inspect the shoots from the beginning, otherwise there is a possibility of planting a low-quality branch, which will later upset the entire balance of the future wicker fence.
