Types of fence
Distinctions between different types are made by the degree of ratio of basic materials and additional ones. This practically does not change the functionality of the fence, but it may be important for the design of the site.
Made from metal profiles with forged elements
Expert opinion
Vladimir Ulyanov
I have been involved in fences for over 10 years, answering questions and helping people cope with the installation task on their own.
Ask a question to an expert
Fences made from corrugated sheets with forged elements are the easiest to make yourself. This is also a cheaper option when purchasing if it is not possible to make it yourself.
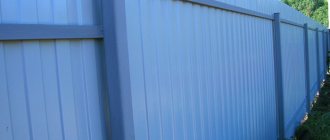
The main difference between such products and others is the minimal use of metal decor.
Most often, forged curls are placed on the upper edge, welding the ornament detail to the frame of the section frame. After this, the sheet of metal profile is mounted so that the edge covers the frame, but leaves the openwork decor open.
Forged fence with corrugated sheet
Making a forged fence is more difficult for an amateur craftsman. A forged fence with corrugated board consists of a stacked section, which includes individual ornamental elements and supporting structures. They are most often connected by a weld.

The corrugated sheet is attached behind the openwork fabric; if necessary, it is cut in place.
The corrugated sheet is attached behind the openwork fabric; if necessary, it is cut in place. In this case, it serves only for the impenetrability of the fence, since the section of forged elements is functional without it. But sometimes colored profiled metal serves as a good background for metallic openwork and emphasizes it favorably.
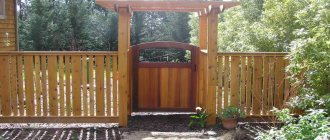
Combined
Combined products are considered to be those types of products that include not only sections mounted on posts that are invisible from the outside. Beautiful fences made of corrugated sheets with forging will be obtained if you supplement them with brick or stone pillars, arches over gates or gates, etc. with massive decorative elements. The material for construction or cladding of pillars must be in harmony with the overall finishing style of the building.
What type of fence did you find most interesting?
With forged elementsForged with corrugated sheetCombined
Advantages and disadvantages of the combination
The advantages of fencing with forged elements are the highly decorative nature of such a product. It is no less durable and reliable than a simple fence made of corrugated board, but it always looks beautiful, even if the forging takes up very little space. Metal decor does not go out of fashion, and the materials used are quite durable. A fence made of corrugated sheets and metal openwork structures can be used for several decades without repair or painting.
Useful Combined fence made of forged elements and polycarbonate, its types, features and installation
Sections, even with an abundance of forged parts, remain light. They can be quickly installed on pre-dug poles. If you have an assistant and skills, installation can be easily completed in 1-2 days, depending on the amount of work.
A forged fence with corrugated sheets also has disadvantages:
- thin material can be damaged by strong mechanical stress;
- any blow to the surface of the fence causes a strong noise effect;
- the cost of forged parts made in a workshop, or a finished forged section, is quite high.
Do these shortcomings bother you?
Not really
Step-by-step instructions for creating a fence from corrugated sheets on a metal frame
All work can be completed by two or three people. On small sites there is no need to use special equipment.
Installation diagram, drawings
A sketch of the future fence is preliminarily developed. If it is difficult to do this yourself, then look for it on the Internet. There are many examples of ready-made structures made of corrugated sheets, located both on flat areas and on sloped estates.
The diagram should show the dimensions of the sections, the height of the pillars, the distance at which the logs will be attached.
The characteristics of the soil and the distance from the highway, green spaces, and outbuildings are indicated.
Elevation differences, if any, are shown schematically. The type of foundation is applied.
The requirements for materials are briefly indicated. Cost estimates are calculated.
Marking
Performed using rope and wooden pegs. The main pegs are driven into the ground at the locations of the pillars, auxiliary ones - every linear meter. A rope is pulled between them at a strictly 90 degree angle.
Foundation
Key factors when choosing the type of base:
- climate and soil features;
- depth of freezing and occurrence of groundwater;
- load on the foundation (whether the materials will be light or massive).
Installation and fixation of pillars occurs at the stage of foundation arrangement, regardless of the chosen foundation.
In this case, profile metal pipes are used under the supports.
Frame installation
Involves fastening the joists to the racks.
This is done in two ways:
- Welding. Using a grinder, cut pieces 5 mm smaller than the distance between the posts. The covering of the pillars is protected at the fastening point, and the old paint is removed. The procedure is performed by three people: two on the sides hold the vein, the third welds it. The seams are cleaned. Defects and poorly cooked areas are eliminated. The process is repeated around the entire perimeter. The finished frame is primed. After a day you can paint it.
- Fixed with brackets. The holder is installed on the pole at the desired level on the sides or outside, it all depends on the design of the plate. Fastened with self-tapping screws. The jumper is applied to another pillar. Another bracket is fixed according to the level. The process is repeated around the entire perimeter. The logs are mounted to the plates from the reverse side.
Methods of fastening corrugated sheets
Prepare sheets of the required sizes. Remove the protective film.
The further procedure of work is described in this article: “How to screw a corrugated sheet onto a fence.”
How to calculate the cost
Cost calculations for finished fencing include:
- parameters of each section of the fence (length and height), their number;
- thickness of the metal of the corrugated sheet, its type depending on the color;
- the number of metal posts for mounting sections and their height;
- the need to manufacture foundations and pillars in combined fences: depth and width of the base, cross-section of supporting elements, material for construction and cladding;
- cost of forged decor (individual elements or finished product, materials for self-production, etc.);
- type of gate and wicket (in the price of a sliding structure with a block of rollers, include the price of the beam for their movement).
Foundation
A site with a slope imposes special conditions on the construction of a foundation for a metal fence. Regardless of the presence of uneven terrain, the fence must have a clear geometric direction. Even at the level of designing the landscape design of the site, it is necessary to make correct calculations of the height of each span.
They must be strengthened into the foundation and have smooth planes. The height of the foundation must be maintained so that the uniformity of each upper indent is ensured. All adjacent support piles are installed as close to each other as possible.
Diagram of a foundation with a slope
How elements are made
Simple but beautiful metal patterns can be made even with your own hands. To make circles, spirals, curls and other elements of a prefabricated ornament, you can use welding wire about 1 cm thick. This is a soft and pliable material that you can work with even without blacksmithing skills.
Before bending, the wire must be heated using a gas burner. A heated rod can be bent even to a small diameter (3-4 cm) using a hammer and a vice. If you need many identical parts, it is recommended to make a template from metal. The large bending diameter (more than 7 cm) does not even require heating. The finished elements are connected by welding according to a pre-made sketch.
Materials for creation
In addition to welding wire, for forging and its imitation you can use:
- smooth reinforcing bar 1-1.5 cm thick;
- professional pipe 15x15mm (square section).
Useful Do-it-yourself combined fence made of corrugated sheets with brick pillars
Work with these materials is carried out hot or cold using special tools.
Hot or cold forging
For the hot forging method with your own hands, you need to have a forge and an anvil, as well as pliers, a set of hammers of different weights, template mandrels and other tools needed for the work. To create twisted rods you will need a wrench. Making hot forged elements yourself is not too difficult, but requires skills in working with metal.
Cold forging machines are easy to buy or rent. Working with them is quite simple and involves creating bent parts from square corrugated pipe. This is a simple activity that even a beginner can master. You can apply a shaped notch to the ends of pipe sections using special devices. The advantage of this method is that the finished section will be lighter than the forged one, and all the elements will be neat and identical.
Ready-made elements
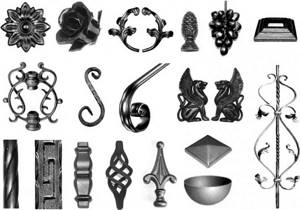
Wrought iron decorations (rod tops and posts, rosettes, leaves, etc.) are available in hardware stores. In addition to applied decor, circles, volutes (various types of spirals), wavy, twisted, etc. are available for sale. fragments of the future product. Installation of forged elements is carried out independently, calculating the quantity according to the prepared drawing. Large companies also provide services for assembling sections according to the customer’s own sketches and drawings.
DIY installation
You can make a fence from decorative parts with metal decking yourself. Before starting work, you need to determine the need to make a strip or columnar foundation, mark the location of the supports on the site and prepare the foundation pit.
Recommended sizes
When drawing up a plan and transferring it to the area, the parameters of each section should be taken into account.
Expert opinion
Vladimir Ulyanov
I have been involved in fences for over 10 years, answering questions and helping people cope with the installation task on their own.
Ask a question to an expert
The height of the fence of a summer cottage or private house rarely exceeds 2 m. To manufacture it, you will need standard corrugated sheeting 1.5-2 m wide. The best section length is 2-3 m.
But if necessary, you can order a profiled sheet of a different size or with a shaped profile. Forged sections are assembled before installation, so the length of the run must be selected taking into account the free sections for fastening to the supports. For purlins or frames, it is recommended to choose a 40x20 mm corrugated pipe. Fence posts made of corrugated sheets should be made from a metal pipe with a cross-section of at least 7-10 cm.
Useful How to make a wrought iron fence with wooden elements with your own hands
The standard width of the gate is 70-80 cm, and the gate leaves are 1.5-2 m. Their height may differ from the height of the fence or be equal to it. To make gates and wickets from corrugated sheets, a frame in the form of a rectangle with additional stiffeners and jibs is welded in advance.
Foundation
In order for the fence to stand for a long time without distortions, a concrete foundation is placed under it. If the fence is not combined, the foundation can be columnar. This type consists of separate parts poured for each column. The supports are installed before pouring, leveled vertically and reinforced with concrete mortar.
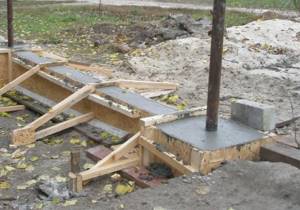
For combined fences, you need to prepare a strip foundation at least 30 cm wide and 50-70 cm deep.
For combined fences, you need to prepare a strip foundation at least 30 cm wide and 50-70 cm deep. Before pouring, mark the installation locations of the pillars, place them in a dug ditch and level them plumb. Such a foundation is raised above the soil level by 30-50 cm, erecting the formwork after pouring the underground part. The base serves as a decorative element of the fence and is often lined with brick or stone.
Assembly
When the foundation hardens, they move on to making the fence. If the pillars are to be used as decoration, fasteners for the sections are welded to them in advance. The metal pieces must be of such length that they protrude beyond the border of the column facing material. After preparation, the installed supports are covered with bricks or the formwork is poured with concrete to the required height.
The assembled forged sections are welded to posts or fasteners protruding beyond the cladding. The corrugated sheet can be attached even before installing the sections on the poles. Sometimes it is attached after this step, or even on a ready-made forged fence: if you want to make it opaque, you can sew up the sections yourself with sheet material.
Can you install it yourself?
Not really
Photo report on the manufacture and installation of gates
This is one of the options for how to make a gate from corrugated sheets with your own hands. The technology is not the best, but not the worst either: everything has been functioning without problems for the past six years.
Hinges are welded to the installed posts of 80-80 mm, the counterparts are welded at the required distance on the vertical parts of the posts made of 40*40 mm pipe - on the right and left. We hang the posts on hinges on the post, place a layer of the required thickness between them and the posts and secure them with a clamp.
We measure the required height and cut off the excess, from above to the racks, not to the posts, weld a cross member from the same pipe 40 * 40 mm
The quality of the welding is not important at this stage. For now, we are tackling the parts, not worrying about the thoroughness of the seam - then we will bring it to standard. The main thing is that everything is smooth and stays together.
Therefore, we grab points in several places
The main thing is that everything is smooth and stays together. Therefore, we grab it with dots in several places.
We grab the pipe at the bottom in the same way.
Find the middle of the cross beams. From the middle in both directions we set aside 3 mm. We make clear marks. We measure the distance between the upper and lower beams, cut off two sections, and weld them along the marks (there should be a gap of 6 mm between the two vertical pipes).
We measure the distance between the two posts of one half of the gate. They should be the same, but it is better to measure separately. Cut the pipes to the required length and clamp them at the desired height. If you need more crossbars, install them too.
Along the marked center with a grinder, we make through cuts at the top and bottom, dividing the gate into two halves. So very simply we got a gate that will open and close without any problems.
The gate frame is ready. We remove it, lay it on a flat horizontal surface and weld the seams well
This is where the quality of welding is important, we make sure the bath is full and try not to burn holes. We clean the finished seams, prime them and paint them.
Let's start assembling the support for attaching the profile sheet. To reduce the windage, it was cut into two parts, so that the sheet was not whole, but cut. To do this, we use a profiled pipe 20*20 mm. We cut it into pieces of the required length, so that it can be secured along the inner perimeter.
We place them in the same plane as the outer part - the sheet will be screwed on from the inside. We fasten it with self-tapping screws, having previously drilled holes of the required diameter.
We paint the finished frame - inside with light gray paint, outside - red-brown, to match the color of the corrugated board. Leave to dry.
Let's start installing the profiled sheet on the gate. It is cut into a slightly smaller size than the main frame - there should be an indentation of 2-3 mm around the perimeter. They are laid on prepared supports and secured from the inside around the perimeter with self-tapping screws.
You can take special ones, with caps and gaskets, but they put them on regular ones.
All that remains is to install the locks. You can, of course, install a lock and handle, but the quality of inexpensive ones is very low, and taking expensive ones is currently an unaffordable luxury. Therefore, bolts were welded from the remains of pipes and fittings. They definitely work under any conditions.
One (the top one) is mounted on self-tapping screws with a counterpart on the sash, the two lower ones are attached to the racks. Small holes are drilled in the ground in the right places, in which sections of round pipes, the diameter of which is larger than the diameter of the rod, are concreted. The gate is made using the same method, only there is a lock embedded in it.
With this manufacturing technology, gate leaves are guaranteed to open and close. If there were some distortions when installing the pillars, they are taken into account. When presented step-by-step, the whole process does not look complicated, but it is. If you weld all the parts separately, the geometry must be ideal, and you also have to make sure that the pipe does not move during welding. See several different technologies for making gates from corrugated sheets in the next section, where video lessons are collected.
You can make sliding gates from corrugated sheets and equip them with automation.