Advantages of metal profiles
For the manufacture of wickets and gates, profiled sheets are used, which have many advantages:
- The sheets are light enough, so there is no need to lay a strip foundation under the wicket or gate. The supports are simply concreted in the pits.
- Even a non-professional builder can handle the installation of a metal profile gate with his own hands.
- The material has a low cost, so it is a competitor to chain-link mesh and wood.
- Profiled sheets are strong and durable. Their service life can reach up to 20 years or more.
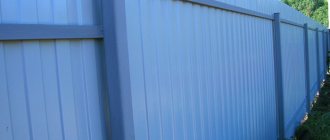
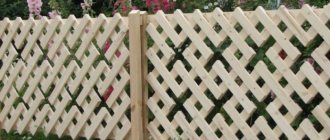
Until recently, fences made of metal profiles were not particularly attractive. However, in recent years, in the construction markets you can see profile sheets with imitation wood, stone or brick. Examples of gates and wickets made of this material can be seen in the photo gallery.
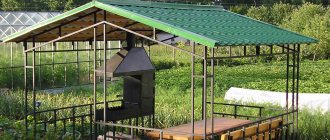
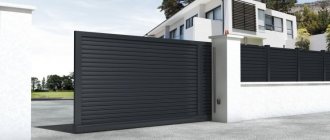
Options for gates made of corrugated sheets
Wickets made of corrugated sheets, regardless of shape and design, look bright and attractive, which is why they have always been very popular. With a little imagination, you can come up with an original and expressive version that will become the calling card of its author and owner. An experienced craftsman who has become skilled in repair or construction work can “swing” at a gate in the form of an arch. This fence gate made of corrugated sheets is difficult to manufacture, but it looks very stylish and impressive. A beginner craftsman can be advised to use a simple rectangular design. This advice is also suitable for making gates. Knowing how to make gates from corrugated sheets, you can make them yourself. You can also read “Do-it-yourself frame house step by step instructions.”
Dimensions and diagram of a metal profile gate
There are no restrictions or mandatory standards regarding the size of wickets and gates. Each owner makes them with his own hands to suit his individual needs . And yet, when deciding on the size, you should consider:
- The height of the gate should not exceed two meters. It will not look very good if the fence installed around it is higher. In order not to overly burden the canvas, you can install additional crossbars on top of it in the opening between the posts and attach a metal profile insert to them.
- The optimal width of the gate should be one meter. A large width will lead to skewing of the canvas or rapid wear of the hinges. The 1 meter wide opening can easily accommodate almost any large items.
If for some reason the height or width of the wicket or gate needs to be made larger, then the frame should be strengthened with additional crossbars and special hinges should be installed.
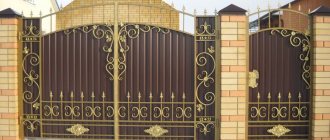
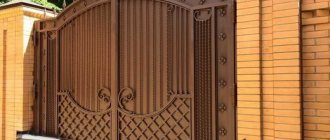
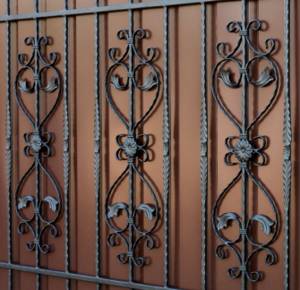
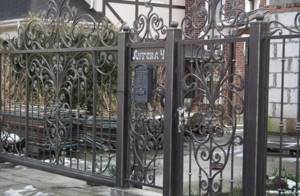
Option 5 – Forged
The most complex in technology and incredibly beautiful in the end is a forged gate, captivating with its openwork, incredible patterns and curves. True, for such a miracle you at least need a welding machine, and at most a grinder, a device for spiral twisting, a spray gun and a vice.
But the basis for the gate can be all the metal scraps lying around the household, rods, plates, gratings and even a broken bicycle.
Having laid out all the existing elements on the ground and given them the necessary shape and size, we proceed to welding, painting and attaching to the fence.
Installation of support posts for wickets and gates
Installation of support pillars is one of the labor-intensive tasks when building a gate or fence from a metal profile with your own hands. The work will not be difficult, but will take quite a lot of time, especially if the supports are supposed to be made of brick.
Of course, the wicket and gates can be attached to metal pipes dug into the ground. But the most durable and beautiful option would be a gate and a fence made of corrugated sheets surrounded by pillars of stone or brick.
Installation of support pillars made of metal pipes
Installing metal supports for gates and wickets with your own hands is quite simple and quick. For their manufacture, it is recommended to use profile pipes 80x80 mm , the wall thickness of which should be 3-4 mm.
The depth of the holes for such supports depends on the soil in which they will be installed:
- for rocky soil a depth of 70 cm will be sufficient;
- for clay soil - about 1.2 m, here everything depends on the depth of soil freezing.
A layer of crushed stone must be poured and compacted at the bottom of the pit. Then pipes are installed in it, their verticality is checked using a level, and the hole is filled with concrete mixture. It will be possible to hang a wicket or gate on concreted metal supports after 5-6 days, during which the concrete should become strong enough.
To prevent moisture from getting inside the pillars, they should be covered with caps .
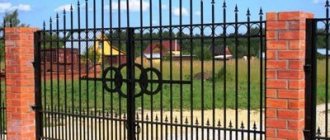
How to make support pillars from stone or brick?
Such supports for gates and gates are usually laid out in 1.5 bricks, resulting in their size being 390x390 mm.
In this case, the foundation should have dimensions of 500x500 mm. It is quite difficult to make supports from stone and brick with your own hands, so this option is rarely chosen.
Brickwork does not withstand bending loads well. To give it additional strength, before pouring the foundation, metal pipes should be installed in the pit, around which stone or brick should be laid.
Before starting the construction of supports to the pipes, you must remember to weld the metal embedded parts and bring them out beyond the masonry. Subsequently, a wicket or gate will be installed on them.
Recent Entries
Chainsaw or electric saw - what to choose for the garden? 4 mistakes when growing tomatoes in pots that almost all housewives make Secrets of growing seedlings from the Japanese, who are very sensitive to the soil
Advantages and disadvantages of polycarbonate
Due to the characteristics of the material, polycarbonate fencing has a number of advantages :
- resistance to daily temperature changes and sudden temperature changes;
Polycarbonate does not heat up in the sun and is not afraid of frost, and with high-quality fastening it can easily withstand wind loads.
The flexibility of the panels allows them to be given different shapes. The degree of plasticity of the material is usually indicated by the manufacturer in the accompanying instructions;
- polycarbonate sheets are transparent and translucent, which allows you to construct fences with varying degrees of transparency ;
- such fences do not need painting, and all their care consists only of periodic washing with water;
- polycarbonate is not afraid of fungus, mold and corrosion. This has a positive effect on its service life;
- the panels go on sale in various colors, which gives the buyer the opportunity to choose;
- the material goes well with wood, metal and artistic forging.
- polycarbonate structures require the creation of a reliable metal frame , otherwise the fence will move or be blown away by the wind;
- although the panels have some degree of resistance to mechanical stress, they are not protected from impacts and damage caused by sharp objects;
Flaws:
It is as easy to damage polycarbonate with a stone thrown at it as it is to scratch it with a nail.
Making a gate with your own hands: stages of work, photos
While the foundation gains the necessary strength, you can begin assembling the gate.
Frame welding
To make a frame with your own hands, you need to prepare:
- profile pipe 60x30 or 40x40;
- corrugated sheeting for crossbars;
- welding machine;
- composition that protects metal from corrosion;
- paint;
- tool for cutting metal.
According to the diagram prepared in advance, blanks are cut from the pipe , the edges of which must be made at an angle of 45 degrees. The pre-profiled pipe should be cleaned of rust with a wire brush.
To give the structure greater rigidity and facilitate the installation of the lock, two crossbars are inserted between the large sides of the frame along its height.
To make the corners of the frame straight, it is recommended to secure its blanks in a homemade jig, which you can make with your own hands:
- A sheet is cut out of a sheet of thick plywood, the dimensions of which should be 50 mm larger than the dimensions of the future gate.
- The frame elements will be pressed against the canvas by clamps, of which there should be twice as many as weld seams.
Having measured the diagonals of the frame and checked all the corners, first crossbars and then clamps are installed between its lower and upper jumpers. It is necessary to ensure that the clamps are located at a short distance from the welding site.
Once again carefully checking the parallelism of the sides, you can begin welding. The clamps will need to be removed only after all the seams have cooled.
The welded frame is treated with an anti-corrosion compound and hinges are welded to it with a continuous seam. Once the frame is painted, its production can be considered complete.
Installation of a metal profile gate
First of all, on the support posts it is necessary to mark the places where the hinges are attached. To do this, the frame is installed strictly vertically and a block is placed under it. to make a gap of 10 cm between the path and the gate so that the door can easily open in the winter season.
Using electric welding, the hinges are attached to the designated places of the support posts and, after checking for opening and closing, they are welded with a continuous seam. A correctly installed frame will not open or close spontaneously.
Next, a metal profile is cut out according to the measured measurements and attached to the frame using self-tapping screws. A lock is embedded into the finished structure.
Making a fence with your own hands
The process of constructing a polycarbonate fence includes several stages , each of which will be discussed below.
Marking the territory and installing poles
Any stable stakes and strong cord . First of all, determine the starting point, that is, the first corner of the fence.
Next, mark all other corners in the same way and install stakes along the entire perimeter of the future structure at a distance of 100-150 cm from each other.
They also indicate the locations of intermediate posts and gate supports. All established landmarks are connected with a cord .
After this, corner and intermediate posts are installed, for which steel pipes with a diameter of 32-60 mm are most often used.
The optimal distance between supports should be 3 m.
Under the racks, dig holes 0.7-0.8 m deep and pour a layer of crushed stone (10-15 cm) onto the bottom. The part of the post that will be in the ground is treated with bitumen waterproofing, wrapped in roofing material and lowered into the recess.
Each pillar is leveled, secured with supports and filled with concrete. To prevent metal racks from deteriorating over time, it is advisable to equip them with plugs. They will protect the pillars from water , which, when frozen, can tear the metal.
Manufacturing and installation of a metal frame
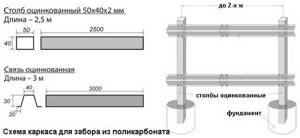
A profiled pipe or metal corner is suitable for constructing a frame base . The frame manufacturing process includes the following steps:
- Places for attaching horizontal jumpers are marked on the pillars. The distance between these elements can be 0.6-1 m.
- The jumpers are attached to the supports using welding or bolts. It is better to make at least 4 such crossbars . One is located at the top, the second at the bottom, and the other two will serve as intermediate elements.
- Welding seams are cleaned, treated with a primer and all metal parts of the frame that may be subject to corrosion .
The frame diagram is shown in the photo below:
Installation of polycarbonate
First, sheets of material are cut into fragments of the required size using a grinder, jigsaw or circular saw. Then special U-shaped plugs are put on the ends of the sheets, after which the polycarbonate is screwed to the frame with self-tapping screws .
To prevent the material from cracking during installation, holes are pre-drilled in it, which should be slightly larger than the diameter of the screws. They are screwed in at a distance of 30-40 cm, and not all the way - this will protect the material from the formation of cracks due to temperature deformations.
Small gaps should be left between the panels. In the future, they can be covered with special strips in the shape of the letter H.
How to properly attach polycarbonate to a metal profile is described in the video:
Types of locks for gates and rules for their installation
After installing the gate, you need to think about reliable protection. There are several main types of locks. It is necessary to characterize each type of device separately, this will allow you to choose the most suitable option
When purchasing it, you need to pay attention to the material and features of the house. A significant role in the selection and installation of this product is played by the personal preferences of the owners.
Mortise
This mechanism is similar to an overhead product. To install a mortise lock on a gate made of corrugated sheets, you need a face plate. Its quality affects the strength of the product. The bar must be held firmly, otherwise such a device can be easily hacked. For long-term operation of the device, it is necessary to provide waterproofing. The door is sheathed with the above material on 2 sides. Then water will not get on the product.
Invoices
This type is the most popular. During the installation process, it is necessary to secure the mechanism from inside the gate. When choosing such devices, you should prefer those that open with a key from the inside.
It is advisable to provide locking devices. They are responsible for opening the lock, during which the bolt is pulled out of the body, and when locked, it is pushed back.
The strength of the mechanism depends on the number of rods inside the cylinder. These designs are durable and are widely used for gates. There are 2 types of overhead devices: cylindrical and level. Each installation has its own characteristics.
Type 1 has a code system. It is burglar resistant. The presence of an armored cup minimizes the possibility of breakdown. The second is not inferior to the first in terms of protection against hacking. The basis of the lever device are plates. Thanks to their figured shape, the mechanisms have the following advantages:
- high degree of protection against opening;
- the presence of armor plates;
- small dimensions.
Mounted
This type of lock for a gate is the simplest; to install it, you need to weld the hinges to the door. The main advantages of the devices are their affordable price, ease of installation and a good level of protection.
However, hanging structures also have disadvantages. They are fixed on one side of the gate. When installed on the outside, the mechanism is easy to break. Due to this disadvantage, it is less common.
Rack and pinion
This locking mechanism was popular 20 years ago. Now these products are rarely installed for gates. They come with a deadbolt. The rack moves along the structure. It consists of fixing hinges; they must be welded to the door.
The lock can only be used from the inside. The product is not reliable. To open the structure, it is enough to insert a crowbar into the hole between the door and the locking device. Keys are used for locking. They are too big to carry with you all the time. When opening the device, you will have to make some effort.
Code
These gate locks are convenient and reliable. The code device works without a key. To enter the gate, you must dial the required combination. To open the mechanism from the inside, you need to press the button. The main flaw is wear of parts, as a result of which the buttons stop working. These are mechanical devices.
Another type of code structures is electromechanical. They have a complex design. The code is entered on the electronic panel. A special device activates the locking mechanism. The symbol combination is easy to change and no key replacement is required.
Code designs are recognized as the most reliable, but their price is high. Self-installation is difficult, so specialists are involved. Electromechanical devices require constant power from batteries. They periodically fail.
Radio wave
The operating principle of radio wave locks is similar to car alarms. The price of such products is high; they are placed on armored doors. It is not advisable to use them for a gate made of corrugated sheets.
The main advantages of the design are its high resistance to burglary attempts. To open the device, you must have practical skills in radio engineering. Installing a lock on a gate is fraught with difficulties.
The installation of any of the mechanisms considered has some features. But there are several general rules for everyone:
- Before installation, please read the instructions. It comes complete with the device.
- It is necessary to make markings for the installation location of the product.
- Then use a grinder to cut out places for the product, key and cylinder.
- Then comes the installation of all the parts.
- The serviceability of the mechanism is checked.
The presented algorithm is more characteristic of the mortise type. If you are installing an electromechanical or radio wave structure, you should contact a professional.
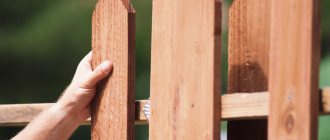
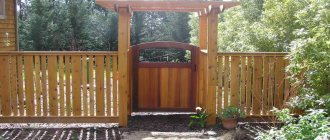
Wooden gate for a summer residence
Fences at dachas rarely represent an impregnable barrier. Usually these are not too high wooden fences. For such a fence it makes sense to make a gate made of wood. There is a very simple one, no fuss. Only dry boards will be needed (provided that there are already pillars).
If you don’t have woodworking machines (thicknesser, router), it’s easier to buy an edged board with the required parameters. The width/thickness of the boards is arbitrary, as are the distances between the planks. Most often they use a pine board 5-10 cm wide and about 2 cm thick, the distance between the planks is 2-6 cm. More or less is possible - it depends on the desired degree of “transparency”.
One of the most common options
It is advisable to have dry boards, otherwise they may later bend in a screw or in an arc. To prevent wood from deteriorating longer, it must be treated with protective impregnations. Now there are compounds that protect even wood that lies on the ground (protective impregnations for wood in direct contact with the ground). But some of them give the wood an extraneous tint (most often greenish, olive). If you are going to paint the gate, it’s not a big deal
If you are planning to use a light varnish, pay attention to this point
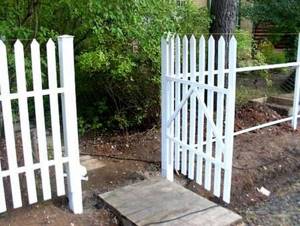
Simple garden gate
This is the simplest option that can be done not by a carpenter, but by an ordinary person. If you know how to saw, hold a hammer, and hammer nails, everything will work out. You don't have to do anything complicated.
Take two planks or two beams (parameters depend on the weight of the gate). They are equal in length to the width of the future gate. The bars are laid across. The distance between them is slightly less than the height of the gate. It makes sense to place them at the same distance as the bowstrings on the adjacent fence (as in the photo above). Then the gate will look like part of the fence.
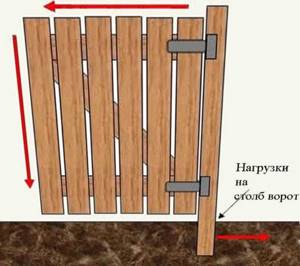
Wooden gate device
Choose a flat surface, lay the bars and measure the distance from the corners of the crossbars diagonally. It should be the same. This must be done otherwise the gate will turn out crooked.
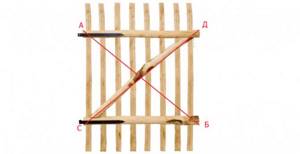
The diagonal distance AB and CD between the wicket crossbars must be equal
Treated and dried pickets are laid out at a given distance on the crossbars. To make it easier to maintain distances, you can use scraps of the same length, laying them between the boards (you can also use a matchbox if you are satisfied with its dimensions). We take nails (two per plank at the top and two at the bottom) and attach the boards to each cross member.
After all the planks are nailed, we turn the gate canvas over, try on the jib, and draw the lines along which the jib should be cut. We saw off the excess with a hacksaw, put it in place, fasten it - two or three nails on both sides. Now we attach each board to the slope. This gives the wicket additional rigidity.
How to make a simple wooden gate for a summer house
We choose metal hinges, or barn hinges. They are small in size, just for country gates. If desired, they are attached to the front part of the gate - they add some zest. You can just as easily secure them from the back.
Making a gate from boards: the correct design
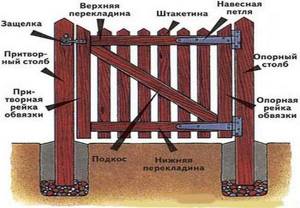
A simple garden and dacha option is described above, but there is a more complex and reliable design. This will require minimal carpentry skills, since it is assembled using a tongue/groove connection. This wooden gate consists of two thicker strapping slats, two crossbars (top and bottom) and a strut. The thickness of the upper crossbars and pickets (vertical slats) is the same, but the thickness of the strapping slats is three times greater (thicker is possible, thinner is not). For example, pickets, crossbars and miters have a thickness of 20 mm, strapping slats - 60 mm.
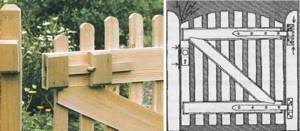
Wooden gate with frame
A groove is cut in the strapping slats, and a tenon is cut at the ends of the crossbars. The joint is coated with wood glue and clamped in a vice. The bevel can also be installed - on a tongue and groove, but it will turn out to be of a complex shape. Therefore, more often it is simply attached to nails - it’s easier. After the frame is assembled, pickets are nailed. They can be nailed from the yard side or from the street side. Instead of nails, you can use bolted connections; in this case, the fasteners also serve as decoration. It makes sense to install stainless or bronze rivets.
Materials and tools for making gates from corrugated sheets with your own hands
Before welding and installing gates made of corrugated sheets, you yourself select materials suitable for the chosen design and calculate their quantity.
To complete the work you will need:
- metal profiled sheet (usually choose a profiled sheet marked C8-C10, C means wall, it is used for the construction of fences in the form of fences and gates, numbers 8 and 10 indicate wave height);
- metal profile for the construction of racks on which the frame is hung; for these purposes, pipes with a cross-section of 60x60 mm are chosen;
- metal pipes for making a frame, their cross-section can be 40x40 or 60x20 mm;
- to strengthen the frame, that is, for jumpers, a slightly smaller pipe is suitable - 20x20, 30x30;
- sheets of metal can be attached to the frame using self-tapping screws, screws, or special rivets;
- fittings (mortise lock, bolts, latches) and hinges;
- special primer and paint for metal;
- forging parts for decoration.
To work, you also need to stock up on all the necessary tools:
- apparatus for performing welding work;
- tape measure or other measuring tool;
- grinder for cutting pipes onto the frame;
- plumb line or level;
- scissors for cutting metal;
- screwdriver;
- paint brush;
- to fix the pillars, a cement mixture; to create a cushion, a mixture of sand and crushed stone.
Corrugated sheeting as a building material
Before making a gate, we suggest you understand the advantages of corrugated sheets over other equally popular building materials for the manufacture of enclosing structures.
Some of the main advantages of corrugated sheets include:
- Excellent quality characteristics. The manufacturing material is profile sheets, which are covered with several layers of protection: anti-corrosion, and then polymer on the outside, and varnish on the inside.
- Simplicity and ease of installation. This material is ideal for arranging fences and gates. Structures made from lightweight and at the same time durable metal plates can be erected in just two to three days, which in turn speeds up and reduces the cost of construction. The erected gates and fences made of corrugated sheets look solid and solid.
- Aesthetic appeal. Wavy curved metal plates can have completely different shades. The use of a colored polymer coating when painting corrugated sheets makes it possible to choose a product of the required color in order to make a gate that, complementing the ensemble, will harmoniously combine with other building structures on the site.
- Long service life. The service life of structures equipped with corrugated sheets can reach over 50 years.

Thanks to multi-stage processing, the material has high anti-corrosion resistance and the ability to maintain aesthetic appeal even under the influence of ultraviolet radiation and weather conditions