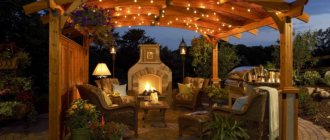
A dacha is a place where you not only need to dig in the garden, count your beds or harvest, but also from time to time take a break from the bustle of the city. Read a useful article - description: how to make gazebos from a profile pipe with your own hands - photo examples:
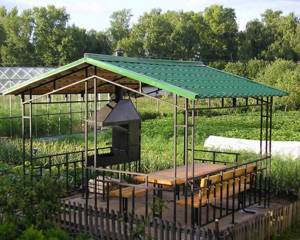
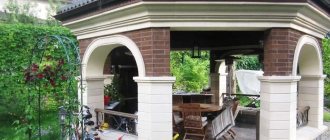
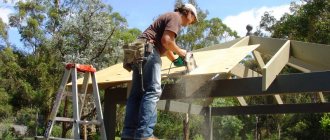
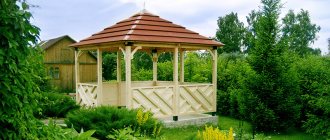
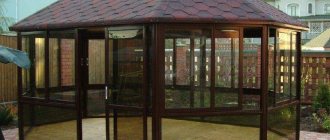
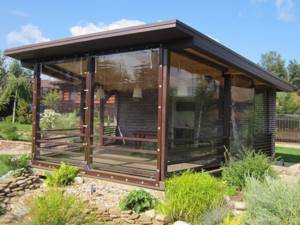
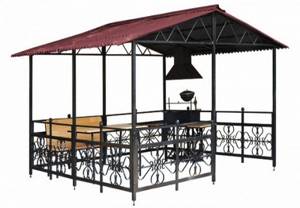
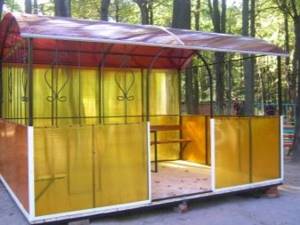
gazebo example - 1
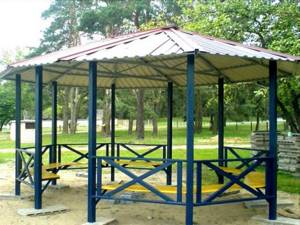
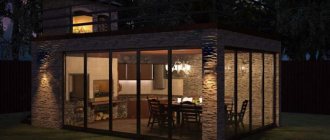
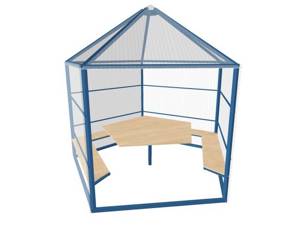
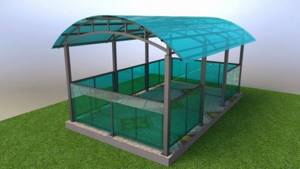
gazebo example - 2

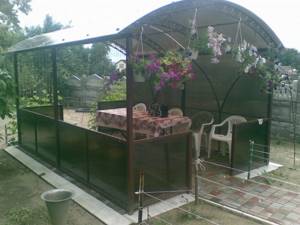
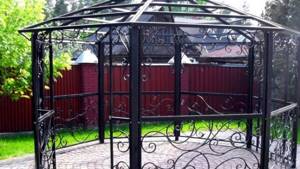
gazebo example - 3
Indeed, in our time, summer residents are increasingly equipping their properties with additional structures for recreation. If you have the opportunity and certain skills, why not do everything yourself? For example, a place where you can just sit or hide from the sun.
Such structures made of profile metal always look interesting and are in demand. The main thing that is needed to build gazebos is the ability to use a welding machine and do it well enough. The article describes in detail the stages of working with profile pipes. But first, you need to figure it out.
What is a profile pipe
The profile pipe, unlike its standard counterpart, has no volume. Its feature is lightness and practicality. It is made mainly from carbon or low-alloy steel. Recently, it has been often used in the construction industry.
The shape of profile pipes can be: • Oval • Rectangular • Flat-oval • Square
The most stable shape is square. To build a gazebo from a square-shaped profile pipe, you need to take into account its positive features: • Lightness • Flexibility • Stability • Increased resistance to corrosion • Easily connects to other parts of the structure • Inexpensive material
Drawings with dimensions
Before assembly, detailed sketches of the structures should be made: a diagram (drawings, dimensions, detailing) will help to correctly calculate the amount of material. As a sample, you can use gazebos that are available for sale at construction companies. Most often, these are variants of non-traditional shapes: arches and semi-arches, pentagons, trapezoids, etc. The design of a simple 4-6-corner garden building of the classical type can also be taken as a basis.
When drawing up a drawing, it is important to determine the height inside the structure so that a person can stand upright. Benches in non-standard gazebos are often located near short walls or arch slopes
There must be at least 1 m above the seats to metal structures to prevent injuries.
What profile pipe parameters should I use?
Basically, to assemble a gazebo from a profile pipe, they use metal that is not thick, but not too thin either. They are looking for the middle. Approximately 3-4 mm. Since it is sold price/kg. Therefore, it is not profitable to take a heavy pile, and there is no point.
If you use a round profile pipe, there is a plus and a minus. Cheap material, but it will be more difficult to weld it to the structure.
A do-it-yourself gazebo from a profile pipe is made according to certain shapes, which are indicated.
Metal gazebo projects
There are a lot of options for metal gazebos, so everyone can choose the best option for themselves. Among the most popular design solutions, experts highlight the open type of gazebos, the walls of which are openwork partitions made of profile pipes or rods. Some manufacturers of gazebos immediately offer ready-made prefabricated structures in this form.
When choosing a gazebo, you need to decide on its dimensions; for this you need to know whether feasts with friends and relatives will be held here, or whether only the owner of the site will relax here. Often the gazebo has a rectangular shape, the dimensions of which are 4 * 6 meters. A more original shape of the gazebo is round or hexagonal with an original roof.
The collapsible structure is very advantageous in that it does not require a foundation or its laying. This type of gazebo is mobile, it can be assembled outside in any convenient place, and with the onset of winter, assembled and hidden in a dry and warm place, for example, an attic or a barn. In the case of modular structures, corrugated sheets are used for the roof, and metal corners are used for supports.
A stationary gazebo is a fundamental structure that is installed once and for all. Metal supports are dug into the ground and filled with concrete. The floor area can be decorated by laying it with ceramic tiles, wooden slats, or simply pouring concrete around the perimeter of the supports.
For shelter, a roof is used, the design of which can be either classic or original. The most commonly used types of canopies are:
- Single-pitch is the simplest and most boring option in appearance, representing a flat surface located at a certain angle. To create an angle I use supports of different heights. The angle of inclination is necessary for the roof to allow snow and rainwater to roll off its surface. The difficulty of implementation lies only in the correct choice of the angle of inclination, since the minimum angle of inclination will be useless, and with its increase, the windage of the canopy increases and with a strong gust of wind it can be torn off.
- Gable roof is a popular type of roof, which consists of two planes connected at an angle. Often such a canopy is used for large roofs, but you will have to take care of additional strengthening of the structure.
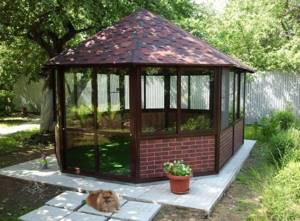
- Multi-slope is the best option for small gazebos and has an attractive appearance. Often a quad or hexagon is used.
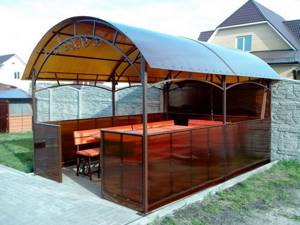
- An arched canopy is an original type of roof with a curved shape. Externally, this design is very attractive and aesthetically appealing. Only professionals can equip such a canopy, and it is expensive.
Forms and types of assemblies
A gazebo made from a profile pipe comes in several forms:
• Rectangular, • Square, • Hexagonal, • Round, • Octagonal.
To make your dream come true and build a gazebo, you need to know two assembly methods.
1. Profile pipes located vertically are concreted into the ground. The rest of the structure is attached to these piles. In this method, the presence of a foundation is not relevant. Instead of a floor, the area is sprinkled with sand, concreted or tiled.
2. The second method involves the presence of a foundation. Monolithic tiles are poured on site or the frame is fixed, as in the first option, only the piles are much shorter. A ready-made structure is attached to them. The structure is lifted using a crane and installed.
A gazebo from a profile pipe is made using both the first and second methods. Determine which is better? In terms of reliability and fastening - the first option. The posts are fixed with concrete. In addition, less material will be required and will save your budget. The second assembly option is more complex in execution, but has a number of advantages:
• Beautiful design • Possibility of having a floor made of warm material (wood, plastic) • Moisture will not destroy the structure
Preparation of material and tools
For construction you will need the following tools:
- level;
- roulette;
- grinder with metal discs;
- electric drill;
- welding machine;
- Screwdriver Set;
- spanners;
- sandpaper;
- paint brush.
Necessary materials:
- profile pipes with a cross section of 40×40 mm and 40×20 mm;
- sand, small crushed stone and cement;
- primer for iron;
- metal corners;
- acrylic paint;
- tar;
- finishing material.
If cellular polycarbonate is chosen as the roofing material and wall finishing, then a set of special fastening hardware will be required.
What should be the installation location?
For a collapsible structure, this factor is not of great importance, since it is easy to move around the site. As for a permanent structure, building codes and regulations should be followed.
The installation location must be selected taking into account the following requirements:
- on higher ground to prevent flooding;
- lack of underground communications;
- no closer than 3 meters from fire-hazardous buildings;
- the possibility of arranging a path for free passage;
- at a distance of 15 meters or more from the toilet.
It is worth choosing a construction site with perspective, so as not to dismantle the gazebo for the construction of a garage, bathhouse or other facility.
What materials are best to use
The basis of the structure is a steel frame. It is assembled from profile blanks with a wall thickness of at least 2 mm. Products with thicker walls are much more expensive, harder to work with, and have little practical effect.
To reduce material costs, you can use round water pipes for lintels and decorative elements. Their cost is much lower, and their strength is high.
As for collapsible structures, aluminum profiles can be used for their construction. This metal is 3 times lighter than steel, but also much more expensive.
Pipe weight calculation
This event is carried out when designing a collapsible structure or building on unstable ground.
To carry out calculations, you must have drawings with dimensions and know the weight of one linear meter of the profile pipe. If the total weight of the frame exceeds the maximum permissible load on the ground, then steel rafters can be replaced with light and durable wooden beams. When designing a collapsible gazebo, it is advisable to divide it into modules that can be lifted and carried alone.
Calculation of other materials
Thoughtful construction planning has a direct impact on its cost and time. Equally undesirable is the presence of surplus or shortage of materials.
Calculations are carried out in the following areas:
- foundation;
- frame;
- roof;
- blind area;
- floor;
- connecting elements;
- external and internal finishing.
The need for consumables is calculated separately. It is necessary to have a sufficient supply of electrodes, drills, cutting and grinding discs.
Preparing for work
Making a gazebo with your own hands from a profile pipe means acquiring certain skills in the field of construction. And for everything to go smoothly, it is necessary to prepare and think through everything in advance.
First of all, we buy metal. Use the following pipe parameters for supports:
• 50 by 50 mm – if the roofing material you want to use is not slate. • 75 by 75 mm – if the roofing material is slate. • 20 by 30 mm – tubes for spacers and jumpers. For a small gazebo three by three meters long, two meters high and with a polycarbonate roof, you will need a square-shaped profile pipe:
1) 50 by 50 mm. Length 13 meters (with reserve). 2) 40 by 40 mm. Length 15 meters. 3) 20 by 20 mm. Length 6 meters 4) 40 by 20 mm. Length 30 meters.
Choosing the location and shape of the gazebo
An important task is choosing a location. The best location for a gazebo made from a profile pipe is not in the area near the house, but not too far away either. Four meters from the house is ideal. And make sure that the structure will eventually be visible. This is all a decoration for the yard.
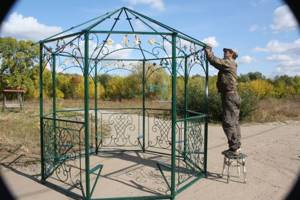
The second stage is to decide on the shape of the gazebo. Make a drawing. If you are confident in your abilities and have construction skills. You can build an elegant hexagonal gazebo, as in the photo.
If this is your first time, try a square or rectangular design. Reduce the risks to zero, and you will not have problems with the construction of the roof.
Material and tools for making a gazebo
A do-it-yourself gazebo made from a profile pipe, made on a budget, can last for many years and will not require additional reconstruction over time. To build it we need:
• Profile pipes (meterage depends on the size of the gazebo). Take with reserve. • Concrete mortar (cement, water, sand) • Polycarbonate • Wooden or plastic fittings (your choice). You don't have to use it at all. • Primer or paint
You also need to have the following tools in your arsenal:
• Electric drill with a set of drills for working on metal • Grinder • Welding equipment • Channel beams • Bayonet shovel • Metal cutting itself and thermal washers to match the color of the finishing material
Do-it-yourself gazebo made from a profile pipe - step by step
Before you start drawings, you need to make a final decision: will it be a structure for summer pastime or a closed gazebo, since each option will have its own characteristics, as well as positive and negative aspects:
- Collapsible gazebo It has a profile frame; a tent covering, plastic or polyethylene is used as a roof. This design is lightweight and can be assembled in a couple of hours. Period of its use: April – October. The cost of materials is reasonable, there is no base, it is quite compact and after disassembly can be placed in a utility room. Such a structure can be assembled by one person without outside help. As for the parts, you can make them yourself or purchase a complete set at a retail outlet. Basically, such gazebos are installed in summer cottages.
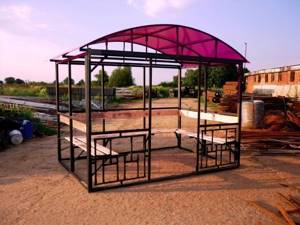
Collapsible gazebo
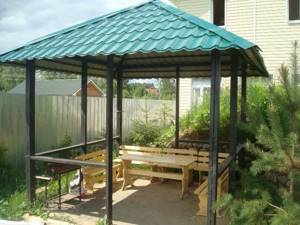
- Stationary gazebo looks like one of the capital buildings, which can be used all year round. In it you can hide from bad weather and have a great time with friends. If constructed correctly, its service life is quite long. In addition to the metal frame, wood, stone or brick are used. The foundation for such a structure must be prepared. Such a gazebo can only be built if there is a professional project. You can build a fireplace, barbecue or oven in it. You can choose a unique interior design for interior decoration. But there are significant disadvantages of such a structure: large financial and labor costs, a long construction period; as a rule, it is impossible to build such a structure independently, without the involvement of construction crews.
Stationary gazebo
The best option would be to build a stationary gazebo with dimensions of 3m x 3m or 4m x 4m. These sizes are quite enough for a cultural relaxation in this room with family or friends.
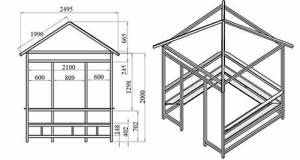
Drawing of a gazebo made from a profile pipe
Before you start building a gazebo, you need to draw it on a sheet of paper. This will make it possible to understand what the future structure will look like. This applies to all types of gazebos. Thanks to the drawing, you can calculate the amount of material needed.
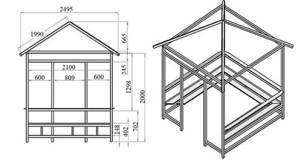
Drawing of the future gazebo
The drawing is a drawing of support posts, lintels, and roof covering. All details must be carefully drawn. The pipes used may have the same cross-section. The number of racks must correspond to the number of roof slopes. The height of the gazebo is usually a little more than 3 meters. The roof of the gazebo can be either single or gable. Sometimes tent or dome options are used. But the latter can be seen rarely, since their construction requires special skills.
Gazebo drawing
Materials for the gazebo
Even before the construction of the gazebo begins, it is necessary to clearly understand what material will be used on the roof. There are a lot of options and you can make a roof from:
- Cellular polycarbonate. But this material has certain disadvantages that are worth paying attention to: it is afraid of strong subzero temperatures, its service life is short, it is used mainly for prefabricated gazebos. The advantages include low cost.
- Ondulina. It is not afraid of negative atmospheric phenomena and is easy to install.
- Roof tiles. It has a rich color palette and looks beautiful.
- Tarpaulin. Often used in a collapsible version.
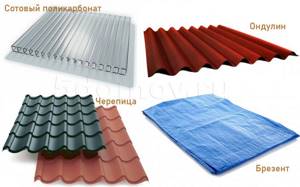
Materials for the roof of the gazebo
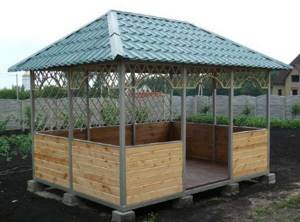
As for the walls, you can use wood, glass, polycarbonate or a profile pipe for their construction. Forged structures improve the appearance.
In most cases, buildings are equipped with such necessary items as a wooden table and chairs. Plank benches can also decorate the view.
To make a foundation, you need to acquire materials such as crushed stone, sand and cement, as well as reinforcement and insulation. When constructing a columnar foundation, concrete and brick are used.
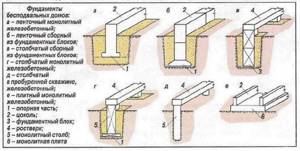
Types of foundation
The flooring is mainly plank, but tiles can also be used - this is much more expensive, but more practical.
The simplest option is polycarbonate sheathing of the gazebo. But it's worth buying additional protective equipment. Pipes need to be coated with anti-corrosion agents, which will prevent them from rusting. When using wood, it is coated in advance with agents that prevent rotting and fungal development. There are many types of polycarbonate: matte, transparent, translucent.
Gazebo covered with polycarbonate
You cannot start construction if you do not have such basic tools as:
- electric drill;
- shovel;
- welding machine
- Bulgarian.
Calculation of the gazebo project
In order to at least approximately determine the cost part of the project, you need to find out the prices for materials and understand how many of them are needed for turnkey construction.
Naturally, much of the cost will depend on the size of the gazebo, its decoration, type and quality of material, etc.
When developing an estimate, the following components are taken into account:
| Support pipes (section 50x50 mm) | Electrodes |
| Plywood sheets | Boards |
| Drills and screws | Crushed stone |
| Polycarbonate | Concrete |
| Profiles | Waterproofing material |
| Pipes | Other mounts |
Significant expenses will be spent on purchasing pipes. In order to avoid paying for delivery several times, materials must be taken with a certain reserve.
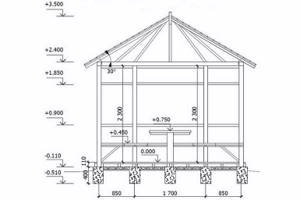
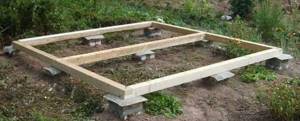
Gazebo foundation
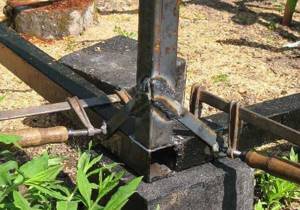
First, the construction site is prepared: trees are cut down, garbage is removed , and the fertile layer of soil is removed. If the pipes are intended to be installed directly into the ground, they must be carefully primed.
Afterwards, holes are drilled 70 - 90 cm deep. The diameter of the pipes is selected independently. A pipe is placed in the hole, then coarse crushed stone and construction waste are poured in, everything is thoroughly compacted. It is checked that the pipe is strictly vertical. Afterwards, cement mortar is poured using M400 cement, sand and water. The resulting mixture should be slightly liquid in order to penetrate deep into the pit.
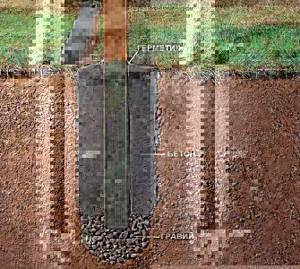
The main thing is that the vertical position of the rack is checked not only using a building level, but using a plumb line to avoid significant errors. If you have metal stands, it is convenient to use magnetic plumbs.
If there is a need to slightly raise the structure (make it higher), then you can install the frame on blocks from the foundation. It is irrational to use whole blocks, so they can be cut into two parts for the gazebo. To do this, use a diamond blade on an angle grinder.
Block foundation for a gazebo
The resulting figures are placed according to the principle: in each corner there is one cube, between them there are 4 more pieces, in the center there are 4 more in a checkerboard pattern. Blocks are used to avoid possible deflection of the structure.
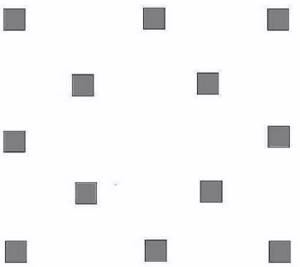
An example of the location of foundation blocks
Bitumen mastic is needed to prevent the concrete from beginning to absorb excess moisture. It can also be replaced with resin, but from an aesthetic point of view this is not recommended. Ruberoid will last no more than two years. Blocks must be displayed at the same level. To do this you need:
- Use a laser level.
- Apply the rail.
- Use a long cord.
Bottom rail and racks
After the final placement of the blocks, sections of square pipes are laid on top of them. The bottom trim is made using a profile pipe measuring 50mm x 50mm. You can use a more powerful copy, then its service life will increase.
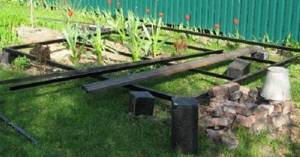
Then the pipes are laid. Their horizontalness is checked with a level. Fillet welding is carried out. Then, two jumpers are made from smaller pipes (40mm x 20mm), which are designed for floor boards or plywood to rest on.

Pipes must be primed at least twice. The areas where welding took place are primed most thoroughly. The height of the racks should not be less than 220 cm so that a person’s head does not touch the ceiling.
The posts should be installed as level as possible. The level is checked using plumb lines (magnetic ones are more convenient to use). Clamps are used to crimp the jibs after checking. The welded elements will stand straight, but you will still need an assistant for insurance. After welding the pipe, the clamps are removed. When using a pipe with a cross-section of 50x50, the posts will reach the level of the railing. The height should be the same to give the structure greater stability.
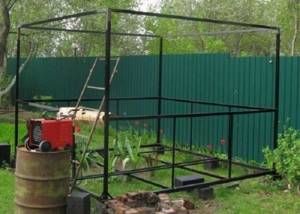
The top of the gazebo and railings
The approximate height of the railing in the gazebo will be 95 cm. However, this figure may be less, because the value is not standardized. You don’t have to use railings at all—polycarbonate can be used instead. It is possible to use any other translucent material in order to protect life from the encroachments of neighbors and onlookers. The railing as a middle frame can be made of a pipe with a cross-section of 2-4 cm, which is optimal for the top frame. Two vertical posts are welded between the second and first trim.

Roof and roofing of the gazebo
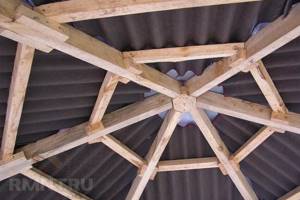
Now it’s the turn of the roofing. For example, the roof can be covered with bitumen shingles, but for this it is recommended to make the rafters wooden. To create a frame for the roof, you should use a beam with a cross-section of 75x40 mm, but clapboard is laid under the sheathing. Thus, the view from the gazebo itself will be no less attractive.
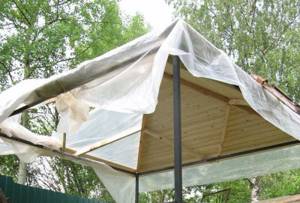
Wooden jibs from timber
If desired, you can also use moisture-resistant plywood. The pieces should be driven into the ends of the racks so that the plug is 10 cm inside the structure. Pieces of 5-10 cm will be visible from above. It is to them that the rafters will be attached. You can also cut them at the base.
There will be a total of 4 rafters, each 2.5 m long, and they will all be combined at the top into a single structure. The top level from the zero point should be about a meter.
Top frame and rafters of the gazebo
First you need to combine two elements. A certain slope is given, for which the elements are slightly filed. The remaining two elements (bars) are nailed on both sides of the structure, the ends of which must also be sawn. Stainless steel corners will help make the structure stronger.
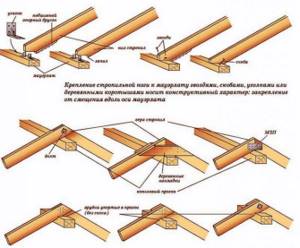
It is inconvenient to process while sitting on the roof, so all necessary manipulations with materials are done on the ground. All boards are treated with protective and antiseptic compounds. Another board will be laid in the central part, and an auxiliary block 80-85 cm long will be nailed onto it. Thus, the rafter legs will extend beyond the frame. Moisture will get inside in a smaller volume.
The already assembled structure rises to the top. The top should rest strictly on the block. Afterwards alignment is carried out. After fixing, the board and support are removed and the sheathing is installed. Under the tiles it will be made from clapboard. The construction will cost a little more than an edged board, but it will look better.
Side walls and floor of the gazebo
For the flooring you will need an edged board with a section of 70x40 mm. Floor boards are not used here, since small gaps will be needed for ventilation, which will allow the material to swell a little in conditions of high humidity. It is not recommended to use tenons and grooves in this case. Edged boards can also be used for side partitions. The lining becomes deformed after the first heavy rain. The ends of the sheathing are covered with boards. You can make a separate spacious shelf out of it.
You can also watch several useful videos on how to make a gazebo from profile pipes with your own hands:
Frame assembly
If the site is planted, you will need to remove the fertile layer. Then fill the unevenness with sand or the natural layer that was lying. Do not try to plant flowers in this area; if they sprout, it will be difficult to get rid of the weeds.
Now you can get to work. Stock up on cool water and ice cream. The work will take approximately 10 hours, and a gazebo will be made from a profile pipe with your own hands.
Dig holes for the piles approximately 50-60 centimeters deep. It is better to do this with a drill (hold tightly). After all the holes have been dug, install the pipe at 90 degrees. Cover the hole with brick fragments and secure the post. For stability, experienced installers weld a “heel” to the pile. Fill the exposed stand with concrete mortar. One shovel of cement for three of the same sand. The result was a liquid solution. If this doesn't work, use the advice below.
Helpful tip: if the cement is thick, use a stick to fill the hole with the solution.
To ensure the gazebo has a long service life and protect it from moisture, apply a layer of primer to the metal located at the base of contact with the ground. Having completed the installation of the supports, proceed to welding the upper and lower trims.
Bottom harness
When making the lower trim, use pipes 50 by 50 mm thick. Lay them out and check the degree of the angle. Adjust if necessary. Make a couple of jumpers from a thinner pipe. The floor will rest on them. Cover the welding areas with primer.
Top railing and railing
Set the height of the railing to approximately 100 cm. But this is not a required parameter. You don’t even have to use them if you completely cover the entire structure with polycarbonate.
For piping, use pipes 40 by 20 cm thick. For strength, weld two posts between the piping on each side, except for the opening. Otherwise you can get carried away.
Roof assembly
We choose the method with which we will cover the roof. It all depends on your roofing material:
• Wooden rafters are used for slate • Metal rafters are used for polycarbonate
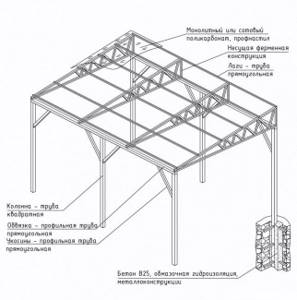
Installation of a metal frame
In articles devoted to how to install a metal gazebo with step-by-step photographs of the work, we have already described in detail the entire stage of installing a metal frame with nuances related to a particular project.
Here I would like to remind you of one important detail. The point is to slightly rationalize the sequence of work stages; the fact is that it will be more convenient to install the rafter cage under the roof on a platform on the ground, and only then install it as a single piece on the racks of the upper frame.
And besides this, we recommend that before installing the roof frame, treat it with an anti-corrosion compound and paint it, because it is much easier then, after installing it on top, to paint only the welding points than to paint the entire rafter cage.
Metal rafters
Welding rafters is another of the main tasks that can facilitate the installation of a gazebo roof. Choose the same pipes as for the support piles and the required laying angle should be 10-15 degrees.
If you decide to build a large gazebo, you will need to create another bracing system between the rafters. And inside the contour, every 35 cm we will weld a thin profile tube. This will not only give the effect of strength, but also improve the appearance of the structure as a whole.
The next step is to use pre-prepared polycarbonate. Drill holes for the bolts. We stretch the material around the entire perimeter and attach the plastic using self-tapping screws and thermal washers. The roof, which does not let in rays of light and raindrops, is ready.
Key Build Options
In most cases, metal products are connected to each other using a welding machine. The speed of operation in this case is high, as is the degree of reliability. However, if we are talking about an open summer structure, it may be necessary to dismantle and subsequent re-installation. And it’s not surprising, because if a summer cottage is not guarded, then leaving a bunch of metal on it is at least unsafe. The point is that this hardware can simply be stolen. If so, then the modules must be welded and then connected to each other using bolts. For the most part, such collapsible structures are a metal frame on which an awning is installed or, alternatively, any other material that can be quickly fixed and just as quickly removed.

Wooden roof structure
A do-it-yourself gazebo made from a profile pipe can be assembled using wooden rafters. To do this, select a block of approximately 80 by 40 mm and lay moisture-resistant plywood under the base of the tile.
We hammer 6 cm bars into the ends of the piles on which the structure rests. The rafters will be attached to them. After the operation, you will cut off the excess. Let's get down to the main thing, cut out the rafters in the amount of four, 3 meters each (you can cut off the excess later). The main thing is to connect them correctly at the peak of the structure.
First of all, connect the two beams first. File away what you don't need. After that, create a slope by knocking down the length with nails. File again until you get the result. Do the same for the two remaining beams and attach stainless steel metal corners for strength.
Treat the resulting wooden structure with an antiseptic and stain. You can varnish it. Rain should not destroy the structure.
Place an additional wooden post in the center and nail a 90 cm block to it. This is required so that water from the roof does not flow inside.
Gain strength, drink some water. You have to place the wooden structure assembled on the ground on top of the gazebo. The top should rest on the block. Install the structure strictly in the center, check the degree of verticality of the bar with a plumb line. If everything is ready and standing normally, secure the ends of the rafters to the plugs that were driven in. Remove the support and you can mount any material you choose.
Assembly diagrams
Typically, metal elements are attached to each other using a welding device. Such work provides significant strength to the welded gazebo and is carried out quite quickly. However, it should be borne in mind that this option is practically not used for an open summer gazebo. In this case, it is better to connect the elements to each other using bolts. If necessary, you can repeat the installation or dismantling work, which will not work if the structure is welded.
Most often, a collapsible structure is a metal frame that is covered with some kind of material. Many people use an awning for this.
If the structure is collapsible, then it is better to split the frame along its edges. For a quadrangular gazebo, separate contours are created, there should be four of them. Using jumpers, you need to connect them to adjacent elements. Octagonal and hexagonal structures are made in a similar way.
Varieties and methods of creation
Gazebos for summer cottages come in a variety of varieties: round, octagonal or hexagonal, rectangular.
The metal frame is installed in one of two ways:
- Vertical pipes are concreted into the ground. After this, the structure is attached to these supports.
- A monolithic slab is poured, which is quite rare, or a columnar or strip foundation is erected. The overall structure is created separately. The frame is fixed after installing the racks.
It’s hard to say which method is better. The first method is more reliable fastenings, because the pillars are concreted. In this case, you also have to pay less money, because the lower trim and foundation will not be needed. However, a gazebo without a floor is an exclusively summer option. In a structure made of corrugated pipe on a foundation, the presence of a floor is initially provided for.