Most often, without further ado, the gate is made of the same material as the fence. If it was built independently, then DIY garden gate can be made without difficulty. If you want to make something extraordinary, then you need to familiarize yourself with other types and choose the preferred option.
Popular types of garden gates
Content
A variety of materials are used to make country gates:
- Wood is used in the form of boards or picket fences attached to a frame. In recent years, it is increasingly made from a metal profile, which is more durable than a wooden beam. Moreover, fastening canopies and locks to a steel frame is more reliable. Wood paneling combined with metal looks stylish, and wrought iron decorations enhance the impression.
- Forged gates provide reliable protection and do not require periodic repairs. They are forged in antique or modern patterns.
- Corrugated sheeting is easy to install, inexpensive, durable, and has a wide range of colors. A do-it-yourself country gate for a fence made of corrugated sheets turns out to be light and durable, which is important when the sash is moving.
- Translucent polycarbonate, mounted on a durable frame, looks great and successfully withstands the vagaries of the weather. It withstands impacts without consequences, does not burn, and does not require maintenance (cleaning with water is sufficient).
- Colored plastic is, of course, inferior in strength to wood and metal, but given its advantages, this is insignificant. It is available in matte and transparent versions, with a large selection of colors and textures. To increase strength, a metal profile or forged products are used. A garden gate made of a plastic picket fence with an imitation of a rustic style looks great. PVC plastic does not require painting, maintenance, sun and precipitation.
- Chain-link mesh is the cheapest material. Building it with your own hands will not require much time or any professional skills. In terms of reliability, high-quality chain-link mesh is not inferior to forged products and can last more than 50 years. Since its ends are sharp, only a very desperate uninvited guest would risk climbing over it.
- The option made from three-dimensional welded mesh looks much more attractive at the dacha than a gate made from chain-link mesh. The vertical rows of wire have V-shaped bends, which create volume and increase rigidity. If desired, it can be painted in any color.
Step-by-step instructions for making a gate from a profile pipe with your own hands
When manufacturing gates, be guided by pre-developed documentation and follow the technological sequence of operations.
Gates can be made from a profile pipe using welding equipment or using threaded fasteners.
Let's consider both options.
Welded construction
When welding swing gates from profile pipes, perform the work in the following order:
Remember to properly fasten the hinges in accordance with the direction in which the gate opens.
The welded construction of the gate is characterized by increased strength.
How to weld a gate frame from a professional pipe with your own hands: video
The video shows in detail the sequence of work on welding the gate frame.
Threaded version
If you don’t have a welding machine or don’t have the skills to handle it, you can assemble a gate from a profile pipe without welding. To do this, it is necessary to use bolts, nuts with M8 threads and washers, as well as connecting elements.
The use of standardized connectors simplifies assembly
Remember that the use of spring washers will prevent spontaneous unscrewing and increase the reliability of threaded connections.
To complete the assembly, you will need a drill with drills corresponding to the diameter of the hardware used, as well as wrenches.
The algorithm for manufacturing a structure without welding is completely similar to the previously given sequence for a welded product, with the exception of the following points:
During operation of gates manufactured without welding and assembled with bolts, the threaded fastening is gradually weakened. To ensure the rigidity of the structure, it is necessary to periodically monitor the degree of tightening.
After assembling the frame, you can begin covering it with finishing material.
Every person strives to secure their home as much as possible and to prevent access to it by strangers. That is why many owners of country houses, as well as summer cottages, put up a fence on their territory that will not only protect against intruders, but also protect them from the wind and prying eyes.
And so that the residents themselves can freely enter their home, an opening is made in the solid wall of the fence. This could be a gate or even a small wicket. But in any case, their design must be very reliable and strong.
There are two ways to solve this problem. Many people wonder how to weld a gate from a profile pipe themselves. If you are the owner of a welding machine and have at least some minor skills in handling it, then you can take on making a gate yourself.
Product made from profile pipes and corrugated sheets
In the second case, you can simply turn to a company that manufactures such products for help and purchase a ready-made design.
Note!
The process of making a gate is quite simple and does not even require the use of special equipment or the presence of an assistant. If you use the recommendations on how to properly weld a gate from a profile pipe outlined in this article, you can easily do it on your own.
Preparatory stage of work
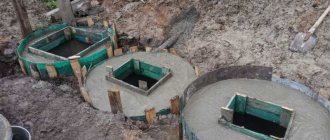
Having agreed that manufacturing the structure will not take much of your time, it is worth clarifying that before welding the gate from a profile pipe, you need to install the supports on which it will be fixed. These can be simple pillars made of wood or metal, or you can choose a more beautiful option by installing pillars with brickwork.
Note!
The simplest and at the same time reliable option is to use metal pipes with thick walls or channels.
Support after pouring
Installation of supports:
- Perform the marking by marking the location points of the pillars.
- In the designated places it is necessary to dig recesses; their diameter will be 60-70 cm, and their depth should go approximately a third of the length of the support segment, which will be above the ground.
- The bottom of these pits is covered with fine gravel or crushed stone, after which the embankment must be thoroughly compacted.
- To make the support as stable as possible, a piece of thick steel sheet can be welded to its lower part. After this, the pillar is lowered into the recess.
- Prepare a concrete solution; you can use gravel or crushed stone as a filling material.
- Holding the post upright, fill the hole with concrete.
The second pillar is installed in the same way. If you decide to make a gate instead of a gate, you will need to install a third support.
Note!
After filling the pillars with concrete mortar, it will be possible to begin installing the structure itself no earlier than in a couple of weeks. This amount of time must be allowed for the concrete to dry completely and set well.
In order to ensure that the supports are strictly vertical, you can weld a crossbar in the form of a thin pipe or metal rod to their upper ends.
Crossbar for fixation
As for calculating the necessary materials, here you need to start from the dimensions of your future product.
In our case we take:
- profile pipe, its footage can be calculated by measuring the perimeter of the gate and adding its width to it (pipe diameter 20x40 mm);
- steel corner, which will be placed along the perimeters (25x25 mm);
- corrugated sheeting with galvanized coating (C10 or C8), it must be ordered in advance, based on the height of the future structure;
- self-tapping screws with a hexagonal head, with a color corresponding to the shade of the corrugated sheet (20-30 pcs.);
- gate or garage hinges;
- reliable lock;
- convenient handle for opening.
If you do not know well enough how to weld a gate from a profile pipe, the photos and instructions below will help you solve this problem.
Design diagram
Manufacturing of the product
You can see how to weld a gate from a profile pipe in the video below.
Note!
If you place the facing material not outside, but inside the frame, the product will be more reliable and aesthetically pleasing. For these purposes, metal corners are needed.
Step-by-step instruction:
- Make two sections from the corrugated pipe. Their length should exceed the pieces of the profiled sheet you prepared by about 0.5-0.6 cm.
- In addition, it is necessary to cut two more pieces of pipe; their length should exceed the width of the profiled sheet by 0.5-0.6 cm.
- Place horizontal pieces of pipe on vertical drains on a level surface. Then you need to grab these parts by welding at the corners. Don't forget to make sure that all diagonals of the resulting frame are equal and the corners are right.
- Using the internal dimensions of the frame, prepare several parts from metal corners (steel). The ends of the workpieces must be cut at an angle of 45 degrees.
- The resulting corners should be placed inside the frame in the appropriate place and connected by welding along the aligned cuts. Don't forget to weld them to the frame itself.
- Check the correct placement of all parts and the overall geometry of the structure. After this, you can fully scald all the joints of the corners and pipes.
- Welding areas should be thoroughly sanded.
- Coat the frame with a coat of primer and then paint intended for metal surfaces (twice). You also need to paint a profile blank that is equal to the width of the gate and will act as a lintel.

Jumper for strength
In order to mount a profiled sheet, it must be inserted into a frame made of corners. If necessary, the material can be trimmed a little using a grinder. The casing is fixed with self-tapping screws along the perimeter on the front side. The color of the heads on the screws may differ from the color of the corrugated sheet. In this case, the fixing elements are twisted from the reverse side, their ends are cut off with a grinder, and then painted over.
Note!
If your structure will be equipped with a lock, then all work on its installation should be carried out before finishing the cladding.
After the profiled sheet has been installed, the last part is welded - a jumper running along the width, which you had previously painted.
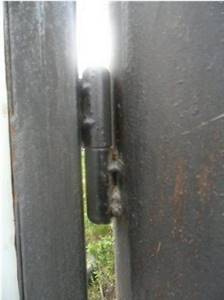
Loop placement
Product installation:
- Leave a gap between the bottom of the structure and the ground below it of about 20-30 cm. To do this, you can lay bricks or bars of appropriate thickness between the supports. Mark the point where the loops will be located.
- Weld to the frame that part of the hinge that should be located on the gate itself. Connect it with the other half.
- Place the structure in its appropriate place and weld the second parts of the hinges, holding the structure in the desired position.
This method of fastening can be labor-intensive, since it is very difficult to keep the metal product suspended. But in this case, you will know for sure that both halves of the loops will match.
03.09.2016 2993
The instinct of self-preservation forces people to fence off their homes from uninvited guests. At the same time, the owners of the house strive to ensure that the wicket and gate look organic and match the color scheme to the surrounding environment.
You can make it from corrugated sheets for fencing your site if you have basic skills in working with a welding machine. There is nothing complicated about this; moreover, the process does not even require the presence of assistants or the presence of special lifting equipment.
Decoration of the entrance gate
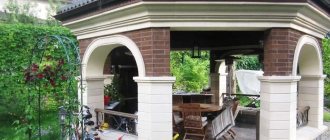
The appearance of the gate should be in harmony with the country fence. For example, massive fences made of brick or stone look great with gates decorated with forged steel products.
If possible, a canopy or, preferably, a small roof should be built over the country gate. It will protect guests and hosts from precipitation while waiting for it to open. In the standard version, the canopy is made of polycarbonate sheets or corrugated sheets fixed to the frame. In the first option, the canopy is made in the form of an arch, covering a significant area and withstanding large wind loads. The option made from corrugated sheets is more modest and not so demanding on the strength of the pillars on which it is installed.
In order not to violate the integrity of the fence made from corrugated sheets, the gate is designed according to a hidden pattern. That is, it is made equal in height to a fence made of the same material. The gate made of corrugated sheets harmoniously combines with concrete and brick supports. In a high sash, a window is sometimes made from a welded fence mesh or transparent polycarbonate to allow the visitor to be seen from afar.
Wooden and forged types of gates are traditionally installed on high and massive fences made of natural stone. It is recommended to make the canopy for them in the shape of an arch fixed on forged consoles. Many craftsmen decorate gates made of boards installed on wooden fences with carvings. Due to its neutral appearance, polycarbonate fits well into metal, wooden, forged, and profile fences.
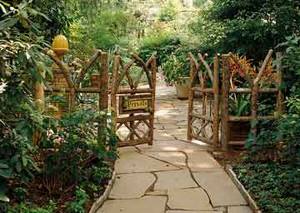
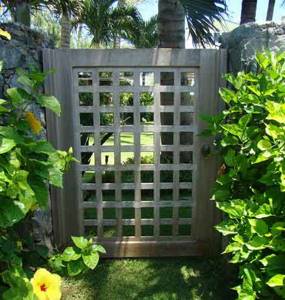
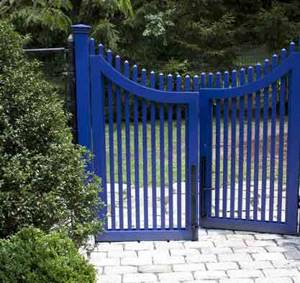
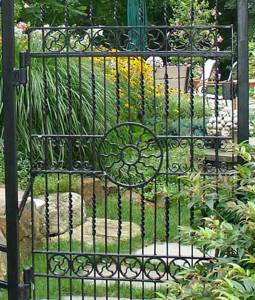
Garden gates.
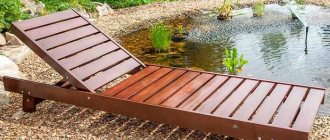
You can and should be bold when choosing the design of garden gates. The most common and functional option is wooden garden gates. A garden gate should not be made of solid fabric, because it should not zone the space inside the site and divide it into parts, thereby visually reducing your yard. For the same reason, designers advise giving preference to low options.
Here is a very simple, but nevertheless stylish version of a wooden garden gate.
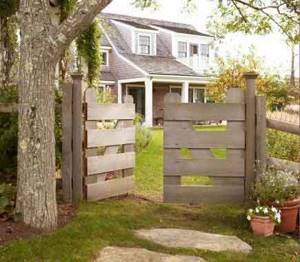
The gate can be made not only from boards, but also from tree branches or roots.
A high wooden gate will look beautiful only if there are a lot of tall trees in your garden and the garden is large in space.
If you have pets that you allow to roam in the garden, provide them with free access there. Such a swing gate will allow your pets to walk freely around the area, and if necessary, you can fix the gate by closing the lower locks.
A wrought-iron garden gate is a great option, because you don’t need to hide anything inside the garden. The forged version will give the landscape additional airiness and will not destroy its spatial integrity.
Choice of alarms and locks
Any gate must have the same devices as the entrance door to the house. In the simplest case, a call is installed. Sometimes a hanging bell is placed to signal its opening. Increasingly, homeowners are equipping them with intercoms with CCTV cameras. To visually control the area near the gate at night, a lamp is installed or it is illuminated by a spotlight.
Rotary latches are most often used as a lock for country gates. They are easy to use, work even when the fence is distorted, but can be easily opened from the outside. An equally popular latch is installed quickly and can be made by hand.
A mechanical combination lock is more reliable. It is convenient because when using it you do not need keys, which tend to get lost. Overhead locks for external installation, sold in stores, have proven themselves to be quite good.
Necessary materials for the gate
Depending on what the future gate will be made of, it is necessary to prepare building materials. For the main entrance, a door one meter wide is usually installed. If there is a need to make another exit, then the gate can be narrower - up to 80 cm wide.
We recommend reading:
Pebble paths in a summer cottage
So, the materials for making a wicket are as follows:
- material (wood, metal, corrugated board) that will eventually become the door;
- loops; and it is better to use burglar-resistant ones;
— a welding machine, if we are talking about a metal gate;
- concrete or brick for installing supports, if necessary;
- Building tools.
Choosing a foundation
If the gate crashes into the gate, then, of course, there is no need for a foundation for it, and powerful support posts must be installed under the gate.
In the case of a free-standing structure made of the same material as the fence, the foundation will be similar to the main version. Since gates at the dacha are made of relatively light materials, for their installation on strong soils, supports driven into it are quite sufficient. On weak and crumbling soils, a foundation for pillars with full concreting is preferable, and for forged gates a shallow (up to 30 cm) strip foundation is preferable. On sandy and peaty soils there is nothing better than piles.
Installation work
If you plan to manufacture and install products from corrugated pipe, then you should stock up on the following tools: tape measure, pencil, metal scissors, self-tapping screws with a 6-sided head or rivets, handle, lock, hinges, drill, grinder, welding machine, etc.
The materials you will need are metal profile sheets, a 60X30 profile pipe, a 25X20 steel angle, cement, sand and crushed stone, primer and paint, and an anti-corrosion mixture.
The work algorithm involves performing the following steps:
- Installation of two support pillars.
- Working with the frame.
- Installation of a gate from a profile.
All processes are important in their own way and will be discussed in detail.
Installation of support posts
In order for a gate made of corrugated pipes to serve for a long time and without failures, it is important to correctly install stands that can support its weight.
A reliable and durable material for a support post is considered to be a channel or pipe. Also, pillars are erected from stone or brick.
The work is carried out in the following sequence:
- First, 2 holes are dug (the diameter is determined depending on the thickness of the pipes). Basically, the width of the pit is about 70 cm. The depth of the pit is 1/3 of the above-ground part of the rack.
- At the very bottom of the pit, crushed stone is compacted.
- In order to increase stability, dense sheets of steel are welded to the bottom of each of the support pillars.
- Keeping the support perfectly vertical, a solution of a mixture of cement, gravel or crushed stone, and sand is poured into the hole.
Important! You can hang the gate on the finished support no earlier than 2-3 weeks after the mortar mixture has completely hardened!
Frame
Creating the frame is another important step that requires attention.
You can simply strengthen the profile sheet on top, or you can place it inside the structure - under the corners, which will significantly strengthen the gate.
The process of creating a frame looks like this:
- First, using a grinder, blanks from corrugated pipe are cut. It is important to clean the metal from scale and corrosion, and then coat it with a mixture that prevents the formation of corrosion.
- Then the frame is assembled on a horizontal plane. Horizontal guides are laid on vertical ones and welded to each other at equal intervals. Be sure to ensure that the corners remain straight and the slats remain perpendicular!
- Corner blanks are cut at the edges at 45 degrees and welded inside the frame. A chamfer with this angle can improve the quality of the weld, making it almost invisible.
- After checking the geometric evenness of the frame, it is necessary to weld the joints of the pipes and corners.
- Then the structure is put in order. To do this, all seams are cleaned, places of fastening and damage are sanded, and then primed and painted.
- At the final stage, locks are cut into the frame, handles and strong hinges are installed for hanging the gate. The frame made of profile pipes is ready!
Covering the frame with corrugated sheets
The profiled sheet is inserted into the middle of the welded frame. If it is too large, you should adjust it to the required size using a grinder.
Then it is secured using self-tapping screws, twisting along the front side of the gate. If the screws differ sharply in color from the base material, they should be screwed in from the inside, then the excess pieces should be cut off with a grinder, and finally painted over.
Important! inserted before cladding the frame begins, including drilling and cutting out holes.
In the very center of the gate frame, using tools, a fixing metal jumper must be welded, which must be painted in the same color as the frame. The metal profile sheet is tightly screwed to it so that in a strong wind it does not tear out or become damaged.
Manufacturing and installation
Making a country gate for a fence with your own hands is quite simple:
- First of all, you need to make a drawing indicating all dimensions. This will allow you to complete all the work without errors, that is, without rework.
- Regardless of the casing, the frame from metal corners or profile pipes is first welded. To strengthen it, jumpers can be welded inside. At the same stage, a place for attaching a lock or deadbolt is equipped.
- The sheathing is cut from a profiled sheet or polycarbonate to the size of the prepared frame.
- The casing is secured with bolts or self-tapping screws.
- The work is completed by welding the canopies to install the door on the support. If the design of the prepared lock does not provide handles, they must be secured on both sides.
A do-it-yourself garden gate made of wood is quite simple to make. A picket fence is nailed onto two parallel wooden crossbars. Then the structure is strengthened with a diagonally installed strip. The hinges and lock are attached to horizontal bars. A gate for a fence can be made from Euro picket fence in the same way.
If there are no supports yet, they must be installed using a method appropriate to the existing soil. When installing poles, you need to make sure that they stand strictly vertically. The counter parts of the canopies are fixed on the support table in such a way that the lower edge of the door is at a distance of 4 - 5 cm from the ground. This will eliminate the formation of snowdrifts in winter. After hanging the door, a lock or other locks are installed on it, and their counterparts are placed on the false post.
If it is necessary to make a passage in the finished fence (for example, a back door at the rear of the site), install a gate with a latch instead of locks and latches. It is made in the form of a movable steel rod placed in a socket at the bottom of the sash. When raised, it does not interfere with door movement. When lowering, it rests against the ground and rigidly fixes its position. It would be very difficult to open such a door from the outside; it would be easier to climb over. Since this design does not require a false post, it can be installed on any fence support.
Calculation and necessary tools
Having decided on the standard size of the profile pipe and competently developed the drawing, you can begin to determine the need for materials, purchase purchased components, and prepare tools and equipment for construction.
A general list of materials for making gates includes:
- profile pipes corresponding to the drawing dimensions;
- sheathing material that will be attached to the canvases, for example, profile sheet, polycarbonate, wood or metal;
- hanging loops for connecting the leaves to support posts or a roller mechanism for sliding gates;
- lock and elements for fixing the panels (staples, latches, latches);
- fastening elements designed to fix the finishing material;
- decorative details (for example, forged elements), if they are provided for in the drawing;
- primer for corrosion protection and pre-painting of metal structures;
- enamel for exterior work, intended for final finishing and ensuring the presentation of the product.
Using the example of a swing gate with two leaves, we will calculate the need for materials.
Determination of the need for materials is carried out according to the sketch with dimensions
For the gate shown in the sketch you will need:
A typical set of tools for making gates, installing and concreting support pillars differs slightly.
To perform the work, it is necessary to prepare equipment and tools
The gates we are considering require the following equipment and tools:
- welding machine with electrodes with a diameter of 3 mm;
- grinder with a circle for cutting metal;
- electric drill with drills;
- hammer;
- tools for taking measurements, monitoring the accuracy of manufacturing and assembly (tape measure, level, corner);
- grinding wheel for sealing welds;
- file for removing burrs;
- brush for applying a protective coating.
How to make a lock for a gate
Today, choosing a lock for a gate in a store is very easy, since the range is quite wide. Few people will undertake to make it with their own hands. But if you want, there will be such craftsmen.
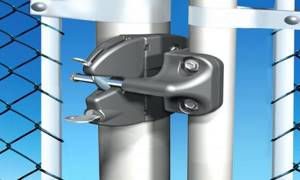
The most convenient both to operate and to manufacture are horizontal valves . To install one, first of all you need to weld additional square or rectangular sheets in the place of the door where it will be attached, so that the gate is thicker in that place. This will increase the reliability of the design. Next, two arcs with a diameter slightly larger than the metal rod, which is the main part of the valve, are welded onto them. Try not to make a mistake with the size: if the arches are too narrow, you will have to make additional efforts to push the rod in. Then another arc is welded onto the support, which will act as a shut-off. A handle is installed on the rod itself, with which the valve opens or closes.
horizontal valve
In addition to the gate valves, you can install a deadbolt lock, a latch with a spring and a screw lock . But these structures are much more difficult to install and it is better to entrust their manufacture to a professional. Thus, you will avoid not only the unaesthetic nature of the design as such, but also the possibility of hacking will be much less than if you manufactured and installed them yourself. Therefore, do not spare money and contact a specialist.
deadbolt lock Latch with spring Screw lock
Author of the publication
offline 1 year