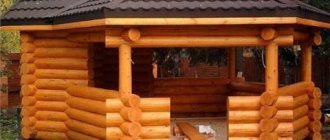
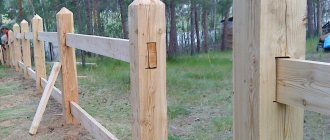
A fence made of rounded logs has an attractive appearance, long service life and ease of installation.
The advantage of the material is its smooth, rounded shape, thanks to which builders are able to achieve a tight and reliable connection. This avoids the formation of cracks and gaps.
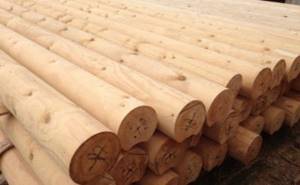
When constructing wooden fences of this type, rounded logs with a diameter of 210-230 mm are suitable, and for log fences - 150 mm.
We build a fence from rounded logs with our own hands
A fence made of rounded logs has an attractive appearance, long service life and ease of installation.
The advantage of the material is its smooth, rounded shape, thanks to which builders are able to achieve a tight and reliable connection. This avoids the formation of cracks and gaps.
When constructing wooden fences of this type, rounded logs with a diameter of 210-230 mm are suitable, and for log fences - 150 mm.
Here are photos of fences made of rounded logs in both regular and combined form.
Material used
To build a structure with your own hands, rounded wooden logs, approximately equal in diameter, are used.
If you do not plan to make a massive fence, a diameter of 10-15 cm is suitable for blanks.
The height of the external fence is usually made at the average height of a person, so the length of the logs should be at least 2 meters , and for the internal fence (to delimit zones on the site) - up to half a meter.
The stability of the logs is ensured by their deepening, and sometimes a transverse beam is used for this, which is fixed on the supporting pillars.
It is important to determine how tall the structure will be. If you decide to build a fence in the classic way, with deepening posts, then keep in mind that approximately 1/3 of the height of the log will be “eaten” underground.
When choosing trunks, keep in mind that their surface should be without recesses and protrusions in the cross section.
Fences made from rounded logs are characterized by the presence of sharp tops with an angle of about 34-40 degrees (the trunk looks like a pencil). Sharpening is done using an axe.
Log protection
The material requires additional processing before installation. As already mentioned, with the classic installation method, a third of the column is buried in the ground.
To prevent wood from rotting, it is necessary to perform certain actions.
Now there are simpler and more modern methods - for example, parts of rounded logs that will be immersed in the ground are treated with hot bitumen.
Installation process
The construction scheme for such a fence is generally simple. The main thing is to follow a number of mandatory rules:
- The lower ends of the trunks are sharpened and stuck into the ground. A little water is poured into the holes so that the log sits firmly in the ground and is fixed. Screw it in carefully, using a sledgehammer or hammer, but not enough to damage the material. Sometimes plastic caps are placed on the hammers to prevent chips and cracks from impacts.
- When building the structure, take care of the trench, the depth of which should be 0.5 m. To ensure stability of the fence, the bottom of the trench is reinforced with a “cushion” of sand or crushed stone, the layer of which is approximately 20-30 cm.
- The logs are placed very close and tightly to each other, without gaps. The trench is covered with a layer of earth and compacted, watered with water to achieve maximum soil density.
- For additional strength, horizontal beams made of timber can be used, placed parallel. The top one is installed 20 below the top edge of the fence, the bottom one – at a height of 20 cm from the ground.
- The final stage of installation is to give the structure its optimal appearance. For this, clear varnish, stain and primer are used.
Such fences are considered very budget-friendly options for wooden fencing, especially when it comes to suburban construction.
The fence is valued for its environmental properties and ease of construction. At the same time, the result of the work often turns out to be worthy and outwardly attractive.
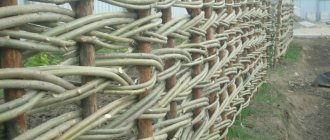
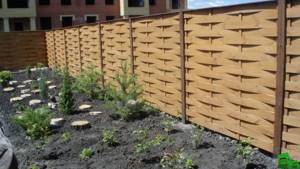
Weaving a fence with boards
Surprisingly, it’s not difficult to weave a fence step by step using boards. It is more interesting than the usual picket type, although it is much more difficult to work with. However, it is this type that has become the most popular among owners of cottage plots. The wooden wicker frame has its own subtleties of manufacturing technology:
- The support beams are installed in the same way, the distance between them is about 2 m. The ends that will be dug into the ground are impregnated with a special mastic and must be concreted, maintaining a strictly vertical position, an angle of 90 degrees.
- All lumber must be made the same size.
- The pillars are installed in two types: wider, thinner - additional stiffening ribs.
- Similar to wicker, weaving begins from the bottom, retreating about 10 cm. The board is passed between the beams horizontally, pressing downwards. Each board is screwed with self-tapping screws to the supporting posts. The second board is placed on top of the first, only in the reverse order of bending, forming a checkerboard weave. It is fixed in the same way with self-tapping screws.
- The structure is made using canvases, so it is important that the boards of the canvases coincide horizontally, otherwise the appearance will be ugly.
- The final stage is treatment with stain, paint for exterior use, in other words, a material that will help the wood last much longer.
If you just want to fence your house, put up a regular fence: wooden, corrugated sheet, brick. However, braids are a work of art that is made by hand. The work is done from boards by ordinary weaving, the vines are connected with checkerboard, diagonal checkerboard, straight weave. The speed of production sometimes plays a negative role; hastily made fences cost about 2 years, fundamental buildings without renovation cost up to 10 years.
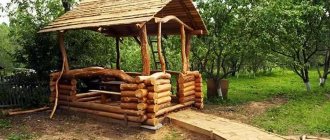
Fence palisade made of logs
It has long been the custom that any home was fenced off by our ancestors with fences to protect it from ill-wishers. And the higher and stronger this palisade was, the greater the confidence of keeping personal property intact.
This is what a classic log fence looks like
- Comfort and maximum protection,
- Simplicity and speed of installation,
- Relatively inexpensive cost.
One of the options for creating such fences is a palisade. The word palisade itself consists of two derivatives “often” and “stake”, which indicates the frequent arrangement of stakes in the fence. This type of fence involves installing them with pointed ends deep into the ground. Such a fence will not only be a magnificent decoration for any country house, but also an excellent protection against thieves.
Variant of a palisade made of hewn logs
Palisade fence: advantages and disadvantages, as well as features
Just like any other type of fence, a palisade has certain advantages and disadvantages, knowing which you can navigate when constructing such a structure.
Advantages
The advantages of using palisades include the following indicators:
- Environmental friendliness. The fence is made of absolutely natural material - wood,
- High strength logs,
- Originality and uniqueness of the exterior,
- Excellent home protection against entry into private territory by thieves,
- Resistance to negative factors during operation: wear resistance and moisture resistance.
A picket fence is a good solution for fencing a dacha, a personal plot, as well as a country house where you plan to relax away from prying eyes. In addition, such a fence will indicate that its owners are serious people who want to live in peace and quiet.
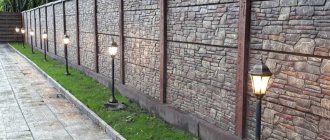
An example of a combined fence made of logs and natural stone
Flaws
Among the disadvantages, the following characteristics should be identified:
- Constant care of the fence: since the material is natural, it is subject to all natural processes, including rotting,
- Carrying out repair work.
One of the features of picket fences, especially tall ones, is the creation of additional shade. This can be used for rational purposes or cause some inconvenience. Also, a wooden fence serves as an excellent place for entwining it with ornamental plants, which creates an additional design effect.
Features of the palisade: dimensions, parameters, wood
As for the height, the palisade can be of any size: from fencing flower beds with your own hands to fencing private houses. In addition to height, the dominant indicator when choosing a fence is its shape, which can be round, rectangular (classic), or jagged.
Scheme of a log fence with dimensions
High-quality dried raw materials, in accordance with all building codes, reduce the risk of rotting and fungal infections, making the structure durable. The cost of logs on the building materials market is reasonable, which allows you to build a palisade without much expense.
It is worth noting that the price also depends on the quality of the timber, its dimensions and quantity.
To secure the palisade and connect the logs together, galvanized nails that are resistant to corrosion are used. It is not recommended to save on this very expensive material, since rust can harm wood, rendering it unusable.
Types of palisades
There are several types of making palisades. The simplest one is to build a fence by installing sharpened stakes in the ground. Our ancestors used this method of fencing, making the stakes very sharp and high, thus protecting their homes from attacks by ill-wishers.
Today you can find small picket fences enclosing a garden or flowerbed, whose function is not to protect, but rather to give a beautiful appearance to the area. Flowerbeds surrounded by a palisade look much more attractive, and the garden will become the real pride of its owners. Small and low palisades, the diameter of which is about two to three centimeters, are also attractive.
Advantages and disadvantages
The log palisade was widely used by our ancestors to protect against uninvited visitors in ancient times.
Today the construction industry offers a wide range of materials for a wide variety of options. And not so many people choose fencing made of natural material. Therefore, in our time it will look fresh and exclusive.
Compliance with construction technology will give high strength and allow it to serve for decades.
The design does not require special knowledge or the use of specialized equipment, so you can build it yourself.
Construction does not take much time.
Disadvantages include susceptibility to rotting and damage by insects and microorganisms, so special treatment is required.
Rounded trunks
How to build a log fence?
Owning your own suburban area, you have probably thought about building a fence. This is not a completely useless structure. A fence will protect your property from the encroachment of uninvited guests, both people and animals, and will hide everything that happens on your territory from prying eyes; in addition, a good fence will fit perfectly into the ensemble of your country property.
However, the cost of such a fence, which could protect and hide and at the same time be nice to look at, is quite high. Here it is important to understand that we are talking about the construction, not of any decorative fence, but of a full-fledged log fence, no less than a hundred meters high. How can you carry out all the necessary installation work yourself, without involving specially trained people who will rip off your last penny for their work? In fact, it is not difficult to build such a fence yourself; moreover, you can do it alone. Let's see what needs to be done for this.
Choosing the appearance of the fence
First, you need to decide what your fence will look like. For example, you can choose a design where each log fits tightly to the adjacent one, and so on throughout the entire perimeter. This option will be more expensive, since you will have to shell out for the logs themselves. The second option, the logs are installed at a distance of approximately one or one and a half meters from each other and are solidly fastened with boards. This option is a little cheaper, but you will need fewer logs, and their cost is significantly higher than the cost of ordinary boards.
When choosing logs, remember that the best material for a fence is pine. It reliably retains its qualities and structural strength for a long time. However, be aware that the log must be without bark (otherwise bugs will eat it) and dried for at least two to three months in a room without moisture.
The next step, after preparing the material, is the pits. In order to install logs in the ground, you need to dig holes for the logs. If you build a fence in which the boards will fasten the posts, then you will need significantly fewer holes, and if you have a whole log fence, feel free to dig a trench around the entire perimeter. The depth should be at least one fifth of the height of the post. That is, if you want to build a two-meter fence, then the hole should be at least half a meter, and the length of the post should be two and a half.
So, having dug holes for installing poles, you need to install poles in them, but first you need to protect the tree from exposure to dampness, bugs, mold and other unpleasant factors. To do this, the tree must be processed. The simplest and most affordable remedy is used machine oil. To treat the pillars, you just need to coat the wood with oil twice. After which, let it sit for a couple of hours. It is more difficult to protect that part of the tree that will be in the ground. It is best to concrete it after installing the log in the hole.
In this case, the support of the structure will be more reliable, and in addition, the tree will be reliably protected from rotting. If you do not have the opportunity to use concrete, then part of the log, immersed in the ground, can be wrapped in sawn-off roofing felt (this material also prevents rotting). Next, to secure the log in the ground without using cement, pour stones of different sizes into the hole and tamp them down. Then, having installed the pillars and strengthened the structure, fill the holes or trenches (depending on the structure) with sand or earth.
If you want to approach this issue more carefully, then we have prepared a small recipe for impregnating pillars in a separate article (read here).
The next step in building a fence
Next, you need to fasten the resulting structure for additional strength and stability. To do this, on the inside of the fence, crosswise, fasten every fifty to seventy centimeters of the structure with strong slats to form an “X” at the base. In addition, you can make supports. To do this, you need to support the inside of the fence with small logs or strong slats (from the ground to the middle of the height of the fence), at an angle of about thirty degrees.
Material selection
Three types can be used for the design:
- rounded;
- planed;
- scraped.
The first type, also called calibrated, is obtained after processing on a special machine. They have the same diameter along their entire length. When rounding, the top layer is completely removed and only the core part remains. The production process involves treatment with special compounds to protect against mold and rot.
Rounding makes construction easier and faster.
Planed wood is obtained by processing with an electric planer. In this case, the top layer is not completely removed. The remaining sapwood protects against moisture and insects. It is frost-resistant and durable.
The scraped material is obtained after manual processing with a special tool (scraper) by hand. The sapwood remains virtually untouched. The surface comes out smooth and retains its unique texture. The disadvantage is the high labor intensity of manual work.
Installation of a colorful fence made of logs with your own hands
Compared to various types of fences, a fence made of solid logs is quite rare. Such structures are distinguished by a special color and immediately stand out against the background of neighboring fences made of familiar materials. This makes them attractive in the eyes of developers who prefer self-expression and exclusivity in everything. Like other types of fences, a log fence can be built with your own hands if desired.
An original fence made of horizontal logs (ranch type)
Pros and cons of log fences
To decide to build such a fence, you need to understand its positive and negative sides. The advantages of log buildings are obvious:
- remarkable and distinctive appearance,
- A properly installed log fence is durable and reliable,
- due to the large thickness and massiveness of the wooden elements, the fence has a long service life,
- for the same reason, the structure can easily withstand any wind loads.
On the other hand, the massiveness of the logs is a significant disadvantage, since the weight of the finished structure is quite significant. Specifically, the disadvantages of structures made from rounded logs look like this:
- A heavy structure requires a more reliable base and support.
- DIY construction is a labor-intensive process that is best done with an assistant.
- An exclusive fence made of round timber is a material-intensive structure, and therefore not cheap.
- Like any wooden product, trunks need processing and constant care.
There is a way to get away from all the difficulties associated with the massiveness of the structure. Increasingly, instead of natural timber in the construction of fences, an imitation of a log wall is used - spans of siding made of metal or the same wood.
Types of wooden fences made of round timber
To fence off your dacha or estate plot, you can use one of the following types of log buildings:
- A traditional palisade is an ancient structure, built with your own hands from vertical trunks going into the ground.
Fence palisade made of large logs
- A palisade made of round timber of small diameter, built in the usual way - with fastening to the crossbars.
Solid fence palisade made of small diameter logs
- Structures with horizontal arrangement of logs. They are made solid or with gaps of certain sizes.
Fence made of horizontal logs with gaps
- A fence made of siding imitating horizontally laid and processed tree trunks.
Fence made of siding imitating logs
Since the traditional palisade rests mostly on the ground, the support pillars serve only to maintain it in an upright position and reflect lateral loads from gusts of wind. Here it is important to properly strengthen the posts and vertical logs in the ground.
The design of the following options for log fences assumes that the supporting elements (pillars and foundations) will carry the entire mass of the spans. Therefore, they will have to be made as reliable as possible, for which we use brick, steel or solid wooden pillars on a concrete foundation.
An exception is a siding fence, which is light in weight and built using generally accepted technology - on metal or brick pillars mounted on horizontal lintels.
About the choice of materials
As a rule, such fences are built from coniferous trees, which are the most affordable:
A traditional fence made of rounded logs must be built from trunks pointed at 45° without bark of approximately the same diameter, lying in the range of 100-150 mm. It is not advisable to use larger round timber due to the increase in weight and price of the structure, and small logs will quickly rot in the ground. The length of the elements is taken with a margin of 40-50 cm, taking into account immersion in the ground.
For fences, where the load from vertically installed trunks falls entirely on the crossbars, it is better to take logs with a diameter of up to 100 mm in order to reduce the total weight of the spans. Half-logs or blocks without bark of the same size are used as crossbars. All wood is subject to mandatory antiseptic treatment before construction.
An imitation of a log structure can be siding elements made of painted thin metal or wood (block house). It is mounted on lintels made of 60x40 mm timber, mounted on supports made of any material - wood, metal or stone.
Installation of support structures
Construction begins with marking the fence line and installation locations for support posts. The span length is taken as standard - from 2 to 2.5 m. If you plan to construct a fence from horizontally laid logs, then the span size is adjusted to their length.
Depending on the type of log fencing you choose, you will need to install the posts yourself using the following technology:
- To build a palisade, you need to dig a trench with your own hands 5 cm deep, and in places where the posts are installed - up to 1 m. The bottom is covered with crushed stone and compacted, the supports are concreted. For reliability, instead of wood in the hole, it is better to concrete sleeves of steel pipes, into which wooden posts are then inserted.
- The palisade is also supported on the base of a strip foundation, poured into a trench using reinforcement and formwork.
- For horizontal layout of logs, you can build brick pillars with side grooves or concrete 2 wooden trunks in each place. The width of the groove and the distance between the elements of the double support are equal to the diameter of the logs.
- For other types of fences, including those made from siding, the posts are installed using conventional technology by backfilling or pouring concrete.
The racks must be mounted strictly vertically, and for the concrete mixture to completely harden, it must be left for at least 28 days.
Installation of fencing elements
Before erecting the palisade, the ends of all logs should be treated with bitumen mastic or coated with resin to the length of immersion in the ground (about 40 cm). Then horizontal jumpers are nailed to the posts, the lower one at a height of 20 cm from the ground level, the upper one at a distance of 30 cm from the top of the fence. The trunks installed in the trench must be nailed to the crossbars with 3 nails at each point - two at the top, one at the bottom.
To prevent the future fence from being warped by moisture, when installing it yourself, it is necessary to provide small gaps between the logs - 1-2 mm. In horizontal structures, round timber is simply placed in the grooves of a brick pillar or between two supports. The last operation is to apply a protective coating of special paint or varnish. The coating must be renewed at least once every 3 years.
Installation of fencing elements
Before erecting the palisade, the ends of all logs should be treated with bitumen mastic or coated with resin to the length of immersion in the ground (about 40 cm). Then horizontal jumpers are nailed to the posts, the lower one at a height of 20 cm from the ground level, the upper one at a distance of 30 cm from the top of the fence. The trunks installed in the trench must be nailed to the crossbars with 3 nails at each point - two at the top, one at the bottom. To prevent the future fence from being warped by moisture, when installing it yourself, it is necessary to provide small gaps between the logs - 1-2 mm. In horizontal structures, round timber is simply placed in the grooves of a brick pillar or between two supports. The last operation is to apply a protective coating of special paint or varnish. The coating must be renewed at least once every 3 years.