What is a stockade
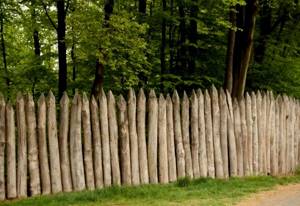
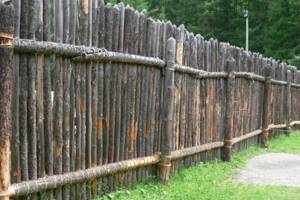
This is the name of the fence, which is radically different from existing wooden analogues. It is built from rounded logs sharpened on one side. If you are wondering what “picket fence” means, you should turn to word formation. This word is associated with a series of logs, often driven into the ground. They form a functional enclosing structure that can protect the object from prying eyes, snow drifts and wind.
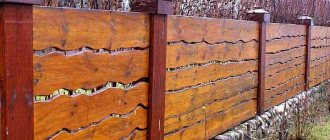
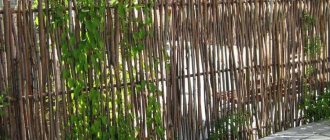
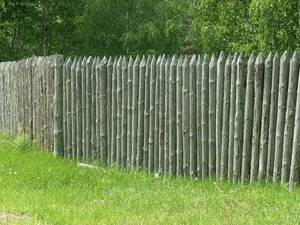
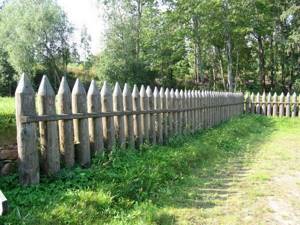
The palisade is characterized by different heights. This type of fencing looks unusual not only due to the use of pointed logs. If you look at the structure from the outside, you cannot see the pillars. The supporting elements often look like the rest of the beams in the fence row, only they are more deeply buried in the ground. This type of fence can be used in summer cottages for the purpose of fencing country cottages. The design will emphasize the rustic style of the property.
A full-size picket fence is installed around the perimeter of the site. You can also make a small-sized structure that will help zone the territory. The height of the fence is small: from 10 to 50 cm.
Processing of stakes
One end of the board is sharpened with an ax at an angle of 40°. We do this with all the material. You will get a lot of large pencils, as shown in the photo. Before installing the fence, be sure to treat all products with a special compound so that they do not rot. The fact is that you will install the stakes end to end, so after installation it will simply be impossible to process the product completely.
The third part of the product that will go into the ground and about 20 centimeters that remains on the ground must be treated with bitumen or creosote.
Then start digging the ditch for the fence. Its depth will be equal to the third part of the board. We fill the bottom of the trench with fine crushed stone approximately 15 cm, as shown in the photo.
Advantages and disadvantages
A palisade fence is the most original solution, which is important when choosing a fence for an object. Positive qualities of this design:
- a blind type fence creates shade in the summer, and in cold weather protects from wind and snow drifts;
- due to the absence of gaps between the logs, what is happening in the fenced area remains hidden from prying eyes;
- when erecting a palisade, there is no need to build a foundation;
- note the high mechanical strength of the structure;
- the fence is not painted;
- natural materials are used in the construction of the fence;
- simple installation;
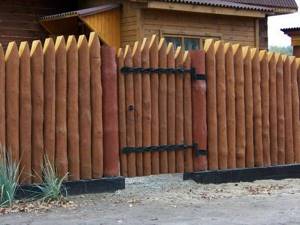
- it becomes possible to combine materials, for example, logs and corrugated sheets, boards are used simultaneously, and you can also grow climbing plants along the surface of the palisade.
The fence also has disadvantages. First of all, note the limited scope. For example, a structure of this type is not installed for the purpose of fencing administrative, public, commercial, industrial and commercial facilities. Most often, such fences can be found outside the city or in the private sector. In addition, a stockade is a structure exposed to fire. Its service life is relatively short. This is due to the impact of moisture on the logs.
Making and installing a picket fence with your own hands
Many owners of suburban and summer cottages are interested in the question - how to make a fence from a palisade with your own hands?
Considering that many centuries ago people made this fence on their own and without the use of machinery, it may seem that anyone can make a palisade fence. In fact, this process is quite troublesome.
First of all, you will have to find the required number of logs of the same size. Then they will need to be thoroughly sanded and processed, because... otherwise, the fence will quickly deform.
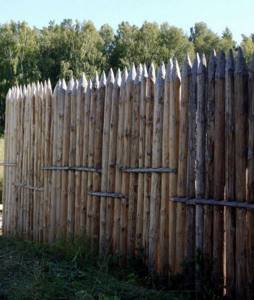
But the main difficulty lies in the installation of logs. Our ancestors installed logs in the ground to a depth of 50-60 centimeters, having previously sharpened their ends. This method is still used today, but for greater reliability, a trench is installed under the fence, and crossbars made of thick timber are laid horizontally, which act as a support for the fence.
In addition, in the modern version, the palisade fence can be mounted on a concrete foundation or specially prepared metal pipes, into which logs are lowered.
DIY stockade photo
How to make a picket fence
Low picket fence
A picket fence is a beautiful and original fence that, with proper care, will serve you for many years. However, the quality of this fence depends on the quality of the material and the technical correctness of the installation, so there is no need to save on these expense items.
Source
Material and tool
If you plan to build a palisade fence with your own hands, you need to select logs. To ensure long-term use of the fence, only certain types of material should be used. A structure made from the following types of wood will last longer:
- conifers: pine, spruce, cedar;
- oak;
- alder;
- aspen;
- hazel.
Logs that are identical in appearance are selected. Their diameter can vary greatly: from 70 to 150 mm. If the fence will be used only as a decorative structure, it is permissible to take small logs. When it is important to provide additional protection to an object, wood with the largest cross-section is used.
Dead wood is used for construction. The material can be purchased on the market or prepared independently. The height of the logs is determined taking into account the dimensions of the fence. A fence of 2-2.5 m is installed along the perimeter of the site. In addition, the need to bury the tree in the ground is also taken into account. To determine how deep the fence should be installed, you should choose the method of fixing the material:
- on separate posts and fixed crossbars, then the logs are located above the soil level;
- The products are buried in the ground to a distance sufficient for strong fastening.
In addition to wood, logs and supports may be needed, but these structural elements are prepared if the first of the fence installation methods discussed above was chosen. The following tools are used in the work:
- shovel;
- garden auger;
- building level;
- plumb line;
- axe;
- hammer;
- equipment for wood processing (needed if the material will be prepared by hand).
Step-by-step fence installation
First way
The simplest tool that any site owner has is used. For supports, you can choose metal pipes or logs of greater thickness than the entire material for the fence. We sharpen the prepared fence elements in the form of a sharpened pencil; the cone should be flat.
- Marking the fence. For structural strength, it is advisable to maintain the distance between load-bearing (power) supports at 2.5 m.
- Having laid out the area for the fence, it is necessary to drill (dig) holes for supports. The burial depth must be at least 50 cm, otherwise the fence will not have rigidity. Over time, the soil will settle and the fence will tilt. It is best to carry out concreting of columns or compaction with a high density of soil.
- Metal supports that will be in the ground or mortar must be treated with a primer, wood with a special antifungal compound or wrapped with roofing felt.
- After the soil has settled or the pipes have been cemented, it is worth starting to arrange the horizontal crossbars on which the fence elements (stakes) will be attached. The lower bar must be located at least 20 cm from the ground (foundation), the top - at least 30 cm from the pointed top of the palisade. Such markings will provide strength, as well as an evenly distributed load on the crossbars and supports.
- To maintain the height level, it is worth tensioning the cord, which is attached to the top of the pillars (between the spans).
- The fastening process is very simple. The prepared stakes are attached to both crossbars. In this case, it is necessary to leave a gap between the material, because in a damp camping the tree can absorb moisture and increase in size.
- Each log is secured separately with several nails (two at the top and one in the bottom crossbar).
- The construction of wickets and gates occurs in the same way, only the crossbars have different sizes and special elements for opening.
The second (old-fashioned) method of construction
It is better to build from cylindrical logs , then the fence will have a more attractive appearance. It is worth considering that the height and length of the log are completely different sizes. Indeed, for the stability of the fence, they will need to be buried in the soil approximately 1/3 of the total height of the material. The assembly steps here are very simple:
- To calculate the amount of material required, divide the estimated length of the fence by the width of one log, so we can determine their number.
- We choose material with a diameter of 15 cm.
- We sharpen the bottom of the log, stick it into the ground and twist it. Pour water into the resulting hole and screw in the log. For greater strength, hammer the stake with a massive hammer.
- The logs are held together with metal wire by creating a loop around each stake.
This installation option is suitable for summer cottages with seasonal residence. This fence is designed for 5-6 years of service. To increase service life, you can perform the following actions:
- After marking the fence, we dig a trench of the required depth along the perimeter.
- We sprinkle it with crushed stone, the thickness of the layer depends on the type of soil (for sandy soil - 15 cm, loamy soil - at least 30 cm). We install stakes on the surface without gaps and fasten them either to the crossbars (as in the first method) or by tying adjacent logs.
- After complete installation of the fence, you can refine it at your discretion.
In the following video you can see an example of such a fence:
Wood processing
Log fences are erected only using bark-free and processed material. To make the fence resemble a picket fence, on one side the shape of the product is changed. You need to get a point; for this, the wood is cut at an angle of 30-40°. It is important to protect the palisade from moisture and insects. Therefore, the lower part of the logs and the small protruding part should be treated with hot bitumen.
Previously, natural material was processed using a more primitive method - the wood was charred on the side that would sink into the soil. A layer of ash on the surface of the wood protects the material well from negative external factors. If you skip this stage, the material will quickly lose its properties and attractiveness. In the worst case scenario, the fence will fall apart in a few years. Treatment using the methods described above will extend the service life of the fence by 10-15 years.
Design Features
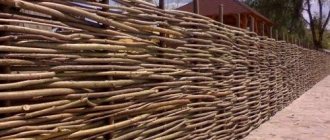
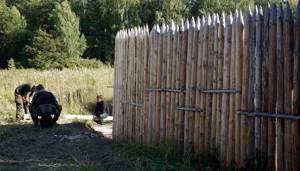
The palisade is a solid wall made of solid wood of the same diameter (slabs, unedged boards, logs). The fence elements are mounted vertically, close to each other. The upper part of the rounded logs is sharpened.
Previously, to increase the protective properties of the fence, the fence was erected from logs of the largest diameter. Now there is no need to use such raw materials, so logs with a thickness of 10-15 cm will be sufficient.
Note: the height of the fence is determined by its purpose. For protective purposes, a two-meter structure is built; for decoration, a fence 0.5 m high will be sufficient.
Among the advantages of a stockade:
- environmental friendliness, natural origin;
- affordable price;
- strength, high protective qualities;
- ease of construction;
- colorful appearance.
Please note: many people are concerned about the fact that wood is a perishable material that is destroyed under the influence of moisture, insects, and fire. But proper preparation of raw materials and preventive measures will eliminate these shortcomings and extend the service life of the wooden fence.
How to make a stockade
There are several technologies for constructing a fence of this type. You can consider the traditional option. In this case, the palisade fence is erected without additional tools and materials. Only timber is used. However, this is a long and labor-intensive process, so it has been gradually improved. Today, when arranging a palisade, a trench is first prepared. To increase the efficiency of fluid removal from the structure, drainage is used.
There is a more reliable method - on a columnar foundation. In this case, wooden/concrete/metal pillars are buried in the soil. Crossbars are attached to them, then the logs are installed. When choosing a modern method of building a palisade, they combine materials. However, the fence sheet always remains solid, without gaps, and consists of processed logs.
Traditional
This is an ancient technology for fencing construction. In this case, there is no need to prepare a foundation or even dig holes to install pillars. Log fences are built sequentially. The work is carried out with each individual wooden product in turn. The main feature of this technology is the need to grind both sides of the logs.
The product is inserted into the soil with the tip down, then pulled out. A depression is formed, which is filled with water. The log is again placed at the same point, screwing it in. These steps are repeated until the product is buried to the required depth. The work is labor-intensive, which means that one log during the construction of a palisade will take a lot of time. If you take into account that the material is placed without gaps, the installation will take a long time.
You can speed up the construction of the palisade a little. A heavy hammer is used for this. However, if you have no experience, it is better to refrain from such actions, as the product may become deformed. The hammer should be covered with a protective cap made of material that is resistant to mechanical stress (rubber, polymers).
Modern
A picket fence can be built faster. To do this, it is recommended to prepare a trench. Its width and depth are determined based on the dimensions of the material (depth of wood and diameter of products). In most cases, when building fences and palisades, the supporting elements are inserted into the soil to a level corresponding to 1/3 of the length of the product.
A crushed stone cushion is installed at the bottom. This is necessary to enhance the outflow of moisture from the area where the palisade is located. Then wooden products are installed in the trench; it is recommended to fix each post with spacers. Thanks to this, it will be possible to complete the installation faster by installing several logs at once. They should be located close to each other. Then the fence will look like a picket fence.
The position of each log is checked with a building level and plumb line. It is important to deepen them so that the result is an even, continuous line, and the structure is the same height along the entire length of the palisade. At the next stage, soil is backfilled into the trench. This must be done correctly: the earth is compacted and periodically watered, which will allow the soil to be more compacted. The structure is strengthened by means of logs: wooden crossbars are fastened across the fence, they are placed at a distance of 20 cm from the top and bottom edges.
Today, another option for installing a palisade is common. In this case, the pillars are installed first. They can be made of wood or metal. The last option is strengthened with a columnar foundation. The supports are installed at a distance of 2.5-3 m. Then the logs are attached in any convenient way (welding, nails, screws). Logs or edged boards with a rounding on one side are placed closely on them. This method allows you to create a durable decorative fence that will last a long time due to its reliable fixation in the soil using concrete.
Measures to prevent stakes from rotting
Thus, one third of each palisade log will be in the ground, and this is fraught with rotting of the wood. If no protective measures are taken, then within 2-3 years the lower part of the palisade will completely rot and it will collapse - not a very pleasant prospect, is it? To prevent this, our ancestors charred the bottom of the stakes over low heat until a charred crust 10-15 mm thick was obtained. This procedure should be carried out not only to the digging depth, but also 20-25 cm higher.
You can do it another way: lubricate the lower part of the stakes with bitumen - this will also allow you not to think about the condition of the wood.