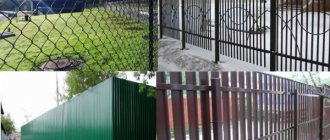
How areas can or cannot be demarcated is regulated by GOSTs. Regulations require that neighboring areas be demarcated with transparent fences. The boundary is usually long, it is desirable that the fence be inexpensive, the choice is small - a chain-link fence or a wattle fence. Wattle is cheap, but short-lived, leaving only a mesh fence. A chain-link fence is correctly called, but it is more common to incline the name.
Popular, inexpensive - chain-link fence
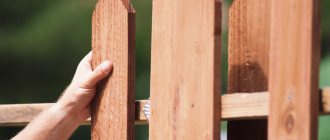
Whatever this fence is called, it has a significant number of positive aspects. The first and most important advantage is low cost. This applies to both the filling itself—the mesh—and the rest of the structure. To tension the mesh, no foundation is required. It is enough to drill holes about a meter, insert a post and, filling it with crushed stone, compact it well. That's it, no concrete work. On most soils, this method of installation for this filling works “five”.
How to make a chain-link fence with your own hands
The fact is that a chain-link fence is lightweight. Moreover, it is light both in terms of its own weight and in terms of perceived wind loads. No matter how strong the winds blow, the pressure transmitted by the mesh to the poles remains insignificant. Due to their low weight, this technology for installing pillars can be used: in a hole, backfilled with sand or crushed stone, without concrete. Moreover, such a fence can stand without problems even on heaving clay soils with a high level of groundwater, and even with a large freezing depth.
Without guides
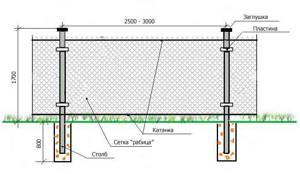
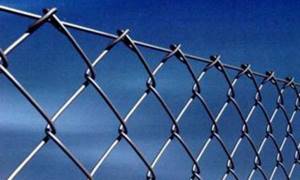
Here's how it works. We are talking about the simplest design: just pillars with a mesh stretched between them. As you can see, the pillars are buried to a depth of less than a meter. What happens to such a fence on soils that drain water normally? All water located near the column goes down through the sand or crushed stone to the bottom of the hole. There it leaves naturally - it seeps into the underlying layers. Even if frost hits and the sand or crushed stone around the post freezes, the moisture contained is not enough to have any significant impact on the post.
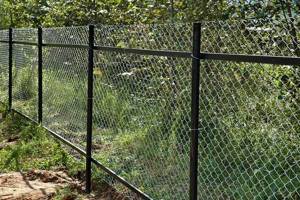
The simplest design of a chain-link fence
On clays and loams you can use the same principle, but you must fill it with gravel. And be sure to pour 10-15 centimeters of gravel at the bottom of the hole, and only then install the post. What happens in this case? Water still accumulates below, but it leaves very slowly. It may well happen that by the time it freezes, the crushed stone will still be wet, or even in water.
What will happen then? It will freeze and become hard. But since the soil also freezes, it puts pressure on the crushed stone. The forces are considerable, and the ice breaks, the crushed stone becomes mobile and compensates for most of the pressure created by the soil. As a result, if any movement of the pillars occurs, it is very small - from a few millimeters to several centimeters. Since the structure is not rigid, the mesh will easily transfer it without any harm. After everything thaws, the pillars will lower into place. But this scenario only happens if they are positioned perfectly vertically. Otherwise, the pillars may tilt and everything will have to be corrected.
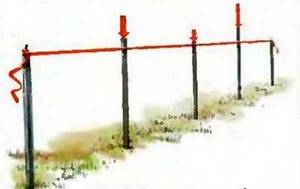
With guides (slugs)
Sometimes, to make the fence more solid and hold its shape better, two longitudinal guides are attached to the posts. They may be made of pipes, or they may be made of timber. Wood, as a plastic material, will withstand ground movements remarkably well, but a welded pipe will create additional difficulties.
Chain-link fence with metal guides
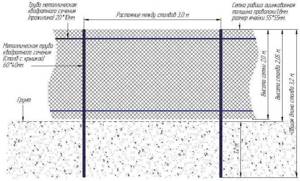
The degree of rigidity of such a fence is higher, and during heaving, if the posts are squeezed out, it is quite possible that in some places the pipes may be torn off. To prevent such a situation, you will have to dig below the freezing depth in your region. Everything else remains the same: the hole is 15-20 cm deeper than required, there is crushed stone at the bottom, then a pipe is inserted and filled with well-compacted crushed stone.
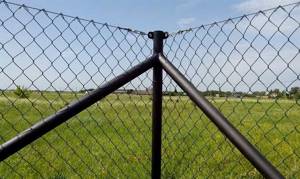
Sectional
There is another design of a chain-link fence. Frames are made from the corner, onto which the mesh is then stretched. The finished sections are welded to the exposed posts.
Sectional chain-link fence
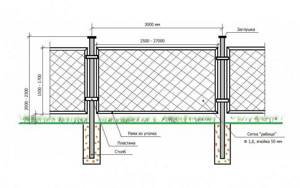
As is clear from the description, the design is also quite rigid. This means that on heaving soils (clay, loams) it is necessary to bury the pillars 20-30 cm below the freezing depth of the soil, but it is also advisable to do this without concreting. If you fill crushed stone with concrete, the likelihood that the pillar will “squeeze out” increases many times over.
Materials required to install a chain link fence.
Even if you are one of the people who rarely do anything with their own hands, installing a chain-link fence will not cause you any particular difficulties. The most important thing is to accurately calculate everything and purchase the required amount of the mesh itself, as well as additional materials.
Installing a chain-link fence can take no more than two days if you prepare in advance all the materials and tools necessary for the work:
- Rabitz;
- tension wire, the function of which is to support the mesh, provide additional attachment points and eliminate the possibility of sagging. It is possible to use galvanized wire, thickness from 2 mm. and more. An alternative option that protects the fence from mesh theft is the use of reinforcement or thin pipe;
- support pillars (made of metal, concrete or wood);
- thin wire for fastening the mesh or other fasteners;
- sand and cement necessary for concreting support pillars;
- For processing wood or metal, special protective compounds will be required.
- necessary tools: rope for marking the area, tape measure, drill or shovel.
Using metal posts as the base for attaching a chain link fence is the most popular. This is not surprising: it is difficult to find a more durable and reliable option. The best option is to use round or square profile pillars with a cross section of 6–12 centimeters. Some people use unnecessary water pipes for these needs, which can significantly reduce the costs required to install the fence.
| Chain-link fence on metal supports |
Concrete pillars are not inferior in properties to metal pillars: due to their strength, they can stand for centuries. Their significant disadvantage is their high cost. And attaching the chain-link mesh to them is quite difficult: you need to use special clamps, braiding the concrete structure with a steel cable. All this significantly complicates the installation process.
|
| Chain-link fence on concrete supports |
Another support option is wood poles. However, it is most often used as a temporary option. Experts strongly recommend that when installing such poles, you must remove the bark, and the part of the tree that is to be buried in the ground must be thoroughly coated with mastic with high waterproofing properties.
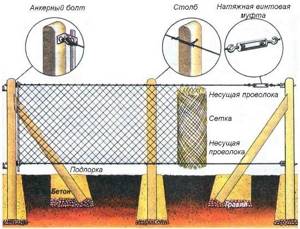
| Chain-link fence on wooden supports Installation of a chain-link fence: 1 - Insert bolts; 2 - Attach the wire with paper clips; 3 - Pull the wire; 4 - Fasten the wire with paper clips; 5 - Attach the mesh to the posts with paper clips; 6 - Attach the mesh to the guy wires; 7 - Attach the mesh to the post with paper clips. |
Types of chain-link mesh for fences
Even such a seemingly simple material as chain-link mesh can be different. Moreover, the difference is significant both in price and in service life.
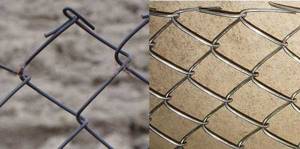
- Non-galvanized. The cheapest material, but also the most short-lived, requiring significant costs to maintain a normal appearance. Immediately after installation, the mesh must be painted, otherwise it will rust. Painting has to be renewed annually or every two years.
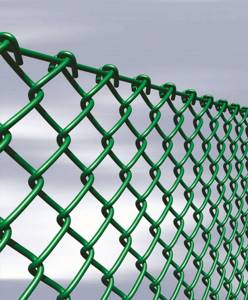
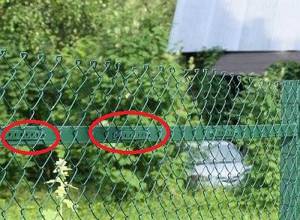
- Galvanized. Significantly more expensive in price, but does not require painting and lasts a long time. Plasticized mesh netting - metal in a plastic “wrapper”
- Plasticized. A layer of polymer (plastic) is applied to the metal wire. This type of chain-link appeared not so long ago. It costs even more, but the appearance is the most attractive, and the service life is even longer. When choosing, pay attention to the thickness and stiffness of the wire that is under the coating. A normal one bends under your fingers with great difficulty. If it bends easily, then it will be difficult for you to tension it properly.
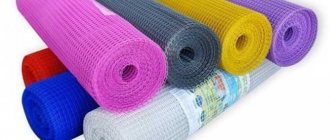
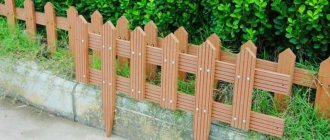
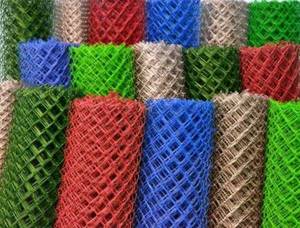
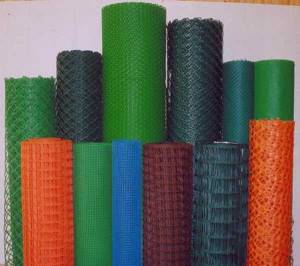
- Polymer or plastic. It is made of polymer and has additives that increase its resistance to ultraviolet radiation. It is painted in different colors and has different cell shapes. There are more familiar, rectangular and even round holes, similar to the cells of a regular stack. This type of mesh is sometimes called "garden plastic fencing". On the boundary with a neighbor it can be used as a fence from the street - it will not work: insufficient strength.
Plastic or polymer mesh - 100% polymer
In addition to different materials, the chain-link has different mesh sizes. It varies from 25 mm to 70 mm. The larger the cell, the cheaper the mesh, but the less load-bearing capacity it has. If you are installing a chain-link fence at the boundary with a neighbor, take mainly the middle link - from 40 mm to 60 mm.
What to look for when choosing a mesh
Carefully inspect each roll. Its edges should not be curved. The upper and lower cells should have curved “tails”. Moreover, it is desirable that the length of the bent part be more than half the length of the cell. This mesh is easier to stretch.
The edges should be smooth and curved
Pay attention to the thickness of the wire, how even the cells are, how ugly they lie. All deformations are a sign of low quality.
If the mesh is polymer-coated, check the warranty period provided by the manufacturer. With the cheapest ones, not only does the wire often bend, but they also use ordinary plastic, which, under the influence of ultraviolet radiation, after a couple of seasons becomes brittle and begins to crumble. Normal coating can last up to ten years or more. Therefore, in this case, there is no need to chase cheapness.
Why you should order chain-link fences in
- Own production of chain-link mesh, on German automatic machines;
- Galvanized mesh of our own production - a guarantee of a wire thickness of 2 mm or 1.8 to choose from;
- Constant railcar deliveries from the largest plants, three large production workshops allow us to provide low prices with high quality materials;
- “MASTEROVIT” is one of the oldest and most experienced companies in the fence market; as a result, fence installation is a well-oiled mechanism in the hands of professionals;
- 9 sales offices + mobile office, the ability to order a fence in a place convenient for you;
The cost per linear meter of a chain-link fence is influenced by:
- building height;
- mesh thickness;
- method of installation of fittings;
- the need to erect wickets, gates or other additional structures.
The production of a chain-link fence is carried out automatically using modern German equipment. The lines we organize allow us to produce up to 5 km of high-quality mesh per day at each of the three production complexes.
During delivery to the site, materials are not subject to overload. There are no intermediate stages of transfer. The number of movements of fencing elements is reduced to a minimum. Our clients receive mesh of the highest quality possible.
Which pillars to use
There are several options:
- Wooden pillars - made of timber or logs. The cheapest, but also the most “perishable” option. Antibacterial treatment is required before installation. The best option is a special protective impregnation. To save money, you can paint the above-ground part, and it is better to impregnate the part that will be buried with mining: immerse the pillars in a container for several hours. Before installation in the hole, you can additionally wrap this part with roofing felt. Chain-link fence on wooden posts
- Metal pillars. They can be made from a round or square pipe or a metal corner. The wall thickness is 2-3 mm, the pipe diameter is on average 50 mm, the profile section is 40-50 mm, the angle flange is 50-60 mm.
- Concrete pillars. The most inconvenient installation option: it is too difficult to attach the mesh to them, and it is difficult to install. In addition, the strength resource of reinforced concrete will not be in demand: too small loads are created by a chain-link fence.
The most convenient option of all those mentioned is a profile pipe, and preferably a rectangular one. It is easy to attach the mesh to it, and you can weld hooks or wire if necessary. If possible, install these. The optimal cross-section for a pillar is 25*40 mm or so. There is no need to take a larger cross-section - the fence is light.
The order of installation of pillars
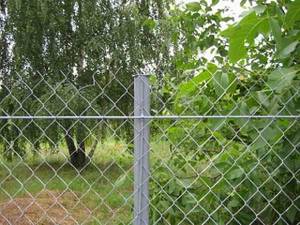
First, the pillars are placed in the corners of the site. If you need to fence only one side, place one post at the beginning, the second at the end. Their verticality in all planes is strictly checked, and the height is adjusted. At the very top and 10 cm above ground level, two cords are pulled. The rest of the pillars are placed on them. The height is leveled along the upper cord, the lower one serves to facilitate orientation: by applying a plumb line to a point on the upper thread, you can find the place where the hole will be drilled.
Installing posts under a mesh fence
The installation step of the pillars is 2-3 meters. Less is too expensive, more is no point, the mesh will sag. When installing a grid without a guide wire, it makes sense to place posts every 2 or 2.5 meters. This makes it easier to tighten the mesh without sagging. For other models - with wire, slugs (guides) or sections - the step can be 3 m.
Example of corner post reinforcement
If the mesh is pulled between the pillars, the outer ones will bear a considerable load. To prevent them from being led away, they put up jibs. They are placed, dug in, and welded to the installed pole.
Complete set of fences
Select the required fence height and installation technology. In addition to the mesh, the fencing package includes posts and reinforcement.
- To install a chain-link fence with a height of 1700 mm and below, supports 60 * 30 mm are used. For the construction of structures of greater height, pillars of 60*40 mm are used. Profiled pipes are equipped with hooks for rigid fixation of the mesh and plugs.
- The reinforcement (10 mm) is pulled either in one row (4th cell from the top) or in two (4th cell from the bottom). This protects the mesh from sagging and also gives additional rigidity to the structure. Installed sections cannot be removed.
The materials we produce are stored in compliance with all necessary conditions. Mesh rolls do not deform, do not get tangled and are not exposed to aggressive environments.
Installation of chain-link mesh
It’s only at first that it seems easy to install a chain-link fence. As soon as you start to think about how to fix the mesh on a pole, how to tension it, everything is not so obvious and simple... First, about the general rules. The mesh is attached to one of the corner posts. Fasten in at least four places. In principle, you can simply fasten it with wire, passing it into the cell.
Methods for attaching the mesh to the pole
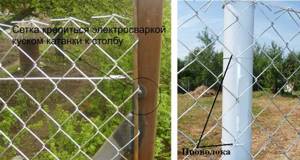
The method is simple, but not the most reliable. If the fence is at the dacha, during the absence of the owners, the mesh can be easily removed and taken away.
You can at least secure it more securely on the first and last pillar. To do this, take a steel rod with a thickness of at least 4 mm, thread it through the cells, weld it to the post, grabbing each 40-50 cm (pictured on the left).
Another way: weld three or four rods with a diameter of 6 mm to each post. A mesh is placed on them and they are bent.
Weld the rods, stretch the mesh, bend
If you are still paranoid about removing the mesh, you can drill two through holes in the post, insert a rod bent in the shape of a horseshoe - U, gripping the mesh with the “back”. On the side where the ends come out, twist and rivet them, or weld them.
Tensioner
There is another problem: how to tension the mesh. If the design is simple - without slugs (transverse guides that are fixed between the pillars), you can simply stretch the mesh from one pillar to another. Just note that it must be attached sequentially to each post. Fastening first through one, and then intermediate ones is a bad idea: there will definitely be uneven tension and sagging.
How to tension a chain-link mesh so that there is no sagging? Insert the rod, grab it and pull with all your weight. The stretch will be quite significant. You need to work with an assistant: one pulls and holds, the second fastens.
With wire
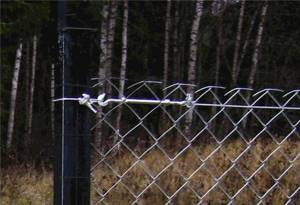
This type of fence is good because it can be installed quickly. But the top edge may sag. If someone climbs through it, the top will definitely become wrinkled. It is unlikely that it will be possible to straighten it. To prevent the top from sagging and “creasing,” a wire is pulled through the first row, either steel or plastic-sheathed so that it does not rust.
To prevent the mesh from sagging, a wire is pulled on top
If wire is used, the technology can be simple: make a loop at the end and throw it over the outermost post. They unwind the wire, trying to tighten it; after two or three posts, make another loop, wrapping the wire around the post. So until the end of the flight. If you use muscle force, you won't be able to pull it enough, and the wire will inevitably sag. This is easy to fix. Take a thick metal rod and use it to twist it, pulling the wire. Is one twist not enough? A little further you do another one. This way you pull up all the “spans”. Afterwards, you can begin to “pull” the mesh, tying it to a stretched wire.
If you weld “ears”—a metal strip with holes—at the top of the post, the wire can be attached to them. It is easier to stretch a piece of 2-3 meters, but the work is slower.
Another way to attach wire

You can also use special wire tensioners. Then, having secured the wire on one pole, on the second it is passed into a device such as in the photo. It is secured in a clamp, and then using a key, the excess is screwed onto the drum.
Special wire tensioners
You can use a cable and lanyards - hooks with ties-clamps (at a rigging store). On one side, a cable is twisted around the pole and secured with a clamp. A lanyard is placed on the other. Its middle part has a thread, thanks to which the cable can be tensioned.
Lanyard with cable - another option
Since the cable is more flexible, it can be passed through the links. Each one will be too long, after two or three cells it’s normal. One more thing: take a cable with a polymer sheath: it will not rust.
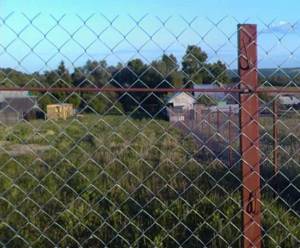
With welded rod
A steel rod with a diameter of 6-8 mm is threaded into the upper cell, or just below. It is cut into pieces equal to the distance from one pillar to another. The threaded rod is welded to the post.
Welded rod threaded through the cells
Pay attention to the top of this chain-link. This photo clearly shows that it has already begun to bloom. This is precisely the reason why it is necessary to take a mesh with curved ends. It just doesn’t unravel and even without wire or rod it holds the edge well.
With slugs (guides)
In even more rigid structures, after installing the pillars, slugs are welded to them. These are cross pipes or wooden strips attached between the posts. There may be one guide, or there may be two or three.
Chain-link fence with slugs
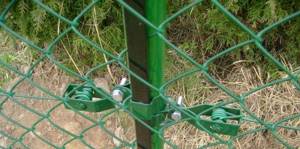
As you can see in the photo, in this case the mesh can also be secured using wire. It is clear that all the methods described above can be used. The only difference is that the mesh is attached not only vertically, but also horizontally. The photo below shows another method - with plates screwed on with bolts, the ends riveted. This method can also be used when attaching to poles.
Another way to attach chain-link to metal posts
Decoration of a chain-link fence
No matter how happy the fence may make you at first, after some time you will want to either decorate it or make it less transparent in order to hide from prying eyes.
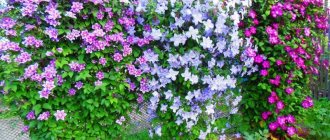
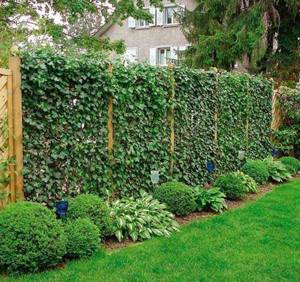
The first way - the most obvious - is to plant plants. If the neighbors do not object, you can plant bindweed or any other annual or perennial plants.
The most natural way is to plant plants
If you just want to decorate your fence, you can do “embroidery”. The squares are the same size, so you can embroider as if on canvas. There are two materials for embroidery: wire and colored twine.
A decorated chain-link fence looks incredibly beautiful
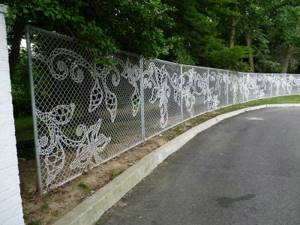
The good thing about colored twine is that you can “embroider” colored pictures. Any that seem appropriate to you.
Embroidery on mesh with colored twine
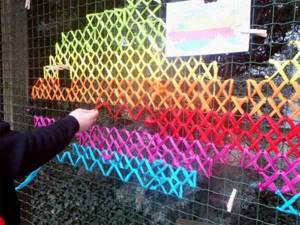
Something like this

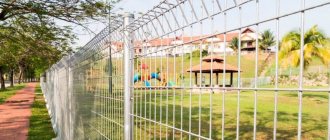
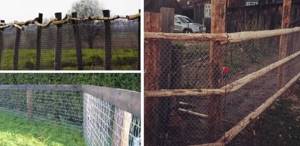
A not very aesthetic, but quite effective way is to stretch a camouflage or shading mesh. The good thing about these methods is that they require a minimum of effort: just pull it on and grab it in a couple of places.
Camouflage mesh on the fence significantly reduces visibility of the area
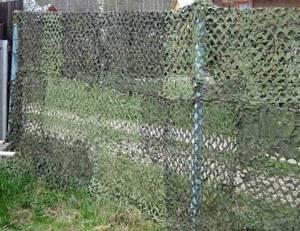
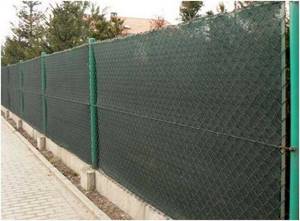
The shading mesh is almost opaque and the wind load will hardly change
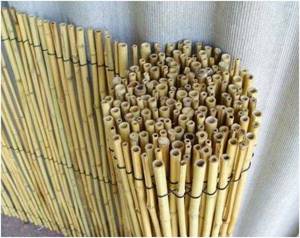
The same effect is achieved if twigs or reeds are woven into the cells. The disadvantage of this option is its high labor intensity. It will take a lot of time.
Weave reeds or thin twigs into the mesh
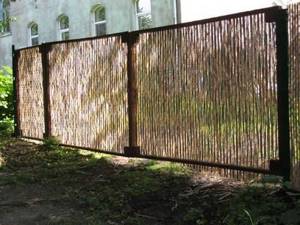
Ready-made reed mats can reduce manufacturing costs. They are sold in rolls. All you need to do is roll it out and secure it. But the cost is much higher than the previous option.
Reed mat
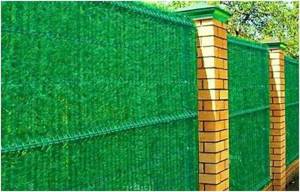
Another way is to use artificial pine needles sold in rolls. It is used in the manufacture of baskets and wreaths, but it can also be used on a fence.
Green wall - chain-link mesh decorated with artificial pine needles
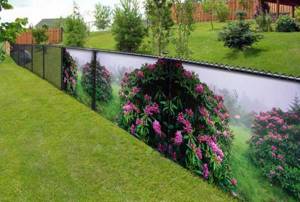
Not long ago, another way to decorate and, at the same time, reduce the visibility of a chain-link fence appeared - a photo grid.
This is a pattern printed on a polymer mesh. Sold in rolls (for tension fences) or fragments (for sectional fences). Attached using eyelets and wire or clamps built into the surface. You can see the approximate effect in the photo below. A photo grid for a chain-link fence will both decorate the fence and protect the area from prying eyes
Technology for assembling a sectional fence from a chain-link mesh
Preliminary work is the same as described above. The first step is to install supports from the selected material. To install the mesh, you need to unwind the roll and select the desired piece by pulling out the wire.
To tension the mesh between the supports:
- twigs 4–5 mm thick are inserted into the outermost holes of the mesh;
- welded on one side inside the corner;
- reinforcement is placed below and above;
- using welding, they connect the reinforcement on the side where the mesh is fixed;
- the mesh is stretched and secured inside the frame of the pillars.
After the sections are secured, it is necessary to attach metal strips 4–5 mm thick to the supports, which should protrude along the sides of the pillars in such a way that it is possible to secure the frame. A sectional chain-link fence is labor-intensive, but its appearance is much better than usual.
The cost of constructing a chain-link fence depends on its design and the materials used. You can use the services of companies that install turnkey chain-link fences, or you can build it yourself, spending much less money.