Types of trailers
Before starting work, it is worth considering that the dimensions of the future structure will directly depend on the power of the walk-behind tractor itself. Conventionally, all towed devices are divided into 3 groups:
- Lightweight single-axle trolleys (more suitable for walk-behind tractors with power within 5 hp), with dimensions of 1 by 1 m or slightly larger, supporting up to 300 kg of weight.
- Medium-duty trailers (selected for walk-behind tractors with power from 5 to 10 hp). Here it is already possible to provide dimensions of up to 1 m by 1.5 m, because they will withstand loads of up to 500 kg.
- Heavy trailers combined with stronger units. They most often come with two axles (i.e., on four wheels), and accordingly the dimensions can be chosen within the range of 1.2 by 2 m.
Once the dimensions of the trailer for the walk-behind tractor have been selected, it is worth thinking about the materials used and the basic components of the future brainchild.
Making a trailer with your own hands
After studying all the design options, when making a homemade trailer for a walk-behind tractor, the simplest options are most often used. A dumping device is certainly more difficult to make, but its functionality is an order of magnitude higher.
Work on creating a tow hitch for a walk-behind tractor with your own hands begins with a drawing. Thanks to this, you can determine the amount of materials needed and select complex components that require the development of more accurate diagrams.
It should be remembered that the center of gravity of a properly balanced trailer should be located closer to the front side, but not exceed the level of the wheel axle.
Frame assembly
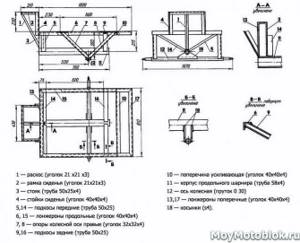
The reliability of the frame is determined by the durability and strength that the towbar will have. This should be taken into account when creating a project for a future trailer hitch. Thus, the following materials can be used in the manufacture of a trailer frame:
- Angle and rectangular pipe.
- The front and rear crossbars can be made from a corner measuring 25x25 mm.
- For spars, a 60x30 mm pipe would be an excellent choice.
- To connect all the elements, it is necessary to make five additional crossbars forming a lattice frame.
- Four vertical posts are attached to the longitudinal pipes of this lattice in the corners.
Making a one-piece trailer is quite simple. Some homestead owners decide to make more complex devices. In such a situation, all subsequent actions depend on the choice of a specific type of trailer:
- On a dump trailer, the tailgate must be hinged.
- If you plan to manufacture a trailer with folding sides, then all three sides, except the front one, must have such a design.
- The frames of the folding elements should be made separately from the general frame. For simple models they can be its common elements.
Frame covering
This is one of the easiest steps in creating a tow hitch. However, some nuances are present and must be taken into account. To carry out work on framing the frame, it is worth choosing those materials that cannot increase the cost of the tow hitch:
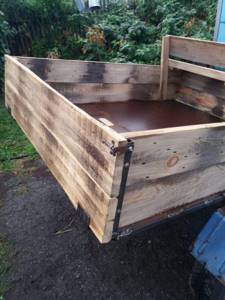
- Wood is the most affordable material, but not the most practical due to its low resistance to moisture. In order for the boards to last as long as possible, it is imperative to treat them with special compounds and constantly monitor the integrity of the coating.
- Plastic lacks the main drawback of wood, but at the same time has poor resistance to mechanical damage.
- Metal sheets must first be treated with anti-corrosion compounds and are the most durable, but also quite expensive material.
First you need to sheathe the bottom (floor) of the trailer, and then work on its sides.
Chassis
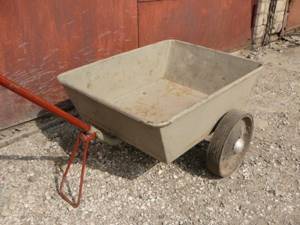
This design element can be taken from an old vehicle, such as a garden wheelbarrow.
An additional pipe is required to attach it. The hub can be pressed, and its rear part can be bored and secured to the axle. It is extremely important to ensure that no distortions occur. For mounting wheels, the best option is pins .
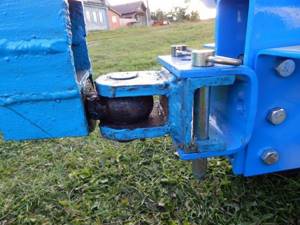
They will provide a fairly reliable and long-lasting connection. To strengthen structures, bolted connections can be used. The final stage of work on the manufacture of the chassis will be the fastening of the caps. After creating the towbar, all that remains is to make the hitch. This is a separate element, which is also very responsible. The simplest way to connect a walk-behind tractor to a trailer is a “pipe-in-pipe” assembly. A short piece of pipe is attached to one end of the pre-bent pipe in a vertical position.
At the opposite end of the main element (curved pipe), a second section is welded, and a king pin must be attached to it, which will act as a connecting element. This robust design is easy to manufacture and highly reliable.
Main stages of work
The algorithm for creating attachments for a walk-behind tractor includes several basic steps:
- image of the exact diagram of the product, taking into account the expected dimensions;
- preparation of necessary materials and auxiliary components;
- organization of the workplace itself with convenient access to the necessary tools;
- transfer of drawing data directly to the materials used;
- the assembly process, as well as fitting the resulting components into a single whole;
- painting or varnishing, final body design.
After a preliminary acquaintance with the progress of the work, it becomes quite clear how to make a trailer for a walk-behind tractor with your own hands.
Manufacturing
If you have everything you need, you can assemble a dump trailer for a walk-behind tractor with your own hands. It will meet all your requirements.
First of all, you will need the following tools:
- channel number five;
- jigsaw;
- welding machine (for convenience it is better to use a semi-automatic machine);
- screwdriver;
- Bulgarian.
Having prepared the necessary tools, you need to determine the dimensions of the trailer. The parameters of parts and workpieces will depend on them. For work, you can use drawings of the simplest models of the unit, which are found on the Internet at every step. See the best options, but you can do without them:
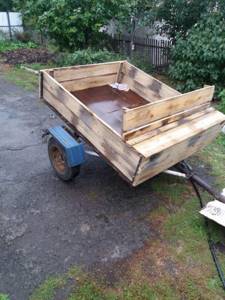
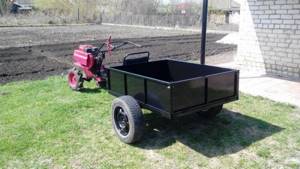
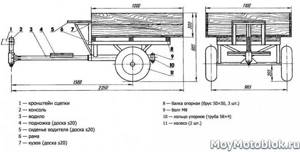
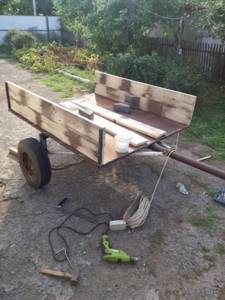
Our homemade trailer consists of the following parts: frame, body, wheels and coupling device.
- iron pipes of different sizes (preferably 60X30 millimeters and 25X25, respectively);
- springs;
- small wheels (usually taken from old domestic cars);
- sheet of iron (up to 1 millimeter thick, otherwise the trailer will be too heavy);
- duralumin sheet.
Sequence of operations
First of all, you need to assemble the frame. Smaller tubes (based on the design we describe - 25X25 millimeters) are used as front and rear crossbars, and two larger tubes will become spars. All structural elements are fastened using welds. As a result, you will get a kind of lattice.
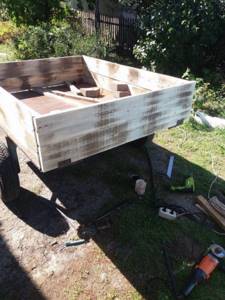
After this, you can proceed to manufacturing the body. The frame is strengthened by attaching twenty-five millimeter pipes to it perpendicular to the grid mesh. Then longitudinal pipes are attached to them using a welding machine, and four racks are attached to them. The strapping is welded to the tops of the posts.
A dump trailer for a walk-behind tractor must have folding sides, preferably not only at the back, but also on the sides. To achieve this goal, you need to use a welding machine to connect narrow pipes into three rectangular structures separately from the body.
We use duralumin to cover the frame - making the bottom - and iron sheets for the sides. It is more advisable to use bolts as fastening elements. To attach the sides to the posts and trim, you will again have to think about welding.
After this, you can begin to mount the beam. To do this, you need to insert two channels into each other. Wheel axles are attached to the rear end of the resulting structure. After this, the beam is welded to the trailer frame using springs.
Now you need to equip the dump trailer with a drawbar. The algorithm of actions is very simple. Take two pipes with dimensions of sixty by thirty millimeters. Their front parts are mated and welded to the base of the coupling device. The rear parts of these pipes are attached to the side members with an overlap of two hundred millimeters.
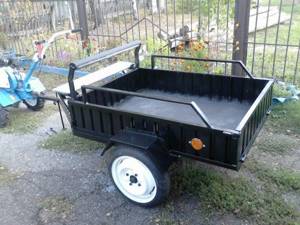
Actually, the trailer is ready. You can start painting. This is not necessary, but it is advisable, since the paint layer will provide longer protection of the metal from rust and corrosion.
If desired and possible, the trailer can be additionally equipped with side lights, turn signals and brake lights. In this case, your product will be practically indistinguishable from its factory counterpart. Here is an example of how to assemble a simple trailer for a walk-behind tractor with your own hands. Made efficiently and economically. This does not require any drawings.
Drawing up a drawing
So, we’ve sorted out the features of the model and the materials, it’s time to start drawing up a drawing of a trailer for a walk-behind tractor or a sketch of a diagram of the proposed equipment. The best option would be to depict the trailer from different sides with marks of the selected dimensions of the components of the hitch.
Here you don’t have to be a real engineer or draftsman; a thoughtful sketch will be enough.
Basic trailer components
The universal design will include several auxiliary units:
- the frame of the attachment that takes the main load;
- the body itself;
- drawbar (coupling device) designed to connect a vehicle to a trailer;
- a seat with a footrest, taking into account the selected configuration and dimensions;
- trailer chassis (wheels);
- the steering mechanism itself.
Among other things, it would not be amiss to provide additional devices that will facilitate the operation process: a simple folding mechanism, brakes on the walk-behind tractor trailer, additional stops, etc.
Brakes
To ensure that the trailer does not accidentally roll on a slope and stands firmly on the road, a simple braking system is provided for it. How to make brakes on a trailer for a walk-behind tractor? It is best to use a parking structure from a car or motorcycle and secure the mechanism near the driver's seat with bolts.
As in any vehicle, the braking system is one of the factors of road safety. You can make your own brakes using a cable, rod and drum:
- A drum is attached to the hub of one of the wheels.
- Take a brake disc and weld a small piece of pipe to it.
- Place the mechanism on the axle.
- The brake pads with a cable are secured to the axle, the cable is pulled to the lever near the driver’s seat.
Brakes are usually not installed on two wheels. One parking brake for a trailer attached to a walk-behind tractor is also sufficient.
Preparation of body components
To assemble a trailer for a walk-behind tractor with your own hands you will need:
- iron pipes with characteristics of 25x25 mm, as well as 60x30 mm, metal profiles;
- fastening components;
- steel sheets (thickness about 0.8 mm);
- suitable boards, pieces of plywood or duralumin sheets, corrugated sheets (for the body);
- two (or four) wheels on a walk-behind tractor trailer (from an old Moskvich, Zhiguli, scooter, motorcycle cradle, from garden equipment);
- channel, corners, etc.
When choosing materials, it is worth taking into account their characteristics in order to eliminate the possibility of deformation under the applied loads during operation. Only high-quality load-bearing elements can provide the necessary safety margins, especially when driving on bumpy roads.
Assembling a homemade trailer for a walk-behind tractor
When starting to implement a project, a DIYer needs:
- create a working draft or drawing (drawing);
- prepare material for the frame and other main components;
- prepare the workplace;
- mark the main structural elements of the trailer;
- lay out and adjust alignment angles;
- collect part templates;
- carry out the adjustment of the purchased entire units to the structural elements.
Required tools and materials
To carry out the work, you need to prepare all the necessary tools:
- welding machine;
- grinder with a set of cutting and abrasive discs;
- measuring instrument - tape measure, metal ruler, protractor, square, marker and chalk, metal scriber;
- hammer, chisel, pliers;
- bench vice, set of clamps, welding clamps;
- drill, set of metal drills;
- riveter
The required materials will be:
- steel square or rectangular pipe 60×60 or 60×30 mm;
- steel square pipe 30×30 or 25×25 mm;
- corner 25×25 mm;
- channel;
- springs of the Moskvich passenger car;
- steel sheet 2 mm thick;
- galvanized sheet 1 or 0.8 mm thick;
- fasteners, bolts, nuts, rivets.
For a rigid body model, instead of a spring-loaded wheel set on springs, you will need a regular beam.
For trailer wheels, ready-made car wheels from a Tavria, Moskvich or Zhiguli passenger car are suitable.
The wheels need to be selected immediately with the hubs, this will facilitate further assembly of the homemade product.
Frame
The trailer frame is an all-welded structure in the form of a frame lattice made of a square pipe. Traverses made from a 25×25 mm square form the cross members of the frame, and the spars are made from a 60×60 or 60×30 mm pipe. After marking, all structural elements are cut and laid out on a flat surface, the joints are welded with small seams, and each joint of the elements is checked with a square. After assembling the structure, final welding of all parts is carried out along the perimeter of all planes. The frame is painted after treating the surface with a metal primer.
Chassis
In making a homemade trailer for a walk-behind tractor, the chassis is the most difficult element.
The basis of the chassis is a beam with hubs at the ends. The channels are joined to each other in such a way that they form a square. The joints are welded with a continuous seam. Wheel hubs are installed at the ends of the axle and welded.
The accuracy of the axle assembly is checked by checking the parallelism of the planes of the wheel rims. The connection between the frame and the beam is carried out using springs, while the ends of the springs are installed in welded brackets on the frame, and the beam is pressed against the central part of the springs using an earring.
The chassis installed on the frame is additionally checked for resistance to overturning. As in a car, the axle spring group must have rubber bushings in the frame mounting bracket.
Body, frame trim
The platform is marked relative to the grid in such a way that allowances are left for attaching the side posts. The front and side boards are firmly installed, and the rear board is made removable on door hinges.
The sides of the trailer have a frame structure made of 25x25 mm corners. The corners are butt welded, the seams on the inside are cleaned to the level of the metal plane.
Removable sides are assembled in the following sequence:
- side frame;
- The galvanized iron sheet is adjusted to the size of the frame;
- The side panels are cut out and secured with rivets through the corner.
The bottom of the body, made of a 2-mm iron sheet, is installed on the frame and welded with a small seam around the perimeter every 3-5 cm.
The installation of the boards begins with the installation of the front board, then the side boards are installed and connected with a welding joint.
The tailgate is secured last - first the hinges are marked and welded, and then the latches.
Other design details
After assembling the frame and body, a folding seat is installed - a wooden bench placed on top of the front side with support on the sides.
As a trailer brake system, it is recommended to use elements of the brake system of a car whose hub and wheels are used in the design. To ensure reliable operation of the brake system, it is recommended to provide an additional lever lock.
You may also be interested in homemade carts for walk-behind tractors.
Read about attachments for the Neva unit in this article.
Required Tools
Depending on the selected materials, a different set may be useful, including a welding machine, grinder, drills, lathe, electric saw, screwdriver, etc. You can’t do without wrenches, a file, a ruler and tape measure, a sledgehammer and hammer, pliers, and sandpaper.
It is better to prepare all the necessary “helpers” in advance to avoid large delays during assembly.
Note!
How to make a shoe rack with your own hands - simple and complex options. Step-by-step instructions with photos and descriptions
How to make a fence with your own hands: detailed instructions, diagrams, drawings. Description of the process from A to Z!
How to make a barbecue with your own hands from metal - the best manufacturing options with drawings and step-by-step instructions (100 photo ideas)
Creating a Frame
Durable frames are made from rolled metal (profiles, pipes) with suitable cross-sectional dimensions. The number and parameters of such elements will depend on the carrying capacity and dimensions of the future trailer. Channels and angles can be purchased at any hardware store.
The prepared elements are connected by welding, paying special attention to the angles between adjacent components. It is recommended to additionally weld the resulting frame around the entire perimeter to enhance its overall strength.
Drawing of a trailer for a walk-behind tractor
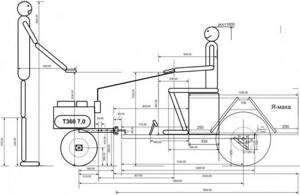
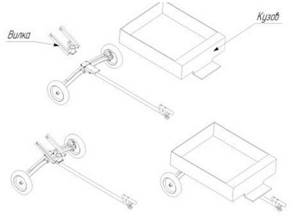
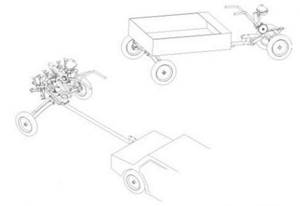
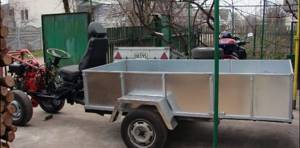
This trailer can be used with both a walk-behind tractor and a passenger car, and is a transformed unit. Equipped with a simple sprung suspension.
One of the purposes of a trailer is the ability to transport a walk-behind tractor by car. The “Fork” unit allows one person to load and unload the walk-behind tractor without much physical effort.
In the absence of a passenger car, the trailer is equipped with a body and connected to a walk-behind tractor. Instead of cutters, wheels are installed on the walk-behind tractor. The trailer has a good sprung suspension, resulting in excellent ride softness, good longitudinal stability and virtually no rigidity. The trailer parts can be easily separated, which allows the trailer to be stored compactly when disassembled.
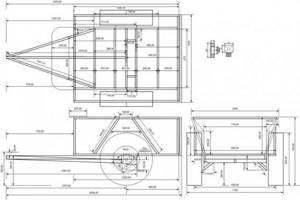
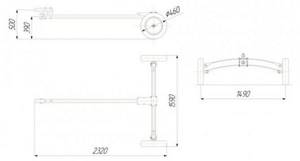
The length of the body is 2320 mm, width 1590 mm, and height 500 mm. The track width is 1490 mm. Body dimensions: length 1500 mm, width 1200 mm, height 300 mm. Fork size 500x300 mm.
Options
All parts by detail
Trailer usage options
Trailer dimensions
The main purpose of a trailer is to transport cargo. The trailer itself is an intermediate link when transporting cargo. Therefore, the primary task when creating a trailer is to achieve low weight and good load capacity. All elements of the trailer design are used rationally. Chassis weight - 25 kg. The weight of the transported cargo is 200 kg. When stored, the trailer takes up very little space and easily fits into a passenger car.
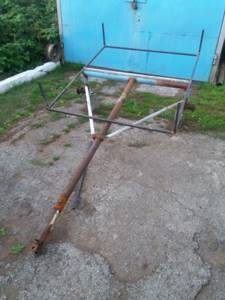
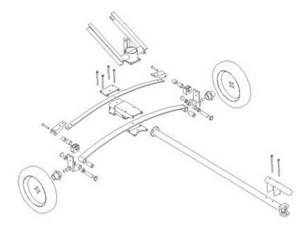
Chassis assembly
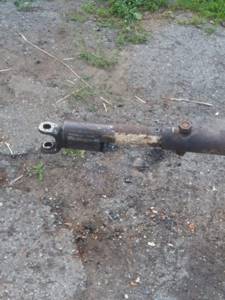
To make the axle itself, automobile axle shafts are welded into the pipe. Channels should be welded along the edges, as well as in the center of the pipe, where the created frame will be attached.
Next, the frame is welded to the trailer beam of the walk-behind tractor, turning the structure over. Welded cross members, according to the drawing, will further strengthen the frame. When installing wheels, check their parallelism.
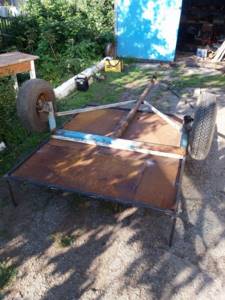
Body shaping
Then it is recommended to weld vertical posts of the required height to the finished frame, which are also connected to each other by horizontal strips. At each stage, the angles and spatial arrangement of the elements are carefully measured.
Note!
DIY country washbasin - review of simple and complex designs (97 photos of the best ideas)
How to make a garden (construction) wheelbarrow with your own hands: detailed instructions with description + 85 photos of fresh ideas

How to make a bench with your own hands - 90 photos of the best ideas from the master. Review of finished drawings, diagrams and dimensions of the bench
A metal sheet with a thickness of up to 2 mm can be used for the pallet. At the first stage, it is only slightly “grabbed” by welding, then welding takes place along the entire perimeter of the trailer.

Required tools and materials
To ensure high-quality performance of trailer assembly work, prepare the following tools:
- apparatus for welding work;
- grinder for cutting material with a set of cutting wheels;
- tape measure and ruler, protractor and square;
- marking tools (chalk, ink, marker);
- impact tool (hammer), chisel and pliers;
- yew for fastening parts, clamps and clamps;
- electric drill with a set of drills of various diameters for working on metal;
- equipment for installing rivets in the trailer body.
To make a trailer frame, a square or rectangular metal profile, a small-diameter steel pipe, angles, and a channel are used. The trailer pallet is a steel sheet up to 2 mm thick. Bolts, nuts and rivets are used to connect parts of the structure. Springs and a beam are added to the trailer to attach the wheelset. Car wheels from Moskvich or Zhiguli are suitable as wheels.
Don't forget about the appropriate trailer tool
It is made from a square pipe, which is cut into separate sections. The pipe sections are welded together, forming a frame with cross members. Each angle is carefully measured. After the frame is ready, it is boiled around the perimeter again. The finished product is primed and painted with paint and varnish material.
The trailer should not be overloaded, otherwise it will quickly become unusable. The service life of the entire structure depends on the quality of the frame element. Therefore, before starting work, you should determine what maximum load the tow hitch will carry and for what purposes it will be used.
There are three main trailer models:
- Easy. Designed for a load of no more than 70 kg. Typically this is a lightweight cart with one axle on which the driver's seat is mounted. A trailer for transporting goods is welded to the axle.
- Universal. It can transport small loads up to 120 kg over rough terrain. For greater strength, an I-beam is used as a material for making the frame.
- Heavy. These examples use a metal profile and elements of an automobile chassis with rubber running. Heavy trailer options are more reliable and durable, although a little more expensive than other designs.
Covering the finished frame
For the sides, craftsmen use sheet metal, wooden boards, and pieces of corrugated board. The hinged rear part will greatly simplify the shipping process, and can also create additional pallet area.
Such variants of trolleys for a walk-behind tractor, which, if desired, can be built by a craftsman in two or three days, will last practically without repair for more than one year.