The place where domestic chickens are raised, be it a poultry farm or a modest chicken coop in a private backyard, must be equipped with a feeder.
Just what kind of container cannot be used in this capacity - the device must be designed in compliance with a number of rules.
You can purchase a finished product in a store, but many breeders prefer to make chicken feeders with their own hands to save a little money.
We invite the reader to follow their example by choosing one of the options described in this article.
Features of chicken feeder
First of all, you should familiarize yourself with the basic principles of designing a chicken feeder:
- The device should prevent feed spoilage, thereby optimizing its consumption. To do this, the feeder is equipped with elements such as grates, turntables and sides that do not allow the bird to climb inside and contaminate the feed with droppings or scatter it.
- Consideration should be given to the possibility of sanitization. The feeder, as far as possible, should be kept relatively clean, for which it is regularly cleaned and washed. Accordingly, the material and design must be such that this can be easily done. In this regard, it is advisable to make the feeder light and mobile, but in moderation so that the chickens do not knock it over.
The sizes are selected so that each individual has access to food. If the feeder is made in the form of a tray, then its length should be set at the rate of 10 - 15 cm per bird. For young animals, this parameter is halved.
If the feeder is round, then 2.5 cm will be enough for each chicken. With limited access, weaker individuals will constantly be pushed aside by stronger ones.
Feeder made from plastic bottles
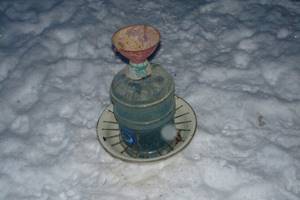
This is perhaps the easiest and most affordable way to make your own feeder. The design is a container with slits at the bottom in which chickens can receive food. It can be used for very young chicks. Its big advantage is that the chickens are arranged in a circle and do not jostle, so they cannot turn it over. Using the same scheme, you can make a drinking bowl, as can be seen in the photo below.
Tools and materials
- empty plastic bottle;
- scissors;
- vessel.
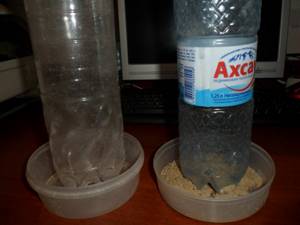
Feeder and drinker for chickens from bottles
Step-by-step instruction
- One plastic bottle is selected. A regular 1.5 liter is also suitable, since a large one is not needed for chicks.
- Using scissors, on average, several holes with a diameter of 2 cm are cut - this is enough for free access to food and so that the chickens do not climb inside.
- The feeder is fixed in a bowl.
- The bottle is filled with food to the top and you get a homemade feeder. Now the birds can receive food while in a circle, and it will flow freely from the reserves above when the previous portion is eaten.
Necessary materials
A variety of materials can be used to make a feeder. But when choosing, you need to pay attention to the combination of material and the type of feed for which the feeder is used. Chicken diet can be divided into three groups:
- Dry food: this group includes compound feed and grain. Mineral supplements - shells, chalk, pebbles - are also served in dry form. For all this, the feeder can be made of wood.
- Mash: This type of food is wet and will be problematic to clean from a wooden feeder. Metal and plastic products with a smooth and waterproof surface are much more suitable.
- Grass: for such food, the feeder does not need to have solid walls, so it is most often made of mesh. You can make the mesh yourself from thin wire.
Let's look at the design and manufacturing process of a wooden feeder. It will require the following materials:
- thick plywood;
- hinges with an opening angle of 90 degrees;
- self-tapping screws
Main types of drinkers
Before you start creating a feeder with your own hands, you need to clearly divide the designs into certain types. This will help determine what type of feeder you need .
Variety of materials
Chicken feeders are made from wooden materials, plastic, and metal. The choice of specific material will directly depend on what kind of food the container is needed for. Main types of materials for feeders:
- Wooden products are considered the most widely used. They are needed for filling dry food. Wood is considered a natural material; it is best suited for grain, dry feed, and various mineral components. Wood structures should not be used for raw feed. Food debris will stick to crevices and hard-to-reach parts of the product. After a certain time, the container will begin to rot, contaminating the food inside with various pathogenic bacteria.
- Chickens must necessarily add special mash to their diet. Plastic structures are well suited for raw food, as they can be easily and quickly cleaned of all residues. also good to use steel feeders for such purposes , but ferrous metal can corrode when exposed to moisture.
- Metal can be used to create a herb hopper. Most often, a V-shaped structure is created with a blank back wall made of tin. The front part must be covered with a special mesh or rods.
Correctly selected material when creating a feeder will help preserve food, which means saving the owner’s finances.
Feed mixture supply features
The comfort of feeding itself will depend on how food is supplied to the chicken feeder. It will be much more convenient to pour grain into the chickens once than to constantly go to the barn and add feed mixture.
Based on the method of feeding feed, feeders can be divided into the following types:
- The simplest is the tray model, which is most suitable for feeding chickens. This container is improved with special sides that prevent food from spilling out. In most cases, feeders are made in an elongated shape.
- Grooved structures include a turntable or a delimited removable mesh. The internal surface of the products can be divided by special partitions, which together create compartments for various feeds. Such feeders are most often placed outside the chicken cage so that they can reach the food with only their heads.
- The easiest way to care for bunker-type structures. They are needed for pouring grain, as well as dry combined mixtures. Most often, the total size of the bunker is calculated based on the daily supply of feed. A special tray is installed at the bottom of the structure, into which food is poured from the hopper as the bird feeds.
All feeders are divided according to the method of feeding the feed and the material from which they are made.
By type of grain supply : bunker and trough.
According to the material in the design of the feeder, there are:
- combined;
- wooden;
- plastic;
- made of metal mesh or rods;
- solid metal.
Installation location in the chicken coop
The last factor by which all feeders are grouped is the location of their installation. Two types of structures can be used in a chicken coop or cage:
- The floor type is convenient because of its mobility. If necessary, the feeder can be moved to a more convenient place inside the barn.
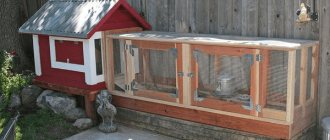
- A hanging structure that is attached to the wall of the chicken coop. Such products are convenient because of their stability. In this case, the chicken will not be able to tip the feeder with food inside on its side.
Manufacturing procedure
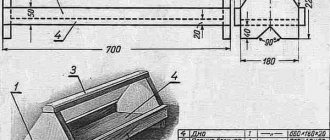
Using a jigsaw, you need to cut out rectangular parts of the following sizes from a plywood sheet:
- 29x17 cm (bottom);
- 29x40 cm, 2 pcs. (blanks for sidewalls);
- 28x29 cm (front wall);
- 70x29 cm (ibid.);
- 29x26 cm (lid);
- 40x29 cm (back wall);
The proposed feeder is made according to the following scheme:
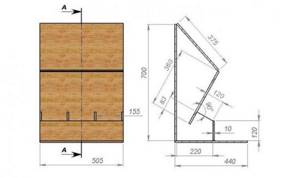
- In rectangles measuring 40x29 cm, which serve as blanks for the side walls, you need to make cuts at an angle of 15 degrees. The end result should be pieces that look like slightly beveled letters “L”, with the top edge measuring 24 cm and the bottom edge measuring 29 cm.
- Holes for screws should be drilled in all parts, not forgetting to use a drill of a larger diameter to make recesses for countersunk heads.
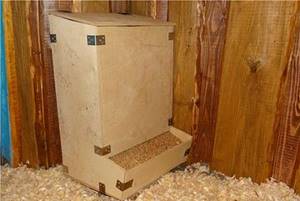
- Now you need to assemble the feeder. It will look like a box with a drawer pulled out from below. The front wall is formed in two parts: the narrow one is fixed on the “pull-out drawer”, the larger one covers the rest. The hinged lid is attached to the top.
- All edges, protrusions and burrs must be sanded so that birds cannot be injured by them.
- The assembled feeder must be treated with a biocide. It cannot be varnished or painted.
To ensure that the parts fit together as tightly as possible, before screwing in the screw, press them with a clamp or other clamp.
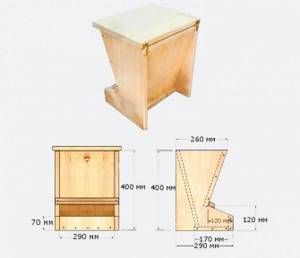
Wooden feeder diagram
The feeder is ready and you can pour dry food into it. The main supply will be inaccessible to the bird, but a small part will be visible in the “pull-out box”, which acts as a feeding tray. As food is consumed from the tray, it will gradually spill out from the main part of the feeder. This part is called a bunker, and feeders operating on this principle are called bunkers.
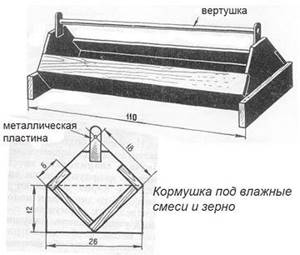
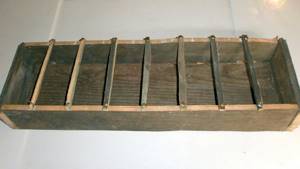
Another version of a wooden feeder turned out to be quite popular, for which the following parts need to be cut out of plywood or boards:
- a rectangle with dimensions 100x15 cm (this will be the bottom);
- two rectangles measuring 100x8 cm (front and back walls);
- two parts in the form of a “house”: a rectangle measuring 15x8 cm, to which a triangle is attached;
- rail with a cross section of 2x3 cm and a length of 100 cm.
Drawing of a bunker feeder
The “house” parts are the side walls. A rail is attached between the tops of their “roofs”, so that the feeder looks like a toolbox. Only the rail in its upper part is not so much a handle as a barrier for the chickens: thanks to it, they will not be able to climb into the feeder.
Please note that such a feeder is easy to tip over, so it is advisable to cut the bottom from a thick board.
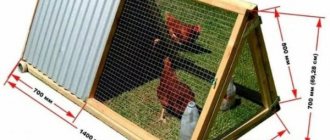
Metal mesh is also an effective barrier. The size of the cell is selected so that the bird can freely stick its head into it and get to the food.
In conditions of limited space, a two-story feeder would be very appropriate. First, a frame is assembled from the bars, then it is sheathed with sheet material, for example, the same plywood. The lower floor is made 25 cm high and 26 cm wide. The length is chosen in accordance with the number of chickens. The second floor is made in the form of a trough with sides 10 cm high.
Photo - homemade chicken feeders with your own hands
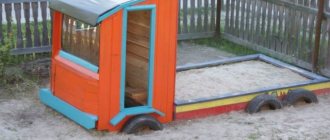
Simple feeder for farm poultry
Plastic feeder
Bottle feeder
Photo
Next you can see the photos , which show original ideas for self-made automatic feeders:
Even if food is on the surface, chickens have an innate habit of digging it up. Therefore, they get into the food with their feet and scatter it. Read articles from our experts on how to make feeders yourself from sewer, polypropylene, plastic pipes, as well as from a 5-liter plastic bottle.
Original feeders
The following types of feeders, some of which are made from scrap materials, will certainly appeal to the reader:
Feeder based on cutting board
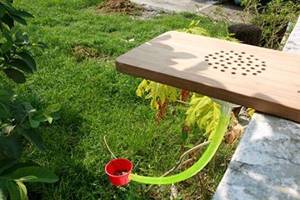
To make this device you will need:
- cutting board;
- plastic cup;
- funnel (it’s better if it’s also plastic);
- hose with transparent walls;
- silicone sealant.
You need to act in the following sequence:
- The wide part of the watering can is placed on the cutting board and outlined with a pencil.
- Within the drawn circle, many holes are drilled in random order using a drill.
- Next, using sealant, the watering can is glued to the board in exactly the position in which it was held when circling the wide part. Both items need to be held together for a while until the sealant sets.
- A hole is drilled in the cup near the bottom with such a diameter that a hose can be threaded into it, but at the same time the latter fits tightly enough.
- Now you can start assembling the feeder. One end of the hose is put on the spout of the watering can and fixed to it with a clamp; the second one is inserted into the cup through a hole made in it. If the hose in the cup does not hold very tightly, you need to use sealant as a seal.
The feeder is ready. The grain poured into the watering can will flow through the tube into the cup.
Feeders for supplying dry feed for poultry can be conventional or automatic. An automatic chicken feeder is good because it saves feed and preserves it.
For instructions on how to make a bird feeder with your own hands, see here.
Options for pig feeders with photographs can be found at the link.
Hopper bucket feeder
Any container can act as a feeder hopper. You can make such a feeder very cheaply from a plastic bucket in which some kind of construction mixture was packed. In addition to it, you should prepare the bottom of the same, but larger bucket, or a sectional bowl for pets, or a plastic container for seedlings. This part of the feeder should have a diameter 10–15 cm larger than that of the bucket.
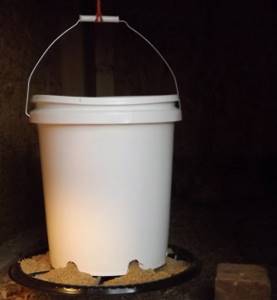
Plastic bucket feeder
The manufacturing technology is extremely simple:
- Holes are cut in the side wall of the bucket near the bottom.
- Next, the bucket is installed in the center of the bowl or menagerie and screwed to it with a bolt and nut.
All that remains is to pour the food into the bucket and close it with a lid. Some of the food will spill through the holes into the bowl and while the birds eat it, it will spill out again and again.
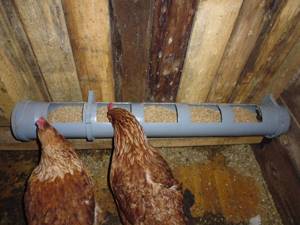
PVC pipe feeder
A very affordable material are plastic parts for sewer assembly. Here's what you need to prepare:
- pipe with a diameter of 150 mm;
- a pair of plugs for it;
- tee.
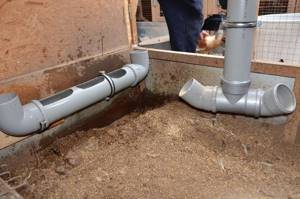
DIY chicken feeders made from plastic pipes
Make a feeder like this:
- A) Three fragments are cut from the pipe: two are 10 and 20 cm long, the third is of arbitrary length (this will be a bunker).
- A long piece of pipe, acting as a hopper, is inserted into the tee on one side, and on the other - a piece 20 cm long. The free ends of these pieces are closed with plugs.
- A 10 cm long piece is connected to the outlet of the tee.
The structure is filled with grain or other dry food, after which it is installed with the long part up. And they fix it. A short piece attached to the tee outlet will act as a tray. You can also close it with a plug at night.
Are there a lot of squirrels in your area? Build a squirrel feeder and these little animals will delight you in cold weather.
Read about the features of making silicone molds for paving slabs in this article.
Hopper feeder made from 5-liter plastic bottles
This container, used for packaging purified water, is quite popular today. To make a feeder you will need two copies. Here's what to do with them:
- From one bottle you need to cut off the upper tapering part so that what remains is something like a glass with smooth walls.
- A window is cut into one of the side walls of this “glass”, wide enough for the chicken to stick its head through.
- The edges of the window should be covered with fabric electrical tape or adhesive tape so that they, being sharp and rigid enough, cannot injure the bird.
- You need to cut off the bottom of the second bottle.
- Near the lid itself, you need to make several holes in the wall of the 2nd bottle.
- Let's start assembling. We turn the 2nd bottle, that is, the one that we have deprived of the bottom, upside down and insert the 1st bottle into a glass-like bottle. In this case, the cap of the 2nd bottle should touch the bottom of the 1st.
The feeder is ready. Now you need to pour the grain into the inverted 2nd bottle and cover it with some kind of lid. This feeder works in the same way as all other bunker-type feeders.
The principle of operation of an automatic feeder with a timer
ATTENTION! These feeders are designed only for feeding dry food, which is characterized by flowability. It is possible to pour grain, granules, and mixed feed into the container, but in no case should you add various mash or grated vegetables.
These devices can be of different types, but they are based on the same operating principle.

Thanks to the operation of the feeders, food is given to the chickens automatically , exactly in the volume that was consumed by the birds.
Its other part is contained in the individual compartment of the mechanism. The advantage of an automatic feeder is not only the continuous supply of food to birds, but also its protection from scattering and getting wet during periods of precipitation. Also, these devices save feed well due to correct dosing.
The automatic feeder, which can be programmed and also has a timer, attracts attention. Using the timer, you can set the feeding time. The feeding mechanism has a screw that moves the feed into the tray. Almost all models of devices with a timer have a backup battery and a capacity for storing feed mixture. The frequency of feedings is possible up to eight times, the break between them is also adjustable.
The food compartment is perfectly protected due to the tightly closed lid. Since the tray is removable, it is very easy to clean. The main disadvantage of this device will be the very high price.