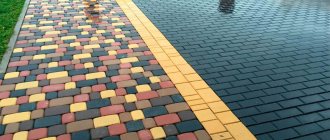
Types of paving slabs
If you ask yourself what kind of paving slabs there are, then you can distinguish several types of this material:
- Cement-sand. The most economical tile option, which is very popular due to the fact that moisture does not linger on the surface.
- Vibrocast. In the tile production process, plastic compounds are used. It has a special appearance that is similar to a brick or wood covering. These tiles are mainly used for paving paths in garden plots and local areas of country houses.
- Vibropressed. It is made from a concrete mixture that is poured into molds subjected to pressure and vibration. This tile has a strict shape and a rough surface. The material is most often used for paving paths in public places.
- Granite. These natural stone tiles easily withstand temperature changes and have a long service life.
- Rubber. A relatively new material, which is made on the basis of crumb rubber. This tile is soft and highly elastic. The material is most often used for installation on playgrounds, pedestrian paths and other areas that are subject to increased safety requirements.
The choice of material depends on where it will be installed and how actively the tile will be used. The material is usually selected according to its intended purpose. For example, if cars will drive on the tiles, then preference should be given to products that are produced using a concrete block press, since they can withstand heavy loads and have a long service life.
Back to Contents
Mosaic materials
Materials with a glossy surface create an incredible 3D effect, as each particle of the pattern shimmers with its own colors.
You can lay out the mosaic either on a flat, flat surface or on a raised, convex surface, which will look even more interesting.
When laying mosaics on a concrete surface, it is better to use dry construction mixtures; for a wooden surface, waterproof adhesives can serve as the basis.
Materials for laying mosaics can be very different, depending on the chosen area of use:
- shells, river stones, pebbles, tile fragments, which are more suitable for laying paths, steps, borders
- broken ceramic dishes, fragments of mirrors, glass, fragments of disks are suitable for laying out patterns on walls and fences, decorating flowerpots, benches and tabletops
- Coins, bottle caps, decorative chips and colored quartz sand, beads and buttons can be used as mosaic material.
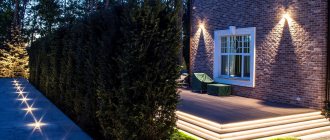
Advantages of paving slabs
The material has the following positive features:
- excellent appearance compared to other types of coatings used outdoors;
- strength, reliability and durability - artificial material lasts at least 30 years, and the service life of natural stone products can be more than a hundred years;
- the tiles are made from absolutely environmentally friendly and harmless materials;
- the products tolerate low and high temperatures well;
- basic care and ease of cleansing;
- paving slabs are easy to transport and install;
- the ability to create many styling options, thanks to a large selection of shapes, sizes and colors;
- If necessary, the material can be removed for reuse.
Many people wonder how to choose paving slabs for a car. The main feature that it should have is high strength and withstand heavy loads. Also, the tiles should be laid on a concrete base using all necessary standards. This is the only way the material can withstand the heavy weight of the vehicle.
Back to Contents
Laying natural flagstone in the yard
Before laying the yard with wild stones, it is necessary to wash each part under running water, using a brush. Clean stones should then be placed around the concrete-filled area to dry. It is advisable to sort them by shape, shade and size.
When the site is ready and the stones have dried in the sun, you should determine the most prominent place in the yard and place the most beautiful and smoothest stone there. His o. This can be done using chalk. Then a second stone is found, the side of which fits well with one of the sides of the first. It is also marked with chalk, only with the number “2”. You should immediately note the matching sides of the stones; to do this, write the number “2” on the corresponding side of the first, and “1” on the second. If wild stones are very difficult to match to each other, then their strongly protruding sides can be cut off with a grinder using special cutting wheels.
Despite the apparent complexity, working with flagstone is accessible to almost everyone, if you have at least minimal knowledge of the technology of working with it.
After all the stones intended for laying in the yard have been selected and marked with numbers, you should dilute a special glue for them, bringing it to the consistency of liquid sour cream. Some people add cement or very fine, sifted sand to the glue in a 1:2 ratio. In this case, the consistency of the binder is achieved, identical to that of thick sour cream. The mixture should be homogeneous and fairly plastic. If you want to create a beautiful stone edging, it is best to mix white cement into the glue.
The glue is applied to the site using a special trowel. In this case, care should be taken not to create cavities that may subsequently fill with water, which may cause the stone to split or it may simply be torn away from the “trough.” The first stone is placed on the layer of mortar, which is usually immediately stood on with your feet so that it is pressed into the mortar as much as possible. Under the influence of body weight, excess glue will be squeezed out; it should be collected with a trowel back into the container with the solution.
All subsequent stones should be laid using the same principle. When performing these steps, you must be sure to monitor the level of the stone surface of the site. All stones should be located at the same height as the very first one. The next day the glue will not yet be hardened, but will have time to set. Usually this condition is used to create hollows. To do this, the entire area is cleaned with a brush using a large amount of water.
In the following days, the area will dry out, during which time it is necessary to constantly spray it with clean water. It should be remembered that after complete drying the stones will become much lighter, so if you want to leave the area as it was when it was wet, you can coat it with polyurethane varnish.
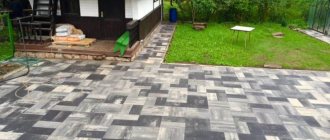
Laying stones on sand whose thickness exceeds 3 cm
When purchasing stones with a thickness exceeding 3 cm, you should consider a different way of laying them in the yard. In this case, the site should be properly prepared. Usually the top layer of soil is removed at the very beginning. If you plan to drive heavy vehicles into the yard, then it is best to choose a depth of 50 cm. In this case, 30 cm of them should be covered with sand.
If the soil is stable, then the depth of the “trough” can be about 30 cm, which will require a 15 cm layer of sand. Each 5-centimeter layer of crushed stone, sand or gravel must be watered and compacted.
Typically, when making the base for a stone paving yard, a drainage system is built that allows water to drain into the lower layers of the soil. This is especially true for areas where the soil contains a lot of clay. Between layers of sand, it is recommended to pour a layer of gravel on permeable geotextiles. The latter does not allow the sand to be washed out, and in addition, it prevents the germination of weeds.
Stones that will be located along the edge of the site are usually placed on cement mortar or on a special curb with a ledge. In this case, it is recommended to make gaps between the stones of at least 3 mm, which are then filled with dry mixture or sand, poured with water and tamped thoroughly.
Disadvantages of paving slabs
Any material has its disadvantages. Paving slabs have the following negative features:
- extraction and processing of material is a rather long and labor-intensive process;
- In order for the tiles to last for many years, it is necessary to organize drainage competently and efficiently;
- uneven subsidence due to improper installation;
- The design of the tracks has a fairly high noise level and is not always convenient when driving a car.
Paving slabs, with all their advantages, have some disadvantages, but for many they are insignificant, since the attractive appearance and durability of the material cover all the disadvantages.
Back to Contents
With concrete base

To properly lay the sheet, you can use a special glue designed for natural stone. But first, we need to thoroughly clean our concrete driveway base. It must be perfectly clean.
The glue should be applied to the sheet using a trowel, making sure that there are no air bubbles. You can start laying track elements on top of the glue. Press them carefully to release excess glue. You can remove the excess with a spatula. All tiles must be on the same level. You can adjust the height using the same glue (see video).
The path should be given at least a day to dry. Then you should rinse it with plenty of water. The edges of the path can be emphasized using borders made of the same material. To do this, you need to shape them with a grinder. And in order to make the stone look more neat, you can coat it with polyurethane varnish.
So, laying the path yourself is not at all difficult. The main thing is to have the necessary tools, patience and the desire to create.
Choosing tile thickness
Both the visual component of the coating and how well the material will fit on the selected area depend on the thickness of the paving slabs. This parameter defines the specific area of use and is the main operational indicator that determines the choice. The following types of tiles are distinguished by thickness:
- Pedestrian. Thickness about 30 mm. These tiles are intended for paving garden paths, sidewalks, house blind areas and other areas.
- Universal. Thickness – 50-60 mm. Designed for laying paths, parks and other recreation areas.
- Monolithic. Thickness – 70-80 mm or more. Designed for parking lots, truck alleys, and other areas with heavy loads.
The thickness of the tile affects its cost. The most budget-friendly is pedestrian, and the most expensive is monolithic.
Back to Contents
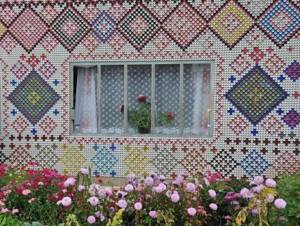
Where to use mosaic?
- laying out garden paths, platforms, patios
- garden furniture (tabletops, benches)
- vertical mosaic on walls, fences
- design of a swimming pool, fountains, mini-pond
- decor of garden flowerpots
- mosaic decoration of various decorative elements in the garden (garden sculpture, decor)
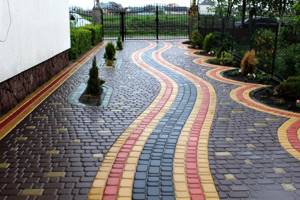
Shapes of paving slabs
Paving slabs vary in shape. There are several varieties:
- paving stones,
- honeycomb,
- Gzhelka,
- clover,
- flower,
- parquet,
- wave and others.
A wide range of shapes and colors allows you to create unique compositions from the material. The number of styling options is limitless. You can come up with your own composition or seek help from professional designers.
Back to Contents
Paving the yard with granite paving stones
The usual version of row masonry of granite paving stones implies tolerances on linear dimensions, while the seams are smooth and located in the same direction. First, the outer stones are installed so that they can be used to guide the height of the entire site. Usually they are laid on a prepared surface covered with a dry mixture. This involves using rubber hammers to drive each stone to a depth of at least one third of its height.
When the entire area is paved, it should be covered with sand and swept at least four times. If it seems unreliable that the stones are compacted in sand and dry mixture, then you can fill the seams in this way: first, clean the space between the stones with a scraper to a depth of about 3 cm and then fill it with a solution of a two-component binder emulsion mixed with quartz sand. After which you need to leave the yard paved with paving stones to dry.
Paving a yard with stone can be done by almost anyone who knows how to properly handle construction tools and who has the slightest understanding of building materials. However, before you begin installation, you should consult with a specialist.