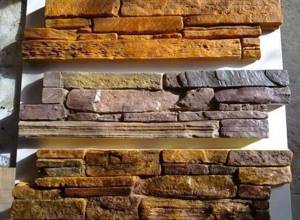
Artificial stone is easy to use and costs less than real stone - moreover, you can make it yourself. Of course, it’s much easier to buy, but sometimes you need stones of a special texture and you can’t get them. Next we will talk about the features of such stones and the materials used for them, how to make the shape and the stone itself.
Features of artificial stone and material for it
Artificial stone has many advantages, including:
- Compared to natural materials, it weighs less - this helps during transportation, and is also useful during processing and installation.
- You can do without transportation at all, and make it right near the object on which it will be mounted.
- If the finished material is not enough, you can always make more.
- Quality can be controlled at all stages of production.
- The smooth back surface makes it easier to work with.
- They can be used to line stoves and fireplaces.
- Materials for production are inexpensive.
- You can make artificial stone of various textures, sizes, shapes, colors, and so on - completely to your liking.
Among the disadvantages of artificial stone, it is worth highlighting first of all its fragility in comparison with natural stone. However, the service life is far from short: approximately 30-40, in some cases 50 or more years. But in order for an artificial stone to last a long time, it must be made from high-quality materials according to an exact recipe. It is not always easy to comply with it - this can also be considered a minus.
It’s worth briefly going through the main materials and manufacturing methods:
- Artificial stone made of cement. In addition to the cement itself, it also requires dry sand, pigment and polymer additives are added. The result is a stone that is both durable, moisture-resistant and chemically inert. It is quite easy to restore and can imitate almost any natural stone.
- Based on gypsum. Since gypsum construction has been around for a long time, the technology is well established. Its advantages: low specific gravity, good sound and heat insulation, maintainability. Water and pigments are added to the plaster. Gypsum does not withstand strong temperature changes, so it is usually used for interior cladding, and stone is made from it in the warm season or indoors.
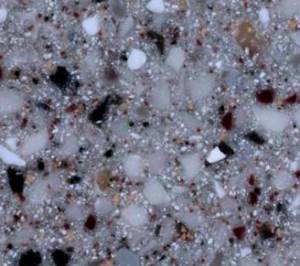
- Acrylic stone mostly consists of a mineral filler, as well as stone chips - it can be made of marble, granite, jasper, sandstone and other rocks. Acrylic resins act as a binding component. The production process is complex, so it is much less common to make such stones yourself. Their advantages: complete moisture resistance, strength, wear resistance, ease of cleaning and low weight.
- Quartz stone is made from quartz and polyester resin. The manufacturing technology is similar to that used for acrylic artificial stone. In terms of properties and scope of application, quartz is also similar to it; Thanks to the polyester resin, it is not afraid of tensile and bending loads; it performs well in conditions of both high and low temperatures.
- The flexible stone consists of two layers: fiberglass and a decorative coating. The key property is flexibility, which greatly simplifies finishing. It is easy to process: you can simply cut it with a knife to give it the required shape, and no problems with the edges such as delamination will arise. Flexible stone has a number of other advantages: it weighs little, is non-flammable, antistatic, waterproof and vapor permeable - as a result, it is quickly gaining popularity, including increasingly being made by hand.
Artificial stones are also made from other materials - there are many more, so they will not be described all. Next, cement and gypsum are discussed in more detail - these materials are easier to use than others, which is why they are the most popular.
How to make a huge false boulder for a summer cottage or garden
08/09/2020 Bender Rodriguez Homemade products
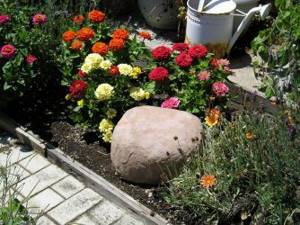
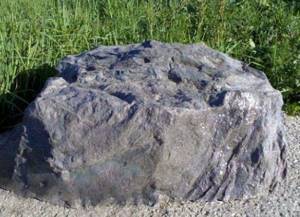
From this instruction you will learn how to make an artificial stone-boulder with your own hands. Although, as the author of this idea admits, there are simpler methods for creating an artificial boulder, we are sure that this method will not cause you any particular difficulties. The author decided to make a similar boulder stone to decorate the courtyard in front of his house. You can also transform your garden plot with artificial boulders. Subsequently, based on the materials in this instruction, you will be able to make huge boulder stones. This will save you a ton of money on purchasing real stone boulders.
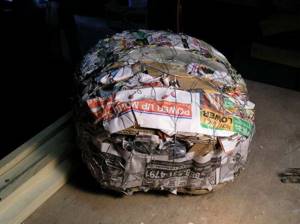
Before you start making your boulder, grab a corrugated cardboard box of the appropriate size. We think you shouldn’t have any problems finding a cardboard box. Also prepare old newspapers as a filler for the boulder stone, a small piece of wire mesh and, of course, tools and materials for creating a cement/concrete mortar: mixers, trowels, buckets, water, cement, sand (or sand-cement mixture), etc. d.
Step two - Selecting a design and starting construction of an artificial stone-boulder
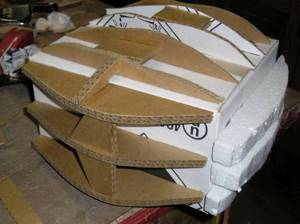
The author of the instructions made the base for the boulder using cardboard extenders on the sides of the box, which he glued with regular PVA glue. You can also use a similar technique, just do not forget to leave this structure for a while so that the glue is well formed and the cardboard base of the artificial stone-boulder acquires sufficient strength. It’s even best to create a cardboard base in stages, gluing each subsequent element and waiting time until it sticks properly.
Step three - Give our future product a natural shape for a boulder stone
Look at a few photos of raw boulders before you start filling the cardboard expanders with newspaper. This will give you an idea of how to make the boulder into a more natural shape. The author of today's tutorial also used several pieces of foam to create the expanders. This is not at all necessary. This is only necessary if you have a desire to add additional strength to the structure when applying the cement mixture.
Step Four – Wrap the shape of the future boulder using wire mesh
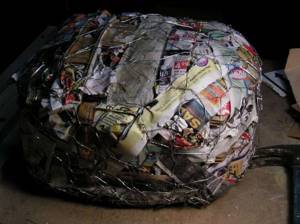
Once you've filled the mold with newspaper and added foam expanders (this is optional), you can wrap chicken wire around the faux boulder base. The author used a mesh with a cell size of 5 cm, since it was significantly cheaper than meshes with smaller cells. But if your financial capabilities allow, then it is best to use a mesh with 2.5 cm cells. We may recommend that you wrap the entire cardboard structure two full times (when using a mesh with large cells, like the author).
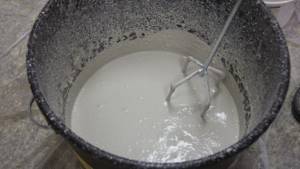
Step five - Preparation of cement mortar
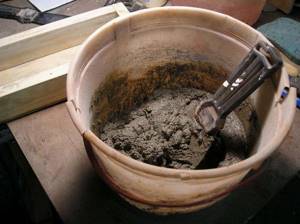
We will follow the recommendations of building materials manufacturers and prepare a mixture consisting of 3 parts sand and 1 part cement. Next, add enough water to form a thick cement mixture. Of course, you can experiment with the composition of your cement mixture. For example, you can take 4 parts sand and 1 part cement, etc.
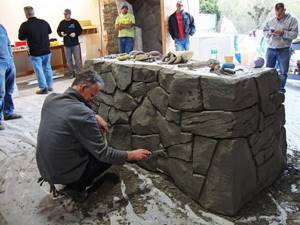
Step six - Lay out the stone-boulder from the cement mixture
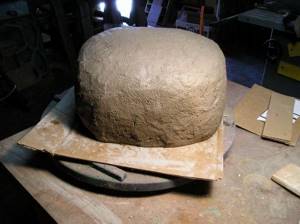
Use a wide trowel to spread the cement mixture into the prepared mold. It is best to start from the bottom of the form, waiting for the previous layers of cement mixture to adhere well to the surface. The author of this instruction used a small rotating tabletop to make it more convenient to work with the shape of an artificial stone-boulder. Recommendation: Try to cover the entire surface of your workbench with newspapers so that in the future you will not have to scrape off frozen drops of cement mortar.
Step seven - Finishing the work on creating an artificial stone-boulder with your own hands
Leave the resulting structure overnight for the cement mixture to dry. Now you can begin to fill in any missing areas of the faux boulder or any exposed pieces of chicken wire. To seal such places, the author used tile adhesive, having previously mixed it with special cement paint. And to give the boulder a natural color, use yellow-brown paint. Keep in mind that this mixture dries very quickly.
That's basically all at this step. Although, you can experiment to achieve a blurry effect by using different paint coating techniques, using acrylic paints, etc.
After final drying (within several days), the author of this instruction applied a high-quality sealant (special, for interior concrete work) to the surface of the manufactured artificial stone. This will protect the boulder stone from the weather and make it more durable.
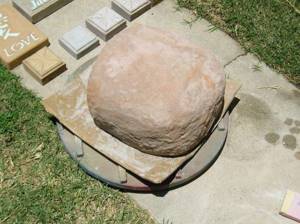
Step Eight – Boulder on your plot
Now you can move your artificial boulder to your garden plot to the place where you want to see this decorative element. A hand-made boulder stone will cost you much less than buying and bringing the real thing. Yes, and if you wish, you can always move the artificial boulder to wherever you want. But, it will be difficult to do this with a real stone-boulder.
Source: prosamodelki.ru
boulder, country homemade crafts, homemade crafts for the garden, homemade decorative chambers, false boulder, figurines for the garden
How to make a mold
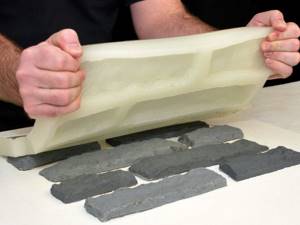
Before you start working on the stone itself, you need to make a mold for it. Although you don’t have to do this, but simply buy ready-made ones, making it yourself is not too difficult a task. The mold can belong to one of about a dozen varieties; the easiest one is to make a silicone one - it is the process of its manufacture that will be discussed further.
- First you need formwork. The material for it can be PVC panels, plastic containers and the like. Mark the template with a 1 cm allowance from the edges and cut it out.
- Prepare hot soapy water.
- Apply lubricant inside the formwork (you can use grease).
- Place the sample inside, having also lubricated it first.
- Squeeze out the silicone.
- Soak the brush in soapy water, coat the silicone and press it in, do not forget to constantly foam the water and dip the brush in it. Make sure there are no gaps between the silicone and the surface of the sample stone.
- When you're done with this, all that remains is to use a spatula, also previously soaked in soapy water, to level the surface with it.
The silicone will take a long time to dry: about a centimeter per week, so it’s best to start making molds well in advance. When it dries, the formwork will need to be disassembled and checked to see if there are any cracks. If they are found, cover them with fresh silicone. Using one matrix, you can make about a dozen stones, after which it becomes deformed - so you should immediately calculate how many forms you will need.
Types of artificial stone
When considering the question of what artificial stone is made from, it is not difficult to choose a technology acceptable for use at home.
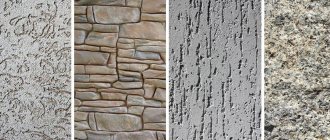
Depending on the raw materials and methods of processing, artificial stone is divided into the following types:
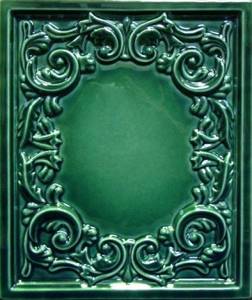
— Ceramic (tiles) - the manufacturing process requires the creation of high temperatures to fire the raw materials and transform them into a monolithic conglomerate.
— Plaster (cast). It can be done at home. The costs of raw materials and production are minimal, however, such stone is suitable only for interior decoration, since it is not resistant to frost.
— Concrete molded. The cost of production is more expensive than gypsum, since the resource of molds for casting concrete is less. Suitable for self-production. Frost-resistant.

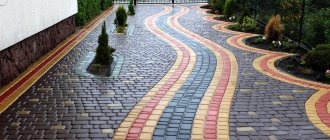
— Free-formed reinforced concrete. This artificial stone is made piece by piece, usually at the site of use (artificial cobblestones, boulders, slabs).
— Hot-curing polyester. In terms of its mechanical and decorative characteristics, it is superior to some types of natural stone, but the synthetic compound hardens only in a vacuum at elevated temperatures. It is not suitable for home production.
— Cold-hardening cast acrylic stone. Suitable for home production. In the temperature range from +175 to 210 it is thermoplastic, therefore it allows additional molding after casting.
How to cast stone from cement
To make a mortar, add one part cement to three parts sand. You can take less sand, then the stone will be stronger. Mix the sand and cement, then gradually begin adding water and dye, constantly stirring the solution. Its consistency should ultimately resemble very thick sour cream. To increase ductility, you can add glue.
If you need to make a cobblestone, then you don’t need a mold at all; in other cases it will be required. Before you start pouring the solution, you need to paint the mold - this way the dye will stick better. Little by little it will need to be added to the solution from the very beginning to the end of mixing - however, some people do the filling in two layers and do not add dye to the second. You need to take it from 3% to 7% of the weight of the mixture, it depends on the quality of the dye itself, the cement, and also how intensive staining is necessary.
When the filling is half done, you need to add synthetic mesh for reinforcement. Instead, fiber fibers can be poured into the solution. After reinforcement, pouring continues until the form is filled. Vibration is carried out all the time to compact the mass, so work must be done on a vibrating table. You need to make grooves on the surface of the mixture so that the stone will stick better.
12 hours after pouring, it can be removed and closed in a plastic bag, where the concrete will gain strength. After use, the mold should be washed with dish soap - this will help it stay in good condition longer. The surface of the stone should be covered with drying oil - this way dust will not stick to it and the dye will last longer.
Previously, we wrote about how to make a concrete countertop.
How to make a stone from gypsum
The process is similar to how stones are made from cement and sand. First you need to prepare the water: the gypsum solution hardens very quickly, 5-8 minutes are enough, so if more time is needed, you should add citric acid to it in advance - about 1 gram per liter or a little more. With it, the solution will remain liquid for more than an hour.
If a coloring pigment is needed, it is also added to the water immediately, approximately 3-7% of the mass of the prepared gypsum, after which it is mixed well. To find the optimal color, you can make several test stones, adding different amounts of dye.
Sometimes it is not added at all and the result is a white stone, which is then tinted. This should be done with several brushes of different widths, and not try to paint even strokes - on the contrary, the more chaotic the color of the stone, the more natural it will look. To make the paint stick better, the stone should be varnished, but you need to use a matte one. If the stone is lying in a dry room, you do not need to use varnish.
To decorate, you can pour a little sand, pebbles, beads or ash into the mold in advance - in the latter case, the stone will look beautiful only from a distance.
Sand is often added to gypsum - it makes the stone stronger; the usual ratio is 10:1. After this, the mixture is added to water at a ratio of 3:2 and mixed until smooth.
The form for pouring must be coated in advance; for this, a composition of turpentine and wax is usually used. The solution is poured into it until it is full, leveled with a spatula and left until it hardens. Then the stone is removed from it, dried - and it is ready. It is better to use it only indoors, but if it is well processed and impregnated, it is also suitable for exterior decoration.

An article on the topic was previously posted: read >>
Molding mixtures
Gypsum artificial stone
The mixture for gypsum stone is prepared from gypsum grades G5 - G7. It is made in small portions, counting on simultaneous filling of no more than two forms, since the setting time of this binder does not exceed 10 minutes.
Composition of the mixture: gypsum, citric acid to slow down hardening (0.3% by weight of gypsum), water - 60-70% of the volume of gypsum. The pigment is taken at the rate of 2 to 6% of the weight of the gypsum. The dosage of the coloring substance is selected on test samples of castings.
concrete stone
You can make artificial stone with your own hands inexpensively and with high quality from concrete. Unlike construction, here the initial composition of the components is slightly different: 3 parts of cement are taken for 1 part sand. The proportions of the pigment (you need to use an alkaline resistant one!) are the same as for gypsum stone.
The addition of polymer additives reduces the brittleness of this material and increases its abrasion resistance.
Cold hardening acrylic stone
This material is made on the basis of acrylic resin and hardener. The recommended volume of mineral filler to acrylic is 3:1. The amount of pigment is taken depending on the total weight of the filler (on average from 2 to 6%).
As an inexpensive filler, you can take gravel, stone chips or granite screenings. Before preparing the mixture, the filler is washed with dish gel, then calcined over a fire and rinsed with clean water.
The preparation process consists of three stages: first, the pigment is mixed with the filler. Then the acrylic resin is mixed with a hardener and a filler with pigment is added to it.
The time during which the acrylic mixture must be poured into the mold (from the moment the hardener is introduced into the resin) is no more than 20 minutes. The setting time of the mixture lasts from 30 to 40 minutes. The product requires 24 hours to completely harden.
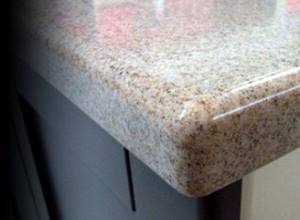
If you are interested in countertops made of artificial stone, then the best materials for their manufacture are concrete or acrylic. The concrete product is heavier and does not allow you to create surfaces as varied in pattern as when using acrylic resin. However, the low cost of raw materials and the simplicity of the casting process partially compensate for this disadvantage.