What should you pay attention to first?
Before you make a hanging hammock, pay attention to the following parameters:
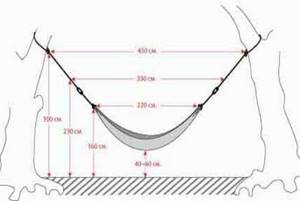
- Reliable supports. You can hang the product between a couple of trees, posts or swing supports. If you choose trees, then the diameter of their trunk must be at least 20 cm. If the posts are, then they must be deepened by at least a meter. Remember, the more the canvas sags, the less the load on the supports.
- The product is suspended as standard at a height of 1-1.5 m above ground level. And the distance between the supports should be about 3 m. If you buy a ready-made hammock with supports included, then the distance from the ground can be adjusted by the degree of tension of the canvas, but in simple models the required distance will need to be measured and fixed when hanging.
- Fasteners should be strong and thick. Minimum diameter - 8 mm. Take the trouble to reinforce the fabric with eyelets if the model requires it.
- The best fabric to use is tarpaulin, teak for mattresses or camouflage fabric. Synthetics cost less, are light and durable, but when you sleep on such a bed, you will understand the mistake. Your body must breathe, in addition, natural matter takes on the shape of the body much more easily. See photo ideas below.

- It is better to make a wicker hammock from cotton threads. The knots on such threads are tightened tightly, and they are much more pleasant to touch than nylon sliding models. In those places where the rope touches the tree and can fray, it is necessary to put on a clamp made of a nylon tube.

Next, we’ll figure out how to properly make a high-quality home hammock with your own hands.
Photo tips on how to make a hammock for a summer house
Read here DIY bird feeder - the best ideas for making simple, beautiful and practical feeders (90 photos)
Did you like the article?
1+
DIY Mexican hammock
The Mexican model is simply made from a single piece of durable material without the use of crossbars. Like a cocoon, it envelops the person lying down, relaxing the whole body.
Important! We do not recommend using this type of hanging bed for elderly or sick people, as it is difficult to climb into and easy to fall out of.
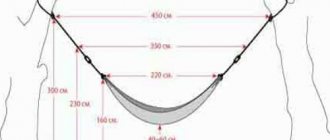
The weight of such a product is about a kilogram, so it is convenient for a fisherman or hunter to take it with him on a hike. To make it, take a couple of pieces of fabric 3-3.2 m long and 1.5 m wide. Tuck and stitch around the entire perimeter each time.
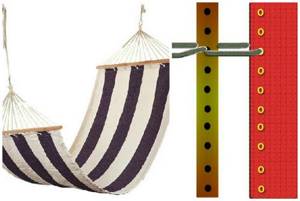
Next, look at the photo and follow the instructions:
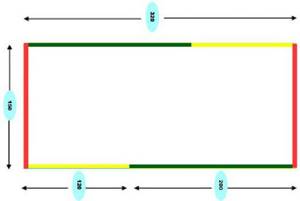
- Sew (green line) 2 m along the long sides of the product.
- Leave the areas marked in yellow on the drawing unstitched. This will make it convenient for you to slide the “foam” or mat inside for greater comfort.
- Fold the red line (narrow side) 2-3 cm and stitch.
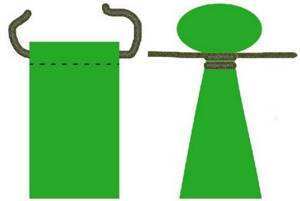
- You will get a kind of “tunnel”, and thread the cord there.
- When crossing the cord, pull it by the ends. Thus, the matter will bunch up into a knot.
- Wrap the ends of the cord around the tightening area a couple of times and tie them in a knot.
- Use a hanging rope to wrap the tree or support several times, putting a pipe on the rope to prevent chafing. After this, the suspension is attached to the hammock knot and secured with a “noose” knot.
- Check the strength of the fastenings, adjust the degree of tension and you can relax in a blooming garden.
If you leave the hammock in its original form, then it will wrap you like a cocoon. If you put a rug inside, the bed will become wider and harder. The choice is yours.
Types of hammocks
Practical and convenient products have appeared a long time ago. There are the following types of hammocks:
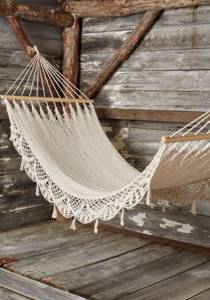
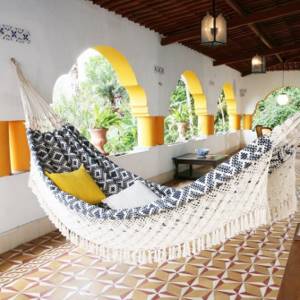
- Brazilian model made of cotton fabric with fringe;
- the Mexican version has a long service life and is made of synthetic fabrics;
- The Colombian type is made from natural materials.
The modern hammock combines all the best characteristics of different models. Manufacturers today offer interesting solutions and are constantly improving their products. Therefore, finding a suitable model is not difficult.
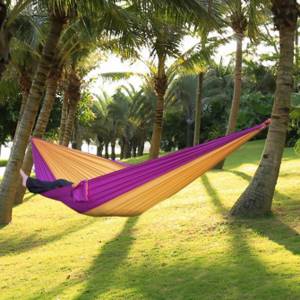
Hanging hammock
This option is popular due to its light weight. It is easy to hang it between trees; poles are also used as mounting supports. It is worth choosing strong supports that can support the weight of an adult. Measured rocking calms the nervous system and provides complete rest.

A hanging hammock can be purchased inexpensively at various stationary retail outlets, or use the services of online stores. Hanging it is easy with the help of tension elements. Special supports for such products are also commercially available.
Hammock with frame
The mobile model is installed in any picturesque place in a suburban area. It can be easily transported in a car or installed at home as a bed. To ensure that the hammock fits into the surrounding landscape, select a suitable color option.

There are stationary models available in different decors. They are ideal for decorating a suburban area, but they are difficult to transport.

A hammock for a summer house with a frame is popular due to its ease of installation. You can take the product with you fishing or when traveling outdoors with friends. You can order a simple model or choose an original design option.
Chaise lounge
You can perfectly relax in a chair - a hammock or on a sun lounger, in other words, on a chaise lounge. Nowadays there is a large selection of them on sale, which is designed for different budgets and tastes. It can be a wooden structure, made of strong fabric with a metal frame, plastic or even inflatable.
Mattresses and chairs filled with air are very comfortable, have a pleasant-to-touch surface, but you need to protect them from sharp objects, and there is one drawback - they are short-lived.
Wooden beds in the form of cots are also convenient for relaxation. You can install them in the open sun or under trees to hide from the heat. They are easy to transport as they take up little space when folded.
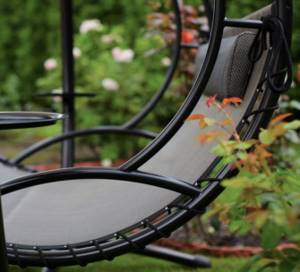
Hammock chair
An excellent option for arranging a backyard area will be an excellent choice. A hammock chair is a type of hanging chair. The main difference is the shape of the lounger. Choose a product of the shape that best suits the taste of the household.

The design will be complemented by comfortable pillows and simple canopies. The universal model is convenient for reading books in the fresh air, knitting on the veranda. If you need to work, sit in a hammock with your laptop. Depending on the design chosen, you can sit or lie in it.
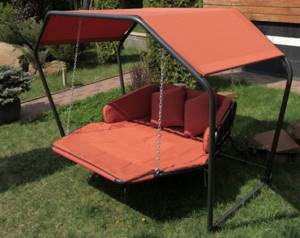
Hammock swing
An interesting model is made in the form of a swing. Products are available in various shapes, but they all have one attachment point. This allows them to swing. This children's hammock will appeal to kids and adult family members.
To fasten the structure, a strong base is required that can withstand significant loads. If you purchase a large product, it is often complemented with pillows of different shapes and sizes, and a beautiful canopy.
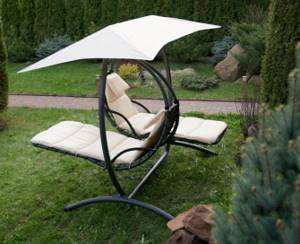
It is made in the form of a chair or a standard model. It is installed on a special frame or hung on posts.
Choosing a hammock for a summer residence
In order for the product to please its owners for a long time, it is worth paying attention to the quality of the material when purchasing. The fabric must be hypoallergenic, breathable, and durable. The best option would be a cotton product. The nylon type is highly durable but has poor air permeability.
When choosing a wicker type, keep in mind that it stretches quickly. If you purchase a version with a flat weave cord, it will rub the skin less. Hammocks often have cross bars that prevent the fabric from stretching.
A good hammock for a private home can be found in specialized stores. They are presented in a huge assortment. The cost of products depends on the materials used and the type of construction.

How to hang a hammock in the country?
The product must be securely fastened during installation. To do this, choose a convenient place in the garden in the shade of trees. The distance between the supports should be 0.3 m greater than the length of the hammock. It is also necessary to take into account that the structure will stretch.
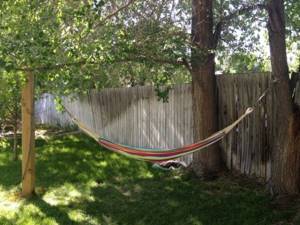
The hanging height should be from 1.5 m so that the product does not sag to the ground. There are special supports on sale on which the hammock is attached. For the frame type, poles are not required, its installation takes a minimum of time.

Children's hammock
Whatever the mounting, it is designed for less weight, so it is better not for adults to use it. Children love hammocks and swings, so the coloring and decor should be appropriate.
A great option for children's play at any age is a rocking chair.
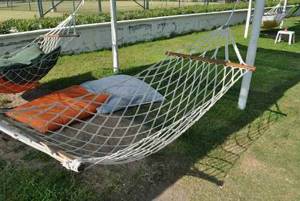
Simple hammock
With a piece of tarpaulin or blanket and strong ropes, you can make a simple hammock. The edges of the bed are assembled, secured with a knot, which then needs to be pulled to the tree trunk, tied several times and that’s it! The device is ready. You can test it.
DIY hammock
You can get an original version that will become a real decoration for your dacha by making it yourself. If you have weaving skills, then it’s easy to make a stylish accessory using special tools. You can purchase fabric to make a hammock for your garden with your own hands. This is the easiest way.
It is necessary to purchase crossbars, which are drilled at a distance of 5 cm. For a length of 1.5 meters, you will get about 30 holes. Then they take cotton fabric or tarpaulin and sew the base of the product. After selecting the material, a piece 2.7 meters long is cut.

If the hammock is supposed to be installed outdoors, then the resistance of the fabric to getting wet is taken into account. The edge of the fabric is folded and stitched with a sewing machine.

Metal rings are used as fastenings. The ropes will give the structure strength. The cord passes through the holes in the slats, rings on the base of the structure.

There are two ropes and several cord edges on each side of the warp. All of them are collected into a single bundle using a special fastener. Afterwards the structure is suspended on supports. If you can’t find a couple of trees in the garden to mount a hammock, you can make stands yourself. This design will allow you to install the product in the right place and move it at any time.
It is easy to make from available materials. The price of a self-made frame will be much less than a finished structure purchased in a store.

Homemade hammock model “cocoon”
This option is simple, you can relax in it and not be afraid of falling. It envelops the whole body. But to get there, you need to make some effort. Therefore, older people will not be very comfortable in it. Otherwise, it is convenient: it takes up little space, is easy to manufacture, light and cozy.
What do you need for the business?
- Thick fabric 3 m X 1.5 m.
- Durable cotton strips 1.5 cm long, 2 cm wide - 2 pcs.
- Blanks for loops - “tunnels” made of strong material measuring 3 cm by 17 cm - 24 pcs.
- Nylon or nylon cord.
- Clothesline for hanging.
- Sewing machine, scissors, pins.
Execution sequence:
Trim the fabric along the length, making seams of 2 cm. When tucking the narrow edges, insert a strip into the middle of the fabric and stitch it twice on a typewriter. Sew the second strip to the other side in the same way.
Attach the “tunnels” with pins at equal distances, folding each one in half. There are 12 pieces per side. Flash them several times to be sure.
Thread cords through the “tunnels”, which are collected and pulled together into a knot. Then tie a rope and wrap it around the tree several times.
The result is a good hammock for a private home, which can be quickly and easily made without having great talent for sewing.
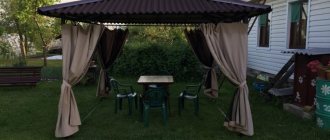
Decorating a hammock
After purchasing and installing the product or constructing it yourself, you should take care of the decor. You can give the structure an original look with the help of a beautiful canopy made of transparent or thick fabric. It will not only decorate the product, but also protect a person from bright sun rays and gusts of wind when resting.
Soft pillows in bright colors will help create comfortable conditions. It’s easy to sew them yourself by filling them with padding polyester or down. You can purchase finished products in the store. The hammock is also decorated with ribbons and other elements.
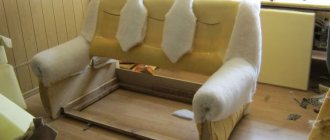
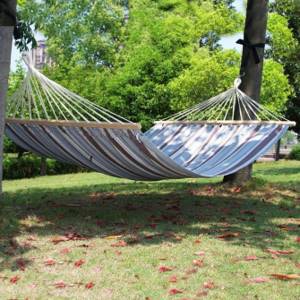
Brazilian model with crossbars
If you sew a hammock at home using fabric and crossbars, it can become a cozy place for both a child and an elderly person. Take:
- a couple of pieces of fabric 90x200 cm;
- 2 shovel handles approximately 90 cm long;
- a pair of nylon cords for linen, 10 m each;
- drill.
The manufacturing process consists of the following steps:
- Sew the pieces of fabric together. Fold short sections by 2 cm and stitch.
- Mark places for eyelets every 8.5 cm.
- Install metal rivets 10 pcs. from each side.
- If you don't have eyelets, you can replace them with fabric loops. Cut 20 squares 20x20 cm, fold in half, stitch and sew tightly to the edges.
- If you choose between loops and eyelets, it is safer to choose the latter.
- Also mark on wooden sticks: step back 2.5 cm from the edges, and then every 8.5 cm.
- Make holes 20 cm in diameter so that an 8 mm cord folded in half can pass through them freely.
- Cut the cords into pieces 1 m long, and pass each piece through a hole in the crossbar, the grommet and again through the crossbar. Align the ends.
- At a half-meter distance from the crossbar, gather the laces into a bun, tie a knot, and tighten securely.
Braid the knot also from the rope, and the hammock is ready!
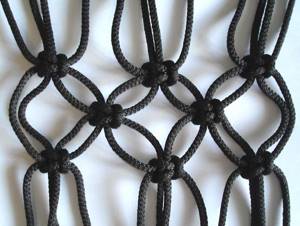
Woven hammock model
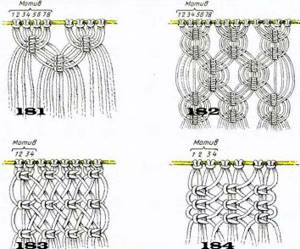
A macrame hammock will become the main decoration in your country house if you are at least a little familiar with this technique.
- Before weaving a hammock, prepare a couple of slats made of wood without knots or flaws. Make holes in them every 5 cm.

- Remember that the diameter of the holes in the slats should be equal to three diameters of the cord.
- It is better to weave a hammock from cotton cord 8 mm thick.
- The length of the cord is calculated by the formula: the distance from rail to rail multiplied by the number of holes and multiplied by 3.
- Attach each cord with a loop to the stick, and weave the fabric. There are 4 cords for 1 knot. Cells should not exceed 7 cm.
- Examples of weaving are presented below.
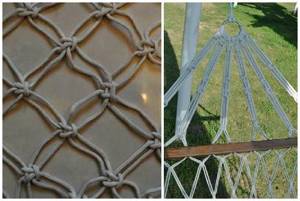
Pass the completed mesh through the holes in the rail and connect it into knots of 4 pieces. To increase strength, use metal rings.
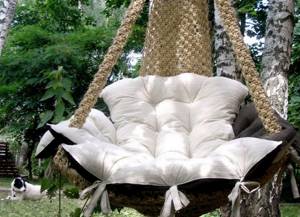
Making a hammock-cradle
The round hammock-cradle is an invention of modern designers. This exquisite hammock chair is made from hoop. At the same time, the future dimensions of the hammock depend on the diameter of the hoop. In addition, you will need:
- fabric 1.5 m wide - 3 m;
- padding polyester (same amount);
- belt tape - 8 m.
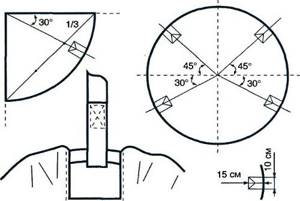
A round hammock chair is made with your own hands like this:
- Cutting drawings are presented above.
- Place padding polyester in several layers between the fabric pieces.
- Sew a kind of cover for the hoop by sewing together parts of the circle.
- Sew both sides of the cover, first placing a hoop inside.
- The cradle is attached using belts, which are simply tied in powerful knots on the hoop.

For decoration, you can tie a rich, thick fringe.
Varieties and features
There are several types of hammocks; the main ones are shown in the photo. The discoverers of the New World saw hammocks made of mats suspended on vines. Their modern modifications are known as the Mexican hammock, pos. 1. It can be either woven or sewn from fabric, but never contains solid rigid parts, except perhaps an eye ring for hanging. Wicker hammocks are generally more complex and more expensive than sewn ones, but more hygienic, because... provide ventilation from all sides.

Types of hammocks
The main advantage of the Mexican hammock is simplicity. It can only be a piece of fabric + a couple of guy ropes, see below. Other advantages are more of a native-nomadic type: it can be carried with you in a shoulder bag or carried on a horse in a saddlebag-alforkh. Nowadays, an employee of a paid beach can take several pieces under his arm, quickly carry them and hang them on newly arrived clients.
However, the Mexican hammock is, generally speaking, not ideal. In order for the person lying in it to turn from side to side, the panel needs to be approximately 3 m long, and another 1.5-2 m for each suspension. The fabric consumption is excessive, and you also need a lot of hanging space. A Mexican hammock cannot be double: the cut on the bed will need such a length that the cocoon, already quite tight, will curl up into a stuffy tube. It is pleasant to relax in a Mexican hammock for no more than 1.5-2 hours. The sailors of the sailing ships and the gaucho shepherds didn’t care: after a shift or a working day on horseback from dawn to dusk, they would sleep like the dead and on a mattress made of hedgehogs. But a modern city dweller may be interested in a Mexican hammock only for relatively short-term occasional use.
At pos. 2 hammock... you're wrong, not Brazilian. Vietnamese, also known as Malay. The natives of the extreme southeast of Asia invented the hammock independently of the Indians and for the same reasons, only the Europeans got to them much later. There is a lot of fish in those parts and fishing is developed, so it is quite natural that the original Vietnamese hammock is wicker. Fortunately, the material is always at hand - a variety of vines. The tropics of the Western Hemisphere are not rich in vines suitable for small weaving.
A hammock made from a piece of dilapidated fishing net or stems of different mechanical properties required suspension from many sling branches and distribution of the load between them. Therefore, the Asians supplemented the panel with crossbars. It is more difficult to make and install a hammock on traverses, but it is much more durable, more comfortable than a Mexican one and can be double. In a hammock on the traverses, you can enjoy the day with all the cells of your body, without feeling the desire to get up and walk unless absolutely necessary.
Note: for a home craftsman or craftswoman to make a Vietnamese hammock in amateur conditions may be easier and cheaper than a Mexican one, if one focuses not on repeating machine-factory technologies, but on manual rigging and maritime practice. Of these, only the basics will be required, and they are not at all as complicated as is commonly believed; we will master them as we go.
The Brazilian hammock is shown in pos. 3. This is a modification of the Mexican hammock for people who are more civilized, demanding of amenities and technologically equipped. A Brazilian hammock can be hung in the native way, on ropes, or, if you insert a solid cross-beam into the drawstring straps, fully extended in width. For relaxation, it is no less convenient than Vietnamese; can be up to 2 m wide. Almost the entire width of the cut.
The convenience of a Brazilian hammock for all occasions does not come for free - it is complicated and expensive. Concentrated loads from suspension points “diverge” through the fabric more difficult than through the mesh, so they require a lot of suspension branches and drawstrings. And each one needs to be reinforced by inserting a piece of braided sling into it, as well as into the edging of the panel. Without reinforcement along the contour, the edges of the stock will soon sag.
As a result, there are many sewing elements on the wrong side (bottom side) of the cloth. Strength is not strength, but in order to at least hide them, the panel has to be sewn double: 2 identical cuts are sewn down on the short sides, the resulting short wide sleeve is turned inside out and the rest is sewn/sewn inside it, whatever is needed. According to the second method, which is more designed for skilled manual work, the long sides are first ground down, and the drawstrings are sewn into the resulting wide armholes. The fabric consumption doubles this way and that without any, in general, need. In general, making a Brazilian hammock at home only makes sense for an experienced seamstress who has a machine with a needle of at least No. 100, capable of cutting through 3 layers of dense fabric with a 1.5 mm thick sling between them.
Lying down or sitting?
A Brazilian hammock of reduced size and simplified design is nothing more than a soft hammock chair on a trapeze suspension, pos. 4. A hammock chair, or hanging chair, can also be a semi-rigid frame or even rigid; in this case, the cradle position is suitable for the suspension. 5. But hanging chairs are a special class of furniture. How to make a hammock chair using approx. for 500 rubles, or a hard one made from scrap materials, you can watch a couple of videos below, and for now we’ll work on hammocks in which you can lie, stretched out to your full height.
Video: DIY hammock chair
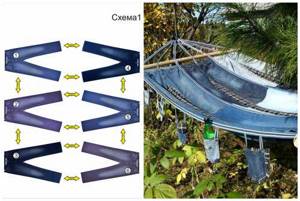
Denim hammock
To give life to old jeans, we suggest transforming them into a hammock:
- jeans - 6 pcs;
- transparent fabric width 1.5 m - 3 m;
- strong braid - 50 m;
- a pair of shovel cuttings;
- strong threads and rope;
- iron and sewing machine;
- drill and tape measure.
Jeans can be used to decorate not only a hammock, but also the seat of a swing, the creation of which we wrote about here.
Pants Conversion:
- Iron the pants and place them according to the pattern below 1-4, 2-5, 3-6.
- Align the length of the trousers, take one “pair”, and sew the slits of the trousers in a circle, one to the other.
- Adjust all other parts to match the first one.
- You will end up with 3 pairs of sewn trousers. After that, lay them on the fabric and sew them to each other and to the fabric.
- Cut the braid into 10 cm strips, then fold them in half and sew them to the waistbands of the pants. There are 2 pieces on each trousers.
- Make holes in the slats according to the number of loops on the jeans at equal intervals. The diameter of the holes is the width of the cord multiplied by 2.
- Pass the cord through the holes and loops, first in one direction to the edge, and then in the other, as if entangling the fasteners.
As you can see, anyone can make a comfortable and beautiful hammock, even without much carpentry experience. Have you ever made a hanging bed? What secrets can you share with readers? Write in the comments.
Let's get started
First, we cut 20 meters of rope for fasteners. We cut the rest into 6 meters into equal parts. Then we fasten each rope with a loop and a knot on the bar. Next we weave a hammock. The most suitable cell size, so as not to get confused and not fall through in the hammock while relaxing, is seven centimeters. Once you have finished the hammock, attach the ends of the cords with knots to the second plank and to both straps with fasteners.

Hammock Weaving Guide:
- Initially, you need to plan the size of the hammock. For example, its dimensions are 2.5 × 1 m. To do this, you need to knit a mesh, casting from 20 to 30 loops across the width. Remember, the thicker the rope, the fewer loops you need to cast.
- The process of knitting a hammock is reminiscent of making fabric. Knit the first row, turn the product wrong side out and knit the next one. Then turn over again and knit the third row, and continue in this way until the end.
- It is important to correctly calculate the remainder so that the knot is at the edge of the row and not in the middle. Knots can ruin the appearance of the hammock and cause inconvenience during use.
- When the mesh is ready, prepare the wooden planks. Make holes in the bars for fastening.
- Then, in order, you need to thread the loops from each row into the holes.

- Do this with all the holes and loops, attaching the second bar to the future hammock.
- Gather the free ends of the rope together, fold them into a ring shape, wrap them across and tighten. We repeat the same with the other side of the product.
- Thread the holder into the newly formed holes or a tight cord that will secure the hammock to the trees.
Article on the topic: Crochet Patterns and Motifs - my selection

The relaxation hammock is ready! A two-hour sleep in this bed completely restores a person after a hard week of work. In a suspended state, it is easier to relax and not take unpleasant little things to heart.
Here are a few photos showing hammock weaving patterns:
You can also watch the video collection for inspiration.