We tell you how to tame the water element in your garden. A variety of artificial sources, waterproofing the riverbed and water supply, the sequence of ground and technical work, decorating the finished reservoir - all this is discussed in the article.
You will learn:
- what is the difference between “dry” and Heron waterfalls;
- what styles of landscape design are suitable for designing artificial sources;
- which pump is suitable for a stream or waterfall;
- how to determine the optimal location and size of a reservoir;
- a clear sequence of work on arrangement of the source;
- what decor to choose for a stream or waterfall so that it really decorates the garden plot.
Types of streams and waterfalls: choosing the right one
Streams and waterfalls, in common landscape design terminology, refer to the dynamic form of water. Thanks to its fluidity, in addition to visual ones, sound effects of perception are connected: splashing, murmur. Static form, that is, ponds and pools, due to immobility, contains only a visual component. Therefore, for those who want to enjoy the tamed water element to the maximum, we recommend paying attention to streams and fountains.
Regardless of the chosen option for moving water, the principle of implementing this landscape mini-project remains the same. The water flow is looped: it moves with the help of a pump from the lower storage tank through the hose to the upper one, and then flows down again. This scheme of work is considered universal, because a natural source on the site is a huge rarity.
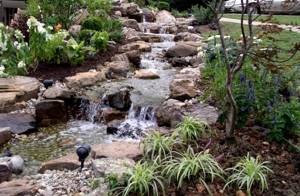
A stream in nature is a water stream flowing from a source to a lake, and on a personal plot the role of these two points is played by reservoirs. An artificial stream is created with turns, bends, areas along the length of the riverbed, and its appearance is complicated by waterfalls or fountains. The difference is that fountains are forcibly created under the action of a pump, while waterfalls arise spontaneously due to elevation changes on the site.
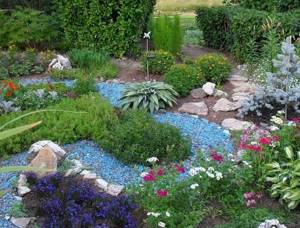
Wide stream on the plot
An artificial source is not some extraordinary phenomenon in landscape design. A stream can be created on any uneven area with a water supply and the ability to operate a pump. Depending on the topography of the area where it flows, several types of streams are distinguished.
- The bed of a calm stream with a quiet murmur is located on gentle slopes or completely flat terrain.
- A stormy and loudly babbling stream - on steep slopes.
It is better to avoid forming a stream with a very winding bed and numerous embankments, as well as any clear geometric shapes. The optimal reference point will be natural streams with their smooth bends, uneven banks and heterogeneous bottom.
To prevent the stream from turning into a series of waterfalls, do not get carried away by its complications in the form of sudden changes in relief. In addition, such a source will require the installation of a more powerful pump.
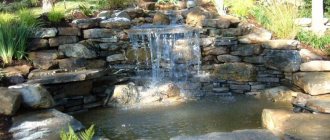
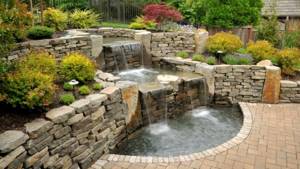
Architectural waterfall
A characteristic feature of a waterfall that distinguishes it from a stream is the pronounced differences in height along the length of the riverbed. It is worth considering: the sounds of loudly falling water can be annoying, so preference should be given to moderately wide rather than tall, narrow waterfalls. But a channel elongated in a horizontal plane is not the best solution, because the water flow will be weak. To activate it you will need a powerful pump.
Tall plants or buildings surrounding the waterfall will help muffle the noise. When arranging a waterfall, like a stream, on a standard garden plot, it is better to strive to imitate natural forms, soft and asymmetrical.
There are several types of waterfalls for a personal plot.
- Cascade. Water flows from the upper to the lower bowls, that is, along the steps of the cascade. For a cascading waterfall up to 1.5 m in height and steps up to 0.5 m wide, you will need a pump with a capacity of up to 80 l/min. If the height and width of the steps exceeds 2.5 m - about 450 l/min. You should buy a pump with a power slightly higher than necessary, since part of the energy is spent on related processes.
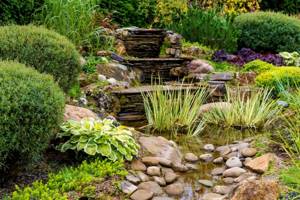
Cascade stream is characterized by the presence of several fairly high steps
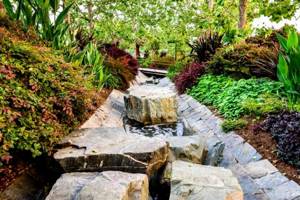
- A flowing waterfall with almost even cascade steps. Water flows smoothly from one level to another with a quiet murmur.
Stream with flowing waterfalls – gentle
- A “dry” waterfall is called so because of the absence not of the liquid itself, but of a visible reservoir for it, that is, a pond or pool. The water flows into a container hidden underground, for example, a concrete pit with a pump inside. Sometimes such a reservoir is not buried, but covered with a lattice entwined with plants.
A dry stream with a waterfall has no visible lower reservoir
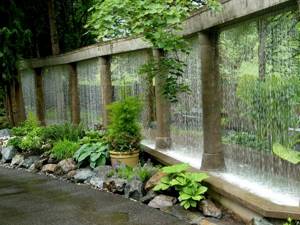
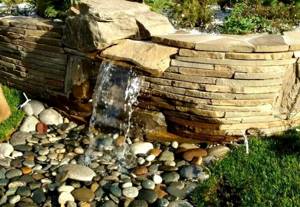
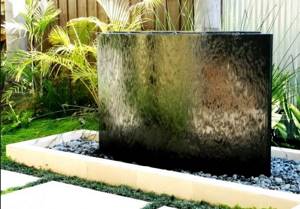
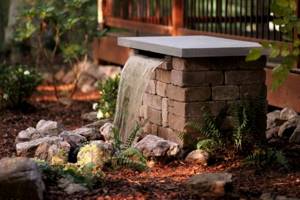
- Waterfall “wall”. Such compact waterfalls are often installed in public spaces or indoor spaces. Water flows over a solid surface: glass or the wall of an artificial grotto.
Miniature waterfall wall
- Waterfall with grotto. This is a complex structure, the construction of which requires a professional approach. The walls of the grotto with holes through which sunlight shines are made of cement mortars on a reinforced base. The walls contain supporting load-bearing structures. The structure itself is installed on a concrete base. The inside of the grotto is illuminated. There is a pump running in the pond surrounding the grotto.
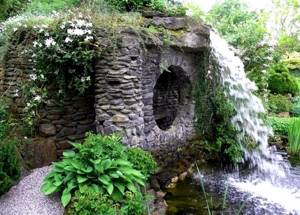
Waterfall with a voluminous stone grotto
- The pumpless waterfall, known as Heron's Falls, operates on the principle of communicating vessels. Thanks to pressure differences in multi-level containers, a stream of water is created. Using simple formulas, you can make a miniature waterfall yourself. Another option for a waterfall without a pump can be implemented if groundwater lies close to the surface of the earth on a personal plot. It is necessary to dig access to the water, make a conclusion for it and a cascade channel directed downwards. For such a natural waterfall, it is necessary to provide a discharge into the sewer system or into a storage tank.
The suitable type of waterfall or stream has been determined, and the time has come to choose its appropriate stylistic design, which depends on the general concept of landscape design on the site.
- Minimalism: laconic decor and strict geometric shapes, like dry fountains. Also, water can flow from smooth slabs into a round or square bowl. In the center of such a body of water, an island in the form of a cube or ball with jets gushing out looks organically. Stone of different textures, ceramics, metal, concrete, glass fit into the minimalist style.
Waterfall wall in minimalist style
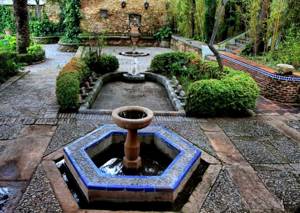
- Classical style: characterized by decor in the form of statues or amphorae, cascading and island waterfalls as a common design method. The classic style corresponds to natural materials, in particular stone: both polished and untreated.
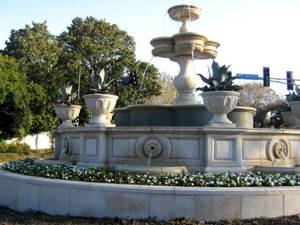
The classic fountain is highly decorative
- The natural style recreates natural landscapes through the use of natural shapes and materials. The existing topography of the site is used to the maximum, including the stones located on it - for decoration and the construction of cascades.
Artificial stream in natural style similar to natural one
- The Mediterranean style is characterized by handicraft and carelessness. Thus, a fountain may have an elaborate geometry, including several cascades, but the feeling of warmth is created by raw stone and ceramics, decorated with mosaics or glaze.
Mediterranean style - cozy and lively
Design features of a dry stream
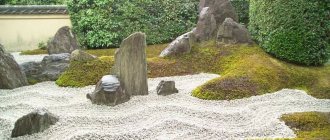
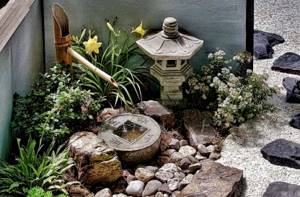
Not every part of a dacha or village has perfectly flat terrain. To hide the imperfections of the relief or to add originality to the exterior, the owners arrange various decorative elements. One of the popular options is the development of Japanese designers, made from natural stones in the form of a dry stream.
- A meandering narrow line of a stream deepens the space, visually enlarging a small flower bed, orchard or rock garden.
- The design of the facility is developed individually, taking into account the scale and quantity of consumables.
- The contour, often drawn from coarse sand, repeats the features of the landscape of the area.
Important! The winding strip should fit harmoniously into the overall picture of the local area and echo other elements of its design.
An interesting design option for a dry stream in a summer cottage
The base of the stream is constructed from natural stones of different types and colors. The wider the range of bulk materials, the more natural the object will be. Don't be afraid of making mistakes when laying out pebbles; the contour can be easily corrected with a new portion of sand.
An important point is the selection of consumables; they should differ not only in color, but also in size. A natural stream looks colorful, including light streams of water and dark depth tones.
Advice! To recreate such beauty on a site, it’s worth thinking through everything down to the smallest detail. It’s even better to familiarize yourself with the works of other masters in order to develop your own, original and extraordinary project.
A dry stream passing through a flowerbed is a fashionable trend in landscape design
Basis: water supply to a waterfall or stream
The basic point when arranging any artificial reservoir is deciding where the water will come from. Depending on the answer, the volume of upcoming construction work is determined. There are three options for supplying water to a personal plot.
- A natural source is a spring or stream that already flows on the site. In most cases, it will have to be adjusted to make it more picturesque and create waterfalls: to shape the relief, strengthen the banks, install a pump, clear the riverbed, plant plants... It is important to take care of the drainage of the areas adjacent to the stream, which are most often swampy due to the accumulation of groundwater on the surface . The way out of the situation is to form an artificial stream based on a natural one.
- Supply from outside. This method is very expensive: a constant supply of water from external sources and its subsequent drainage are organized. Such waterfalls and streams are almost never developed on a personal plot. They act as decorative elements of flow systems, for example, reclamation canals.
- A closed water supply cycle is the most common and most suitable for household plots and even apartments. Water poured into an artificial stream or waterfall circulates in a loop system thanks to the operation of a pump. Periodically, evaporating and splashing liquid must be replenished. In the cold season, drain the water from the system, remove the pump, clean it and store it indoors.
The key element of a closed water supply cycle is the pump. Such devices differ in power and operating principle, and the selection of the desired model is carried out based on the characteristics of the artificial source. To avoid mistakes, it is better to trust the professionals.
Submersible pumps are suitable for small and medium-sized reservoirs. They are lowered into the water. The device takes liquid from a reservoir, sucking it through a mesh filter. This helps prevent plants and other unwanted particles from entering the pump, which could damage it.
To circulate water in a large system that includes fountains and waterfalls, you will need a surface pump. It is placed below the water level outside the reservoir, in a special dry and ventilated shaft.
Miniature dry waterfall wall
Selection of stones
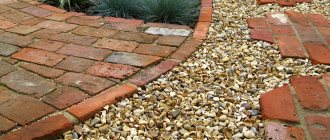
Having decided on the shape and prepared the ground for laying, you can begin to choose the type of stones and their quantity.
Landscape designers recommend not focusing on any specific type of stones, but using a variety of combinations. A combination of large and small stones that differ in color will help you create a truly spectacular composition.
Blue stones will help recreate the color of water
Useful information: If you want the future dry stream to look like real water, you can either paint the stones blue, or use slate, gneiss, basalt - materials that have a bluish tint. It will look even more interesting if you open them with clear varnish. They will reflect the sun's rays, creating the effect of wet stones.
A stream lined with granite, marble and limestone will have a slightly brownish tint. By the way, in order for the dry stream at your dacha to harmonize with the natural landscape of the area, it is advisable to use local types of stones when creating it.
Make banks from the largest cobblestones, and fill the improvised riverbed with small ones. If the width of the riverbed is large enough, you can place a few more large stones in the middle. They will look like islands in the middle of a river.
To create a flow effect, use flat stones. And in places where there is a natural unevenness or depression, you can easily create a waterfall. Light colored pebbles are ideal for this.
Decorative multi-colored stones will help give your stream originality. Lay them out in groups of several pieces along the “flow”.
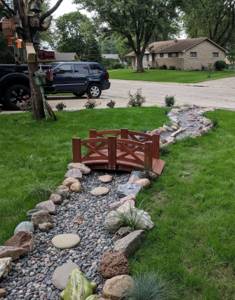
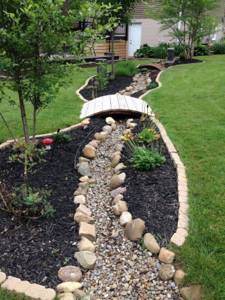
This is interesting: A wooden bridge placed directly over a dry stream will decorate your garden even more. It will give the appearance of your site a touch of romance. In general, try to use as many decorative attributes as possible that will add drama to your stream.
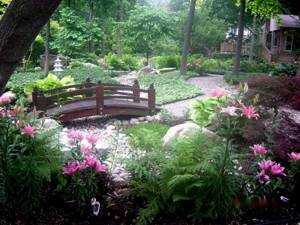
A wooden bridge will add romance
Preparatory stage: location, size, shape
At the planning stage for upcoming construction work, you will need a site plan drawn on graph paper - with all the trees, utility structures, communications. Draw several options for the location of an artificial source, accurately fitting it into the surrounding environment. There are a number of points to consider.
- The optimal location for a stream or fountain is a recreation area, away from flower beds, garden beds, garden trees and residential buildings. This area contains a patio, grill, tables, benches, gazebos, etc.
- Artificial springs with a short channel are the most problem-free. When developing a long stream, serious difficulties may arise, mainly regarding the slopes of the site.
- Where is the storage area for building materials during work? Thus, dug trenches or bags stacked on the path can impede movement around the site.
- It is worth considering the safety of the reservoir for children and pets; estimate the amount of time that can be allocated to care for the reservoir - its inhabitants, plants, technical equipment. Based on the answers, a decision is made on the characteristics of the reservoir.
- The minimum distance from the reservoir to the fence or walls is 1 m. This free space is necessary for planting special moisture-loving plants. An abundance of moisture can harm most garden trees and shrubs, as well as a number of wild and exotic flora.
- The reservoir should not be located in direct sunlight, otherwise active growth of algae and bacteria is possible. The ground directly under tree crowns is also not the best place for an artificial source, because fallen leaves harm fish, and roots, growing, damage the walls and bottom of the reservoir.
- The dimensions of the water surface should be proportional to the area of the personal plot. For a garden of 10-15 acres - this is 4-5.5 sq.m.
- The depth of the reservoir is determined by plans to have or not have fish and plants in it. For flora, 45 cm is enough, and for fauna - 60 - 1.2 m. The deeper the reservoir, the better place it will be for wintering fish.
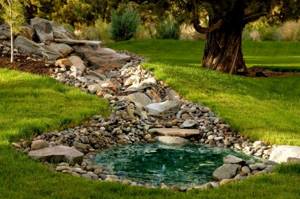
Stream with waterfall and pond
How to properly care for an artificial stream
In order to admire a reservoir with clean water and well-groomed banks, it is necessary to ensure regular care of plants and preventive maintenance of pumping equipment.
To do this, you must follow some rules:
- Regularly check the tightness of hoses and pipes and their connections.
- Timely cleaning or replacement of filters.
- In the summer heat, when the water evaporates strongly, it is necessary to periodically add water to the required volume.
- To preserve the functionality of the equipment, before winter storage, the water is completely drained, the pumping equipment is cleaned and stored in a heated utility room.
- Regular cleaning of concrete fences, wooden structures and stones from silt deposits, debris and dirt.
- Complete replacement of water in cases where for some reason it becomes opaque.
Plants require care similar to the care of conventional garden crops. Trees and shrubs are pruned in a timely manner, otherwise their wide crowns will cover the water composition.
Perennial plants are weeded, fed, if necessary, and replanted. Old and diseased plants are regularly cleaned.
Annual plants are best planted on favorable days. Constant monitoring of their growth and flowering is necessary.
Stocking up on materials
Let's consider the materials that will be needed to build an artificial spring in a natural style. It’s better to stock up on everything you need before starting work: this will save a lot of time.
- Dark PVC film 0.5-0.8 mm thick for waterproofing the riverbed. There is a special film for ponds on sale, as well as related materials for working with it, for example, glue.
Not only PVC film is used as a waterproofing material. Butyl rubber film is considered more expensive and durable. Its service life is 45-50 years, and other advantages include resistance to temperature changes.
Liquid rubber, which is applied to geotextiles, also serves as waterproofing. It will last up to 20 years.
Among the democratic and reliable methods is the creation of a concrete bowl, the service life of which is practically unlimited. An outdated method of waterproofing is the application of several layers of clay to the bowl. Such protection from water will only last a couple of years with the risk of deformation.
- A pump that is installed in the lower reservoir.
- Hose for pump with a cross section of 0.5; 0.75; 1 or 1.5 inches. The more powerful the flow and the longer the channel, the larger the hose.
- Sand.
- Geotextiles.
- Moisture-loving plants and stones of different sizes for decoration.
Do-it-yourself artificial water flow: step-by-step instructions
The general scheme for building a small reservoir in a natural style is as follows: make two reservoir points, upper and lower. A pump is installed at the bottom of the lower one, which pumps water to the upper point. Water, once at the top, flows down under its own gravity.
- The dimensions and location of the reservoir have already been determined earlier. Now it’s better to check them on the ground. Mark the outlines of the water surface with pegs and stretch a rope between them. Using paint or sand, transfer the outline of the pond to the ground. Also mark the locations of reservoirs, waterfalls, and large stones.
- They dig the lower pit, maintaining the tiering of its slopes. The outer tier is the largest; medium - for the roots of aquatic plants; the inner one is the smallest, for wintering fish. The pit is dug approximately 0.7 m around the perimeter larger than the bowl of the reservoir, and 0.2 - 0.3 m deeper. If the soil around the entire artificial reservoir is too loose, then it is replaced with denser clayey soil to avoid moisture loss. And the land removed from the pit will be useful at the next stage.
- The relief of the area is formed from soil embankments and stones, on which a stream or waterfall will be located. It is advisable to form low sides at the end of each step of the stream: they will prevent the water from completely draining when the pump is turned off. It is better to locate sharp turns of the riverbed on flat areas. At the same stage, the upper reservoir is dug.
Stream with a waterfall in a stone bed
- Each tier of the pit is compacted and sprinkled with several layers of sand and crushed stone, each 10-15 cm thick. After abundant watering, the bottom and walls are compacted again. Layers of sand and crushed stone can be replaced with geotextiles to prevent soil erosion.
- A layer of waterproofing (for example, film) is laid from top to bottom without tension and with a margin of 0.5-0.7 m around the perimeter of the reservoir. The film is pressed with stones, covered with sand, or geotextiles are laid. This layer will become the basis for the decor and protect the film from damage by stones.
- The pump is placed in the finished lower reservoir to a minimum depth of 0.5 m. The pump must not be placed on the bottom, otherwise it may become clogged. Several bricks can be used as an installation site. A hose is connected to the pump, which is drawn along the entire riverbed to the highest point of the artificial source. Also coming from the pump is a waterproofed cable with a plug, the length of which is 5-10 m. Make sure that there is a dry place near the source where you can connect the pump to the network.
- A trial run of the pump is carried out, and if all the desired characteristics of the artificial source are achieved, you can begin to decorate it.
If you don’t want to do waterproofing, you can use ready-made reservoir bowls that are immersed in the prepared base. For a large reservoir, reinforcing the foundation pit will be a mandatory step, since the soil often sags under the weight of water.
Stream decor in oriental style
Manufacturing stages
The mill is a fairly simple design, and anyone can handle its construction. The easiest way is to assemble the base, frame with roof, bridges, wind turbines, rotor blades and all the parts.
Step 1: First draw a sketch of the windmill layout and determine the type of structure and its dimensions.
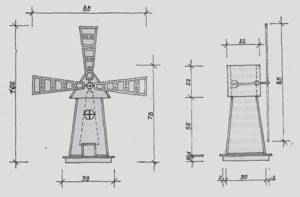
Step 2: Use the drawings to calculate the dimensions of all parts (they must be in harmony with each other).
Step 3: Select the material to be used in our factory. Pine is considered optimal for work (available, cheap, soft and easy to handle).
Step four. Base. First we mark 4 fields (side length 25 cm) with marked crosses. Make a hole in the middle of the crosses.
Then we will draw four equal blocks on the sides. If walls are also required, the parts are cut from solid pieces of wood (35 x 54 cm).
Decoration is carried out with trapezoidal walls consisting of 6 interconnected parts (each 2 cm less than the previous one, starting from 35 cm and ending at 25 cm).
Step five. Skeleton. To attach the frame, it is necessary to use a rod cross-section of 40 x 40 mm (54 cm - 8 pieces, 38 cm - 8 pieces, 36 cm - 4 pieces) and 30 x 30 mm (54 cm - 4 pieces, 10 cm - 4 pieces).
Step six. Mill roof. For marking we use a template: a straight line 38 cm long.
We retreat 19 cm to it (exactly half) and draw a straight line 30 cm long. The side seam of the triangle has a length of 35.5 cm.
According to this drawing, we mark 10 parts from the angle of the roof (5 parts each).
Step 7. Screw with blade. Remove the blade screw pieces from the 45 x 15mm pieces: 1 piece - 91cm, 2 pieces - 45.5cm, 4 pieces - 8cm, 17cm, 26cm, 20 pieces - 19cm.
Then we draw two circles with a diameter of 17 cm with a circus.
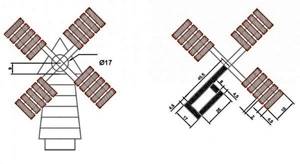
It is recommended to cut the pieces after all the pieces have been cut, but you can also cut one by one after marking.
Step 8: Sand all parts well with sandpaper or machine. Be especially careful when going through the side cuts and ends.
Advice! Use glass and silicone sandpaper to sand the wood. Corundum and other dark skins produce the same color as the dust that contaminates the wood.
Impregnation of wooden parts
Special impregnating compositions for wood (Aquatex, Pinotex, Belinka, Snezhinka, etc.) do not guarantee the safety of your installation.
Antiseptics reliably and permanently protect wooden parts from precipitation, fungi, mold, algae and pests.
Impregnation of wood with special antiseptic compounds is carried out in 2-3 shots with complete drying of each layer.
Watch out guys! Some antiseptics can be toxic and require careful handling.
Assembling a decorative mill
After processing and drying the parts, you can begin assembly:
- The side parts are secured with slats. Precast walls are first screwed to the battens to create a single structure, and then to the battens to secure the walls together. This will further strengthen the walls and make the structure more stable.
- The base consists of two squares with a drilled center. You can also make a square box with four boards and secure it with slats. The base is attached to the cutter body with self-tapping screws screwed into the inside of the strip.
- For the roof, first tie the end pieces in a knot (2 triangles with a base of 38 cm and sides of 35.5 cm). The rods are sawn and connected using screws. Then screw plywood or slides to the triangles on the outside and inside. The roof slope consists of 10 parts (5 on each side). Projection - 1 cm. The upper part of the roof is decorated with a beautiful ridge.
- The frame of a round table consists of wooden slats (small slats are screwed onto a long plank on both sides) or metal tubes.
Screw short strips (in the form of a brush) onto the ends of the blades in increments of 2-3 cm. Both circles are screwed to the screws in the middle of the cross of the blade. In the middle of the circles there are holes for the bolt and at the end of the frame (at the level of the blades) there is a hole for the bearing. Hammers drive the bearings into the holes (at the end) and insert the bolt. After installing the washers on the bolts, tighten the structure with a nut. Tighten all parts together with nuts. - Complete the installation of the cutter by installing the roof onto the body and securing it with screws.
A slide show of all stages of production of decorative windmills - from sketch to finished product - can be viewed in our video:
Painting and decor
The finished product can be painted and the milling machine looks more natural. However, this option is acceptable if the structure consists of clean, carefully processed wooden parts that are identical in structure.
If the wood parts look unclean, it is better to paint the cutter. Varnish, especially glossy, only emphasizes unevenness and defects.
You can paint the mill parts in different colors, after which the product will delight the eye with a bright, elegant appearance.
Sometimes flowers, butterflies, insects and other small pictures are drawn on the walls and roof.
You can decorate the walls of the mill with homemade ones or buy small windows, doors, and balconies. Lanterns located under the windows of the mill make them irresistible in the dark.
Installation
Before installing a milling machine on a construction site, you need to choose the best location. It should be a well-ventilated area away from trees, buildings and things.
The place is cleared of debris and weeds.
A wooden structure is usually mounted on a concrete or stone base.
This ensures that the wooden parts of the building are not exposed to soil moisture and other external influences.