Types of artificial reservoirs
The creation of an artificial reservoir on your site is possible in several options. By and large, a lot depends on the size of the plot, the wishes of the owner, the purpose of the reservoir and, of course, the financial component. During the improvement of landscape design, many varieties of reservoirs were invented. They add beauty and completeness to any area. Appropriate use of water features will make the garden charming and interesting.
Choosing the right place for a garden pond is not an easy task. You should start by choosing the type and purpose of the reservoir.
Dynamic type. This includes bodies of water that are in constant motion. They create a special atmosphere; the murmur and splash of water are good for raising your mood and vitality. “Moving” bodies of water come in several types:
- Source . This is perhaps the simplest implementation option. Most often, its size is not large, and its arrangement does not require a significant amount of money. To ensure that the perception of such a source does not suffer, you can pay special attention to its decor. It’s not bad if you can raise it above ground level, and it’s better to place it as close as possible to the seating area.
- Creek . This body of water is usually small and has a narrow channel through which water moves at a certain speed, depending on the terrain and slope. One rule must be observed: the higher the speed of water flow in the stream, the narrower the channel should be. Accordingly, the slower the flow, the wider and more winding the channel can be.
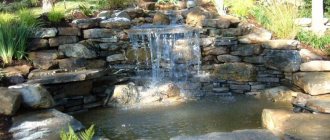
- Waterfall . Essentially, this is a stream, in a certain place of which water falls down from an artificial ledge. Parameters such as height and design may vary. A waterfall is a much more complex “structure”. For its arrangement, a natural or artificial difference in relief heights is necessary. To obtain beautiful streams, special devices may be needed (for example, stones with a special shape), drainage may also be needed, and the bowl of the waterfall must be strengthened. It is necessary to calculate the distance of the spray, particularly in windy weather, to avoid excessive splashing.
- Cascade . This is a single landscape form consisting of several waterfalls, possibly of different heights.
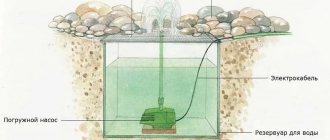
- Fountain . If the previous forms of artificial reservoirs are close to natural ones, then the fountain is rather a decorative source of coolness, with jets of water thrown upward or to the sides. The fountain adds a special chic to the area where it is installed. To create water pressure, a special pump is most often used. The flowing water is collected in one or more bowls or simply flows into a pond.
Static type . Reservoirs with standing water are classified as this type. Such reservoirs provide an opportunity to feel peace, relaxation and tranquility. They can also enhance the contemplation of other decorative elements of the garden. Static reservoirs also come in several types:
Recent Entries
Chainsaw or electric saw - what to choose for the garden? 4 mistakes when growing tomatoes in pots that almost all housewives make Secrets of growing seedlings from the Japanese, who are very sensitive to the soil
- Swamp. The basis of such a reservoir is standing water with an abundance of aquatic and simply moisture-loving vegetation. Most often, the swamp is small in size with an emphasis on vegetation. Its filling capacity is natural; support is required only in dry summers.
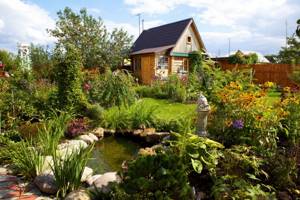
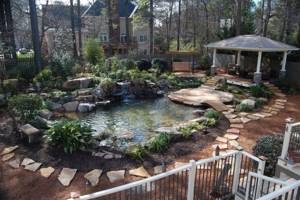
- Pond . Perhaps the most common artificial pond in gardens and park areas. It has any shape and size; it can be combined with any dynamic type of artificial reservoirs. The pond requires periodic cleaning using special products. In such a reservoir you can breed fish.
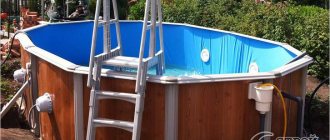
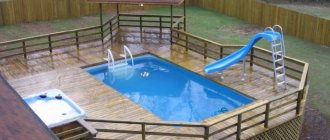
- Pool . This body of water is designed to satisfy a person’s desire to swim. In the pool, great attention is paid to sanitary and hygienic requirements. To use the pool, you must acquire special equipment for cleaning and heating the water.
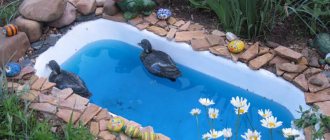
Creating an artificial reservoir is not something unrealistically complicated. In particular, there is a relatively simple way to acquire a corner of wildlife on your site. For example, you can create a pond using a plastic mold of the required size and type.
Types and their features
Depending on the purpose of installation, the shape of the container is chosen. A plastic pond bowl often has uneven width, depth and length dimensions. The most popular is a figure eight curved in the middle with cascading edges. It is convenient to place plants in such a container, resorting to classic decoration with stones along the edges.
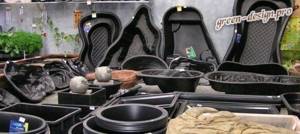
Inexpensive plastic ponds for your summer cottage can be created using one of 3 types of containers:
- Polyethylene. A budget option for the smallest forms, it will last up to 10 years. The disadvantage is the possibility of cracks from bending and the requirement to level the bottom during installation.
Polypropylene bowls - Polypropylene. The material is more durable, therefore the performance characteristics are better - up to two decades of service. Suitable for arranging medium-sized reservoirs.
- Fiberglass (fiberglass). The largest and most durable ones will last up to 30 years if installed correctly. Such containers are often used as swimming pools, as well as artificial lakes.
Fiberglass (fiberglass) pond
Multi-level structures are also used for fish breeding, but the depth of the bowl should be more impressive if you plan to breed large river species. A round or oval pond looks harmonious in a small area. And rectangular and square shapes are used in cases where the reservoir will be used for bathing people. Due to the specific design, the dimensions of plastic ponds are indicated by the largest unit. For example, if the container is narrow on one side, then the width is measured from the opposite side; depth - at the lowest point of the bottom.
Buying a plastic pond for your summer cottage is not difficult. The main thing is to understand exactly what size, volume and service life is needed. The main manufacturers in this segment are German, local and Chinese companies. The former are the most expensive, the latter are the least quality. And our manufacturers enjoy well-deserved popularity due to their understanding of climatic conditions and the correct relevance coefficient in terms of the volume of the product and the thickness of its walls.
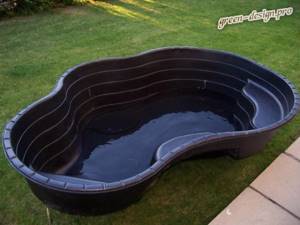
Pond made from finished plastic mold
is used to make the mold for the artificial pond . The shapes come in a variety of configurations and sizes. They also differ in volume. The minimum displacement of this form is about 135, the maximum is 2000 liters or more. Most often, large forms are made from fiberglass.
The main
advantages of such a base are ease of installation, low cost of materials and speed of installation. There is no need to calculate and make terraces, or strengthen the bank. Registration also does not require much effort. However, the bank configuration is set by the manufacturer itself and cannot be changed. The advantages also include resistance to ultraviolet radiation, environmental friendliness and a fairly long service life - about 15 years.
Installation of a decorative pond
Installation of a pond on a garden plot can be divided into several stages:
- As usual, first you need to decide on the location. It is optimal to position a decorative pond so that direct sunlight falls on it for only a few hours a day. This will keep the water from blooming longer, while at the same time not overheating it. You should not install a pond near a large cluster of trees, as falling leaves will quickly pollute the water.
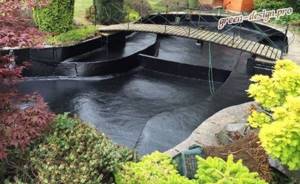
- Then we start marking. It is very convenient to turn the shape upside down and simply trace along the contour. We remove the form and draw a line 15-30 cm further from the marked one. Next, a hole is dug along the marked contours, 20 centimeters deep than the depth of the plastic mold.
- The dug hole is carefully cleaned of stones and roots . The bottom and walls are compacted.
- The bottom of the pit is covered with sand to a depth of approximately 20 cm, the sand is carefully compacted. Thus, the level of the edge of the form coincides with the ground level. At this stage, it is very important to ensure that the area for the pond is clearly horizontal. To determine this, the building level is used.
- The space left empty between the plastic mold and the ground is also filled with sand. This needs to be done gradually. First, 20-30 cm , the sand is spilled with water so that all the resulting voids are evenly filled. Since the form is quite flexible, to avoid its deformation, we fill it with water to the same height. Then sand is poured back in and water is poured in and water is added to the required level. We repeat until there is no empty space between the ground and the form.
- After a day, you need to check the resulting structure and add settled sand.
- Next, pump out the water from the pond, clean it and fill it with clean water.
After completing the installation of the artificial pond, all that remains is to decorate its banks in accordance with your wishes and taking into account the general appearance of the space adjacent to the artificial pond. For example, you can make a small beach near a pond. To do this, you need to fill part of the shore with coarse sand or pebbles, finishing the image by adding several small boulders.
If a small pond is planned in the garden to complete the design concept, which does not involve fish breeding, you can get by with a plastic mold,
no more than 60 cm and occupying about 2-5 m2. Such a plastic “bathtub” will cost from 1 to 10 thousand, depending on the specific size and shape, plus the cost of sand for installation and material for decoration.
If you do everything yourself, then the costs generally end there. Don't forget about care. Since the water in the reservoir is stagnant, it will need to be completely changed in order to avoid such troubles as blooming and spoilage of the water, which entail, at a minimum, an unpleasant odor and a neglected appearance.
Decorating an artificial pond
The most long-awaited and pleasant moment comes after all technical work is completed, when you can give free rein to your imagination and begin decorating the banks of the bowl with decorative stones and planting plants.
The most difficult task that a gardener faces at this stage is to hide the unsightly plastic edge of the container protruding above the ground. Usually, two methods are used for this purpose: they cover the perimeter of the bowl with decorative stone or plant creeping carpet perennials, which, as they grow, cover the plastic with a living green carpet.
Sometimes both methods are used together. It is most natural when part of the shore is covered with plants, and the other part is decorated with stones, as is often the case in nature.
As for decorating the coastline with stone, for these purposes, most often, they use rocks that have a flat shape, for example, slate or flagstone. To hide the plastic edging of the pond, it is important to place the stones directly on it, but in this case they will stand unevenly and unstable (due to the fact that the edges of the pond usually rise above the soil).
To avoid this, you can make a concrete base-formwork around the pond, into which decorative stones are placed. But if your plans do not include a permanent design of the coastline, then you can even out the difference by placing pieces of slate, crushed stone or broken bricks under the stones. It looks very beautiful if some stones hang quite strongly over the surface of the water, while others slightly recede from the water and are covered with coastal vegetation.
Some summer residents use decorative pebbles glued to a mesh to decorate the edges of a plastic pond. You can buy similar “rugs” in large supermarkets in the bathroom tiles department. This option is quite acceptable, but before purchasing it is important to make sure that the manufacturer used waterproof glue.
Often the soil that remains after digging a hole for a pond is used to build high banks, on which something like an alpine slide is then built. Aesthetically, this technique looks good. But as soon as you start watering the newly planted plants, waterfalls of mud will flow straight into the pond. To avoid this, it is important to build slides away from the edge of the pond. In the future, the slopes are strengthened with the help of ground cover plants (for example, sedum), then this problem can be forgotten.
Helpful advice. To make caring for the pond easier, it is important to leave a passage to the water's edge on at least one side. It can be designed in the form of a paved path or platform. Otherwise, when changing water and caring for coastal plantings, the plants will be trampled.
Be sure to make a paved area near one of the banks to provide access to the water. © Lyudmila Svetlitskaya
Video of decorative pond installation
- Author: Alexander Alexandrovich Chebotarev
Rate this article:
- 5
- 4
- 3
- 2
- 1
(3 votes, average: 4 out of 5)
Share with your friends!
Do-it-yourself pond in the country: views, photos and step-by-step installation
How to make a pond at your dacha with your own hands: step-by-step instructions