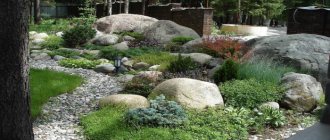
I think I won’t be mistaken if I say that every gardener tries to make his summer cottage unique - beautiful, stylish and original.
There are many different ways to do this: arranging flower beds, alpine slides and rockeries, planting all kinds of exotic plants, building gazebos, recreation areas, and so on. Today we will talk about a trellis - a useful structure that will not only help you grow climbing plants, but will also make your garden extremely beautiful, light and openwork. In this article I will tell you what shape a trellis can have, how to make it yourself, as well as why and how exactly you can use it. Trellis in the garden
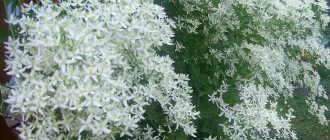
So, a trellis is a lattice structure for supporting various plants: grapes and clematis, roses, morning glory and others... In addition to practical functions, a trellis made in unusual decorative forms will in itself become an excellent stylish decoration for the garden, which can be made of wood, metal and even plastic - it's up to you.
A trellis is not only a support for plants, but also a decorative element of garden design. A trellis as an element of garden decor became popular several centuries ago, and it is no less in demand today. The first trellises began to appear in parks and gardens in France, England and Italy back in the 17th century. Russia was not far behind - there was room for tapestries in numerous Russian estates, palaces and parks.
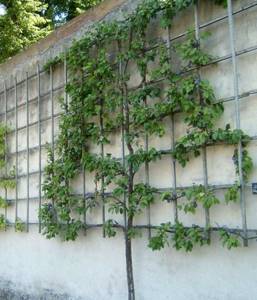
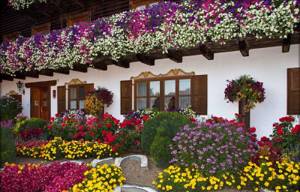
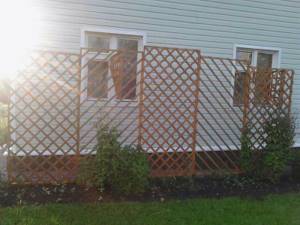
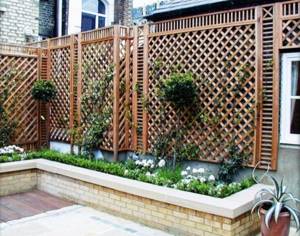
Today, trellises are widely used in vertical gardening. In addition, it is with its help that you can successfully hide various unsightly places in the garden - an old fence or crooked, ugly walls of outbuildings.
Garden trellis hides the wall of the house
And with the help of a horizontally installed trellis, you can build an excellent roof in the gazebo. Trellis on the roof and walls
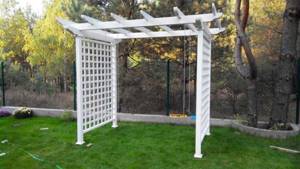
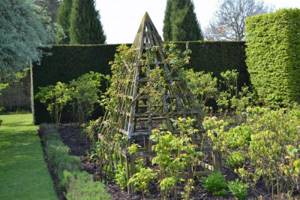
Several trellises connected to each other can make a wonderful gazebo.
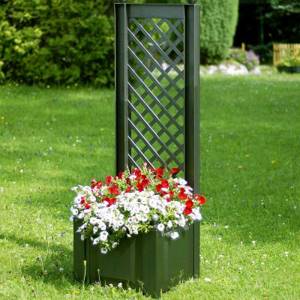
A gazebo made of several trellises. Also, a properly installed trellis will help you hide from prying eyes by acting as a patio. To do this, simply fence off your resting place on three sides with trellises and plant fast-growing climbing plants or vines: maiden grapes
, knotweed, honeysuckle, ivy and others - the choice is great!
In our catalog, which combines offers from various online stores of seeds and planting material, plants for vertical gardening are presented in a wide range - you are sure to find suitable crops for your site here. View a selection of perennial plants for vertical gardening.
Chinese lemongrass, 0.1 g 41 rub.
seedspost.ru
Hops Golden cone, 0.2 g Perennials of the world 32 RUR
seedspost.ru
Chinese lemongrass 950 RUR
vsesorta.ru
Honeysuckle honeysuckle (V2-3l.) 501 rub.
Agrofirm Poisk
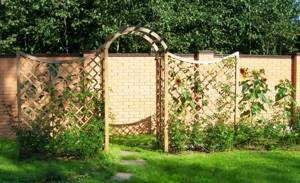
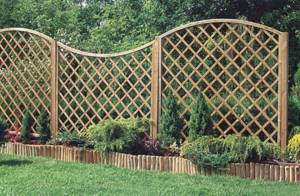
And in general: any garden that has such unusual “living partitions” will look more voluminous and interesting.
Even the trellises covered with plants add elegance to the garden.
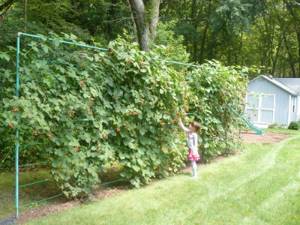
Despite its beautiful aesthetic appearance, the trellis, first of all, performs practical functions: it supports grape and raspberry shoots, burdened with berries, and helps the cucumber to climb as close to the sun as possible:
- Trellis for grapes
- Trellis for cucumbers
You can find a large assortment of trellises in our catalog, which combines offers from various gardening online stores. View a selection of trellises.
History of appearance in garden design
The first mentions of the trellis were found in descriptions of the Middle Ages in Eastern Europe. Gradually, a similar attribute began to be found in France, Italy and Holland. At the beginning of the 21st century, similar products reached Russian landscapes.
It was placed at the entrance to the garden, next to a residential building, or to decorate summer gazebos. The surface was covered with beautiful types of vegetation that cascaded upward.
Beautiful examples in landscape design
Trellis have an elegant appearance and can become a worthy decoration of a garden or personal plot.
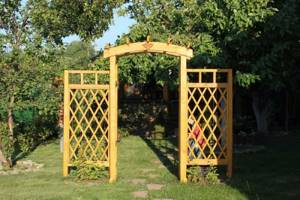
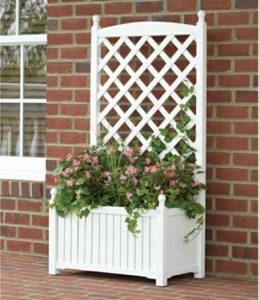
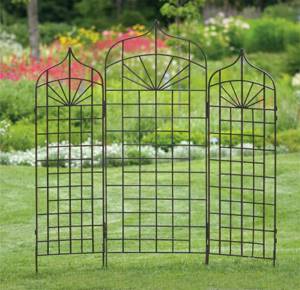
This design looks great as a free-standing element or a structure attached to the wall. Forged arched structures themselves look quite beautiful, but if they are skillfully positioned, the area will look even better. For example, a fairly good option for the location of such a device is installation at the entrance. Thus, the site will arouse the admiration of guests from the first minutes of being on it (example photo 1).
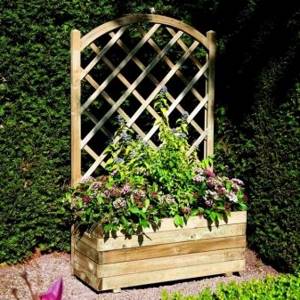
You can decorate a country courtyard or a summer cafe in an unusual and neat way using a wooden trellis with a flower box (example photo 2). In such a basket, place pots with plants - vines, which, as they grow, will entwine the trellis. This design with fresh flowers will not leave any visitor indifferent.
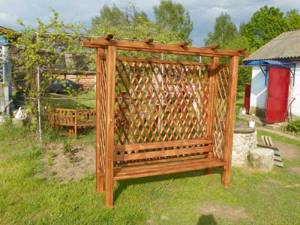
A wooden trellis is an excellent way to divide an area into zones. Installing such a product, braided with delicate flowers, can successfully design a recreation area or separate an outdoor dining area (example photo 3).
For more information about trellises, see the video below.
Advantages of a garden trellis for plants
Trellis and decorative trellis differ from each other in several ways. The first design is used for climbing plants. This type of decoration allows you to fix long lashes at a height.
The static position of the plant ensures its rapid growth and decorative appearance. The lashes receive the maximum amount of sunlight, which affects the process of photosynthesis.
The fruits and berries of the bushes are located high above ground level. As a result, they are not susceptible to the process of rotting and fermentation.
The trellis allows you to activate the ventilation process. Thanks to this invention, plants are less likely to get sick and be attacked by pathogenic microflora. Insects gain access to the inflorescences, which affects the pollination process.
Another advantage of this invention is the ability to trim and form a crown. Gardeners can change the direction of growth of the vines annually. Such manipulations can increase the productivity of fruit and ornamental bushes.
Types of trellises
By installation method
- Single-plane. Considered a suitable option for small areas. With their help you can grow vegetables, decorate fences and create partitions. They are made of racks about two meters high, between which wire is stretched horizontally at intervals of 0.5 meters. This design provides high-quality natural lighting and ventilation of plants, promotes their intensive growth and high productivity;
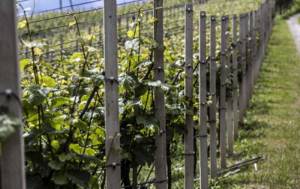
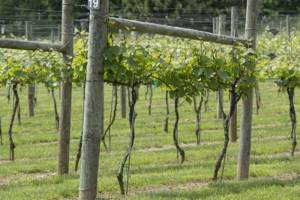
- Two-plane. This type of trellis is widely used for growing grapes. A mandatory requirement for their installation is a significant distance between the rows - more than 2 meters. They are made from the same materials as single-plane ones, only they are installed on both sides of the grape bush. There are two options for their construction: vertical and inclined. With the inclined method, two trellises are connected at the bottom and diverge upward at a slight angle of inclination. The supports are placed on both sides of the plant. Their main advantage is improved lighting and an increase in the number of green shoots on large bushes with several branches (sleeves).
Types of garden trellises for a personal plot
These devices are divided into several types. These include:
- Vertical single-plane;
- V-shaped;
- Horizontal;
- Vertical with an additional visor.
Similar species are used for different breeds of ornamental and fruit crops.
What is a trellis
A trellis is an element of a garden or vegetable plot, with the help of which it is possible to achieve fixation of plants in the most acceptable position for the gardener. When decorating a site, a lattice structure is most often used than others, acting as a vertical support for tall and climbing crops.
If it itself has a bizarre shape or is supplemented with any figures, then, together with the plants themselves, it can serve as an excellent garden accent, attracting the attention of both the gardener himself and his guests. The trellises are attached to the walls of any garden buildings on the site, to pergola posts, or they are installed as an independent decorative element in the most suitable place.
Important! When creating a trellis, it is worth considering the future weight of the crops growing on it. The individual structural elements of the product must withstand the maximum weight of the vegetation, even if it also changes with the change of season (the maximum possible values are taken into account).
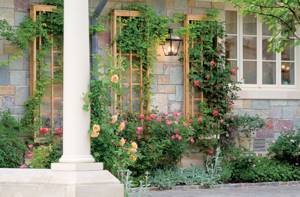
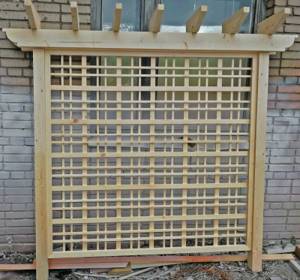
Classic trellises, fixed to the wall of a residential building, are often used to decorate the front entrance, especially if they have straight and diagonal shapes, due to which an original combination of shadow and light is created. This can be a very small structure intended only for one type of plant being grown, or a relatively long structure dividing the territory into several functional zones. Trellis gratings in most cases are made of wooden slats , additionally framed by a decorative frame of beams with a wide cross-section. It is the frame that protects the product from deformation and provides it with sufficient stability.
Vertical trellis structures in the garden area
A vertical single-plane trellis is often used for growing grapes. Such a product allows you to tightly fix curling lashes at a height of more than 2 m. To create it, wooden stakes and metal wire are used.
How to design a flowerbed - instructions, diagrams, types and options for proper placement of a flowerbed (140 photos)- DIY flower beds - 180 photos of unusual ideas for beginners and features of their application
- Garden arch: 145 photos of the best models and rules for their use in modern projects
The distance between the pegs reaches from 5 to 10 m. The height of the structure is calculated based on the growth rate of the fruit vines.
Made of wood
Wood is a traditional and affordable material that is quite easy to work with.
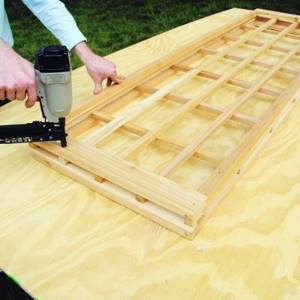
To make a wooden trellis for climbing plants, we will need a frame beam, a picket fence or slats, sandpaper, a level, a screwdriver, self-tapping screws, a brush, varnish or paint.
We make the frame of the future support from timber. The more massive the plant we plan to plant, the thicker the timber we use for the base. The traditional height of such a design is 1.5-2 m, but first of all we take into account the height of the plant. Having fastened the bars into a frame, we attach the rail, arranging it in the form of squares or rhombuses. It is desirable that the cells have sides of approximately 10-15 cm. This is the ideal size that allows you to firmly hold the vines and look quite decorative. When assembling the grate, be sure to use a level, it will help make it as correct as possible. We carefully fasten everything together with self-tapping screws. In order for wooden trellises to be better preserved, we treat them with a special antiseptic, and then open them with varnish or paint them in the desired color.
If the trellis will be installed as a separate screen, then it is necessary to leave 50-60 cm of timber for penetration into the ground, having previously treated it with creosote or wrapped it with waterproofing material. This design also requires additional support to withstand strong winds.
Wooden trellises are great for perennial climbing plants (especially roses), since they will not freeze on the wood in winter (unlike metal).
It will be useful to read:
Choosing support for plants Climbing vines can enhance any corner. In natural conditions, nature itself takes care of them...
Description and difference between horizontal and V-shaped design
V-shaped ones are used for growing wine grapes. They are installed on berry plantations at a distance of 6 m from each other. This trellis allows you to form the crown of a fruit crop.
Horizontal ones are chosen to create beautiful arbors, the surface of which is framed by flower lashes of honeysuckle, roses or maiden grapes. Wooden beams are located next to a residential building or recreation area.
Single-plane trellis
The simplest single-plane trellis
The manufacture of the simplest single-plane trellis begins with marking holes for supports. The distance between the pillars is maintained at 2-3 m, placing them strictly along the line. For the convenience of marking holes, a construction cord is used. Installation of the trellis is carried out in the following order:
- for supports, holes are dug strictly according to the markings, 300 mm wide and 500 mm deep. Half of each hole is filled with crushed stone;
- metal supports are installed by pouring concrete. Wooden posts are treated at the bottom with resin, drying oil or machine oil. The treated area is wrapped with roofing felt and compacted in a hole with crushed stone or soil. During installation, all supports are leveled with a level or plumb line;
Please note: it is not advisable to concrete wooden supports. Columns that have rotted over time need to be replaced and the concrete pouring will have to be destroyed with a hammer drill.
The upper and lower crossbars, depending on the material used, are bolted or welded to the supports. The lower crossbar is mounted 100-150mm higher from the ground;
holes are drilled in the supports for the wire. The first row is placed at a height of 300-400 mm from the ground. All subsequent rows are placed at a distance of 450-500 mm from each other. From the top crossbar, the last row of wire is placed at a distance of 150-200 mm. The wire is pulled like a string, fixed to the posts;
Installation of a two-plane structure is carried out similarly to a single-plane trellis. The only difference is that you need to install two trellises. They are placed opposite each other strictly vertically or in a V-shaped position at an angle. Installation of the V-shaped structure is carried out in the following order: on the site selected for construction, draw a rectangle 3 m long, 800 mm wide; the corners are marked with wooden pegs and an intermediate landmark is measured; In place of the peg, holes are dug and pillars are installed at an angle. The lower distance between the supports is 800 mm, and the upper distance is maintained at 1100-1200 mm. The pits are filled with concrete and crushed stone; After the solution has hardened, attach the horizontal crossbars and tighten the wire. Independent production of an arched structure requires the use of a tool for bending pipes - a pipe bender. It is useful for bending the upper elements of the arch. Installation is carried out in the following order: racks from a profile pipe with a cross-section of 20x20 mm are installed as for a two-plane structure - strictly vertically; The upper elements of the arch are bent using a pipe bender from a profile pipe with a cross-section of 15x15 mm. The finished arched elements are inserted into the supports from above, welded for reliability; for structural rigidity, horizontal jumpers are welded from a profile pipe with a cross-section of 15x15 mm. One lintel is attached to the top of the arch
The sides are welded to the posts at a distance of 500 mm from each other.
Please note: the side jumpers can be welded less often in order to save money, but then you will have to pull additional wire.
To create a small canopy near the house when planting a crop in a single row, you can install a semi-arched trellis. In this case, there is one side of arched elements attached to the posts at the planting site. The second side of the upper structure is welded to a vertical trellis installed near the wall of the house.
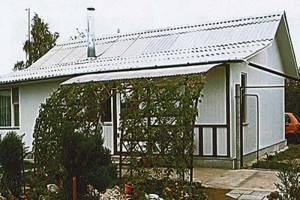
Semi-arched canopy near the house
Materials for creating a trellis
Most often, three types of material are used to create trellises. These include:
- Tree.
- Plastic.
- Metal alloys.
Each type of material has advantages and disadvantages. The weight of the product directly depends on its purpose. For example, horizontal or vertical models are chosen for fixing grapes. They allow you to evenly distribute the weight of the lashes around the perimeter of the product.
What types of trellises are there?
According to the design features, trellises can be divided into single-plane and two-plane. The first include flat structures in the form of fences, fences, trellises and decorative walls in the garden. Single-plane trellises can be used to decorate the walls of houses and gazebos, to zone a garden plot, or to tie berry bushes and vegetable plants to them.
For tall tomatoes, single-plane trellises made of poles dug every 2-3 m along the entire row of plants are suitable. Horizontal poles or a block must be nailed to the top or firmly tied to the top. Above each plant in the row, attach a thin wire or strong cord to a block, the lower end of which is attached to a peg driven into the soil next to the plant.
Diagram of an inclined trellis.
Double-plane trellises are three-dimensional structures consisting of 2 rows of flat trellises parallel to each other. Connected at the top by slats or a single-plane trellis located horizontally, they turn into arches, pergolas and light gazebos. This design is more stable than a flat trellis and looks much more decorative. In “green building” it is common to combine both types of plant supports when designing a garden landscape.
Trade organizations offer a wide selection of trellis structures made from different materials. Metal, plastic, and wooden products are available in various sizes and styles. But to save money, you should try to make a trellis yourself. Anyone who has welding skills can easily make a frame from a steel angle with reinforcing bars welded onto it. With some skill, the rod can be bent and assembled into an openwork lattice, similar to a forged product.
Mark on one of the frames the places where the grille strips are attached. The distances between the marks must be the same. For convenience, you can use a template - a piece of bar equal to the size of the grid mesh. Using a hacksaw to cut off the strips of the required length, screw them with self-tapping screws from one mark to another on opposite sides of the frame. When performing this operation, you must ensure that the planks are parallel.
Polymer alloys for decorative trellis
Such trellises are used for fixing roses. The finished products are light, but are able to hold the flower lashes motionless for a long time. The advantages of such models are their minimal cost, a wide variety of shapes and shades.
The products are not attacked by insects and do not rot. High humidity of the air and soil substrate does not affect the appearance in any way.
Arcs
Plastic and metal arcs can be useful not only for covering plants with film or spunbond, but also for creating support. The arches can be made of plastic or metal, the main thing is that they are strong enough, hold their shape and are not afraid of frost. The easiest way is to buy ready-made arcs in a garden store or at the market, since they are inexpensive, but bending them yourself and getting an even result is not so easy.
Due to their small height, arches may not provide support for all plants. It is best to tie short tomatoes, young grape vines, and flowers with thin and tall stems to them.
Metal trellis models for the garden
This trellis can be used for growing raspberries, grapes and climbing plants. The design is based on metal rods. The advantage of this material is the ability to create elegant structures of various shapes and sizes.
Decorative details allow you to create a unique design that can fit into any direction of landscape design.
However, the lack of anti-corrosion surface treatment provokes the appearance of corrosion and rust. This affects the appearance of the trellis and its performance.
Increased air temperature provokes heating of the metal surface, which affects the state of the decorative crop. As a result, burns may appear on the leaves and vines.
Materials for making trellises
Trellis for climbing plants can be made of wood, metal and plastic. The material is selected in accordance with the required weight of the structure, location in the garden and plants that are planned to be grown. A free-standing trellis must be stable and, as a result, heavier. If you plan to hang the grille, then you should give preference to a lightweight option. The weight of foliage can vary throughout the season, so the maximum possible load must be taken into account when designing the structure.
Tree
Wooden trellises are lightweight, so they are well suited for use as hanging structures. Thanks to their natural origin, these trellises fit well into any garden. Making a wooden trellis for climbing plants with your own hands is not a difficult task. The main thing to remember is that this material can be damaged by precipitation, and therefore it should always be treated with an antiseptic, varnish, and, if desired, paint.
Wooden trellises on the wall
Plastic
In gardening stores you can find a wide selection of plastic trellises for climbing plants because... their production is not a labor-intensive process. These designs are distinguished by their low price and a wide variety of shapes and colors. They do not suffer from high humidity.
Trellis with plastic box
However, plastic cannot withstand heavy loads, so when choosing plants it is recommended to give preference to small-sized species. Dwarf varieties of more powerful species are also suitable.
Metal
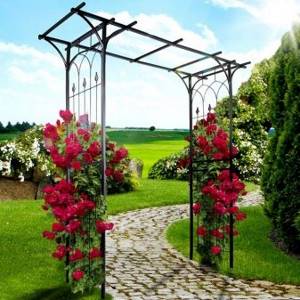
Metal trellises will be highly durable. These are wind-resistant and vandal-proof structures.
Metal allows you to make elegant structures of various shapes and sizes. Elegantly decorated with exquisite patterns, this grille is not only exceptionally decorative. It is also very durable and can withstand high loads. Forged trellises will last a long time and will not require frequent repairs and maintenance. Decorated with climbing vines, this design will harmoniously fit into the garden interior.
Their disadvantage is that the material can be subject to corrosion. Therefore, the metal structure is always treated with paint.
Their other drawback is the high thermal conductivity of the metal, which can lead to the trellis becoming very hot in the sun, and this can harm the plants.
You will be able to make these trellises with your own hands if you know how to work with metal.
Welded metal trellis
Making a trellis - a lattice yourself
To create a trellis with your own hands, you need to prepare supplies and tools in advance. It is first important to decide on the design of the future structure and its scope.
To fix flower crops, it is necessary to choose light types of materials, and for fruit crops you will need parts with a dense structure.
Before you start creating the structure, you need to draw drawings of the future trellis. Such diagrams will allow you to have a clear idea of the decorative product.
DIY trellis for climbing plants
Nowadays, it is not difficult to find and buy the product or thing you need. The trellises were no exception. Many companies offer different types of ready-made products from high-quality materials, but since not everyone can afford them, I suggest considering the option of making a trellis with your own hands.
Growing cauliflower: a healthy and tasty vegetable in your garden
How to make a trellis from wood
The size and material for making wooden trellises with your own hands directly depends on the plants for which they are intended. For peas or vines, you can make a simple structure from wire and fruit tree twigs that remain after pruning them. The entire manufacturing process takes place in several stages:
We also recommend reading: How to make a wattle fence from twigs (video) Do-it-yourself trellises for grapes Do-it-yourself support for cucumbers (10 photos)
- Select thin and even branches for the future structure.
- Stick the branch into the ground at an angle. Insert the next rod 15 centimeters from it. In this case, it needs to be tilted towards the first one so that they cross at a certain height from the ground.
- Use a small piece of wire to tie two twigs together.
- We place the third twig immediately next to the second and tilt it parallel to the first. After 15 centimeters, install a fourth twig parallel to the second. Tie with wire where they cross.
- Repeat this process until the end of the future structure.
- Having reached the desired size, cut off all excess ends and give the structure a rectangular shape.
- If your structure is not very stable, then it can be fixed in several places. To do this, we drive small pegs into the ground and tie them to the structure with wire.
- Plants are planted along the support.
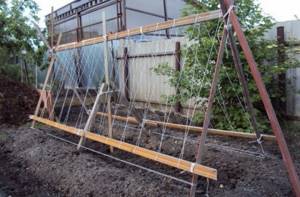
Fan trellis
After you have selected the required number of rods, you need to arrange them according to a template prepared in advance and weld them. First, cook the horizontal and vertical, and then mount the remaining rods one by one. If you need to give additional stability to the structure, you can weld additional rods. The finished product is processed and painted, after which it is installed in a pre-designed location.
Aeroponics: gardening without soil
https://youtube.com/watch?v=fINDnmJfVgM
Constructions for the vegetable garden
When choosing the installation location and height, you should take into account their dimensions so that the plants in the garden are not blocked from light by them. Therefore, these structures are placed in the direction from north to south.
As tomatoes grow, they can be tied to a cord. This will ensure access to enough light. In addition, with this arrangement, the trellis will be well blown by the wind, which will save the plants from some diseases.
For cucumbers, you can install the structure in a similar way. This will help you harvest faster in the future. Unlike tomatoes, cucumbers are not tied up, but every few days they entangle the stem with a cord.
This structure can be converted into a two-plane structure. To do this, we install a bar at the tops of each column. We position it perpendicular to the support pillars. We stretch the wire between the slats. Later we attach the cords for the plants to it. These manipulations allow not only to save material, but also time for production.
What tools and materials will be needed?
To work you will need:
- Screwdriver;
- Level with infrared sensor;
- Several types of sandpaper;
- Brush for applying varnish;
- Thin slats made of ash, birch, maple or pine. The thickness of the elements ranges from 5 to 8 cm in width. The length is calculated based on the product drawings;
- Antifungal impregnation;
- A set of small screws.
To create a lattice you will need slats made of solid pine, ash or maple. These breeds are highly resistant to climate change.
Trellis assembly options
In principle, it is not so important for plants what material you make the supporting structures from, but natural wood, with the right approach, gives the garden landscape an atmosphere of calm and tranquility
Hedge
In addition to purely supporting functions, such structures are very popular when arranging hedges and zoning areas over large spaces.
Assembling a wooden trellis with your own hands is quite simple.
The essential tools you will need are a miter box, a hacksaw for wood and a hammer or screwdriver, it depends on whether you will use nails or use self-tapping screws.

Template for fixing the step.
As for the material, the slats for the gratings themselves are selected depending on how powerful you want your fence to be. Often a size of 30x15 or 40x20 mm is enough. Support posts are usually made of 100x100 mm timber.
Guide inclined bar.
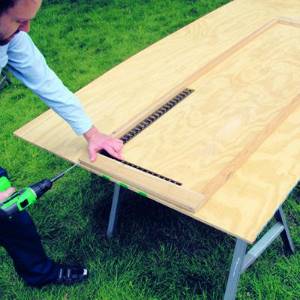
We intend to make a lattice from diagonally crossed wooden planks, which are additionally fastened with a wooden contour around the perimeter. The most problematic thing here is to clearly maintain the distance and angle of inclination between the slats. To do this, it is better to immediately prepare a couple of wooden templates and use them to control all the gaps and slopes, as in the photo.
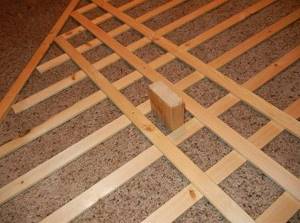
Fixation of cross bars.
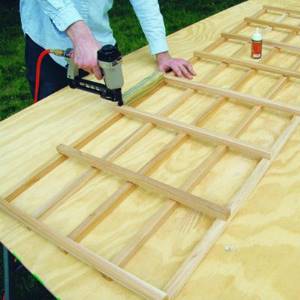
A series of slats are pre-laid out on the floor with a predetermined step, after which all slats are fastened with one oblique guide. A lattice fixed in this way will reduce the likelihood of slats shifting and dimensional errors.
Center fixation.
When the base is assembled, arranging the rest of the lattice is a purely technical matter; simply apply a strip according to the template and hammer a nail into the center of the intersection of the slats or screw in a self-tapping screw.
Edge alignment.
Inner part of the grille.
When the interior space of the trellis is filled, all we have to do is make a decent edging. As a rule, the same strips are used for this as for the grating itself. Although some people prefer to use a thick wooden beam, this will make the structure look more massive. Framing is done on both sides.
Perimeter arrangement.
Overhead decorative trellises
Overhead structures of this type are used to decorate blank walls, as well as as a basis for plants located on terraces or balconies. Unlike hedges, they are made quite tall. A decorative wooden trellis with your own hands can be mounted either as separate islands or as a continuous front.
In general, the instructions resemble the previous version, but there are still some differences. In this case, correct observance of the proportions of the structure plays an important role. Otherwise, you risk getting a massive picket fence instead of an openwork, elegant trellis.
Scheme of a decorative trellis.
Of course, you can develop your own project, but as an option we suggest taking a time-tested model as a basis. The size of the grid itself is 175x60 cm. At the same time, the cells are not made identical, but elongated vertically with a size of 25x15 cm.
Fixing the edging.
The cross-section of the slats of the grid itself is 25x15 mm, but the edging around the perimeter should be visually more massive. Slats of approximately 50x25 mm are placed here. Unlike the previous version, the structure is oriented strictly vertically and horizontally.
Grate assembly.
The vertical slats are taken solid, covering the entire height of the trellis, while the horizontal jumpers here serve as clamps. The photo shows that the inner cage is first assembled, after which it is sheathed with thick timber around the perimeter and attached to the wall with an anchor with a gap of about 50 - 70 mm. This gap will provide the trellis with visual airiness, plus the plants will curl better.
Cash fastening.
If you have carpentry skills, then it is better to join the planks into half a tree, cutting out grooves for this. In addition, it is better to join the perimeter slats at 45º. So, with proper design, the illusion of a picture frame arises.
Fixation on the wall.
Garden trellis production technology
The creation process includes the following points:
Let's make a rectangle. The angles of the structure must be right. The size of the workpiece is calculated based on the diagram. We fix the end parts with screws. Using the building level we correct the lines.
We proceed to fixing the transverse slats. They will be located at an angle of 45 degrees relative to each other. In this way, it is possible to create a decorative pattern on the surface of the product.
We turn the workpiece over to the reverse side and continue to fix the slats according to the same principle.
Now we move on to applying antifungal impregnation. Apply the first layer and leave it to dry for 2 hours. After this, you can apply 2 more layers for full protection.
When the antifungal impregnation is completely absorbed, you can proceed to applying a protective coating. The paint and varnish composition is applied in a thin layer.
To create a waterproof shell you will need three layers of furniture varnish. At the bottom we fix two supports. They are also coated with a protective varnish layer.
DIY trellis – 110 photos of stylish garden decorations and vertical gardening options
Tall varieties of raspberries and blackberries, uncovered grapes, climbing types of vegetables, hanging flowers and shrubs need to be tied to trellises or ropes to facilitate the gardener’s work and increase productivity.
This article is devoted to how to make a trellis yourself at your summer cottage.
Description of trellis structures
A trellis is a lattice or rope tied to a peg, which representatives of the trellis use to cling to as they grow.
In some situations, only the presence of such a structure allows plants to form full-fledged lashes.
Today, summer residents are trying to ensure that the trellises perform not only a practical, but also an aesthetic function.
The photo of the trellis shows that it can be created from a variety of materials:
- metal;
- wood;
- plastic pipes;
- chain-links;
- woven wire mesh;
- plastic mesh.
The simplest option is a structure made of a strong stake driven into the ground and a rope tied to it.
The parameters of the trellises are significantly influenced by the type of plants and the method of forming the stems:
A trellis for grapes must be highly reliable and rigid, in other words, be able to withstand heavy loads. Most often it requires the construction of a concrete base.
We recommend reading:
To form cucumber bushes, high arches and durable mesh or lattice structures are usually used.
Powerful supports of medium height are an excellent solution for tomatoes.
Raspberries only need a little help from trellises placed at the edges of the rows.
Clematis require a frequently spaced trellis.
A lattice made of wood or forged metal, a decorative mesh or a panel can serve as a trellis for roses.
Mesh trellis
This design is probably most often used when growing climbing roses and clematis. To create it, a large-mesh steel mesh with PVC coating is required. It must be strong enough and resistant to deformation.
According to the drawings of the trellis, the device consists of two columns driven into the ground, united by a mesh stretched between them.
Sequence of creation steps:
- Mark the position of the support structure on the ground.
- Dig holes, insert metal or wooden posts into them and bury them.
- Paint the supports in the color of your choice to enhance their decorative effect and to protect them from corrosion or rot.
- Stretch the mesh. Work on the trellis is completed.
Wooden support structure
This wooden trellis is considered the simplest solution. It does not require drawing up drawings or carrying out complex calculations.
Even a novice gardener can build it. Prepare:
- branches 1 cm thick – 20-30 pcs.;
- a ball of rope or wire.
Sequence of steps:
- Disassemble and arrange the collected branches according to their size.
- Take a branch, drive it 10-12 cm into the ground, place the second one at an angle of 60 degrees. Tie them with rope for strength.
- Perform similar manipulations with the next pair of branches. The goal is to weave a span of the required size from branches.
- Make sure that the forming diamonds are of the correct shape. Secure them with rope.
- Remove protruding branches. Form a rectangular lattice.
For the winter, the structure can be disassembled and stored in a storage room.
Advantages of trellises
The raspberry trellis has the following advantages:
- Allows you to avoid contact of berries with the ground, as a result of which they remain clean.
- Provides good ventilation, thereby preventing the formation of fungi.
- Helps achieve uniform lighting and, as a result, simultaneous ripening.
- Facilitates pruning, watering, and harvesting.
Devices for grapes and vegetable crops have the same advantages.
In conclusion, we note that the trellis brings with it not only benefits. With proper effort, it can become a decoration of the landscape of a dacha area.
Therefore, it should and should be used if you grow climbing crops. In addition, constructing such a structure is quite simple and inexpensive.
Installation of the product in the garden
We install the finished product together as needed and begin fixing the long branches. We bury the lower part of the stakes into the ground to a depth of 10 cm. To attach the branches of bushes, we use twine and thin fishing line. The photo of the trellis shows the finished product.
Kinds
Trellis can be divided into types based on several criteria: material of creation, purpose and manufacturing option - ready-made or home-made. Each of them has its own advantages and disadvantages, which you need to know about if you want to get a quality structure.
According to the material of manufacture
In most cases, homemade trellises used near the house or in the country are made of wood and wire, while purchased ones are made of plastic and steel rods.
Important! The greatest demand among consumers is for wooden products made from thin (no more than 1.5 cm) bars or slats.
The shape of the trellis depends on the type of material. Thus, wooden elements are perfect for standard triangular, square or rectangular structures, but wire, plastic and metal will allow you to create structures of more bizarre and unusual shapes: for example, S-shaped or fan-shaped.
By purpose
Trellis are divided into types and depending on their further purpose. The fact is that different climbing plants have different requirements for their cultivation, not to mention different sizes and other individual parameters. Therefore, before you make a trellis, you will have to decide which plant it will be used for: grapes, flowers or vegetables.
Store-bought and homemade
If with home-made options everything is more or less clear: you create a frame taking into account personal requirements and the size of the plant, then purchased options are supplied ready-made and may not take into account the size of your plantings or free space for installation.
Among modern supports there are single-plane (fences, nets, gratings, partitions) and two-plane, represented by balconies, arches, etc.
The first option, which can be easily made at home, is perfect for growing bushes and young plants in small areas. For fast-growing crops, if optimal use of space is necessary, it is better to select two-plane products. In principle, you can also make them yourself, but you will need more material and, perhaps, not only wooden blocks.
In addition to the described species, there are also some other types of trellises. So, depending on its location, you may need a wall support (attached to the wall of any building) or a free-standing one. In the first case, in addition to their direct purpose (supporting plants), such trellises also perform a decorative function, covering the wall.
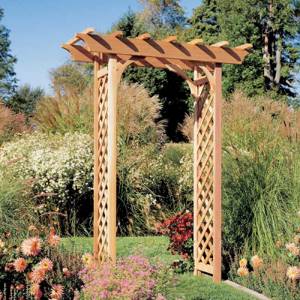
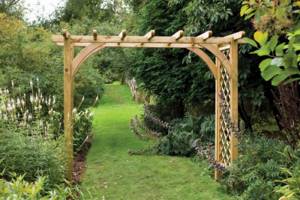
The functions of support for plants can be performed by pergolas and gazebos, while climbing plants, in addition to their decorative qualities, will also protect from the scorching sun
The advantage of such a support is the absence of a mandatory frame, which would give additional rigidity to the entire structure. To fix the wall trellis, you must first nail wooden blocks with a cross-section of at least 5 cm to the wall. With further growing of the plant, this will improve air circulation between the lattice and the solid support.
Important! From a practical point of view, it is better to secure the trellis with hooks, which will allow you to easily remove it and put it back on as needed.
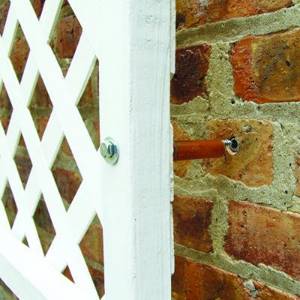
A trellis, tightly entwined with climbing plants, resembles a sail, which means it is easier to move it. To prevent this from happening, do not forget to use a support post, presented in the form of a rod with a thickness of 1 cm (it is stuck into the ground to a depth of at least half a meter). When using a wooden beam, its lower part should be wrapped in roofing felt or treated with resin, which will prevent the wood from rotting.
Many owners of personal plots prefer to make such structures themselves, which, however, is not surprising. In addition to saving, if you wish, you can get a stronger structure that will serve faithfully for many years.
Photos of trellises
Please repost