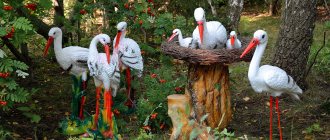
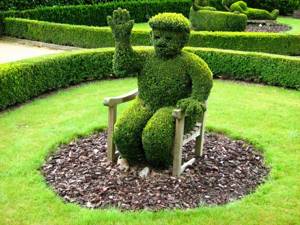
This art direction, such as the creation of topiary, is considered one of the most popular in the field of modern landscape design. Topiary is a geometric figure or sculpture made from garden greens. The birthplace of this art form is the Ancient Roman Empire. A topiary figure created from grass can be a ball, a cube, an image of a person or an animal. The presence of topiary in the garden plot will make it original and unique.
What is artificial grass topiary
Topiary figures made from artificial grass differ significantly from products made from flowers. A grass topiary is a three-dimensional figure, the base of which is a metal frame, covered with artificial turf. Streets and interior spaces are decorated with topiary. The places where topiary is used are the areas of private buildings such as a cottage, mansion or townhouse. In addition, they are installed in park areas, gardens or on city streets as a separate landscape object. Also, this type of decoration, such as a grass figurine, can be found in a shopping and entertainment center, in a restaurant, cafe, or placed in a small garden plot.
Artificial grass topiary
Topiary figures - the art of creating “living” sculptures
The KWA-GOLD online store offers to create a special atmosphere in an open space using products from the Bacho factory. Topiaries made from artificial turf and fiberglass have many advantages over both analogues and sculptures made from real trees and bushes:
- mobility;
- resistance to any weather conditions;
- ease;
- low maintenance requirements;
- the ability to manufacture models of any configuration and size;
- 3D effect that promotes a sense of reality.
Depending on the design, landscape figures for a summer house , garden or space in front of a shopping center are supplemented with other materials - plastic, wood, etc.
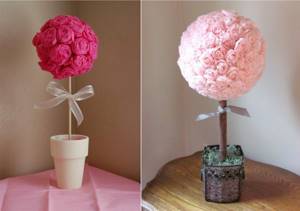
Making topiary from artificial flowers
There are many ways to make such wood. However, the degree of complexity of the work is determined by the choice of artificial flowers, which can be purchased ready-made in a store or made with your own hands. To create artificial flowers yourself, you can choose one of the most commonly used materials:
Most often, needlewomen prefer making roses from paper due to the simplicity of the process. Thus, the most common request on the Internet is “master class on making paper roses.”
Tools and equipment needed to create paper roses:
- decorated pot;
- gypsum;
- a thin wooden stick that will serve as a trunk;
- sheet music paper;
- leg-split;
- PVA glue;
- ball to create the base;
- paints;
- tassels;
- elements for additional decoration.
Note. Even old sheets of music books or music paper can be used as material for creating roses. Often, books or magazines in a foreign language, including those with yellowed pages, are used as material for creating roses.
Topiary made of artificial flowers
Next, follow the step-by-step algorithm for creating a paper decorative element:
- To make flowers, you need to cut out petals of different sizes from paper. The first petal is curled along its entire length, after which the remaining petals are laid out around it until a bud is formed. To make the bud look fully bloomed, you should manually bend all the petals;
Helpful advice. To give the edges of the petals a brownish tint, it is recommended to hold them over a lit candle. Thus, the rose will acquire the effect of antiquity, and the resulting composition can be called vintage.
- Using a thread, each rose must be secured at the base. You can fix the flower with glue;
- The base ball is covered with paper, similar to the papier-mâché technique. The foam blank can be painted to match the colors;
- Using a glue gun, each rose at the base is attached to a spherical base until the workpiece is completely filled on each side. However, the place where the barrel will be inserted must be left untouched;
Note. If there are gaps, they can be masked using beads.
- To create a barrel, a thick pencil is wrapped with twine;
- The prepared trunk is inserted into a spherical base, secured with glue and avoiding damage to the paper flowers.
Coffee topiary
Tools needed to create a coffee bean topiary:
- old newspaper sheets;
- brown corrugated paper;
- brown threads;
- a stick intended for applying glue;
- coffee beans;
- cup;
- stones of different sizes;
- fake banknotes;
- a little brown plasticine;
- strong dry branch.
The process of creating topiary from coffee beans is as follows:
- a sheet of newspaper is rolled into a ball and wrapped in another sheet;
- repeat step one twice until it becomes spherical;
- the spherical base is wrapped with threads;
- the resulting ball is wrapped in corrugated paper;
- the structure is again wrapped in threads;
- a dry branch is wrapped in twine with closely spaced turns;
- the spherical base is connected to the barrel using glue;
- spread a layer of glue over the entire ball;
- cover the crown with coffee beans;
- place the tree in the mug;
- fill the mug with stones;
- Using plasticine distributed over the surface, cover the stones.
Some tips for beginners
- Using crepe paper, you can create paper roses in half the time;
- If you don’t have enough time to make flowers with your own hands, it is recommended to purchase ready-made flowers, which you just need to fix on the base;
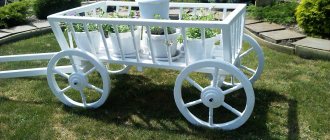
- In addition to the shape of a ball, the base can be a house or, for example, a bicycle with a flower arrangement;
- Both plants and fruits can be used as decoration;
- Decorative fruits can be dried or made in the form of a dummy;
- Topiary, made for interior decoration in a classical style, can be made using the kanzashi technique;
- You can create a composition in the form of a cup with flowers, as if floating in the air, from which flowers flow onto a decorative saucer;
- To complement the flowing flowers, you can use a basket instead of a saucer;
- To decorate a flower tree, coffee beans, small stones, beads, and ribbons are usually used;
- To create a wedding topiary, it is best to use decorative elements such as beads or flowers, which will help support the style of the celebration.
Choosing the shape of the sculpture
First you need to decide on the shape of the product. You can choose a simple geometric figure such as a ball, pyramid, cube or cylinder. The main thing is that it fits the general style of the site.
You can often meet fairy-tale characters in gardens: gnomes, fairies, elves and leprechauns. Also popular are forms in the form of various animals and birds: cats, dogs, elephants, giraffes, swans, ducks.
Making a complex topiary
A complex sculpture made of artificial grass can have the shape of a ball, which is achieved by truncation of the faces of a cube, or cylindrical. You can cut a columnar or cylindrical shape from lawn grass. To do this, you need to install wooden stakes under the crown of the tree, having first drawn a circle.
Making a complex topiary
Often figures from grass are cut in the shape of a truncated cone or simply cone-shaped. To make a frame for a cone-shaped topiary, add three poles fastened in the central part - the resulting cone resembles an Indian wigwam.
Helpful advice. For beginning topiary growers, experts recommend using a plant such as thuja occidentalis to create a cone-shaped sculpture.
The simplest option is to create pyramidal topiaries with four sides. Several of these pyramids placed on a garden plot will make it look like traditional Egyptian pyramids.
The list of complex sculptures also includes spiral, tiered geometric, volumetric and combined. Technically, especially if the topiary artist does not have an experienced hand, the most difficult thing is to depict a person or animal in full size.
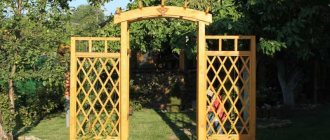
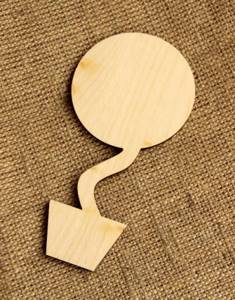
Base for topiary
It is possible to create your own topiary from natural material or other textures. To do this, you need to understand how to make them and what you need first. You can create a base that will be mounted on a special stand. There is a way to make a topiary from crepe paper or make an autumn tree.
In the first case, you can use a press mache for the base. To do this, use napkins, newspapers or corrugated paper. This material gets wet and builds up in layers to form a ball. You will need to wait for it to dry and proceed to the next procedure. In addition, it’s worth figuring out how to make a tree out of paper, using foam plastic as a basis. To do this, it is easiest to make the future workpiece in the shape of a ball. This is a DIY topiary idea for beginners that doesn't require much preparation.

The second option is how to make a tree out of cardboard, which can become a topiary, say, for Teacher’s Day. To do this, we suggest cutting out cardboard and sticking decorations on it - leaves, twigs, and possibly fruits. In this way, you can get a topiary from leaves, branches, flowers, berries collected on your own in nature.
A more complex version of the base is a wire frame. You will get a product made from artificial grass with your own hands, which can later be stretched onto a wire base. If the tree is made from living Centuria lichen, then this wire base will be ideal. Because later the plant will fill this frame, and the shoots will only need to be trimmed.
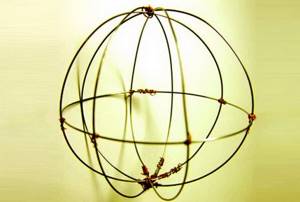
If you need to create topiary figures intended for landscape design, then you can purchase a ready-made frame and plant plants in the middle of it. At the end of the season, the vegetation will grow and take on the desired shape.
Do it yourself!
A similar product can be purchased, but you can also make it yourself. It's not as difficult as it seems at first glance.
The lesson for “garden sculptors” is based on the example of a cute bunny figure. Visitors are strongly encouraged to pet the finished animal and even sit astride it - this makes it clear that this thing is very strong and pleasant to handle. The master class lasts two hours. During this time, it is impossible to create a hare from scratch and turnkey, but the presenter Evgeniy Sluchich managed to show all the most significant moments of the manufacturing process, including the subtleties developed through practice. Under his guidance, I tried to perform the necessary operations myself, and it was very exciting. For those who are interested in the idea of making such a sculpture, I will tell you about the technology for its production.
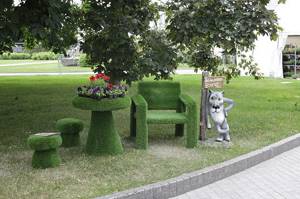
Artificial grass figures: scope of application
The combination of ancient art and modern technology made it possible to produce sculptures of absolutely amazing sizes. A life-size elephant, hippopotamus or horse is an excellent option for attracting attention. Thus, figures for landscape design become not only a decoration of an open-air space, but also a good advertisement.
Buying topiary with a unique shape is an excellent solution for:
- City squares, zoos and other public places - landscaped garden figures will be visible from afar, and the number of people wishing to take a memorable selfie against their background will never dry up.
- Hotels, entertainment complexes and restaurants with summer areas - topiary will become the highlight of any establishment, a symbol of unity with nature and cordiality.
- Residential areas. A fenced area with sculptures of majestic animals, mushrooms or fairy-tale houses will delight children and their parents.
Summer cottages and country cottages. A small garden area can be decorated with a green bunny, gnome or squirrel. Landscape figures will ennoble the space and bring a touch of freshness to it, even if there is a minimum of plantings around.
to buy products from the Bacho factory - topiaries of the most intricate and fantastic shapes . We have a huge assortment, prices from the manufacturer and guaranteed fast delivery throughout Moscow and throughout Russia. Hurry to make the world around you alive and magical. And we will select landscape shapes for your cottage , restaurant or park to suit your budget and wishes!
What will you need?
— Welding machine with all necessary accessories.
— Rubber coated gloves
— Metal wire (so-called wire rod) with a cross-section of 5-6 mm. You can buy it in a store, but it will be cheaper at metal collection points. Sometimes builders even throw away such wire (it is used for packaging). Don't be confused by the curvature of the wire - it can be easily removed.
— Plaster network with a 2x2 mesh 1 mm thick, for individual parts - thinner ones.
— Artificial lawn, preferably with an “undercoat” and a backing painted to match the color of the lawn. Then sharp kinks (for example, on the ears of animals) will be fluffy and without bald spots. The price for coverage of this quality starts from 750 rubles. per m. The color and length of the pile is to your taste.
Creating a garden sculpture
The process of creating a sculpture from plants is not difficult, but it will take you some time. To make the information easy to understand, we will provide all the technology in the form of step-by-step instructions.
Step 1 - Choosing the shape of the sculpture
First you need to decide on the shape of the garden sculpture. When choosing a form, we recommend taking into account the overall landscape design of the site and garden style.
Today the most popular forms are:
- Regular geometric shapes (ball, pyramid, cube)
- Fairy-tale characters (for example, gnomes)
- Animals (lions, elephants, hippos, cats)

Fox mold

Dog mold
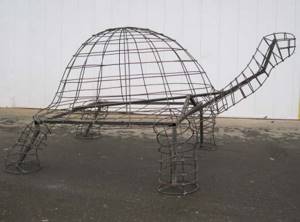
Turtle mold
After the shape of the sculpture has been chosen, we move on to the creation process itself.
Step 2 - Create the design
Using steel wire, we create a frame for the future sculpture. It is recommended to fasten the wire by welding, so the structure will be more stable and durable. If for some reason you don’t have a welding machine, you can use binding wire to securely secure the structural elements.
Step 3 - Preparing the body of the sculpture
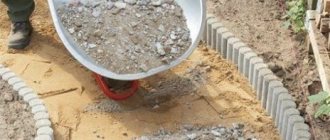
The body of the sculpture will be fertile soil mixed with a nutrient mixture. The exact proportion of mixing the elements is indicated on the packaging of the nutritional mixture.
In order for the body of the sculpture to be viscous and not crumble immediately after creating the sculpture, add a little straw to the mixture, moistening the soil with water in advance.
Step 4 - Strengthen the sculpture with mesh
The steel mesh will protect the soil from spilling out and make the sculpture structure more stable. If your figure will be installed vertically, then wrap the net around its lower part. If the figure is horizontal (for example, a mermaid lying on the ground), it is necessary to strengthen the sides of the sculpture.
Step 5 - Fill the frame with soil
Using moistened soil with straw, carefully pour the finished mixture into the wire frame. The mixture should not be too liquid, otherwise the soil will begin to seep through the cells.
To remove excess soil and give the sculpture beautiful shapes, use a trowel.
The body of the garden figure must be densely packed with soil; there should be no voids, otherwise, after the soil subsides, the figure will lose its shape.
Step 6 - Sowing the Seeds
As soon as the figure from the ground is created, we move on to the final stage - sowing seeds of lawn grass or low-growing plants.
We recommend combining both flowers and lawn grass to create an original garden sculpture.
So that you understand the essence of the combination, let's give the following example: when creating the figure of a lion, it is recommended to create the mane from flowers, and the rest of the body from the lawn.

Green lion in the garden