Making a pier with your own hands: choosing the type of berthing structure and installation stages
Moorings, or mooring structures, are special, different types of devices on a body of water, characterized by a wide range of applications. Most often, boat berths or a pier are used for mooring and parking small vessels, boarding and disembarking passengers, and carrying out repair work. It is quite possible to make such a structure with your own hands if the construction is based on a competent design.
Bridge material
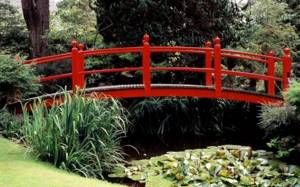
- Wooden bridges are the most popular both in sales and for those who try to build this structure with their own hands. Probably all this is due to the fact that wood is a malleable, affordable material and is used a lot in construction on sites, so almost any product made from it fits harmoniously into the design of the garden. The main thing when building a wooden bridge is to choose a good material. And follow the construction recommendations, then you can build a small structure yourself and literally in a day.
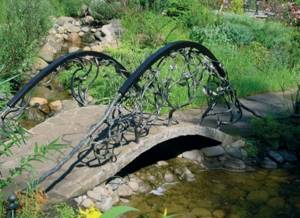
- Metal bridges - you won’t be able to make the entire bridge yourself, because some parts are created on machines. This applies to the base of the bridge. You can do all the other work yourself. In terms of design, such a bridge will look advantageous if you add railings and lanterns to it.

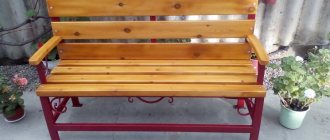
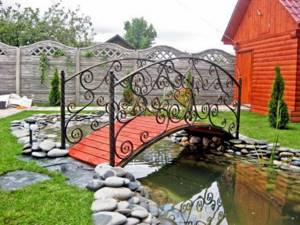
- Forged bridges - this product is assembled from ready-made parts, and even then experts do not advise doing this. Because if you have already decided to spend money on expensive forging, then let the craftsmen do the work from start to finish. You don’t even need to worry about how forging will fit into the garden design; it is considered a classic and looks great together with other elements, such as pergolas, benches and wrought-iron gazebos.
- Combined bridges - such garden bridges are structures that combine the best elements from forged bridges and wood. Typically, the railings and base of the bridge are made of forged metal, but the decking is made of wood. Sometimes they use a burnt board with engravings and drawings on it.
Types of berths and their characteristics
All berth structures can currently be classified into types depending on their location and design characteristics:
Depending on the design features, four main types of piers can be distinguished:
The simplest hydraulic structures for fishing or for a boat can be equipped independently. Piers made from a variety of available materials are used in the following ways:
On rafts, piers and pontoons, made with your own hands, you can sunbathe or dive into the water, transport goods and inspect fish cages.
How to build a simple berthing structure
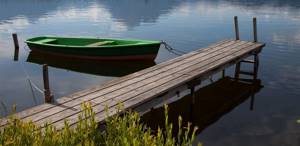
For homeowners living in close proximity to a river or reservoir, the issue of creating a convenient access to the water is always relevant. Some time ago, for this purpose, walkways or a bridge were built, allowing access to tied boats. Today, preference is given to more serious structures.
Making a floating pier
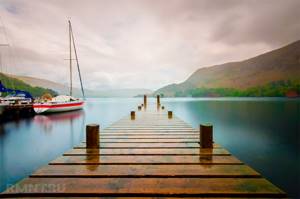
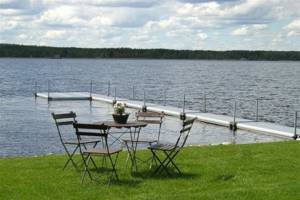
Unlike a pier, a pier can be located not along the shore, but at the intersection of the water plane at a right angle , with an approach several hundred meters from land. In this case, not only a small vessel, but also a cargo vessel can be moored on both sides of the structure. Quite primitive piers are being built on the lake, located on the same line.
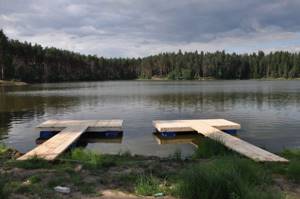
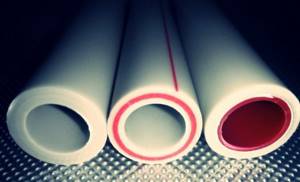
A pontoon or floating pier can be erected in areas of a reservoir that are subject to flooding, but protected from gusty winds. Pontoons are distinguished by their ease and simplicity of assembly, as well as the availability of all necessary documentation. Floating piers are most often metal, plastic or inflatable. The best option is floating plastic structures made of elements connected around the perimeter with special fasteners.
A floating pier does not require special maintenance, and if necessary, such a structure can be easily assembled, dismantled and installed in a new location. The modern plastic structure is created from HDPE with the addition of special compounds against the negative effects of the sun and sea salt.

Installation of a floating pier involves the use of additional accessories in the form of handrails, gangways and bollards. The cost of various composite plastic modules for creating a floating pier yourself is quite affordable.
Installation of a fishing bridge
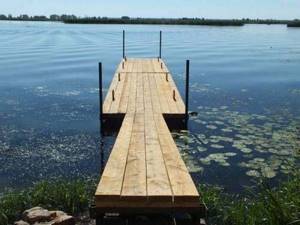
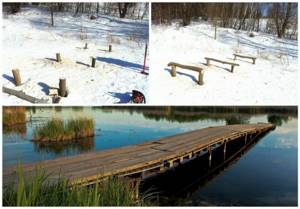
A high-quality and durable deck or bridge can be made quite easily yourself. It is very important not only to choose the right location and develop a competent project, but also to securely secure the structure using a log or pile treated with special compounds. Installation is best done in winter, before the ice crust melts.
You can cut holes with a chainsaw, and the diameter of the hole will depend on the diameter of the support. The standard width of the bridge should be about one and a half meters, so the distance between the supports should not be more than two meters.
It is optimal to use pipes with sufficiently thick steel walls or stainless steel supports as supports. A wooden support will quickly lose its high strength when exposed to water. Some fishermen advise installing the deck on a base made of plastic pipes that are not subject to corrosion and rotting. The frame is made of angle steel that can withstand significant loads.
The flooring is laid from wooden boards pre-treated with transformer oil, which will increase service life and prevent rapid rotting. PVL sheets or profile flooring can also be used.
DIY barrel pontoons
Pontoons based on plastic barrels are one of the most inexpensive options. The strength indicators of such a simple structure depend on a properly constructed supporting frame and elements capable of providing a sufficient level of diagonal, longitudinal and transverse rigidity of the structure. Steel, aluminum, wood or plastic can be used to create the frame.
A high level of stability allows you to use a raft-pontoon made from barrels for movement and recreation on the water, and when supplemented with a small boat motor, you can get a self-propelled pontoon.
To create a pontoon, alternative options to plastic barrels are often used:
Homemade catamaran rafts on plywood pontoons are also in great demand. For production, moisture-resistant plywood sheets impregnated with drying oil 3 mm thick are used, as well as three-meter wooden slats measuring 25x25 mm or 25x15 mm. Bicycle parts make it possible to create a rowing drive and wheels for a catamaran.
Pier construction
Building a pier with your own hands is not difficult. If you have already made a choice in favor of one or another berth structure, then it’s time to start the most interesting part - design and construction.
Gallery: DIY pier (25 photos)
Pontoon
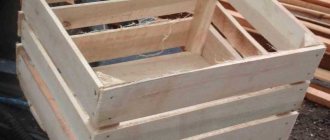
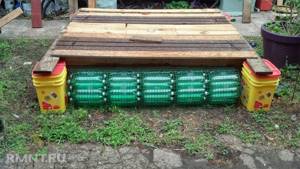
Building a pontoon is one of the fastest and easiest processes. Making a pontoon out of barrels with your own hands is an easy and inexpensive task. First you need to decide on the size of the pontoon. The minimum area will require at least four barrels with a volume of 200 liters, which must be tied with a wooden frame . The larger the pontoon berth area required, the more barrels you need to purchase. If it is not possible to find such a number of barrels, then a pontoon can be made from ordinary plastic bottles. The base of such a floating pier can be either wooden, plastic or even foam.
Wooden bridge
It is best to install walkways on the pier in the winter season, before the ice on the lake or river melts. Using a chainsaw, cut holes of the required diameter and drive in the logs. But it is preferable to use stainless steel pipes , because they will last much longer than wood. The optimal distance between logs or pipes is 1.5 meters. If the choice of material is made in favor of wood, then be sure to treat it with special means before installation. After installing the bases, you can start laying the flooring, which is best made from plastic pipes - they are the most durable, as they do not rot or rust.
Pile pier
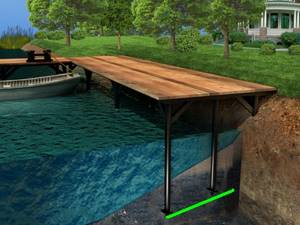
A wooden pier or pier for mooring ships, fishing and recreation is best built on a steel pile foundation. This option, although more expensive, is much more durable and beautiful. As we have already said, there are two types of piles. Driven piles are steel pipes with a sharp end that must be driven into the ground using specialized equipment.
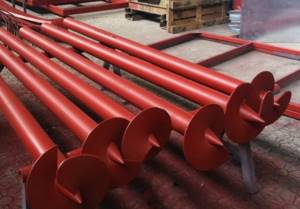
This has a rather negative effect on the condition of the metal. The pipe may become skewed or even twist into a spiral, which, of course, indicates that the support is inadequate. In addition, special equipment cannot always reach your site. Therefore, screw piles have become more popular lately. They are easily screwed into the soil thanks to the cone-shaped end using welded blades. At the other end of the pile, a cap is welded, which will subsequently serve as the basis for attaching the decking. The screw pile smoothly enters the ground, which does not lead to its deformation and does not require excessive effort. In addition, the length of this base can be adjusted independently, which is very convenient.
The number and diameter of piles depends on the area of your future berth and the total weight load. Calculate the distance between the piles so that the flooring layer does not sag. Once the pile is screwed to the desired depth, be sure to fill the cavity with high-quality concrete. This measure will increase the ability of the pile to withstand considerable loads. As we already wrote above, it is better to carry out pile installation work in winter, so you need to add the necessary additives to the concrete.
When choosing a flooring option, you should pay special attention to waterproof wood species . These include:
- larch;
- acacia;
- kumaru;
- garapa;
- merbau;
- massaranduba.
If it is not possible to purchase such expensive types of wood, then you can opt for special polymer deck boards .
It is these materials that meet all the requirements for the construction of structures in contact with water. They do not rot or decompose during long-term interaction with water; due to their non-smooth surface, they eliminate the process of sliding when water enters. They do not deform due to temperature changes and prolonged exposure to sunlight, and will not crack, dry out or swell (as natural wood can do). The design of this material is durable due to its high wear resistance and ability to withstand considerable loads. For overall beauty, a hidden fastening system . During the finishing work of the finished pier, install railings, a convenient descent to the water and the necessary attributes for mooring ships.
Construction of berths
0
( 19 ratings, average: 4.32 out of 5)
Back
DIY adapter for walk-behind tractor
MORE
What you need to consider when building a small pier for a boat or boat
The coastal zone of a reservoir, equipped with special equipment for mooring, repair work and maintenance, is called a berth. If until recently hardwood was used to create a pile foundation, today metal driven and screw piles are most often used, differing in structure and installation method:

The diameter of the shaft and the wall thickness of the piles depend on the level of expected load. A concrete solution must be poured into the cavity of the screwed-in piles, which increases the load-bearing capacity of the support. The cost of the material used for construction can be reduced by purchasing modern polymers with high water-repellent characteristics.
The surface structure made of such building material is characterized by the following quality characteristics:
Polymer deck boards used in the installation of decking do not require protection with varnishes and oil, which makes maintenance simple and affordable.
How to build a pier on screw piles (video)
It should be noted that any piers that go into the water at a considerable distance from the shore line must be built by professionals using special equipment. It is also very important to monitor the technical condition of the pier and carry out timely repair work.
Source
How to build a walkway, platform, pier near a pond with your own hands
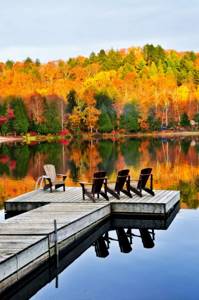
If you are the happy owner of a plot of land near a river, lake or other body of water, sooner or later you will need a platform or walkway on the shore. For what? Fish, sunbathe, take a running jump into the water and just admire the sunset. The RMNT website will tell you how to build such a platform on the shore.
In addition, maybe you have a boat or boat that needs to be moored somewhere. Then you will have to start building a full-fledged pier. From an engineering point of view, all such structures are divided into the following types:
Mooring walls are primarily designed to protect the coastline from erosion. It is almost impossible to build a full-fledged pier or breakwater on your own; these are traditionally capital reinforced concrete structures that require special equipment. Most often, owners of land near the water build simple walkways on stilts or pontoon platforms. Let's focus on them.
The easiest way to build a pontoon is on floating supports. Yes, the structure will not be as spacious and reliable as in the case of using piles, but it will definitely support two or three adults.
We advise you to start assembling your platform, actually a raft, on the shore. First, we make a frame from beams. You can also use a metal profile or pipes, but then welding will be required. The dimensions of a standard platform of four barrels with a volume of up to 200 liters are 2.5x2.5x3.5 meters. The beams are simply fastened together with nails or wood screws.
Important! Barrels must be without holes and cracks, sealed! Otherwise the pontoon will simply sink. The lids are screwed tightly, their threads are pre-lubricated with silicone. Sealant is applied around the plugs. The seams of metal barrels can be pre-welded.
There are three options for attaching barrels to the frame:
Now the structure is turned over and you can begin arranging the flooring from the boards. To prevent your platform-raft from floating away, it is tied to a pile securely driven on the shore, metal corners or a concrete pillar. In the fall, don’t forget to pull the pontoon ashore.
By the way, even the most common plastic bottles and car tires are used for the construction of pontoons.
Platforms and walkways on stilts are, of course, more reliable than pontoon ones. They can be of very different lengths and widths, depending on the needs of the owners.
Two types of supports are used:
Important! Getting to the right place on a muddy, reed-covered bank can be difficult. We advise you to drive or screw in piles for the future pier in winter, when the reservoir is covered with fairly thick ice. Make holes of the required size and screw in, drive the pile. It’s convenient for three people to work - a third person is needed to check the level to see if the pile is skewed. A slight tilt is allowed only towards the shore!
Important! The depth of twisting or driving the pile into the bottom is at least half a meter. And approximately the same distance should be from the upper end to the water. Be aware of how much the water level can rise during melting ice and heavy rains.

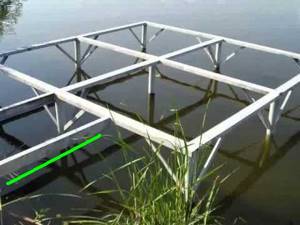
The width between the piles is from one and a half meters, otherwise the walkways will be too narrow, you definitely won’t be able to place a sun lounger. Metal piles are fastened together with angles or steel I-beams. It is necessary to ensure the presence of holes for attaching the flooring boards. Yes, do not forget that for reliability, concrete mortar should be poured inside the screw pile. Or at least throw some stones in the winter.

Important! If your pier will be located on a river with a fast current, make it in the shape of the letter “T” or “L” so that the crossbar goes towards the current, literally “cutting” it.
What your platform and pier will be like is up to you to decide. This can be the simplest and most unpretentious fishing bridge made from old boards and logs. Or maybe a real relaxation area with railings, steps, a platform for sun loungers and stairs to make it convenient to get out of the water. It all depends on your financial capabilities and needs, desire to fully take advantage of all the advantages of the proximity of the reservoir.
How to build a pier (platform) to the river with your own hands? Which installation method should I choose?
There are quite a lot of options, there are individual issues related to a specific area (nuances), such as the speed of the current, what the bottom is, etc.
The decking itself (berth) can be placed on wooden piles driven into the ground, or on metal screw piles, or a “frame” for the decking can be welded.
This option is one of the most expensive, but it is really reliable + the possibility of using the berth in winter, that is, this is not a temporary structure, but a permanent one.
A simpler option is a pontoon pier (floating), it can be made not only from barrels
(barrels keep the structure afloat), but even from plastic bottles.
If from barrels, then we assemble the structure next to the shore.
If the pier is on screw piles
(by the way, even houses on the water are built this way, the design is absolutely reliable), then it is better to do it in winter, when the reservoir is covered with ice, but of course we need to measure the depths near the shore in the summer, the depth is important, we need to know the length of the piles.
We start with the project, with calculations.
Next, we purchase screw piles with heads like these:
marking (we work on ice, we mark there).
We make holes in the ice, the diameter of the piles.
The piles are screwed into the ground (naturally at the same level, the level is achieved by cutting the pile heads at the same level), parallel to each other, how many piles (and their diameter), look at the location, calculations are needed, the dimensions of the berth may be different.
Next, we weld the tips with the platform to the piles (see above).
We attach the channels to the platform by welding (if the pier is not large, you can get by with metal corners).
Almost the same work as in the case of grillage on screw piles on land, the only difference is that at the finish we will have a continuous flooring on the grillage.
Next, the piles are filled with concrete, there are winter mixtures, or we wait for summer.
The last stage is installation of the flooring, there are a lot of options, from boards to moisture-resistant plywood.
The pier can be equipped with railings, look at the location.
The platform to the shore, from the pier can also be welded from corners (or channel)
and then the same flooring made of boards (can be simply made of wood), fastening the boards to the channels (corners) with bolts, the bolt heads in pata.

The entire “forest” is covered with moisture-resistant compounds.
A floating pier made of barrels, very simple.
The frame is square, made of a block (or board), with four barrels in the corners (as an option), tied with ropes, and bars inside the frame for rigidity.
We turned the structure over and covered it with moisture-resistant plywood, this is the flooring, and lowered it into the water.
How to build a bridge for a pond with your own hands
If the site is adjacent to a natural reservoir or there is a man-made pond on it, then sooner or later the question of walkways arises. It can be a simple structure, or a solid home berth. Fish farmers use this structure to feed fish, summer residents use it as a sunbathing deck, and fishermen use it as a small boat dock. In addition, such walkways can become a full-fledged element of landscape design.
In this article we will look at:
How to choose the right material
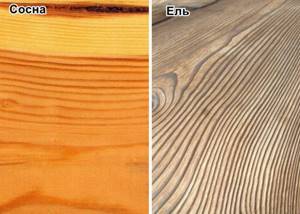
To decorate the banks of a reservoir, wooden boards or stone slabs are most often used. One of the best options for wood is Garapa board. The service life of such material is 30–35 years. This wood is dense, but at the same time easy to process. Coniferous trees are also excellent. You should pay attention to durable and wear-resistant larch, resistant to rotting.
You may be interested in reading about Chinese style landscape design.
When choosing spruce or pine, you should take care of pre-treatment with preservatives. At the same time, you need to understand that even after treating the wood with antiseptics, regular maintenance will be required. The most expensive option is decking. This is a special board made from hardwood from exotic crops.
There is another option - using decking boards, which include composite materials made of wood and PVC. This material is very similar in properties to plastic - it is non-flammable, resistant to moisture, temperature changes, and does not require special care. Its main drawback is that it gets very hot under the sun's rays, which is why you can't walk on it barefoot.
We recommend that you familiarize yourself with the use of wells in landscape design.
If the deck is built over water, then installation of supports is necessary. Traditionally, they are made from paving slabs, wood, concrete, or metal. However, today the best option is polypropylene supports. They have many advantages, for example, resistance to rust, destruction, and insect pests. Milled boards of the second or third grade with a moisture content of 10–12% are suitable for lags. For supports, you can take square beams with sides of 75 mm.
How to make a walkway on stilts
At first glance, the design of walkways on stilts is simple. All you need is:
The work is complicated by the fact that most reservoirs have muddy banks overgrown with sedge or reeds. When starting work, you need to take into account a number of circumstances:
And driving piles into the muddy bottom is very hard work, especially from a boat. In the vast majority of cases, bridge supports are screwed in manually: equipment, as a rule, cannot drive up to the shore of a reservoir, and not everyone is ready to pay a lot of money for a pair of piles.
There is one well-known life hack: it is best to make bridges in winter, when the reservoir is covered with ice. The edges of the holes are extra points of support, and they help maintain the vertical level. It will be easier to do this from ice.
In winter, it is quite acceptable to twirl your arms. 2 people can easily handle this.
You need at least two people to spin, or preferably three people. Two are spinning, the third is standing with a level. And water will help a little in this case. It's not like wrapping it in dry clay.
Superdom
Permanent structure
On the one hand, it seems that building a pier is quite easy: you need to fix the supports in the ground, then install the frame and make a ceiling or flooring on top. On the other hand, you should show care and diligence when performing work. The banks of most reservoirs are muddy, overgrown with reeds and other vegetation. In addition, it is necessary to take into account the characteristics and characteristics of soils, both under water and on the shore. You should also take into account the nature of the movement of water - is it standing or flowing, and if flowing, then what is the speed of the flow. For example, if it is fast, then it is better to make the pier in the shape of the letter “L”, towards it.
Another important point is that it is important to take into account the depth of water freezing in winter and the possibility of ice drift during spring snowmelt. Finally, check to see if the water level varies greatly depending on the season and weather. All this data can be obtained from the local administration, regional hydrometeorological center or geological service, or simply from fishermen. However, if a contractor is hired for the work, then with the right approach he himself must collect information.
First, the support piles are securely fastened. Place them at a distance of 1.5-2 m from each other. The width of the bridge is usually chosen in the same range (if made narrower, it will be uncomfortable to be on it), but the length can be from 1.5 to 5-7 m. More is usually simply not needed. Screw metal piles with a diameter of 10-15 cm, coated with anti-corrosion treatment, are best suited as supports.
Operating procedure
Securely secure the support piles at a width of 1.5 - 2 meters. This is the optimal width: you can put a sun lounger or chair on such a walkway, and if the walkways are narrower, it will be cramped even for a fishing chair.
A gentle method of arranging support
This method is recommended for constructing walkways in an artificial pond. The main advantage of this method is that it does not violate the waterproofing of the reservoir. In addition, such installation of supports is much easier than conventional screwing in piles.
What this method consists of: at the stage of waterproofing the pond, the piles are installed in a plastic container, which is filled with concrete; The container is installed at the bottom of the pond on top of the film. The load-bearing supports of the structure on the shore must be installed on the foundation. This design will be no less durable than walkways on screw piles, and it will serve regularly for several decades.
To make such a gentle design you will need:
Operating procedure:
The difficulty in this process usually arises with measurements. It is necessary to make sure that all supports are the same size, installed at the same level, and that in all containers (usually two are enough) the concrete is poured at the same level.
When the concrete has dried, the load-bearing beams can be secured and the structure of the walkways can be completed.
Main criteria for a bridge
Sometimes it can be difficult to choose the type of bridge you will build based only on photos on the Internet, because they are all beautiful in their own way. Here you will have to focus on your own skills, how the bridge will fit into the overall design, and, of course, the budget. But in any case, there are certain criteria that the constructed structure must meet:
- Reliability and durability - these two qualities are important for every summer resident, because it is known that a durable thing will last longer. To prevent the garden bridge from deteriorating ahead of time, it is necessary to treat it with special means to protect it from external pests.
- Safety - if a person crosses a stream on a bridge, then he must be completely sure that nothing will happen to him. In addition, the structure must be so strong and reliable that it can support several people at the same time.
- Decorative - in most cases, bridges are installed in the garden to make the landscape even more advantageous. There is no doubt that it is impossible to make a beautiful bridge with your own hands, the main thing is to choose the right shape, combination and material.
How to make a pontoon
A pontoon in everyday life is a structure not built on stilts, but on floating supports. You can assemble a pontoon with your own hands, and many FORUMHOUSE users choose this option.
The piles are just a hassle. Make from empty plastic bottles. I’ve had this raft myself for about 5 years now. We take it ashore in the fall. It is easy to build, and the structure will not be carried away by the ice drift.
A pontoon structure is indeed simpler than a pier on stilts. There is no need to calculate the height of the piles or think about at what level to make the strapping. And the issue with ice drift is resolved very simply - the pier can be dismantled in the fall and built again in the spring. The mobility of the structure allows it to be moved to another place.
Most often, this design is made on plastic (or metal) barrels.
For a small design you will need:
The structure is assembled on the shore of a reservoir. Work order: 1. Make a frame from beams, fasten it with nails or self-tapping screws (bend them with a hammer from the back). 2. Nail several cross beams to the frame. 3. Inspect the barrels with full responsibility. It is unacceptable for them to have cracks or holes. 4. Lubricate the barrel threads with silicone and screw the lid tightly. Place the barrels at the corners of the frame. 5. Fasten the structure using one of the proposed methods.
- if the barrels are metal, then weld ears to them, thread ropes into them and fasten the barrels to each other and to the frame with a strong rope web; - connect the barrels and the frame with mounting tape; - drill several holes in the top of each barrel and thread the ropes through them.
6. Nail planks to the frame.
7. Turn the structure over so that the barrels are at the bottom. Take it to the water.
8. Fix the pontoon to the shore as securely as possible. To do this, drive metal corners into the ground to a meter depth and attach the structure to them.
In autumn, the pontoon is pulled out of the water until ice appears.
We build a wooden bridge with our own hands
It is not difficult to assemble and install a wooden structure yourself, since the wood is well processed, and the parts are fastened with ordinary nails or self-tapping screws.
To work you will need:
- stakes or piles;
- wide and long boards with a thickness of 40 mm and above;
- flooring boards 20-30 mm thick
- small grooved cross planks;
- stones, gravel, pebbles for the base;
- rods for railings;
- nails, ropes, screws.
A wooden bridge will last a long time if all parts are treated with antiseptics and painted
Operating procedure
- Assembly of the structure
The two long boards are guides (in other words, joists). They should be carefully treated, coated with an antiseptic, and painted. If a straight bridge is planned, then the work with them is completed; if it is a humpbacked one, then they need to be bent. To do this, cut off the edges, soak both parts and bend them according to the template until the wood is completely dry.
When building small bridges, PVC pipes, which bend well, are sometimes used as guides. For strength, they are reinforced with thick metal rods - they are simply inserted inside.
Next, the flooring is arranged: transverse boards or bars are nailed to the prepared joists. Walking on unprotected decking is dangerous, especially when it rains when it becomes wet and slippery. The corrugated boards that are nailed on top help out. The bridge is ready.
Scheme of the design of a flat wooden bridge
- Installation of the structure
Two embankments are constructed from stones or gravel, on which the assembled product is mounted. If it is created for decorative purposes, the work can be completed there. If the bridge will be used for crossing, it must be firmly secured. The fixing element will be piles, which should be driven near both ends of each guide - 4 pieces in total. The length of the piles is 80 cm.
Just a few boards - and a beautiful decorative bridge is ready
- Decorating the finished product
Railings are an optional element, especially when the structure is adjacent to the ground or adorns a “dry” stream. But if the family has small children and the bridge is high enough, railings are simply necessary. They should be strong, high (70-80 cm), with a lattice or frequently spaced slats.
A bridge with railings is much more attractive than one without them. Sometimes wooden parts are decorated with carvings or painted to match the surrounding buildings. They will last longer if you choose coniferous species impregnated with resin for manufacturing: spruce, larch, pine. Applying antiseptic and paint (or varnish) is the finishing touch.