Send a request Call a specialist
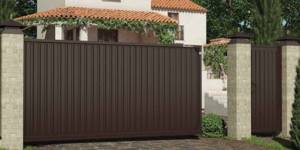
Despite the high cost, the popularity of sliding gates is constantly increasing. If you have the necessary mechanisms and fittings, as well as certain welding skills, you can make sliding gates with your own hands, which will be much cheaper.
Advantages and disadvantages
This design has certain disadvantages, but it has much more advantages:
- does not interfere with the passage of vehicles and allows you to save space;
- Bottom mounts in cantilever systems provide functionality in any climate;
- finishing can be made from various materials, such as forging, corrugated board or vertical lathing;
- wide choice of options;
- sagging of loops is eliminated;
- The choice of automation is carried out individually.
The disadvantages include:
- financial costs exceed the cost of swing gates by 15%;
- fastening the drive, as well as the console part, requires an additional base;
- a large area along the fence is required.
The insignificance of the disadvantages is not commensurate with the advantages of sliding gates.
Types of sliding gates
Based on the type of construction, they are divided into several types, which are suitable for openings of different sizes and purposes.
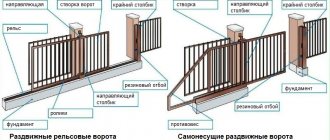
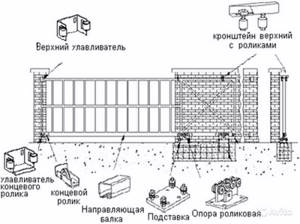
- Hanging. The gate rolls back along a guide located on top. The guide beam can be located above the gate on posts or attached to the wall above the opening. Installed at the entrance to the territory of industrial facilities or tall buildings such as warehouses. Usually controlled by a dispatcher remotely.
Of all the variety of sliding gates, the simplest and most reliable are those that rest directly on the ground, or more precisely on a rail laid under the gate.
- Gates sliding on a rail. The canvas moves on wheels along a rail located at the level of the road surface. Additional support is a guide in the upper part. Catchers fix the canvas in the open or closed position. This design is the cheapest and easiest to install. The rail does not interfere with the ride, but it must be regularly cleaned of dirt, and the ice must be chipped off in winter.
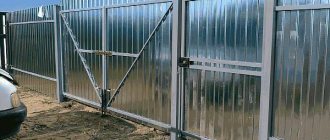
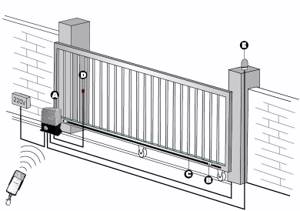
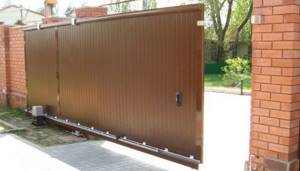
- Cantilever sliding gates. A design that has become widespread at entrances to private areas. The console, or guide beam, moves without touching the soil using electric drive rollers. A frame with casing is fixed to the console. In order for the gate “suspended” on the console to be in balance, it must be longer than the opening. In the drawing, the frame looks like a rectangle with a triangle on the side, which is welded on for rigidity and balance. Despite the complexity of the design, the need for a foundation and space when opening, they are considered the most reliable. Catchers are installed on the side opposite the roller mechanism. When closed, the console can withstand significant wind loads thanks to the foundation and support on the catcher.
Any sliding gate can have a built-in wicket. It is not located in the center, but a meter from the side posts when closed. The gate always opens inward for safety. The hinges are placed on the side to which the gate slides. The lower edge of the frame must remain rigid, so the gate always has a threshold.
Types of structures
There are several types of similar gates, differing in the principle of arrangement and functionality:
- Hanging. This heavy but fairly reliable design has been very popular since the times of the USSR. For the passage of freight transport, a metal beam was installed at a high height. Nowadays, this design is rarely used due to its material consumption and limited opening dimensions.
- Console. These gates will be able to withstand any bad weather and are an ideal option for many climatic zones of Russia. The structure is installed on a strong concrete base created on the side of the opening.
- Mechanical. Moving is done manually. They have lower cost and easy installation. This sliding gate scheme is suitable for rarely visited summer cottages.
- Automatic. Equipped with a remote control, as well as an electric drive, they are the absolute opposite of mechanical ones. The best option for regular use.
Attention! Sliding gates require free space along the fence, the dimensions of which correspond to the dimensions of the opening.
Material selection
To make sliding gates you will need high-quality material. Quite often it is sold ready-made in hardware stores.
What will you need?
- Console equipment.
Console equipment should be selected from trusted manufacturers.
Two pieces of roller carriages that will move the guides.
To add strength to the gate and keep it closed, you will need special sash catchers. Both upper and lower catchers are needed.
To hold the upper part of the sash in motion, you will need a bar with supporting rollers.
Knurling or end roller (one piece).
In order to protect the guide from small debris, you will need plugs (two pieces).
Actually the guide itself.
An electric motor that contains a gear rack, wiring and an automation system.
- Metal.
The frame will require a metal profile. For the outer frame you need 60X40 or 50X50 pipes. For the internal one you will need 20X40 pipes. Pipes must be of good quality.
The manufacture of the frame should be approached with special care. The easiest way to make it is to weld profile pipes. For this purpose, pipes of standard section 60X40 are used. To weld the frame, the rectangular main and triangular side frames are fastened together. The oblique cut ends of the pipes are soldered.
- Sheathing.
Corrugated sheets are widely available and come in a wide range of colors.
What kind of cladding will be depends primarily on the design of the fence. Usually a single composition is created from one material, although variations are possible. Profile sheets are often used for cladding - this is the simplest and most inexpensive material. It is possible to use sandwich panels. They have a variety of textures and with their help you can decorate the gate in an original style. Metal is also often used. Custom wrought iron gates can be made, but simpler aluminum sliding gates can be made. Wooden sliding gates will look good in the interior of wooden cottages. They are sheathed with polyester and even mesh.
- Primer, paint. These materials will be needed both for processing the frame and, if necessary, for processing the cladding.
Let's take a closer look at some types of sliding gates, and start with wooden ones.
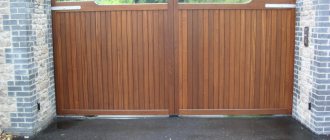
Tree
Cladding using wood is to some extent a classic option, and despite the variety of new materials, it is in great demand among owners of private houses. Wood goes well with other materials and is not very demanding on the overall style. It can be decorated with decorative elements, which will give additional individuality.
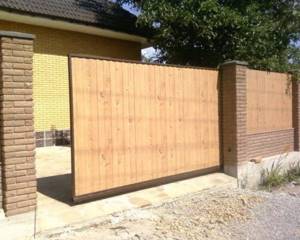
Wooden sliding gates additionally need to be coated with protective coatings to prevent rotting and other things.
Any material is suitable for making canvas, but it is important to remember that wooden structures usually require additional ribs. Wood is prone to sagging, and therefore the canvas itself must be of increased rigidity. Additional ribs are attached to the frame in a vertical or horizontal direction, placing them in the middle. The frame itself begins to look like a rectangle divided into sections from the inside. If necessary, add ribs diagonally.
Wooden ones need protection from negative environmental factors. Oil-based impregnation is best suited for this. The product must be designed to protect against moisture, sunlight and insects. Varnishes can be used as a finishing coat. The only negative is that all impregnations have a limited validity period, so they will need to be updated regularly.
Also, in wooden sliding gates, it is advisable to make the gate separately so as not to create additional load on the structure.
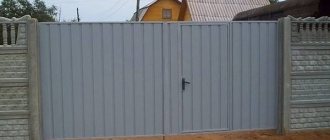
Metal
Metal cladding is also in great demand. This material is reliable, durable, resistant to temperature changes, and unpretentious.
The metal frame used for sliding gates can withstand loads of up to two thousand kilograms. Therefore, cladding options can be quite varied.
Sometimes metal siding is used. It consists of metal panels that fit together.
If you want to make the gate secure, use a metal picket fence. In appearance, it resembles ordinary wood, but is not subject to temperature influences. In addition, the picket fence is produced in various color variations, which allows you to realize interesting design ideas.
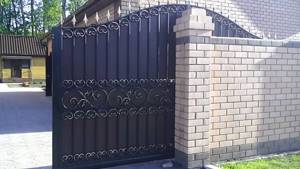
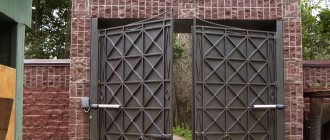
Forged sliding gates are durable and look very solid.
A more expensive option is wrought iron gates. Forged products look great and are more aimed at highlighting the individual style of the home. At the same time, they are heavy and demanding on supports and foundations. The slightest error in calculations can ruin the entire fence structure.
Wrought iron gates can be blind. In this case, they are usually supplemented with some decorative elements. They are also made from openwork latticework. This option will cost less and is less at risk of breakage from strong winds, since it has less windage than a solid canvas.
Quite often, forged openwork patterns are combined with polycarbonate sheets.
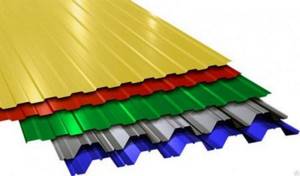
Corrugated sheet
Profiled sheets are made from light steel. This is a durable material, quite suitable for the manufacture of sliding gates. They are available in different colors, which provides a beautiful and elegant appearance.
Profiled sheets are produced in three types:
- roofing;
- wall;
- universal.
Sliding gates can be successfully manufactured and installed independently at the dacha, in a country house, in a parking lot, etc.
To install sliding gates made of corrugated sheets, you will need wall sheets marked with the Latin letter C. The thickness of the sheets should be from 0.4 to 0.8 mm. Also pay attention to the height of the wave. In addition, profiled sheets for sliding gates must have a polymer coating - this will provide additional protection from negative environmental factors.
The frame is made from a standard profile pipe with the obligatory installation of a transverse strip for structural strength. When cutting a profiled sheet, you need to take into account the direction of the waves and how it will fit against the frame. Such sheets are fastened with self-tapping screws using a screwdriver.
Sliding gates made of corrugated sheets are very reliable and economical. Can last up to 50 years. In addition, they are not afraid of minor damage and scratches. The repair will be simple. Sets of paints, which are produced in special cans, will help to completely renew a scratched surface if necessary.
In Moscow, many companies are engaged in the production of sliding gates from corrugated sheets, but if you want to make them yourself, then this does not pose a problem for a skilled person. True, experts advise taking ready-made drawings and working on them so as not to make mistakes in the calculations.
It was written above about materials for cladding; now let’s focus on the issues of installing finished structures.
Do-it-yourself sliding gates: calculation features
Proper design calculation is the most important stage that cannot be ignored. This will help determine the final weight, as well as select the appropriate mechanisms that can withstand the load.
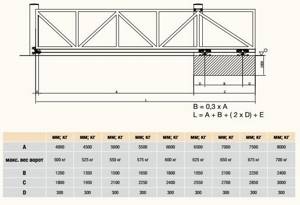
Sliding gate drawing: data on the height and width of the opening
To determine the future width of the gate, you will need to measure:
- opening width;
- distance between the center points of the carriages;
- technological indentation for moving the gate.
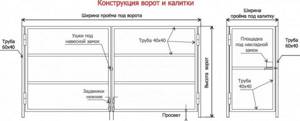
Taking into account the obtained parameters, a drawing of the sliding gate is drawn up indicating all dimensions.
Counterweight calculation
In order for the sashes to remain balanced, it is necessary to calculate the counterweight. Its length must exceed or equal 40% of the width of the sash itself. These calculations will help determine the required distance along the fence to roll back the structure.
Weight calculation
Knowing the weight of the materials, these calculations are not difficult to make:
- a steel sheet with a thickness of 2 mm weighs about 17 kg/sq.m;
- The weight of the corrugated sheet is 4 kg for each square meter.
If the frame is 2*4 meters in size, the weight of the gate will be approximately 200 kg. This data will help you decide on the choice of guide beam.
Calculation of the strength of fittings
In order for the manufactured structure to work flawlessly in any weather, the strength of the components must exceed the expected weight of the gate. In addition, the lateral moment must be taken into account, which corresponds to 800 kg/m. Accordingly, each support will receive no more than 180 kg.
Attention! When purchasing roller mechanisms, you need to make sure that they have about a 30% margin in relation to the weight of the gate.
Additional calculations
When creating sliding gates with your own hands, you need to pay attention to the number of anchors and the strength of the roller carriage supports. When calculating mortgages, they start from 60% of the total amount, which must be divided by the future number of mortgages.
Which ones are better
It’s hard to say which design is better. If we talk about reliability, then the best choice is a suspended structure. Everything is easy and reliable, an almost indestructible system. Gates of this type have been used in enterprises for decades. Their disadvantage is that the beam limits the height of incoming vehicles, which is sometimes important. But today there are models with composite beams, which allow you to remove the lintel above the entrance when the gate is open, and then return it to its place.
The cheapest and easiest to implement is a rail system. These sliding gates are the easiest to assemble with your own hands. But problems encountered during operation make it unpopular.
Of all the above structures, the most expensive and difficult to implement is the cantilever one, however, it is the one that is installed most often: if done correctly, it does not cause inconvenience during operation. When choosing, you need to keep in mind that when installing it on the right or left of the gate, a distance is required that is one and a half times greater than the width of the leaf: in addition to the leaf itself, there is also a technical part that protrudes from the side by about half the length.
The types of sliding gates, design features and construction are discussed in detail in the video.
Selection of components
To decide on the choice of components, you should take into account the weight and dimensions of the sash. To do this, simple calculations are carried out. The base rail carrier is 6 meters long. Therefore, for the correct selection of components, 40% is added to the length of the sash. In addition, selection can be made taking into account the upcoming loads and dimensions of the guide beam.
Attention! When the opening is planned to be more than 4 m, when purchasing components, they are guided by loads of about 500 kg.
DIY sliding gates: installation work
The canvas should move along the fence from the side of the site. Based on this, the place is prepared. The installation process contains 4 stages:
- foundation construction;
- electrical wiring;
- installation of a return pole;
- installation of automation.
Completion of all stages meets certain requirements.
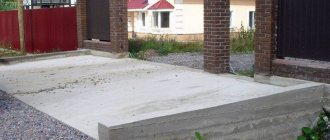
Making the foundation
First of all, markings are made, for which 50 cm are measured from the fence, equal to the width of the foundation. To determine the perimeter of the proposed foundation, it is necessary to measure the distance corresponding to the rollback. If it is not possible to use support pillars, a counter pillar is installed. Having decided to use automation, you need to prepare a place for wiring using a metal-plastic pipe with a diameter of about 25 mm.

The depth of the foundation trench must meet the requirements of a particular region. To create an embedded element, a channel corresponding to the length of the trench is used. The foundation is strengthened with 12-mm reinforcement, connected in transverse connections, and also welded to a channel leveled using a level.
Installation
After the base has hardened, markings are made using a cord, which determines the direction of movement of the gate. Carriages are placed on the mortgage, one at a maximum distance from the other. Having installed the gate on the guide rail, they are placed on carriages. After checking the installation with a level, the carriages are secured by welding, and the joint between the mortgage and the carriages is welded.
Installing the cart will require making holes in the carrier. To do this, loosen the upper nuts attaching to the plane of the trolley and slightly roll the gate. When the wings move freely, the nuts are tightened; when movement becomes difficult, the fastenings are loosened. Then the design of the sliding gates is leveled, and the existing distortions of the trolleys are corrected.
It's time to install the end roller on the supporting profile, tightening it well with the bolts. To provide an end stop for manual movement of the gate, the roller cover is secured by welding to the profile. To prevent snow from rolling into the rollers, profile plugs are mounted on the inside.
The gate frame must be sheathed with a profiled sheet corresponding to the size of the door. The sheathing is fastened with self-tapping screws or rivets, laying the following sheets overlapping. Upon completion of the installation, the automation is installed, securing the gear rack.
How to make cantilever sliding gates
This design is good because there are no beams above the passage. But it is the most expensive in the device. The point is not so much in the roller system, but in the need to construct a foundation with metal mortgages, to which the cantilever beam will then be attached. If there are already pillars, the foundation is poured in front of it and along the fence to the length of the technical extension, which is necessary to compensate for the load created by the canvas.
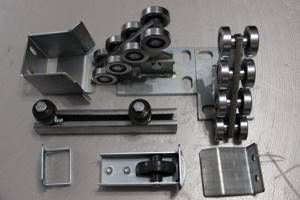
Complete set of cantilever gates
Even if you make cantilever sliding gates yourself, a set consisting of a guide beam, rollers, end rollers and catchers is usually purchased from a company. All spare parts are calculated based on the size of the canvas, frame material and type of cladding: weight is essential. Therefore, it is advisable to decide on all these parameters in advance.
Knowing the length of the supporting beam, you can calculate the required size of the foundation. The type is a strip foundation; a foundation pit is dug below the freezing depth of the soil (it is different for each region), into which reinforced supports are laid under plates with rollers, and racks are also installed. A set of upper rollers is then attached to these posts, holding the canvas and preventing it from swinging.
How to calculate the foundation for mounting a cantilever beam
There is nothing complicated in the calculation. The length of the foundation is almost half the length of the span. If the span is 4 meters (the width of the passage or the distance between the pillars), then the foundation should be 1.8-2 m. Its width is 40-50 cm, its depth is below the freezing depth of the soil for the region.
Foundation for a cantilever beam during the construction of sliding gates
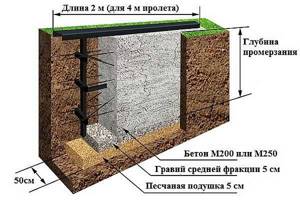
The pit is dug another 10-15 cm deeper - under a gravel-sand cushion. This foundation is reinforced (like a strip foundation), in its upper part a channel (18 or 20) is welded to the reinforcement and the whole thing is poured with concrete. The channel is set to the “zero” level, that is, it must be level with the ground level or the material with which the yard is finished.
Prepared reinforcement and embedded channel

There is a cheaper and faster option, but in terms of reliability it is inferior to the one described above. Three metal screw piles are screwed into the ground, and a channel is welded to them.
Installation of roller bearings
Studs are welded to the embedded channel, and platforms with rollers are then bolted to them. Sometimes you can find options when the platforms are welded directly to the mortgage. It is not right. There is a fairly high probability that the foundation or fence post will shrink. Even a slight shift and your gate will not work. If the rollers can be removed from the studs, the studs can be welded and everything can be put back in place, then how to correct it if the platform is welded? Cutting down? Difficult, long, without guarantees. So in this case it is better to do everything according to the rules.
Example of fastening roller pads
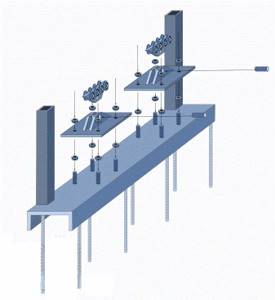
When purchasing, pay attention to the roller carriages and the rollers themselves. These are necessarily sealed rolling bearings. They are usually arranged in two rows of 4 pieces each. The lubricant in them must be frost-resistant - the lower temperature limit is -60°C. Inspect the platform on which they are mounted. It must be steel, cast, good metal with a galvanized surface, coated with a protective lubricant.
The support beam rolls onto the rollers, so they bear the main load
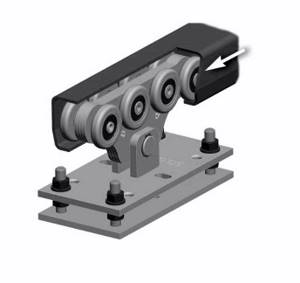
Roller skate. Everything should ride effortlessly and should not have any play (should not wobble from side to side). Then you can be sure that the gate will move easily and the sliding mechanism will work for a long time (some companies give a 10-year guarantee). After all, most of the load falls on the rollers, so their quality is key, as is the balanced design of the blade.
The remaining stages of installation will be more clearly described in the photo report: the gates were assembled independently, without the involvement of specialists.
Read about automatic swing gates here.