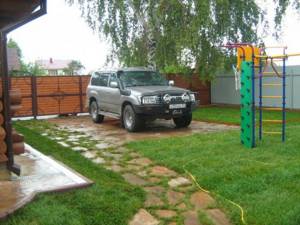
Every person dreams of a cozy country house in which to spend time pleasantly after a hard day at work. And for the holiday to go well, the summer cottage must be landscaped.
Often in a dacha, the entrance to the site does not have an asphalt base, so on rainy days the road is heavily washed away. And strong flows create potholes along the side of the road, making it even more difficult to enter the dacha area.
In this article we will tell you in detail how to make an entrance to the site through a ditch on your own.
Important Tips and Recommendations
So that as a result we can get a reliable and high-quality ride, it is important to think through several important aspects before starting. You can look on the Internet for photos of the entrance structures to the site, and then you can choose the option that interests you.

It is necessary to pay special attention to the following nuances:
Think about the location of the entrance, because it will not be so easy to redo it in the future. You need to think about many parameters, for example, from which side is it more convenient to approach the house, will the light fall on the car if left at the entrance, etc.
Try to think through as many nuances as possible, and then in the future you will not regret the created building.
It is necessary to make a good entrance for different types of transport, so the optimal entry width should be 2-3 meters.
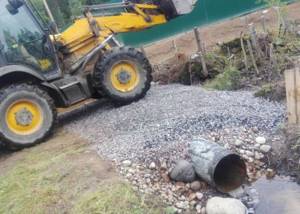
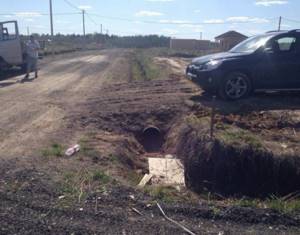
It is worth considering that the pipe must protrude at least 1 meter on each side. This feature will allow water to flow well through the entrance, and if it becomes clogged, cleaning it is not problematic.
Step-by-step construction of the race
The entrance must be very secure, so during construction you should adhere to the main construction rules. Because you will probably agree that you will not be entirely pleased when your car falls into a ditch.
Purchase and inspection of land
How to make drainage on a site - the secrets of a master on how to make drainage to drain water yourself!
- How to clean a pond: a detailed description of how to clean a pond quickly and easily with your own hands (130 photos + video)
Next, we will tell you how to consistently register entry to the site.
Types of coverage in the entrance area
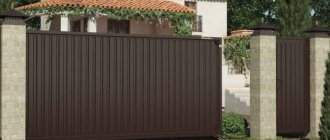
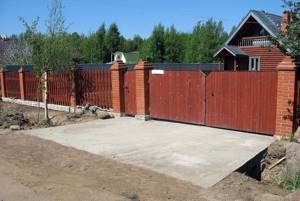
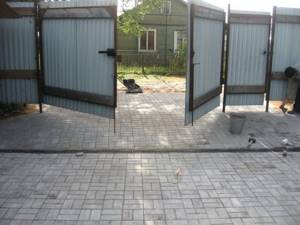
The coating can be regular or hard. Rigid is more reliable and practical. It includes: tiles, stone, reinforced concrete slabs, self-leveling coatings, as well as wooden and asphalt.

A solid hard coating will last the longest. It is also unpretentious in care. However, concreting of the base will be required if cargo transport is planned to enter the site, and large-format elements with a thickness of less than 6 cm are used as paving.

Artificial stone, concrete slabs, clinker are bridge materials used at the entrance area.
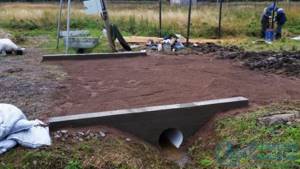
Erecting a pillow
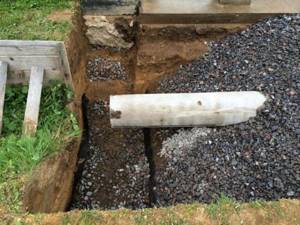
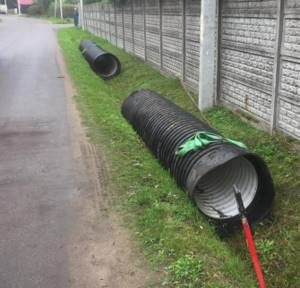
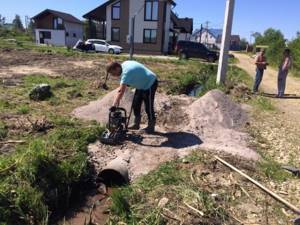
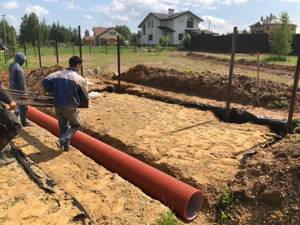
Install a concrete pipe 3-4 meters long at the bottom of the ditch, its diameter should be 0.5 meters.
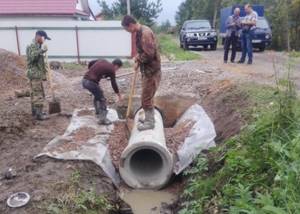
A corrugated pipe with a smaller diameter is laid inside this pipe. This design will provide a functional drain, so debris will not clog inside.
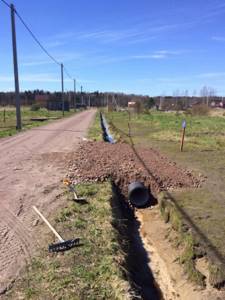
A cushion of crushed stone is poured on top so that it is compacted well, leave it for several days.

Installation of the support structure
A cushion made of crushed stone simply will not last that long; after use, it will simply be washed away and crumble.
Therefore, it is important to install a reliable retaining structure; to create it, read the instructions carefully:

Decorate the site according to Feng Shui: location features, design elements, Feng Shui zones. How to work with a ba gua diagram? Secrets of garden decoration
How to arrange a plot in the Russian style: the best ideas for creating a beautiful and cozy plot (145 photos and videos)
Do-it-yourself pond on a summer cottage: detailed description of the construction of a decorative pond, design and design options (110 photos and videos)
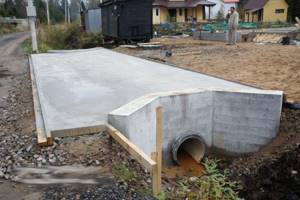
The first step is to install support pipes on both sides of the entrance. The distance from the pillow should be approximately 0.5 m, this will be enough to fill the support.
Reinforced mesh and waterproofing material are installed on the support pipes.
Now that you have formed the compartments on the sides of the cushion, concrete mixture is poured, it is recommended that you contact specialists with special equipment. Because mixing the mixture in such volumes yourself will be problematic.
If you don’t want to spend a lot of time with the construction of the entrance, you can order the entrance to the site on a turnkey basis. But practice shows that the service is expensive, about 1.5-2 times higher compared to self-construction.
How to build a house on a plot inexpensively? Provide access to the site for construction equipment
It is your responsibility to provide access. In addition, building a house on a plot using heavy equipment often means building your dream home with significant savings. You will not have to hire workers to carry soil from the road to the site, and in the same way, your materials will not be piled up against the fence. A concrete mixer with a concrete pump will reduce the time needed to pour the foundation. You have to pay for the run and call for cars based on the mileage, so it’s easier to deliver everything in large quantities. Insulation with ecowool can be done in one day only using special equipment. Manual insulation will take weeks. The quality of installation of ecowool under pressure is completely different than with manual installation. It is likely that in a few years you will decide that it was worthwhile to build a house with a swimming pool and you will have to dig a pit, order concrete, and construction will again make noise on your site.
Completion of work
The working surface is covered with sand and geotextiles are placed on top. After this, it will be possible to pour asphalt concrete or lay paving slabs.

Stone retaining walls are options for constructing and arranging areas with a slope. 115 photos of landscape design ideas
How to arrange a summer cottage - design options, beautiful ideas and stylish design solutions (90 photos + video)
- How to make a well with your own hands - design ideas and recommendations on how to beautifully design a well (110 photos + video)

Only after 3-4 days have passed after the final coating has been created will it be possible to use the entrance. This is done so that the soil and the cushion settle.

Now you know how to enter a summer cottage. Try to think through all the little things before carrying out work, and then you definitely won’t have any difficulties. We wish you good luck!
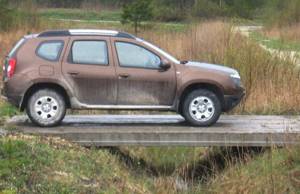
Do-it-yourself temporary access to the site through a ditch using pipes
Entering the site through a ditch with your own hands is temporary, how to do it right. With a limited budget and time, a temporary entrance can be built from any available materials (car tires, flooring from boards, logs or used metal sheets), but when construction is carried out from scratch and materials are transported to the site by dump trucks, such coverings will not cope with the loads.
The only way out in such cases is to lay a metal, asbestos-cement or plastic pipe of the required diameter at the bottom of the ditch, covered with crushed stone-sand mixture.
Work technology
Work begins with clearing and drying the ditch and is carried out according to the following scheme:
1. The bottom of the ditch is cleared of plants and fertile soil, covered with a 5 cm layer of sand, compacted and covered with geotextiles.
2. A pipe of the required size is laid in the ditch with a slope of 3-5°.
3. The pipe is covered with sand and crushed stone, interlayered with geotextiles. For verification, the most durable crushed stone (ideally granite gravel) with a fraction of 20-40 mm is poured, all layers are carefully compacted.
The main difficulties arise when selecting the material, cross-section and length of the pipe. With a standard entry width of 6 m, the recommended pipe length is 8 m; if you increase it in a smaller direction, the edges crumble faster; if you increase it in a larger direction, problems with cleaning may arise. Despite the convenience of cleaning pipes with a large cross-section, it is not recommended to specifically dig a ditch for them. The diameter usually varies from 30 to 50 cm and is selected taking into account the constant filling of the pipe from a quarter to a half, but not less, otherwise the ditch becomes clogged during spring floods or rainstorms. If it is necessary to increase the passage into the ditch, a larger number of pipes, a concrete tray or products with a cross-section of more than 50 cm are laid, but such cases are quite rare.
The material of the pipes has a direct impact on the estimate, the depth of their installation and durability. When constructing a temporary entrance to a ditch, cheap plastic or a/c pipes are most often laid, which require a wider layer of top bedding compared to reinforced concrete or steel and are inferior in strength.
When using metal varieties, it is recommended to weld flanges, pieces of channel or additional stiffeners to the bottom side of the pipe, and steel gratings to protect against clogging with a cell pitch of 150 mm to the ends.
To extend the service life, all external surfaces are coated with bitumen mastics or painted with anti-corrosion primers.
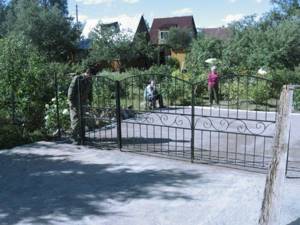
Photo of the entrance to the site
Did you like the article? Share

1+