Now it’s not a problem to build a drip irrigation system for your dacha with your own hands without additional installation costs. You can purchase components for the drop in specialized chain or online stores, or use available materials and your ingenuity. The simplest option is to purchase a ready-made automated irrigation system, which you simply need to assemble.
What is drip irrigation
The idea of drip irrigation arose among farmers back in the last century; it was used to create irrigation systems for vegetable and melon crops in arid regions. The main goal of such irrigation is to deliver life-giving moisture precisely to the root zone of a vegetable plant (tomato, pepper, eggplant), fruit trees, shrubs or under garden strawberry bushes.

The main element of the system is a water source, from which moisture is supplied to the desired part of the vegetable garden (garden) and drips into the ground in small portions. Water supply and shutdown can be carried out automatically, according to time, or upon reaching the desired level of soil moisture, or manually.
Transport communications (pipes, tape, hose) must approach each plant and deliver water directly to the roots. The pressure is created using a pump or due to height differences (the source is raised to a sufficient height).
Benefits of drip irrigation
A list of the positive aspects of drip irrigation for those who still carry watering cans and hoses around the garden.
First of all, this is a real saving of water, personal time and physical strength of the summer resident. This is already a big plus, especially if the water is not from a natural source, but from a paid water supply and the flow is controlled by a meter. Help
When properly organized, watering saves about 80% of water, completely satisfying the plants' moisture needs.
Using the drop has a positive effect on plants:
- the soil is always moist, there is no excess or lack of moisture;
- optimal humidity in the root zone prevents fungal infections and improves immunity;
- no sunburn;
- The system allows you to combine watering with root feeding with fertilizers.
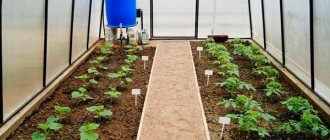
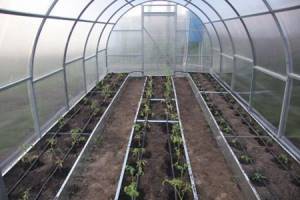
During the hot season, greenhouse owners are especially happy about the drop. Drip irrigation plus mulch and good ventilation provide comfortable conditions for plants and make life much easier for summer residents.
How to make drip irrigation with your own hands without high costs
In order to save the family budget, having a minimum set of tools at the dacha, many people do drip irrigation with their own hands from available materials. Homemade designs improve the quality of irrigation.
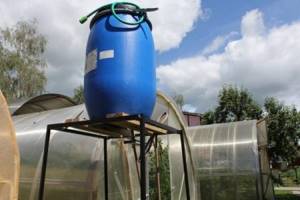
A water source with a volume of at least 100 liters will be required. Canisters and plastic barrels are suitable for this purpose. An important point is the installation height of the container, it should be at least 1 m, and preferably 1.5-2 m.
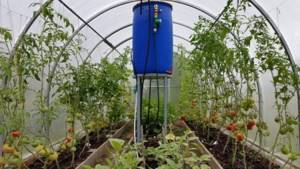
Important! The water pressure in the system will depend on the height at which the barrel is located.
It is practical to place the container under the drain. This arrangement has two advantages: the consumption of tap water is reduced, and rain water contains ammonium and iron that are useful for garden crops. Water is supplied under bushes, trees, and into the greenhouse onto the ridges using garden hoses.
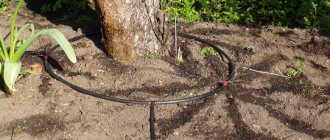
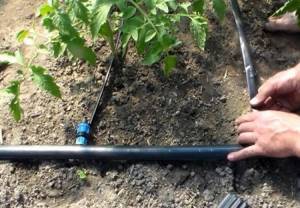
You need to cut the hose and make holes in it after the exact irrigation diagram has been drawn. It is necessary to make allowances - cut segments of a slightly longer length than indicated in the diagram. Lay out the resulting pieces according to the drawing, connect them, and install taps in the right places. In the designated places, use a hot nail or drill to make holes for water supply.
Drip irrigation from a barrel
There are some nuances in this matter. For example, gardeners often notice that gravity flow is not a reliable and not intensive enough method of watering. And the pump is an extra. spending. Therefore, there are several ways to speed up the process. One of them is to raise the barrel not by 1.5 meters, but by three. This technique will also help prevent stagnation, and as a result, the accumulation of plaque.
But inside the barrel, the amount of litter can become many times larger, because due to the fact that it stands high, it is not always convenient to climb up in order to remove unnecessary content. Therefore, a filter directly inside the container is an excellent solution. You can, of course, follow the example of some craftsmen and use ordinary nylon for this. But a factory filter is not that expensive.
The removal of the pipe from the canister also has its own characteristics. You will need to organize a tap, after which there is a filtration system, and then you will need an adapter made in the shape of a 90-degree angle.
Drip irrigation system options
For those who like to do everything with their own hands, there are different ways to choose from for making country drip irrigation. One option is to purchase from a gardening store:
- hose for supplying water to the greenhouse (on the ridge);
- ribbons of the required length;
- cranes;
- fittings.
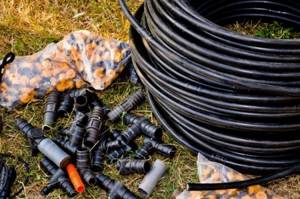
There are ready-made kits on sale that contain everything you need (tape, hoses, tap, tee, couplers) and assembly instructions, but you can quickly make a simple structure for watering using the advice of folk craftsmen.
Traditional design
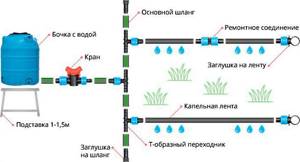
In country houses and dachas, the classic irrigation scheme is in use, consisting of a barrel (water source) and a branched water supply system consisting of pipes (hoses), plugs, special hoses (tapes), start connectors, tees and taps.
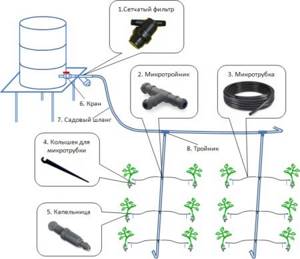
The pipes serve as a main water conduit; through them, water flows to the plants in the garden beds or to the greenhouse. Water is supplied to the plants through special hoses, into which droppers are mounted, when choosing which they look at the characteristics:
- productivity (l/hour);
- the interval between droppers for hoses is 0.2-1.5 m, for tapes 0.15-0.3 m;
- wall thickness of the tape (hose).
Help The optimal hose performance is 1.2-4 l/hour.
Hoses with thick walls of 20 mm or more are more expensive, but have a longer service life than thin-walled ones. The thickness of drip tapes is less (0.12-0.4 mm), they have an oval shape, and come in two types: seamless, glued. The allowed length of the irrigation hose is 250 m with a tape diameter of 16 mm and 450 m if the diameter is 22 mm.
Polypropylene pipes are laid from the source to the irrigation hoses from a hose or tape, and fittings are used to connect the structure. To disconnect the irrigation zone from the source, taps are installed in the system, they are placed after the tees so that debris does not clog the holes of the tape, and a filter is installed on any source.
DIY drip irrigation from plastic bottles
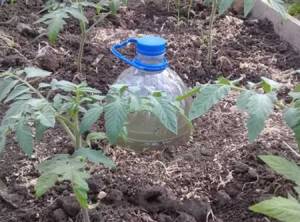
Over the winter it is easy to accumulate a large number of plastic bottles with a volume of 1.5 to 2 liters. In the spring they will come in handy in the garden; with their help you can build a simple structure for delivering water to the root system. We are preparing the tool; for the job we need a drill and a two-piece drill (2 mm).
Help The volume of liquid poured into the bottle is enough for 3 days. For summer residents who occasionally come to the countryside, the design will help organize regular watering of moisture-loving crops (cucumbers, peppers) in the greenhouse and in the open ground.
Stages of making a bottle drop:
- holes are drilled in the tire;
- the bottom of the container is cut, but not completely;
- near a bush (tomato, pepper, strawberry) in the root area, dig a hole (no more than 15 cm);
- the bottle is placed in a recess, tilted at 45° to the horizon;
- pour water.
Instead of a tire with holes, you can use commercial watering pegs. They are put on the neck of the bottle and stuck in the right place. The bottle design is suitable for root feeding. Instead of water, liquid fertilizer is poured.
Watering using medical droppers
Inexpensive medical droppers are used in the manufacture of a simple watering system for a summer residence. You will also need a polyethylene pipe with a diameter of 25 mm and tools: a drill with a 4 mm drill and a thick sewing needle.
Using a needle in the flask from the dropper, they pick out the filter, and using a drill, drill the required number of holes in the pipe for the droppers. The pipes are laid out around the site, welded, and the source is equipped with a tap and filter.

Important! To prevent dirt from the bottom of the barrel from entering the system, a hole for the tap is drilled at a height of 7 cm from the bottom of the container.
A filter for water purification is placed next to the tap, and a central line pipe is attached to it. One end of the dropper is inserted into the holes drilled in the pipes, the second end with a dispenser is attached to a peg and installed in the watering area. The water supply speed is controlled using clamps.
Drip irrigation from polypropylene pipes
Polypropylene pipes serve for many years, they do not rust and are easily connected to each other by welding. In addition to pipes you need to have:
- a barrel of 100 liters or more;
- valve (ball);
- water filter;
- tees;
- taps.

First, draw a diagram indicating the exact dimensions and designation of watering points. Calculate the total length of the pipes and the number of bends. The storage tank is raised to a height of 1.5-2 m, a tap is embedded in its lower part, and a distance of 7-10 cm is removed from the bottom. A 100-liter capacity is enough to provide humidity for 50 m² of garden.
One end of the central line is connected to a container (filter), a plug is attached to the second, and each outlet must end with a plug. Holes are drilled in pipes (branches). When all the parts are assembled, fill the container, open the tap and check whether water flows to the ridges.
Automatic drip irrigation in a greenhouse
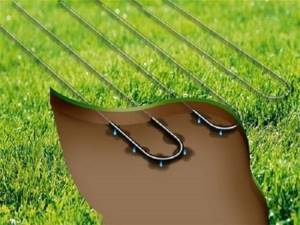
The technology of constructing an automatic drip irrigation system with automatic regulation is a progressive method of watering plants, when water is delivered through the main pipeline in small portions through small dropper holes directly to the root system of crops. Such irrigation makes it possible to create the most favorable conditions for good growth and development of plants.
Video
Automatic drip irrigation in a greenhouse is designed exactly as shown in the video.
Water from the main pipeline is delivered to the dropper, and passing through the pressure-reducing fittings, it comes out in the form of drops under the root of the planting. In this case, a zone is moistened, the size of which varies depending on the physical properties of the soil, the level of moisture in the ground before irrigation, the intensity of vaporization, the irrigation period and the placement of drippers. But the soil between the rows remains dry.
How many drippers you need to buy is determined depending on the type of plants, how they are planted, how much water is needed per plant, etc. The distance between them is determined by the type of plants planted: for vegetable crops, the intervals are chosen after 0.2-2 m, for trees - after 2-6 m.
Drip irrigation technology has shown good results on many agricultural farms, especially in developed countries where water is in short supply. Today, more advanced materials, devices and methods of its use are being introduced.
Underground drip irrigation
Underground irrigation reduces moisture evaporation, which means it reduces the amount of water used. It takes less time to fight weeds; they do not grow in the absence of surface watering. A big advantage of underground irrigation is the absence of crust; the soil on the surface is always loose, which ensures good access of oxygen to the roots.
It is good to have an underground drip irrigation system in a greenhouse: communications do not take up useful space, air and soil humidity are normal, and there is no oxygen starvation in plants.
Required Tools
First of all, you need a shovel. We'll have to dig trenches since all communications will be underground. The tools you need are a drill and scissors. Holes are drilled in the pipes with a drill, and the plastic film is cut with scissors. Pipes for underground irrigation are made of polypropylene; to connect them, you will need a basic set of tools:
- soldering iron;
- steel knife;
- hacksaw;
- pencil and tape measure.
Simple soldering irons for propylene are not expensive, but you don’t have to purchase them; you can rent them for a short period of time.
Manufacturing and installation process
First, they draw a diagram and take measurements, determining the required length of pipes. Polyethylene pipes with a diameter of 20 to 40 mm are suitable for underground irrigation. Holes with a diameter of 2-3 mm are drilled with the required pitch of 20-40 cm, using a drill.
Important! You need to install a filter on the water container to purify the water.
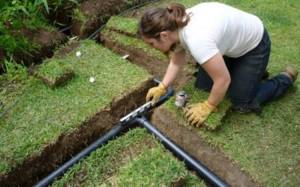
The trenches are dug to the depth of the roots according to the developed scheme, the distance between the trenches is maintained at 40-90 cm and installation begins:
- strips of polyethylene are laid on the bottom and walls;
- a layer of crushed stone is poured on top of the polyethylene, its thickness is at least 4 cm;
- pipes are laid on the drainage layer;
- the pipes are soldered, covered with geotextiles, covered with gravel and soil.
The water container is raised above the ground so that the height difference provides pressure in the system. The main line is connected to the source with a flexible hose through a filter.
Benefits of watering
- Economical consumption, since water is supplied directly to the roots, bypassing row spacing;
- Does not require large expenses for purchasing equipment;
- Improves the productivity of all crops;
- Reduces the growing season, thereby increasing the speed of fruit ripening;
- Possibility to install in a greenhouse and on the site;
- Due to the fact that water gets directly to the roots, its consumption is minimal and hydration is good;
- Uniform water supply to plants;
- The system is not sensitive to pressure changes;
- You can water at any time, the water does not get on the foliage;
- The access of oxygen to the roots does not stop;
- The soil around the plants is not covered with a hard crust.
- The watering process can be automated.
You can make such an installation yourself. You will need:
- Reservoir or container for water;
- Filter for purifying liquid from impurities and suspended particles;
- Distribution line - a set of various fittings, hoses and other parts to ensure the supply of liquid to each root.
A do-it-yourself irrigation system takes into account all the gardener’s needs, which is why many gardeners have learned to independently build an irrigation system on their site.
If you don't want to work with your hands
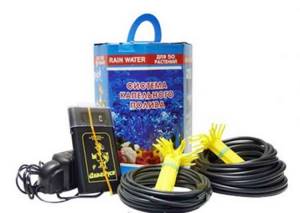
Busy people do not have time to make homemade structures and independently select components for irrigation; they prefer to buy ready-made systems. Industrial irrigation systems are popular among summer residents:
- AquaDusya, AquaDusya Water Tap, AquaDusya automatic;
- Water strider;
- irrigation systems from Gardena;
- Dewdrop;
- Bug;
- Harvest;
- PDA 24K.
Choosing a drip irrigation system
For summer residents who rarely come to their dacha, Water Strider, AquaDusya Automatic, and KPK 24K are suitable. These systems are equipped with automation, the watering mode is set, and greenhouses and garden beds are watered when the owner is not at the dacha or is busy with other things.
There are sets Rosinka, KPK 24, Harvest, Gardena without automation, which manually regulate the volume of water supply and connection (disconnection). Most industrial drip irrigation systems are designed to supply water from a barrel. The AquaDusya Water Tap and Gardena sets can operate from the water supply and from the pumping station.
Help If there is no power supply at the dacha, purchase kits in which the automation is powered by batteries.
When purchasing, evaluate the system performance and your needs:
- irrigation area;
- number of beds;
- type of vegetable crops.
Each vegetable or garden crop requires a certain amount of water per watering.
Installation of the system in a greenhouse or vegetable garden
Installation begins with the installation and equipment of the water tank. They make an insertion of a tap to connect to the water supply and a tap to connect to the main pipe going to the watering site. The tank is placed on a support.
First connect the filter, then the automation (timer, controller). To extend their service life, it is recommended to place them in plastic technological boxes that protect the automation from rain and dust.
Start installing the irrigation system:
- a highway is laid between the beds (in the greenhouse);
- using fittings (angles, tees), make branches (branches) in the necessary places;
- holes are drilled in the main pipe;
- droppers or tapes for watering are inserted into the holes;
- tapes are laid in the watering zone, droppers are distributed in places for planting;
- fill the container with water;
- do a test run.
The automation is configured after assessing the quality of irrigation. The frequency and time of watering are set on the timer (controller).
How to automate the process, “smart drip irrigation” with your own hands
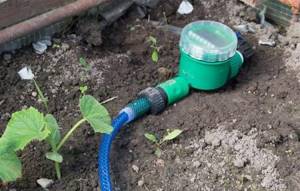
Smart automation (timer, controller, sensors) makes life easier for the summer resident. Installing a timer (electromechanical, electrical) on a water source allows water to be supplied and turned off automatically at specified time intervals.
In order for the timer to work, the pressure in the system is maintained using a pump; when choosing, evaluate the characteristics:
- power;
- noise produced during operation;
- resistance to chemical compounds.
That is, the motor must be powerful enough, not noisy and not react to fertilizer solutions. If the pressure level is unstable, install a pressure reducer.
Using the controller, a program is set that controls watering for several days. Automation uses sensors to analyze the following indicators:
- water pressure;
- soil moisture level;
- air temperature.
Controllers can be single-channel or multi-channel. In a branched drip irrigation system, you can install several single-channel timers.
Making drip irrigation with your own hands: where to start?
First, the drip irrigation scheme is drawn on paper, where all watering points, the location of the water source and containers are indicated. The spacing between rows of plantings is measured. Based on the finished dimensions, you can easily calculate the number of communications.
If a pump is installed, its location can be anywhere, but when watering by gravity, the container is installed closer to the plants.
Drip hoses or tapes are laid on the beds. They have built-in special droppers for supplying water to the plants.
Before assembling a drip irrigation system, it is necessary to have all the components for irrigation. If you have experience, it is advisable to choose them yourself, since watering kits are more expensive.
- A container of water – a barrel or tank.
- The main distribution manifold for water supply, from which it is supplied to the branches.
- Drip hose or tape.
- Valves connecting drip tapes to the collector.
It is not recommended to use metal containers, since corrosion leads to clogging of the system. If this cannot be avoided, the drip irrigation device must contain high-quality filtration.