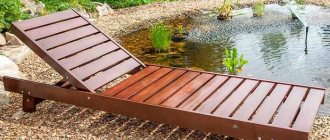
How to make the right choice
A quality choice is the key to durability and ease of use.
What should you pay attention to when choosing a good hand drill for yourself:
The first thing you should pay attention to is the angle between the cutting elements. The blades should be at an angle of twenty-five degrees relative to each other
The permissible deviation is two to three degrees in each direction. The cutting edge should be sharp, and the metal of the blades itself should be quite thick, within three to four millimeters. It is best when the cutting edge is removable. So, you will have the opportunity to completely replace it, or remove it to perform high-quality sharpening. The base should also have a fairly large wall thickness so that under great force the metal does not deform or burst at all. Check all welds for defects and cracks; their presence is absolutely unacceptable.
If the structure is collapsible, check the quality of all connections and make sure that it is possible to install extension cords.
Buy a new drill or use homemade drilling tools
The simplest solution, but also relatively expensive, is to purchase and use a ready-made factory device. After paying the money, you can immediately get to work and build an owl fence. But if you want to save money, then you can without any problems.
A simple model of a hand drill costs about 1,500 rubles, but you need to buy it if you plan to use it regularly.
A homemade tool will cost you much less than a ready-made one, and working with it yourself will be exactly the same if you make a homemade hand drill correctly and efficiently.
There is no exact answer as to which tool would be better, homemade or purchased, since everyone should proceed purely from their own preferences. If you don't want to waste extra time and are willing to pay money, then, of course, your best option would be to buy a ready-made tool that can do the job right away. In the case when you are ready to spend an extra day, but at the same time save a lot, you should assemble a homemade drill with your own hands.
The principle of operation of a hand drill is that the blades act as a screw, which is screwed into the ground, gradually cutting off the top ball and going deeper and lower.
Thus, it turns out that the earth that is cut falls on the surface of the blade and remains there. After the drill is removed from the hole, the earth remaining on the blades is shaken off and the tool is returned back. The side in which you need to wrap the handle depends on the location of the blades.
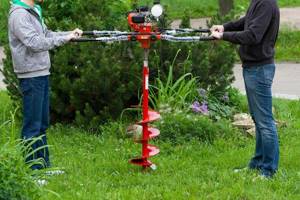
Pieces of pipe are put on the handle, thereby increasing the leverage. Two people take the resulting extensions and begin to wrap the drill, so minimal effort needs to be applied and the work will go very quickly. Do not use too much leverage or rush, as the drill may not be able to withstand the tension.
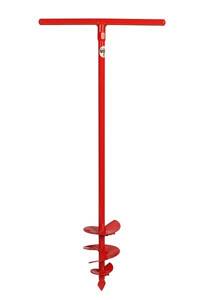
Anyone who has ever encountered the need to construct deep holes of small diameter probably knows that it is almost impossible to dig them with a shovel - for example, to install a fence post with a shovel, you need to dig a hole at least half a meter in diameter. Whatever one may say, these are additional labor costs that can be easily avoided by using a garden auger instead of a shovel. We will talk about it in this article, in which, together with the website, we will study the scope of application of this tool, understand its varieties and answer the question, how to make a drill for the garden yourself?
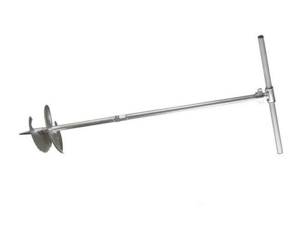
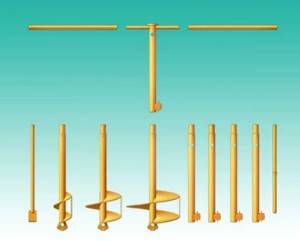
Garden auger with extension photo
Manual earth auger, also known as a garden auger - choosing a hand earth auger, features of operation and tips.
If you are thinking about choosing and purchasing a hand-held earth drill, then you need to drill several holes in the ground. But before you choose the model you need, you need to answer three simple questions.
The most important thing you should know about the earthen hand drill.
Reading this text, you are probably already focused on choosing and purchasing a hand-held earth auger (garden auger). We ask you to stop for a moment and answer three simple questions:
- What diameter and how deep do you need to make holes in the ground?
- How many holes do you need to make?
- What is your soil composition, light (chernozem with sand) or heavy (chernozem with clay)?
If you have heavy soil with clay, or you need to drill a lot of holes, for example you want to install fence posts, then we recommend that you abandon the purchase of a hand-held earth drill and purchase (or rent) an earth drill. Our advice is based on the fact that a garden hand auger, as you might guess, is driven by hands. A person creates rotational movements around the axis of the drill, and at the same time presses on it from above. Such movements are not natural, and are also very costly in terms of strength. The above means that in order to drill at least ten holes with a hand-held earth drill, a strong and healthy man will have to spend a lot of time and energy. For example, to fence a modest garden plot measuring 6 acres, you need to install approximately 33 posts, which means you need to make the same number of holes.
CONCLUSION
The most important thing to know about an earthen hand drill is that it is relatively easy to drill only light soils, and a small number of holes. If you have heavy soil or you need to drill more than ten holes, we highly recommend that you buy or rent an earth drill.
In this video, you can estimate approximately the drilling speed. Please note that when reaching the clay layer (if there is one), the speed will decrease, and the forces expended on drilling will increase:
Purpose of the earth drill
As already written, the only purpose of an earth drill is to drill holes in the ground. A hand drill is used for construction work on the site (installation of various poles, installation of small columnar foundations for outbuildings, other auxiliary operations), as well as for planting various plants.
Choosing a hand-held earth auger (garden auger)
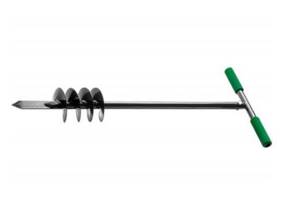
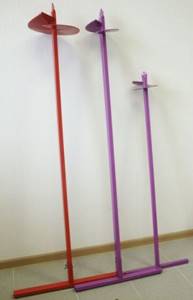
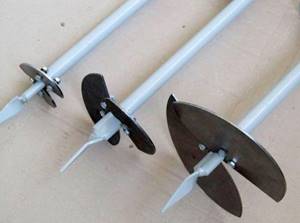
In fact, there are only two types of common earthen hand drills. Each has a central sharp base that helps center the bit while drilling, and also has a cutting edge (or several cutting edges). The only difference is whether the garden hand auger has an auger in its design or not. The auger is designed for simplified removal of soil from the drilling zone. The most popular sizes of garden drill diameters are from 100 to 300 mm. Also, a manual earth drill can be dismountable.
ADVIСE
1) If you have a choice of design for a hand-held earth auger, choose the option that has an auger in its design. As we have already written, working with a hand-held garden auger is very tedious; if the auger helps remove soil from the drilling area, this will make your work somewhat easier.
2) When choosing a manual earth drill with a diameter of 300mm, soberly assess your physical abilities (especially if there is clay in your soil).
Manual excavation using an earth drill
Work using a hand-held earth drill is essentially no different from work performed by a motorized drill. Therefore, we will give you approximately similar advice.
ADVIСE
1) If you notice that in certain places a hand-held garden auger drills holes in the ground clearly worse than the holes already drilled nearby, it means that the soil in this place is very compacted. We recommend that you use mechanical force, such as a crowbar, to soften the soil in the drilling area. We do not recommend trying to soften the soil with water, due to the low efficiency of this method.
2) If for some reason you do not carry out concreting or planting plants in the drilled holes on the same day, we highly recommend that you cover these holes to prevent precipitation or anyone from getting there.
3) Considering the high physical stress that must be exerted when drilling soil with a hand-held earth drill, we recommend that you take an assistant or take breaks from work. Try not to carry out such work in hot weather or in intense sunlight.
DIY garden auger
If you have a welding machine, a drill and a grinder, every home craftsman can easily make a hand drill with his own hands.
You will need:
- steel pipe 150 cm long and 15 mm in diameter for the rod;
- a piece of reinforcement 40 - 50 cm long and 20 mm in diameter for the handle;
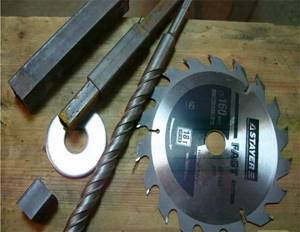
- a circular saw blade with a diameter of 150 - 200 mm or a circle cut from sheet metal 3 mm thick.
The procedure for making a drill:
- A drill is welded to the lower end of the rod, which will serve as a guide tip when drilling.
- To the top, strictly perpendicular, there is a fitting that will serve as a handle. The result is a design in the shape of the letter T.
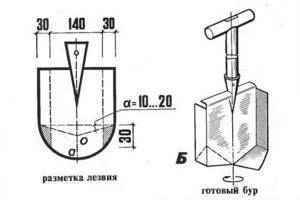
- The disk is cut into 2 halves in the center and welded to the rod directly above the drill on both sides. The blades are tilted so that the angle between them is 30 degrees.
- After welding, you need to knock off the scale and sand the seams and handle with a grinder or sandpaper.
Expert opinion Dmitry Konstantinovich Levin
You can use old scrap as the base (rod) of the drill. In this case, there is no need to weld the drill: it will be replaced by the sharp end of the base.
Homemade auger
This model is a little more difficult to make with your own hands.
To work you will need:
- pipe for the rod – 1.5 m.
- pipe or fittings for the handle – 40 – 50 cm.
- disks of the same diameter - the required number will be equal to the number of turns.
Manufacturing stages:
- A hole is made in the center of each disk, equal in diameter to the base of the tool.
- Each disk is divided into several sectors. They are fastened in such a way as to form a solid spiral.
- Rings are welded to the ends of the spiral.
- Insert the base pipe into the center and stretch the spiral along it.
- The outer rings are welded to the pipe. Then the entire spiral is fastened in the same way.
- The lower end of the pipe is ground at an angle of 25 degrees.
- A handle is welded to the top one.
Rating of garden drills
The most popular are inexpensive manual devices and motor-driven devices. The first models impress with their low cost, the second with their good performance. Power tools are purchased much less frequently and are considered less practical. As an example, here is a list of the most popular garden auger models:
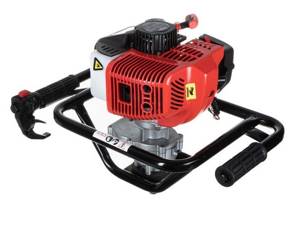
- ELITECH BM 52E
– motor drill with a power of 2.5 hp, flow rate up to 0.7 l/hour, engine capacity 52 cm³, drilling depth up to 180 cm. - MAXCUT MC 62
– motor drill with a power of 3.6 hp, drill size up to 300 mm, tank 1.3 l, engine capacity 62 cm³. - ADA instruments Ground Drill 5
– motorized drill with a power of 2.45 hp, a tank of 1.2 liters, weighing 9.5 kg, engine capacity 52 cm³, drill size up to 250 mm. - Garden auger Fiskars 1000640
is a Finnish disk-type hand tool, removable semicircular knives, weight 2.2 kg, drilling depth up to 0.9 m. - Bison Expert
- hand tool, auger type, hole diameter up to 250 mm, drilling depth up to 120 cm, adjustable handle. - FIT 110 x 11 cm
– Canadian hand tool, auger drill type with 4 turns, rod length 110 cm, cutter diameter 110 mm, weight 1.5 kg. - Palisad 64450
– German brand, hole size up to 110 mm, drilling depth up to 0.7 m, corkscrew auger, anti-corrosion coating.
Boraxes and their varieties
Garden drills may have different designs, but the main elements in most cases remain the same: the support rod, the handle with which the tool is controlled, and most importantly, the cutting edge. This is enough to effectively carry out all everyday tasks that may arise on a personal plot - from planting plants to constructing outbuildings.
Electric garden auger
How to choose soil drills if excavation work is to be done is the first and main question that arises among amateur gardeners. The whole variety of instruments on the market can be reduced to the following classification:
- mechanical drills (this is the simplest type of hand tool);
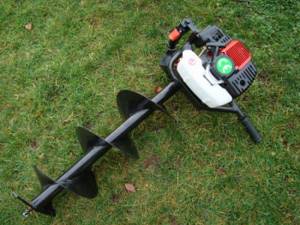
- gasoline models, that is, motorized hand tools that run on fuel;
- electric models are also hand tools, only they are powered by an electric drive;
- hydraulic - this type of equipment is not used in the garden due to its design features and high cost.
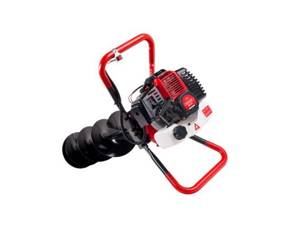
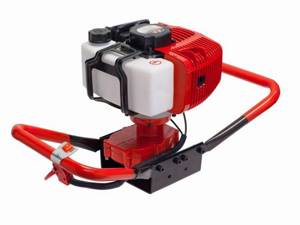
A gasoline hand drill is most often considered the best option due to its compactness and ease of operation.
Important! Gasoline models are not only more convenient to operate, but also cope faster with drilling soil of any type, easily opening layers up to 2-3 m deep.
Electric models also have their advantages. In particular, they operate silently, which distinguishes them favorably from their gasoline counterparts. But they cannot function autonomously - they need to be connected to an energy source, and it is impossible to carry out work at a great distance from it.
The simplest mechanical soil drills may also differ in design. In the basic version, they are a metal tubular rod with a handle; at the other end there is an attachment - a two-bladed cutter. This design is as simple as possible, but also the most reliable. True, with its help you can mainly dig only small holes and wells.
Gasoline drill
There is also a more complex type of mechanical variety. Here the cutter is made removable. This makes it possible to use additional replaceable nozzles, but they all retain their plate shape. But they can have different diameters. This tool can now be used for almost all types of work.
You can also find an auger drill on sale. It differs significantly from those described above from a design point of view, since behind its cutting blades there is not a plate element, but a screw auger. These models provide faster work because they can remove more soil from a hole in one work cycle than conventional tools.
Important! There are improved mechanical plate-type drills on sale. In addition to the fact that they come with several cutters of different diameters, they differ in the detachable design of the rod, that is, its length can be increased, while simultaneously increasing the depth to which such a tool can reach.
Some models provide a so-called handle extension, which greatly facilitates the work of such a tool, since then it can be used together with a partner
The cutting force of the edge will increase and the job will be completed faster
Some models provide a so-called handle extension, which greatly facilitates the work of such a tool, since then it can be used together with a partner. The cutting force of the edge will increase and the job will be completed faster.
Design, technical features and rules for using a garden auger
A special feature of the drill is the ability to produce holes or boreholes of different diameters and lengths, which is achieved thanks to interchangeable nozzles and extension sections.
Knives of different diameters form holes of the appropriate size, which is very convenient for solving specific problems. Before starting gardening or other work, prepare tools and working area. To achieve this required diameter, the knives are mounted on plates and securely bolted.
If necessary, the garden hand drill for excavation work can be extended by attaching an additional section to the rod. The area of land where drilling will be carried out is loosened using a shovel or metal rod. After this, you can install the drill and carry out work by rotating the device clockwise. You need to continue rotating until the hole reaches the desired depth. The tool is periodically removed to the surface and the cut soil is thrown aside.
Description of a gasoline drill for excavation work.
On this page you will find out which cultivator is best for your garden.
Rules of care during operation
Regardless of whether the drill is mechanical or manual, whether it is purchased or homemade, this tool requires mandatory maintenance. This allows you to extend its service life and prevent possible breakdowns during operation:
- After purchasing or making it yourself, the blades and stem should be coated with special anti-corrosion compounds, which will prevent rust from occurring. Alternatively, the product can be sanded and, after polishing, painted with metal paints.
- Before drilling, the sharpness of the blades should be checked and, if necessary, sharpened with sandpaper or a sharpening machine.
- Removing the tool after screwing it in, especially to its full depth, must be done extremely carefully so that the blades do not become deformed due to excess soil. In addition, before starting drilling work, it is advisable to loosen the upper part of the soil with a shovel to allow the tool to be screwed in more gently.
- Upon completion of the work, the blades and rod must be cleaned of adhering soil and dried well in order to avoid corrosion of the cutting part and the drill itself as a whole.
A hand drill is an indispensable tool when carrying out construction on a land plot.
With its help, you can drill holes for the foundation of gazebos and support posts for a fence. In addition, the drill will also make it easier to replant shrubs and trees, which will make the gardener’s work easier. This tool does not require special skills to use, and its use does not cause difficulties. The design is not very complicated, which allows you to make a drill with your own hands if you have a welding machine, grinder and drill. Creating a tool yourself will save money and ultimately provide exactly the mechanism that is required for individual work.
Use of a garden auger
Despite the simplicity of the design, the drill has found application in various work processes, in particular for:
- Drilling soil for installation of supporting structures;
- Drilling holes and forming a columnar foundation;
- Drilling holes and subsequent planting of green spaces;
- Loosening the soil layer, watering and fertilizing plants;
- Obtaining compost pits or shallow wells;
- Drilling horizontal or inclined tunnels for laying communications, drainage structures, ventilation systems.
A hand-held garden auger, the price of which depends on the configuration, is a useful acquisition for various household needs.
It cannot be replaced when landscaping the area or carrying out gardening and construction work. The drill is a universal, compact, easy-to-use tool. With its help, you can quickly drill a hole of the required diameter and length in the ground.
Review of the Mole ripper shovel.
If you don’t know which lawn mower to choose, here you will find what you are looking for.
Here is a brief description of the Stihl FS 55 petrol trimmer.
How to make an earth drill yourself
With a little effort and strictly following the requirements of the step-by-step instructions from the masters, you can make a bracelet with your own hands in a matter of hours.
Selection of materials
To assemble the blanks for the main elements of the drill, you will need:
- For the rod. Round or square pipe. Size - 20*20 mm, 35*35 mm.
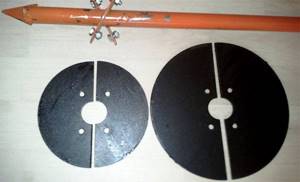
- For blade knives. Sheet steel 4 mm thick or a saw blade from an angle grinder or circular saw (optional). Below we will consider the use of each of them.
- For the pen. Round pipe. The diameter is selected according to the circumference of the palm.
- For the pike. A sharpened large diameter reinforcement rod or steel strip is used. A combination of both materials is allowed.
It is better to work with metal wearing protective gloves and goggles.
Tool preparation
The list is like this:
- welding machine with electrodes, protective mask;
- grinder with disc attachments;
- electric or hand drill;
- hammer;
- sharpener;
- vice;
- mites;
- marker, tape measure;
- compass.
For anti-corrosion protection of metal, a primer and a brush are purchased separately.
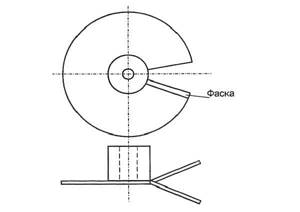
Drawing or diagram
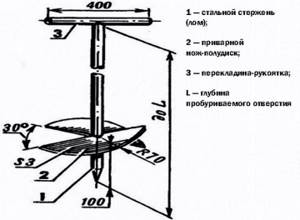
Scheme.
1 – steel rod; 2 – welded half-disk knife; 3 – crossbar-handle; L – depth of the hole to be punched. Here, each master makes a drill for himself, selects the dimensions, material, type of construction, calculates the material consumption and its cost. The finished product can be improved during use.
Drill assembly
It is necessary to analyze which blades it needs to be equipped with: stationary or removable.
Stationary blades are simply welded to the rod.
To make them removable, you will need:
- Weld shelves made of thickened steel on one side of the shaft.
- Make them so that the knives diverge at an angle of 25-30 degrees.
- Make 2-3 holes in the shelves for fasteners and 2-3 holes in the blades of the same diameter.
- Secure the blades with a bolted connection.
Made from sheet steel
To start, it’s easier to cut out a sketch from white paper. After which a circle of steel of suitable diameter is cut along it. A hole is made in the center in the form of a square or circle, depending on the cross-section of the pipe for the shaft. The hole size is taken slightly larger than the rod for ease of welding.
Blades are made in two types:
- From two halves of a circle.
- From an open circle, where the edges shift, resembling a spiral turn. To increase drilling efficiency, the edges are placed at an angle of 25-30 degrees from each other.
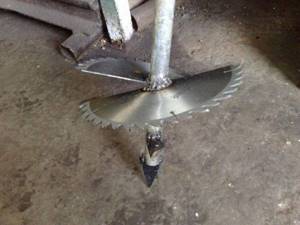
From a saw blade
The best saw blade option is a diamond one. It is highly durable.
Used disks from circular saws will also work. They are made from hardened steel. They have a well-sharpened edge and are reliable, but they cannot be bent, so the disk is sawed in half and the two parts are placed at an angle. To make the drill go easier, the side edges are additionally sharpened on a machine or by hand.
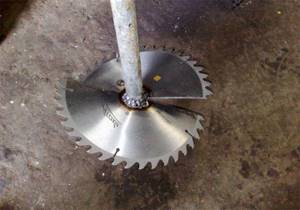
Photo: drill from a circular saw blade
Welding
It is carried out wearing a chameleon-type protective mask (preferably) and gloves. The blades are welded to the rod both from the inside and outside, and the seams are cleaned.
Corrosion protection
The finished product is sanded with sandpaper and treated with an anti-rust primer. An alternative is a phosphating solution.
After priming, the drill can be painted.
Care
It is recommended to periodically disassemble it, clean it of accumulated dust and dirt, and lubricate it with a water-repellent solution. This will avoid jamming of parts, repair or replacement of individual parts and will extend the service life of the product.
Making a drill is not difficult, but it requires skill. In skillful hands, a homemade drill will be an excellent assistant in work on a summer cottage and in the construction of small structures.
Do-it-yourself hand garden auger: manufacturing technology
Making a hand-held garden auger with your own hands is not as difficult as it might seem at first glance - if you confidently own a modern power tool and are comfortable using a welding machine, then you can easily cope with this work. The very design of this product will tell you the technology of its manufacture - in fact, it is a cutting part and a knob. The last element of the tool, in general, can be said to be elementary in manufacturing - these are two tubes (short and long), welded to each other in the form of the letter “T”. And then it won’t be difficult either - for a better understanding of the essence of the process, we’ll outline it point by point.
- Preparing cutting discs. You will need very strong steel, although ordinary sheet iron 2-3mm thick is also suitable for working with soft soils. From it you will need to cut discs of different sizes - 100mm, 150mm, 200mm and, if necessary, larger. In principle, three will be enough - a hole in the center of the disk with a diameter equal to the diameter of the driver will greatly facilitate the process of making a drill. The discs need to be sharpened around the perimeter.
- Next, we put them in a stack and, having thoroughly centered them, fix them with a pair of clamps. The goal of this stage of work is to drill 6 holes, which will make it possible to connect the disks to each other, increasing the diameter of the drill. You need to divide the small disk into two identical parts (you can draw a line) and drill three holes in each half. Now you can separate the disks and cut them in half with a grinder - cut the two large ones completely, and cut the small one so that it does not fall apart. There is a nuance here - the two halves of the small disk must adhere to each other by their outer diameter. It will cut completely when it is partially welded to the collar.
- Install the smallest disk. To begin with, we simply put it on the knob and grab it clearly in the center of the inner diameter - we grab one half separately and the second half separately. Now you can finally cut the disk into two parts and proceed to the next operation - you need to turn out half of the disk so that they form some kind of auger. This is not difficult, but you need to be careful not to tear off the tack - you may have to strengthen them as necessary. When the halves of the disks are in the desired position, they will need to be thoroughly scalded on both sides. In principle, that's all, but you will need to check how other disks are connected to it - perhaps the attachments will have to be sharpened somewhat along the inner diameter.
- Cutting tip. To facilitate the entry of a garden auger into the soil, a tip can be welded to the tip of the driver (under the auger). Alternatively, it can be made from a metal plate, or you can use a hammer drill, or rather its tip, which will be somewhat more expensive.
This is the whole process of how a hand-made garden auger is made with your own hands. Don’t forget to treat the welds (clean them up, as the installers say, with a grinder) and paint the product so that it does not rust in the open air. Don't forget to coat the drill thoroughly with primer before painting.
As you can see, making a garden auger with your own hands is not so difficult - one might even say it’s easy. The main thing is to be precise in size and remember that the drill will cut the soil well only when its cutting parts are symmetrical to each other. Moreover, a clear and sharp axis of rotation is important here, which you will have to control at all times during the manufacturing process of this tool.
Do-it-yourself hand garden auger: manufacturing technology
Making a hand-held garden auger with your own hands is not as difficult as it might seem at first glance - if you confidently own a modern power tool and are comfortable using a welding machine, then you can easily cope with this work. The very design of this product will tell you the technology of its manufacture - in fact, it is a cutting part and a knob. The last element of the tool, in general, can be said to be elementary in manufacturing - these are two tubes (short and long), welded to each other in the form of the letter “T”. And then it won’t be difficult either - for a better understanding of the essence of the process, we’ll outline it point by point.
This is the whole process of how a hand-made garden auger is made with your own hands. Don’t forget to treat the welds (clean them up, as the installers say, with a grinder) and paint the product so that it does not rust in the open air. Don't forget to coat the drill thoroughly with primer before painting.
As you can see, making a garden auger with your own hands is not so difficult - one might even say it’s easy. The main thing is to be precise in size and remember that the drill will cut the soil well only when its cutting parts are symmetrical to each other. Moreover, a clear and sharp axis of rotation is important here, which you will have to control at all times during the manufacturing process of this tool.
Hand drill for excavation work: how to drill with a garden drill, how to make it yourself.
A simple earth drill is a convenient and useful tool that will more than once help a summer resident in his garden. It is not necessary to drill very often, but it is much more convenient to make even and deep holes in the ground with a drill than with a shovel.
If you need to dig a hole to install a post when erecting a fence or installing a support, then a hand drill turns out to be indispensable, greatly facilitating the work. Such a drill can also be used for other work, for example, for planting trees and shrubs, laying sewer lines, and even for drilling wells.
The structure of the earth drill is simple and its design is similar to a brace. A hand drill has at its end a so-called auger, which acts like a screw, screwing into the ground and squeezing the layers of earth upward. The other end of the hand-held earth drill ends in a long handle, with the help of which the drill is rotated.
The diameter of garden drills varies greatly, depending on the type of work that needs to be done on the site. The length of the drill also varies. If it is intended to drill a well with an earth drill, then its body is made prefabricated so that the drill can be extended as needed.
Since a hand-held earth drill is not often used, the question often arises of how to make such a tool with your own hands. The design of a homemade drill is not too complicated, but you need to take into account that to drill into the ground, which also contains stones, you need an auger made of a fairly hard metal. Therefore, you can make a garden auger with your own hands using an ordinary pipe and parts of a circular saw welded onto it as a cutter. Another option for strengthening the auger is pieces of Pobedit or Pobedite drill tips for concrete welded onto the auger.
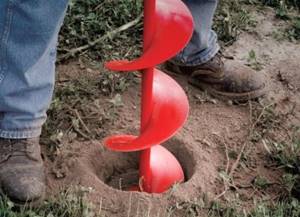
The garden auger is easy to use. It is installed vertically and begins to rotate clockwise. The drill gradually enters the ground, squeezing the soil upward through the auger
Having gone a little deeper, you need to carefully pull the hand drill up along with the earth and shake off the earth next to the hole. So, repeating this cycle, a well is gradually drilled to depth
Drilling a 1 meter deep hole in loam using a hand excavation auger takes approximately 20 minutes. If you need to drill faster, it is better to use.
The peculiarity of using a garden auger is that it enters the ground the easier the more earth is squeezed out by the auger, however, it often gets stuck in the ground and is difficult to remove. Therefore, when drilling, you need to choose a middle ground so as not to get tired ahead of time.
Our company sells high-quality drills
for excavation work
; they are simple in design and therefore reliable. Their advantages include:
Possibility of increasing the length using an extension cord
;
Coating of the working surface that prevents corrosion;
Screw auger design allows you to effectively remove soil and cut roots.
tools for gardening for several years.
. We offer delivery anywhere in Russia, so just place an order, pay for the goods, and we will take care of the rest.
The very first step to be taken when erecting a fence from corrugated board is to drill holes for the posts. And there are a lot of nuances here; you can’t just go and drill holes without a preliminary assessment. And the assessment is that you have a lot of questions - how to drill (manually or with a gas drill), what diameter of the holes is best to make, what depth to drill and in general, how much this whole thing costs.
We carefully analyzed our situation and decided that a gasoline drill is not suitable for us, since the poles are supposed to be placed along the road, which means that there will be stones in the soil and the top layer (10-15 cm) will be a solid pile of asphalt (fine gravel) ). Plus, our soil is clay interspersed with stones after 50 cm, which means a gasoline drill can be easily broken. However, in this review we will also talk about it, because we planned to rent it (there is no point in buying it for 20 holes), rent costs 1500-2000 rubles per day.
So, first things first.
DIAMETER AND DEPTH OF PITS UNDER PILLARS
These indicators directly depend on the materials you choose. Since we decided to make the pillars themselves from a profile pipe measuring 60*60*3 mm, the optimal diameter of the holes themselves became 160 mm; making more would result in extra costs for cement. A diameter of 160 mm was quite enough; this size is the optimal ratio of pillar strength and cement consumption. And of course, we decided to choose 160 because the holes were drilled with a hand drill, and there the diameters were as follows - 135 mm, 160, 200 and above.
The depth of the holes - it all depends on the length of the pipe and the height of the corrugated sheeting that you have chosen. Since our pole is a 60*60 profile pipe, and the standard pipe size is 6 meters long. In order not to lose on scraps, when ordering iron, we paid for a cut in half (20 rubles per cut), so that we got one post 3 meters long. It’s 1 meter deep, with 2 meters sticking out from above - just right for corrugated sheeting, which is also 2 meters high.
Read more about choosing pipes for poles and prices in the next article.
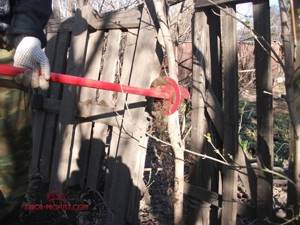
DRILLING WITH A HAND EARTH DRILL - NUANCES
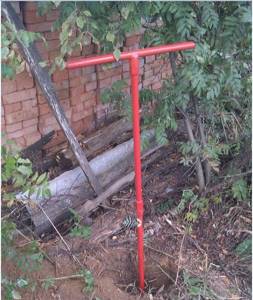
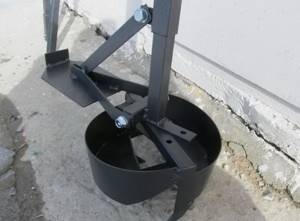
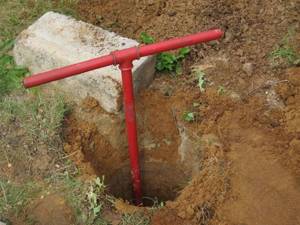
Since we chose a regular garden auger for the work (only reinforced, with strong augers made of thick sheet metal and with carbide tips), we did the work itself by hand. Here's the one in the photo:
Is it difficult to drill into the ground? I answer - it’s not difficult at all, it all depends on the type of soil where you are working. We had rocky soil from above to a depth of 30-40 cm; sometimes we came across very large stones and a crowbar helped a lot in such cases. Especially when the stone hit the wall of the pit and went to the side. We grabbed the stone with a drill and immediately took a crowbar. A few blows on the edge of the stone and it falls into the hole, from where you reach it with your hands. Such problems take a lot of time. But when the soil is soft, a hole can be drilled in 7-10 minutes maximum.
Our drill has a working length of exactly 1 meter, so we drilled all the way to the handle. At the very depth (80-90 cm) there was very hard clay, so these 10 centimeters were the most difficult. They drilled 2-3 cm at a time, but it was not possible to get the drill deeper. They drilled in such small steps. An extension cord was then used for drilling. As a result, the total length of the hole turned out to be about 1.7 meters. Freezing depth!
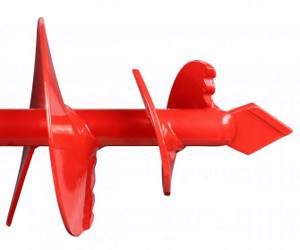
Our drill is really reinforced, with carbide plates, it easily cut off thin roots and cut through compacted soil. Even limestone is not a hindrance to him. For a detailed review, see this article.
This is what the carbide tips on the auger look like to help you cut into dense and rocky soil with ease.
Basic rules for manual drilling:
The most important thing is not to plant the drill too deep. Because then you still have to unscrew it back. If you plant it too hard and try to pull it out of the ground together, you can tear off the “threads” - the welded screw cutters. It’s better to take out and shake out the soil more often, and it’s easier for the tool and for you too. Now in the photo set I will show you everything:
Let's start drilling:

We take the soil out of the hole more often (if the soil is loose, then you can push it in 15 cm):
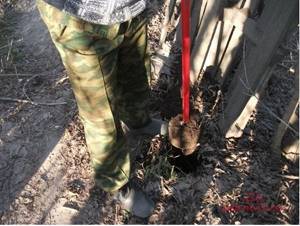
We shake out the earth and drill further:
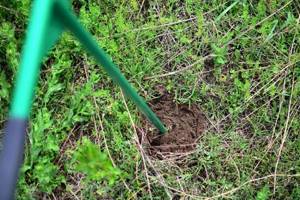
Well, actually, the result in 8 minutes:

WHAT IF YOU TRY WITH A MOTOR DRILL?
If you have soft soil without stones and you need a lot of holes, then the ideal choice is to rent a gas drill. The holes can be drilled very quickly. Rent costs 1500-2500 rubles on average. We also tried to look for the services of a gas drill so as not to worry about it ourselves. Such services also exist and the average price is 200-400 rubles per hole. If there are not many holes, then it is easier to order such a service - a person will come and quickly rivet the holes for you. But it will be noticeably cheaper))
You can work with such a tool alone, but it is much easier and simpler with two people. And of course, if you rent a tool, don’t put too much pressure on it, take it out and shake out the ground more often. Such a drill costs from 15 to 30 thousand rubles (and a professional one is even more expensive), so it is very undesirable to break it. This factor also became important for us, which is why we chose a hand tool.
IS IT HARD TO WORK MANUALLY?
It all depends on the type of soil, its compactness and the presence of foreign impurities/objects in the soil. It’s easy to drill clean soil even by yourself, if you don’t plant it deeply - spend 10 minutes maximum on 1 hole at a leisurely pace (without even breaking a sweat).
If you work together, the work goes much faster, otherwise turning the handle alone gets your hands tired, more so than when you pull out the drill and the earth. That’s why it’s easier, easier and faster to twist with two people.
Such a drill costs 2,500 rubles, the quality and durability have been tested by us (more than a dozen holes have been drilled, neighbors in the dacha saw it and asked to work, they were also satisfied). Therefore, if your soil is dense, with stones and limestone, and you are not in a hurry, you can safely take such a tool and do everything yourself.
Spoon drills for drilling earth
For soil that is resistant to crumbling, a spoon-type drill is most often used. The drill can be made from a pipe of the required size or from a piece of sheet steel that needs to be rolled to a certain diameter. The drill has a cylindrical shape with a slot at the bottom along the device. The cut on the bottom of the drill can be made with a grinder and a metal circle.
The average length of the drill is 70 cm, the diameter may vary. When drilling a well, the crumbled rock is retained inside the cylinder, compressing and sticking to the walls. Even if the drill rests on the water, the earth does not crumble, but remains inside the spoon.
Sometimes a metal drill is welded to the bottom of the drill, which visually continues the axis of the drill. Thanks to the sharp tip, it will be easier for the drill to make a hole.
A homemade spoon drill removes soil with a transverse edge and a vertical notch, and the hole can be larger than the diameter of the drill.
A spoon drill is used not only for drilling wells and wells, but also for installing fences or posts, preparing a hole for a foundation, or planting trees.
Types and technical characteristics of hand drills
The practical use of “vertical shovels” has revealed their advantages and weaknesses. As a result, several varieties of hand drills were developed.
The simplest garden hand auger is a tubular rod with a handle at one end and a two-blade cutter at the other.
The simplicity of the design is a guarantee of reliability, however, you won’t be able to dig anything with it other than a shallow hole or well.
The second type is a tool equipped with removable cutters of different diameters. It can be used for drilling almost all types of pits and wells.
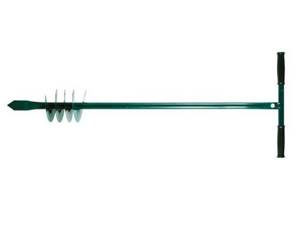
In addition to the plate type, you can also find an auger drill on sale . It differs from its brother in that it has a screw auger behind the cutting blades. Such a tool takes up more soil in one working cycle, which speeds up digging a hole.
The advanced hand drill has several cutters and a split rod design. This allows you to build it up, going deeper to the desired level.
The handle extension is another useful option that is found in drills designed for drilling deep wells. It is easier to work with such a tool. You can twist the handle together with a partner, increasing the cutting force of the edge and the speed of penetration.
A special type is TISE hand drills , sometimes called foundation drills. They have a rather complex design. It ensures the drilling of wide wells under the piles and creates expansions in their lower part.
Such a drill has a wide soil receptacle in which earth with small stones (diameter up to 5 cm) accumulates. A special folding blade begins to work at the very end of the well, expanding the supporting part of the future reinforced concrete pile.
In addition to a flat cutting edge, some hand drills use a serrated one. It loosens the soil better, making work easier.
When choosing a hand-held drilling tool, pay attention to the technical characteristics that we mentioned above. If they don’t have to work often, digging holes for planting trees and posts, it’s better to buy an inexpensive drill with one cutter.
Anyone who has to dig a deep water supply well, install a columnar foundation or install a fence around a site will not do without a drill with an extendable rod and a handle extension. The design of such a tool provides for the possibility of replacing cutters.
A hand drill, which can be used by two people, overcomes not only sandy, but also clayey soils with the inclusion of small stones. If the soil on the site is rocky, then a hand drill will not help you. Here you will need an excavator or hand digging with a shovel and removing the stone.
How to make a drilling tool at home ↑
To make your own hand-held earth auger, select the design of the tool and the type of blade. Usually a T-shaped profile is made from two metal rods, and cutting elements are attached to the vertical one.
The disk drilling device is the easiest to manufacture. You will need a grinder with cutting wheels, a welding machine, a hammer, sandpaper and pliers.
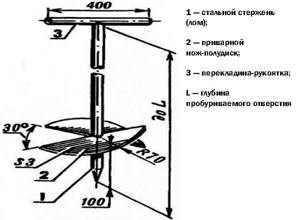
Diagram of a drill with a disc blade
Necessary materials:
- a metal pipe or fittings 1.5 m long for the rod - the vertical part of the drill;
- fittings 40 cm long for the handle;
- circular saw blade 2-3 mm thick for blades;
- drill with a diameter of 15 mm for a pointed tip.
Disc blade drawing
How to make a disc type drill:
- Take a circular saw blade and use a grinder to cut it in half. Select the diameter of the disc depending on the desired size of the hole - on average, 15 cm. Grind the blades to zero so as not to cut yourself during work.
- Weld two pieces of reinforcement - a handle and a rod, so that you get a T-shaped profile. Weld a drill to the end of the rod, and weld the blades 5 cm above. Make sure that the angle between them is 25 degrees.
- Sharpen the blades with an grinder's abrasive wheel. You can carefully “walk” along the drill.
Circular saw - base
You can make a circular saw with removable blades if necessary. To do this, instead of the blades themselves, weld metal pads to the rod at the desired angle, and secure the cutting elements with bolts. When necessary, you can replace them with blades of a different diameter.
A screw tool is more difficult to use than a disk tool due to the larger number of turns that create significant resistance. But narrow holes can be dug manually only with its help. To make an auger drill with your own hands, prepare the materials:
- fittings for the rod - 1.5 m long (can be adjusted according to height);
- profile pipe for handle 40-50 cm long;
- several metal disks of the same thickness (about 2 mm) and diameter - the number of disks is equal to the number of turns of the screw.
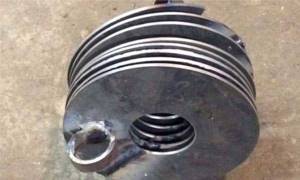
Disks welded together
How to make a homemade drill for poles:
- In the center of each disk, cut a hole with a diameter equal to the diameter of the rod.
- Take the first disk and cut out a small sector from the resulting circle. Repeat on all disks.
- Weld the disks together to form a spiral spring - an auger. Weld rings to the ends of the auger.
- Place the rod rod inside the central hole of the “spring” and use the rings to stretch it lengthwise.
- Weld the top and bottom edges of the auger to the rod.
- Boil the auger along its entire length.
- Attach the handle to the rod by welding or bolting.
- Sharpen the lower part of the reinforcement with an abrasive wheel at an angle of 25 degrees.
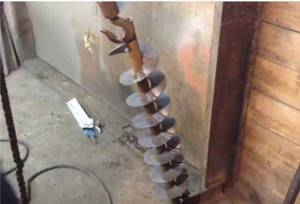
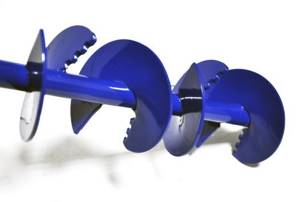
An auger stretched around a rod.
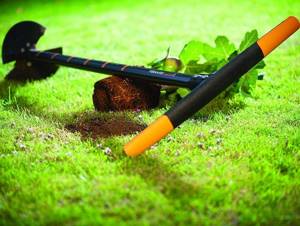
If you plan to loosen soft and loose soil, make a drill from an ordinary shovel. Sequencing:
- Take a high-quality steel shovel and make markings on the canvas in accordance with the drawing.
- Cut the bottom of the blade according to the markings and bend the edges in different directions: one forward and the other backward.
- Bend the petals of the fabric remaining below upward - also in different directions.
Marking drawing on the shovel
The drilling device is ready, it can be used for planting plants in the vegetable garden or garden beds.
If you want to make a garden drill with your own hands, drawings and photos can give you an interesting idea. The materials are often what’s lying around in the barn or garage. Study several models and choose the one that is easier to manufacture or most suitable for the task.
If your own experience is not enough, you can always show the drawing to a more experienced neighbor and get to work together.
A homemade drill can be modified to work more efficiently. Possible improvements:
- Replaceable cutters or blades. To drill holes of different diameters with one tool, make a base with mounting pads welded to the rod at an angle of 25 degrees. Drill two holes in them for the bolts with which you will attach the blades. Install the bolts with the threads facing up so that they do not interfere with drilling.
- A pointed tip of a drill. Cut a plate measuring 10x2 cm from a sheet of metal. On one side, grind it to a cone-shaped state with a grinder and weld it to the end of the rod instead of a drill.
- Small blades between the tip of the drill and the large ones. Add them by welding 8x3cm metal plates immediately after the tip.
- A curved circular saw blade instead of halves. Take one disk and cut it radially to the middle. Bend the metal in different directions and weld it like a screw.
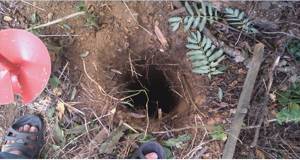
Result of manual drilling
Auger drilling of shallow wells on soft soils
During auger drilling, soil is pushed out under the influence of rotational forces. It is difficult to prepare a well alone, so it is advisable to find an assistant for this work. For drilling you will need a hand drill, removable rods to extend the device and a handle to rotate the device. You can use drills of two designs:
- spiral;
- spoon
The spiral drill is a pointed tip with welded steel blades. Spoon - a rod on which a cylinder with a longitudinal slot is fixed. This cylinder is called a spoon. It is slightly offset from the axis of the rod, due to which the holes in the ground are larger in diameter than the device itself. Drilling with a device of this design facilitates the installation of casing pipes.

Description and photo
The design of the drill allows you not to violate the integrity of the earthen layer, but simply make a hole of the required size. For example, if you need to make a narrow, deep hole for laying water pipes or electrical cables, then a drill will be indispensable.
He will also solve the problem of building a new fence or laying the foundation for a building. It will be enough to decide on the size of the holes and start drilling them, and then install the first beam or pillar. Due to its prostate and effectiveness, this tool has become widespread and now you can see many of its varieties on the market.
In order to choose a suitable drill, you need to understand what problems it is needed to solve at the moment. After all, if you plan to use it only a couple of times a season (to make a hole for planting a tree or bushes), then the simplest model will do. If the task is to drill a foundation or deep holes, then a more expensive and professional drill is needed.