Where are rope ladders used?
Rope ladders are used for work at heights when it is not possible to use a stepladder. Flexible ladders are installed on ships and are used by speleologists, emergency workers and fire services.
Suspended ladders are also used for entertainment: on children's playgrounds, on attractions and in rope towns.
Advantages of a rope ladder:
- Compactness. It is convenient to store even in a small space.
- Ease of manufacture. You can make a hanging staircase with your own hands, and its quality will not be inferior to that purchased in a store.
- Low cost.
- Flexibility.
- Ease of use.
Option #2 – crossbars with through holes
A feature of the second method of making a suspended staircase is the need to make holes in the steps. We will stretch ropes through them, collecting all the crossbars into a single structure.
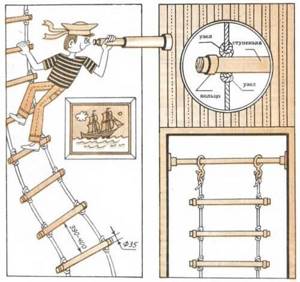
In the proposed option, we will use square wooden cross-sections 40 cm long and synthetic nylon rope. In each cutting, retreating 3 cm from both edges, use a drill to make holes with a diameter of 1.5 cm. After making a couple of holes, do not forget to make sure that their diameter corresponds to the thickness of the rope. After this, carefully sand the crossbars using sandpaper or a grinder and treat them with an antiseptic solution.
We cut a nylon rope, the length of which is 10 meters, into 2 equal parts. We process the edges with harsh thread or hot metal.

Let's start assembling the structure: we make loops or tie knots at the ends of both ropes. We pull the free ends of the rope through the through holes of the first crossbar
When assembling the structure, we use the same device, fixing the crossbars between wooden blocks nailed to the board.
We fold the long “tail” of the rope into a loop, lift it above the crossbar and wrap it around the rope knot. As a result, we get the first step, fixed between two nodes. We use the same technology to assemble the remaining steps.
Requirements for a rope structure
Staircase dimensions.
The main ones:
- Width of stair steps. This value should be 40-45 cm.
- Length - no more than 15-20 m.
- Weight. It should not exceed 15-20 kg.
- The ladder must withstand a weight of 300-350 kg without bending the steps.
- Rope with a diameter of about 6-10 mm. A thinner rope will be inconvenient. When using thicker rope, the weight of the structure increases.
- Interval between steps. If the ladder will be used by children, this value should not exceed 30 cm. For adults, you can leave an interval of 40-45 cm.
a brief description of
You need to know that the materials from which rope ladders are made have their own characteristics. Specialists from the Ministry of Emergency Situations and fire departments use ladders made of low-flammable and durable materials. Climbing ropes have high frost resistance characteristics. Climbers use light, strong and thin ropes.
You can buy a ready-made staircase at a specialty store or make it yourself. At the same time, you don’t need to think that a rope ladder made with your own hands will be worse than in a factory. The main thing is to strictly adhere to certain rules.
The advantages of a rope ladder include ease of manufacture, maintenance and operation, low weight, low cost, compactness, and mobility. Making a rope ladder with your own hands will save you money. In addition, you can make the structure to the length you need.
Any rope ladder must meet the following requirements:
- the standard width of the stairs should be no more than 40 cm, and its length should not be more than 15 m;
- on the steps of the structure (regardless of the material of manufacture) there should be no sharp corners and protrusions on which you can accidentally get hurt or get caught by clothes;
- the distance between steps should not exceed 35 cm;
- the total weight of the ladder should be no more than 20 kg; must withstand a load of 300-360 kg;
- ropes for production must be chosen with a thickness of at least 7-10 mm so that they do not cut your hands.
What material to make the stairs from?
The bowstring is the part of the staircase frame to which the steps are attached; it is made of rope.
The material from which the bowstring is made is selected based on the place where the ladder will be used:
- ropes made from natural fibers are used in playgrounds;
- Industrial enterprises use ropes made from synthetic materials: nylon, nylon or polymers.
Steps can be made from wood, polymer materials, light metal alloys or ropes. Before using the ladder, you need to check whether it can withstand the required load without bending the steps.
Material for production
A rope ladder consists of 2 elements: rope (string), steps. For official use, rope is made from synthetic materials: nylon, nylon, polypropylene, etc. Their strength is higher than that of natural materials, synthetics do not swell when in contact with water, and do not rot.
Steps are made of wood, plastic, metal, rope. The main requirements are integrity, absence of deformations and flaws, and withstand the loads required in different cases. The use of wooden crossbars requires a special approach to manufacturing. A mandatory procedure is sanding with sandpaper to create a smooth surface.
Options for making a rope ladder
There are several options for assembling a ladder from ropes and attaching rungs to it.
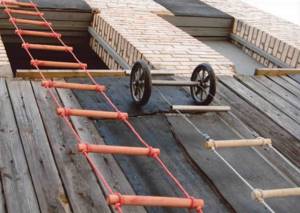
Crossbars with holes
Rope ladder with holes in the rungs.
Step-by-step instruction:
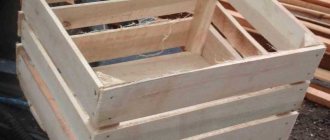
- Decide on the material for the crossbars. You can use wooden blocks, metal or reinforced plastic tubes.
- At a distance of 3.5-4 cm from the ends of the bar, you need to drill holes through.
- The crossbars are strung sequentially from bottom to top onto bowstrings. Under the lower crossbar, simple knots are tied on the bowstrings, and then the rope is threaded through the holes in the crossbars. To prevent the stair step from moving vertically, it is fixed with another knot on top.
- After 30-40 cm you need to tie another knot and repeat the entire algorithm.
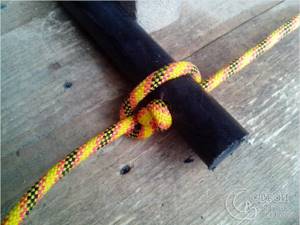
Video: how to tie a constrictor knot
Stair steps that do not have holes drilled for the rope are tied in a special way. This knot is called the “boa constrictor” or “constrictor”. A rope tied in this way does not unravel under load, so the fastening is reliable.
Instructions for tying a constrictor knot:
- Throw the rope over the object from above or from the side.
- Make one turn of the rope around the object.
- Place the running end of the rope under the main one. The running end of the rope is its free end, and the root end is the fixed end.
- Throw the rope diagonally across the knot and the object.
- Wrap the rope around the object a second time.
- Thread the running end of the rope into the loop between the second turn of the rope and its root end.
- Pass the running end of the rope under its first turn.
- Tighten the knot.
You can see the entire algorithm for tying this knot in the video.
Staircase with wooden rungs with notches
The design of this type is a rope frame with footrests that do not have through holes. Wood blocks, metal or plastic tubes can be used as crossbars. To prevent the rope from moving along the steps when using the stairs, and the steps themselves not flying out of the loops, grooves are cut out on them at a distance of 3-4 cm from their edges. Their width is approximately 20 mm and their depth is 5 mm.
After all the grooves have been cut, you need to lay out the rungs on the floor parallel to each other at the desired distance between the steps. Now you need to tie them with ropes on both sides, tying a constrictor knot on each crossbar.
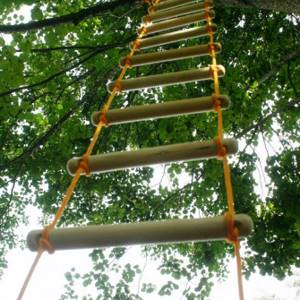
Hanging staircase with plastic steps
To assemble such a staircase structure, you will need hollow plastic tubes as rungs and string that does not stretch. The cavity inside the tubes should have a diameter of about 20 mm. The rope is alternately passed through all the tubes located at an equal distance from each other. This distance is the interval between the rungs of the staircase structure. Having pulled the rope out of the last tube, you need to guide it back to the first tube. There is no need to cut the rope.
As a result, the rope will be laid in the cavity of the tubes in 2 layers. This will increase the consumption of twine, but will increase the strength of the structure.
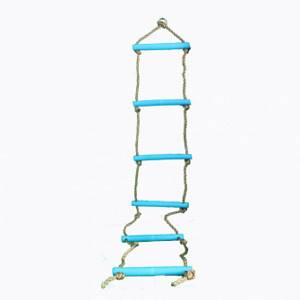
Rope ladder with plastic rungs.
There are two ways to thread the rope through the tubes. The first is that the rope must be threaded alternately into the opposite ends of the tubes. The result will be a staircase with parallel strings.
The second method is to pull the rope out of one end of the tube and lead it to the opposite end of the next tube.
In this case, the space between the steps of the finished staircase will be filled with rope crosses, and there will be no vertical strings. The consumption of rope in this case is higher than in the first.
No steps
There is an unusual version of the staircase frame, where the rope not only acts as a load-bearing part of the frame, but is also used as steps. Such rope ladders are most often used on playgrounds for children.
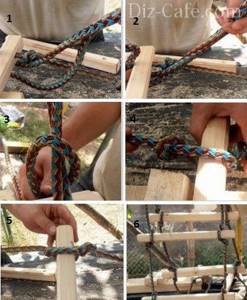
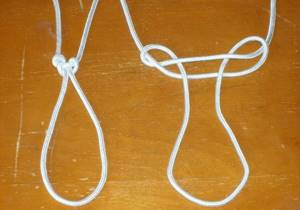
You need to take a long rope, cut it into 2 parts of the same length and place them on a horizontal surface parallel to each other at a distance of the width of the step. One of them is held under the second and twisted in a loop.
Step-by-step instructions for making rope steps:
- The end of the loop must be laid at the level of the moving end of the rope. The length of the loop should be equal to the width of the crossbar. Use the second rope to wrap the loop as tightly as possible and try to tighten the rope as tightly as possible.
- After winding, the loop is twisted with a second rope.
- The ropes must be swapped and the interval between steps must be maintained.
- During the final turn, the running end of the twine is threaded through the loop and secured.
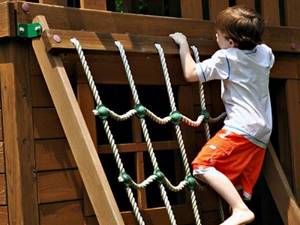
An example of a rope ladder without steps.
Selection of materials
Making a ladder with rope steps requires durable rope raw materials. They buy synthetic products based on nylon, lavsan or nylon. Nylon loops are reliable and can effectively withstand the weight of the human body.
To make lightweight stairs for a sports corner, it is better not to use synthetic material. It is preferable to take rope raw material from cotton. For nautical-themed equipment for a children's corner, experts suggest using linen or hemp material.
To make stairs on your own, use wood interspersed with plastic. On rope ladders, you can use drops made from loops or knots.
Often, materials for stairs are selected based on the purpose of the rope device. If a rescue unit is needed, its manufacture involves choosing a non-flammable variety of materials. For a climbing ladder, you need to use durable frost-resistant materials, and to make a ladder for a well, you need lightweight raw materials.
People are often perplexed about how to make, and most importantly from what, a hanging staircase for their home. In this case, the material is not so important in terms of internal characteristics, but most importantly, how the rope material will look in a home design environment.
Railings equipped with rope
The main requirement for all ladders is safety during use. To meet this requirement, inclined staircase frames connecting floors of buildings must be equipped with railings. Strong twine or rope can serve as a railing.
The most common use of rope barriers is to string a rope between staircase posts. Holes are drilled in the stair columns at the same height and a cable is inserted, and it can be either tightly stretched or laid with a slight slack.
You can drill a few holes and string some ropes. This will make the fence safer. Balusters must be securely attached to the frame of the staircase, because rope barriers cannot bear much load. They play the role of protective and decorative elements.
What materials are acceptable to use?
To ensure the ability to support a fairly large weight (for example, one or even several adults), it is recommended to choose a material from several recommended options.
To create the basis of the structure, the following are used:
- polyester;
- cotton fiber;
- rope made of flax or hemp;
- nylon materials.
Each of the options is characterized by a high degree of strength, ease of use (fold the rope structure and unfold it), not to mention ease of transportation.
When considering natural and synthetic fibers, the choice is often made in favor of the latter material due to the fact that it is characterized by greater moisture resistance, a long service life, as well as increased resistance to aggressive substances, in particular solvents.
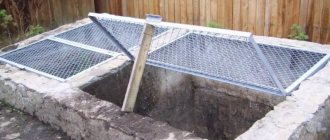
When making a ladder into a well with your own hands, it is also necessary to select the materials from which the steps will be made.
The following are considered suitable options:
- metal (usually light alloys, so as not to weigh down the structure);
- wood is the most common solution;
- plastic;
- the same rope from which the base of the structure was made.
Metal steps are the strongest, however, if the edges are poorly processed, the rope will fray, since the fastening points are in very close contact with the steps. Wood and other materials are lighter, but, accordingly, less reliable, with the exception of rope, but this is not an ideal solution, since in this case it is not very convenient to use the ladder due to the lack of structural rigidity.
Rope ladder
In this model, apart from rope, no other materials are used. To create it you need two ropes. Place them parallel to each other at a distance of about 40cm. Place one rope behind the other, folding it into a loop, the length of which should be equal to the length of the steps. Wrap the other rope tightly around this loop. Then repeat this procedure using another rope. At the end of each step, take a final puff.
Making a staircase with your own hands
A DIY rope ladder is a fairly simple tool to create, but when making it you should be careful about the basic rules. Ignoring these rules is not recommended for safety reasons, especially if the finished product will be used by a child or if it will have to be used to descend into a well.
Basic Rules:
- The standard step between the crossbars does not exceed 14 cm, the width of the crossbars themselves is 40 centimeters. They should also not be made too narrow, so that the knot on each side does not create inconvenience, especially if the rope has a wide weave.
- All steps must be smooth and there must be no extraneous protrusions. The process of raising and lowering should not be complicated in any way.
- The distance between adjacent crossbars should not exceed 30-36 centimeters, otherwise the descent into any well or other narrow place will be complicated. Rope ladders for children should have an even smaller distance between steps, depending on the age of the child.
- The thickness of the crossbars should be 3 centimeters or a little more. This does not depend on the material: crossbars that are too thin will cut unpleasantly into your hands and soles.
tie each individual crossbar and make each knot carefully: according to current requirements, any rope ladder must withstand a load of at least 300-350 kilograms. This also applies to self-made rope products intended for domestic needs.
Despite the significant requirements for strength, reliability and load-carrying capacity, the entire ladder should not weigh more than 20 kilograms, otherwise it will be extremely problematic to use it effectively. To do this, you need to calculate the number of steps, the total length of the product, and the characteristics of its individual parts.
General tips:
- If it is better to choose natural materials for children, then synthetics are perfect for all other needs. A nylon rope with a diameter of 8-9 millimeters weighs very little, but at the same time meets all requirements.
- To calculate the amount of rope, the estimated length of the product should be doubled and a meter and a half should be added to the knots (minimum). It’s better to leave two meters or even a little more in reserve - the rope is inexpensive, and excess material can always be trimmed.
- Knots should be made on both sides of the crossbar, and not on one - then correcting the mistake is extremely problematic.
- It is advisable to strictly measure equal sections on the rope and tie the crossbar at the same distance.
It is better to use not just knots on which the crossbar will rest, but to create a loop or pass the rope through the hole twice, if the diameter allows.
This will significantly increase the safety of the product, since a self-tightening loop is much more reliable .
0
( 1 ratings, average: 1.00 out of 5)
Back
Breeding fish in a pond
MORE
Required tools and materials
The ladder includes 3 components: ropes, crossbars, fastenings.
The rope is selected based on the circumstances of the intended use. For children's attractions and decorative use in rooms, it is recommended to use ropes made from natural materials. For household needs, synthetic materials are best suited. They have increased resistance to solvents. Steps can be made of wood, rope, metal (light alloys) or plastic tubes.
Regardless of the material, they should not be damaged or deformed. The crossbars can be round or square.

When making our own, we will need:
- chisel;
- power tools (for example, drill);
- saw (for “cutting” steps);
- grater with sandpaper (for sanding wooden steps);
- metal scissors;
- a skein of thick thread.
We will also need two pieces of rope (their length is calculated based on the fact that each piece will be halved due to the cost of knots). And the required number of crossbars.
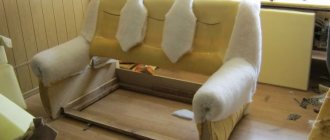
Manufacturing technology for rope ladders with wooden steps
Knot securing the step
Initially, wooden elements of the same cross-section are selected for the steps, not too wide so that it is convenient for adults and children to grab them with their hands. Holes should be made on both sides of the sticks in accordance with the diameter of the rope. The holes are made at a distance of at least 30-40 mm from the edge of the planks or timber. The thickness of the rope or rope must be at least 10 mm. The optimal internal distance between holes is 250-300 mm.
Next, you should carefully prepare the wooden surface, using sandpaper to clean and sand all the irregularities. Be sure to treat the wood with a special antiseptic, and then with drying oil or oil paint. The steps can be painted a single color or you can make them multi-colored, fun and funny. You can involve children in the painting process, who will be directly involved in the production of the stairs, and be proud of this in the future.
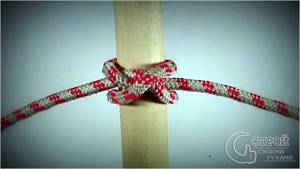
Constrictor knot
The prepared rope or rope is cut into two equal parts and threaded into pre-made holes, securing with a strong and durable knot at the base of the wooden beam, right at the exit. Then measure the distance between future steps, usually 200-300 mm, and repeat securing the steps in the same order. The total number of steps and the length of the staircase depend on the height of the ceiling in the children's room or on other parameters of the surrounding space.

Rules for fixing steps
At the final stage, the rope ladder is fixed to a specially made crossbar, to hooks on the ceiling or to the top bar of the wall bars using a rope or pre-prepared carabiners, strong and reliable.