Classification of structures
The following types of gazebo canopy structures are distinguished:
- According to their design features, gazebos for summer cottages are divided into portable and stationary. Portable ones must be lightweight, so metal or plastic is chosen as the material for the frame. The upper part - the umbrella - is made of durable fabric, polyethylene, or synthetic fabric.
- As a rule, these are collapsible structures. They are easy to move from one corner of the site to another. The disadvantage of this type of equipment is its fragility. Under the scorching rays of the sun, both the polymer and the fabric can become unusable. They need to be put away in the pantry for the winter, constantly updated and repaired.
- Stationary buildings, of course, are somewhat heavier and will be difficult to move to another place in the country. But they are more durable and more reliably protect the owner from the vagaries of the weather. As a rule, these are non-demountable structures.
Construction of gazebos and canopies to complement the design of a summer cottage
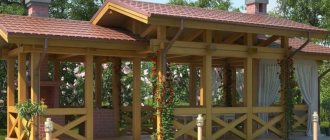
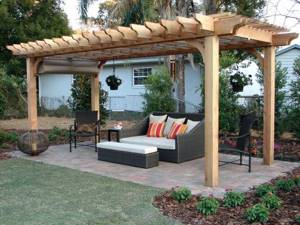
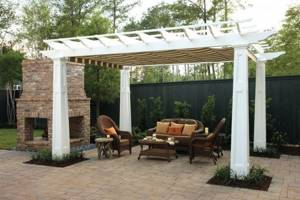
The dacha plot is decorated not only with a green lawn and beautiful flowers. A gazebo attached to a house can be a wonderful addition to a stylish ensemble of garden furniture. Each owner is able to choose for himself the variety, design and material of manufacture. Such components create an exclusive appearance and a cozy atmosphere in the local area.
Such designs have become widespread due to their functionality and minimal construction costs.
The difference from a regular gazebo is the absence of walls, entrance, and parapets. Such a gazebo for an extension to a house is lightweight and does not require a strong foundation. They create an airy effect, especially in contrast to the heavy arbors that weigh down the garden landscape design.

When choosing a gazebo canopy design, personal wishes, financial capabilities and the characteristics of a particular site are taken into account.
Choosing a place for a gazebo
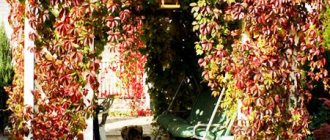
Typically, gazebos and canopies for summer cottages are placed in the summer recreation area of the estate. Near a picturesque location, for example, on a hill where you can admire a wonderful view, next to a stone hill lined with flowers, near a pool, stream, natural or man-made lake. If you decorate them with climbing plants and plant flowering shrubs near them, they will look amazing in spring, summer, and autumn. We do not recommend locating country houses in lowlands. Damp, cold places will not bring much pleasure to a summer resident who has come to relax after a hard week.
Metal canopies for summer cottages
It should be immediately clarified that the phrase “metal canopies for a summer residence” entirely refers only to the support system; the roof can be made of any material. We are talking about racks and roof support system.
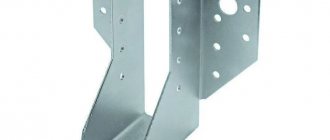
Metal pipes of round or rectangular cross-section are usually used as racks. Their lower ends are deepened into the ground and concreted, and the upper ends are connected to the trusses by welding or using bolts. To strengthen the racks and increase their stability along the longitudinal axis, the so-called. tie farms. Most often they are mounted at the top of the racks, under the trusses. This allows you to free up space below for movement, placement of furniture or any devices. Metal canopies are durable and reliable in operation, but their cost is slightly higher than the cost of other types.
Groups of canopies and gazebos by design
Experts name 3 groups of buildings:
- Open buildings on supports with lightweight roofing. The peculiar privacy and comfort of the gazebo in such structures is created with the help of green hedges. You can put a table and benches under the canopy - your place to relax is ready!
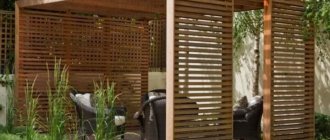
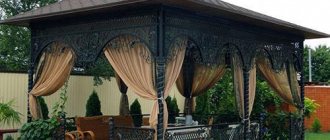
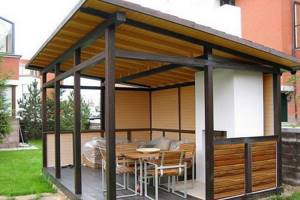
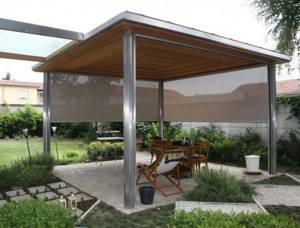
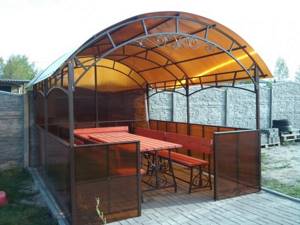
- Semi-closed frame structures with a light roof, with side parapet-enclosing structures, with decorative grilles covering open openings from rain and sun. It is possible to use designer glazing for open openings of gazebos, or you can simply hang protective curtains - thick, moisture-resistant curtains.
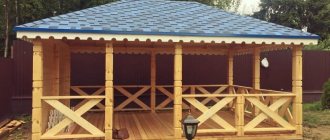
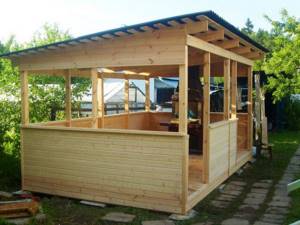
- A veranda is a widespread room that is obtained as a result of constructing semi-closed gazebo canopies with a pitched roof at the dacha with your own hands. On one side they are adjacent to a residential building. Place furniture on the veranda - you will get a comfortable and weather-protected place for the whole family to relax outdoors.
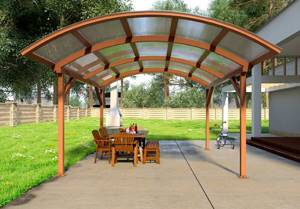
Roofs for gazebo canopies can be straight, inclined (single and gable), arched, rounded. Sloping roofs (canopies) are convenient to use. Rain rolls down the roof slope without getting inside the building.
Ideas for a summer residence
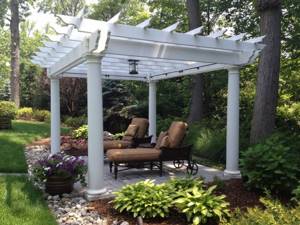
The origin of gazebos goes back to Antiquity; at that time, “pergolas” were considered a luxury and were intended exclusively for noble persons and members of the imperial family.
Today this structure has gained wide popularity among all social classes. Modern materials and innovations in the construction industry have made it possible to reduce the cost and make the pergola accessible to everyone.
Types of gazebos are divided into groups:

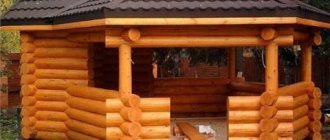
From timber
- Depending on location . The hanging structure can be built separately from other buildings, as well as attached to existing buildings on the site. An open gazebo next to the bathhouse looks very practical. Such recreation areas are used as verandas.
- Differences in installation method . Gazebo frames are divided into prefabricated and stationary. The prefabricated structure is characterized by low weight, lack of foundation and low degree of protection from bad weather. Stationary frames personify the solidity and wealth of the owner. They are massive and often made using expensive finishing.
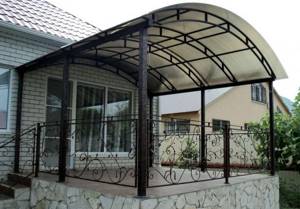
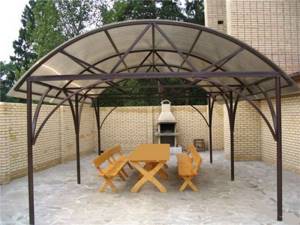
- Various roof modifications . Equipping the structure with a roof can be done using direct and inclined technologies. A straight roof crowns lightweight summer tents; an inclined roof model can be single-pitch or gable. The modern trend is the arched roof frame, which involves the installation of a rounded roof.
- The material of canopies also varies greatly . The simplest are wooden structures and metal frames. Technological gazebos are created using polycarbonate or metal tiles.
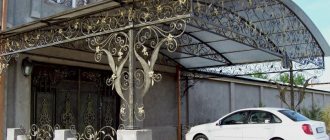
Designer canopy
If you want to turn your own idea into reality and create a truly unique gazebo, you can highlight the most attractive features of each of the above varieties and combine them in one project.
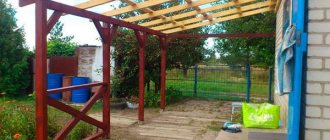
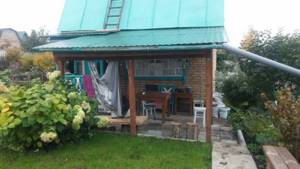
Attached to the house
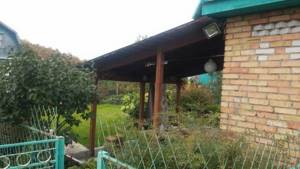
An interesting simplified option is a gazebo, one side adjacent to the main building. Both the main house and the bathhouse located nearby can serve as a support.
Such gazebos canopies are fixed on a sheer wall, and ordinary racks become the second support for the frame.

The simplicity of the design does not require serious construction operations, and the assembly process consists of installing the necessary racks and securing the canopy itself.
When building an extension, you should focus on the type and size of the canopy. It is these parameters that determine the location of the supports and their degree of fixation.

When the weight of the roof covering is light, the racks are sometimes installed without being fixed in concrete.
With a pitched roof made of corrugated sheets
The fashion for octagonal seating areas is already a thing of the past; today, lightweight frames made from innovative materials are in demand.
A shed with a pitched roof can be attached to any building, and there are also projects for separate installation.
The advantages of single-pitch projects are:
- Simple design. Installation does not require specialized knowledge, and any person with a basic course in geometry can build such a project.
- Versatility of the structure. The frame is installed in conjunction with other buildings; there is an option for a separate location. At the same time, the protective qualities of the pergola are not lost.
- Minimum cost and shortest construction time. The correct geometry of the structure allows the master to build it in a few days.
- Wide functionality. Polycarbonate is a universal material that will provide optimal protection in any weather.
The simplicity of the frame in such buildings is simultaneously combined with the reliability of the structure, which makes the gazebo suitable for use in several summer seasons.
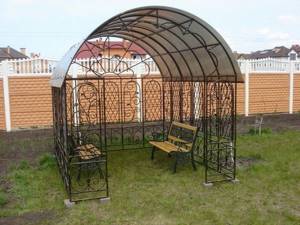
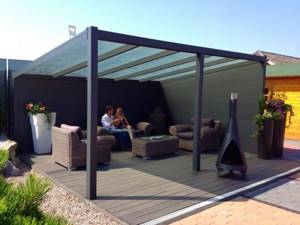
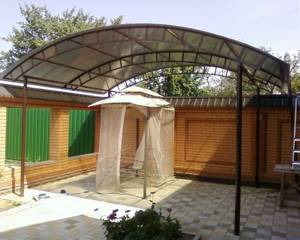
Made of metal and polycarbonate
Metal canopies are characterized by high strength and anti-corrosion resistance. Creating polycarbonate protection on a metal frame allows you to build a virtually indestructible gazebo.
The metal frame can be installed in the following ways:
- Vertical stationary structures, the strength of which is ensured by welding. Such structures are assembled sequentially, right at the location. For additional reliability, the main posts are recessed into concrete by 150 cm.
- Metal profile pipes (preferably of regular square or rectangular shape) are fastened with bolts with additional rubber gaskets. This allows you to make a collapsible frame, which will be hidden during the winter period.
- The metal structure is placed on a solid concrete base, and the walls are lined with wood.
Gazebos and canopies made of metal are installed as durable buildings, the operation of which is designed for a long period. With proper anti-corrosion treatment, the frame is completely protected from external influences.
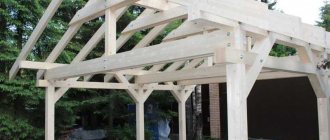
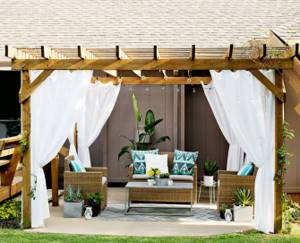
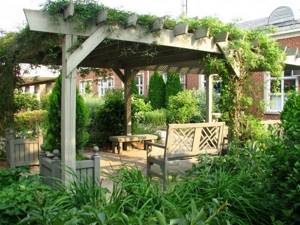
Pergolas with wooden beams
The construction of a decorative wooden gazebo requires the correct selection of building materials. There is no need to use thick logs, so the best option would be a beam with dimensions of 10x10 cm.
To create a slope, it will be sufficient to leave a height margin of about 50 cm for the front pillars compared to the rear ones.
If you do not plan to fill the foundation, then before digging in the pillars, you should definitely treat the wood with protective solutions.
Sometimes winding material is used. Even machine oil can create a reliable antifungal barrier.
A gazebo canopy made of wood requires the installation of a durable roof. You can cover such a pergola with simple boards. Cheap options are slate covering and corrugated sheeting. Metal tiles are considered to be of higher quality and more expensive.
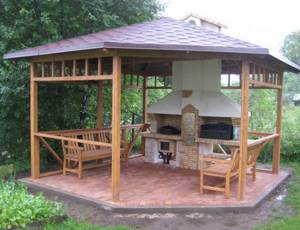
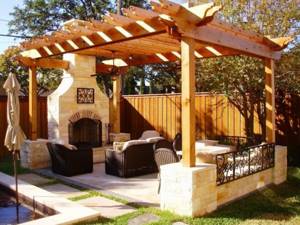
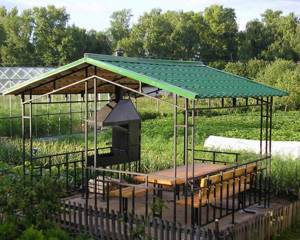
Semi-closed with barbecue
The interior layout of a gazebo is an important aspect of maintaining its functionality. Equipping a building with a barbecue requires the creation of an exhaust hood or a special hole for smoke removal.
If you neglect such nuances and simply bring a barbecue into an ordinary gazebo, then you can give up a comfortable rest - smoke will become the main drawback.
With barbecue
The best option is to create an open pergola for a barbecue, which, due to the half walls, will be well ventilated.
For the summer period, there is no need to build a massive structure that will limit natural ventilation.
How to build a canopy gazebo at your dacha with your own hands
- Holes for supports are dug at an equal distance from each other (the number is determined by the size of the structure). The depth of the holes corresponds to ¼ of the height of the support. A cushion of crushed stone and gravel is placed in them and compacted.
- Support posts, pre-treated with antiseptic impregnation against mold and mildew, are inserted perpendicularly into the holes. The correct installation is checked using a plumb line and a building level.
- The holes are filled with concrete. The foundation will be ready in 2-3 days.
Installation of a gable roof
- It is first necessary to connect the rafters on the ground with metal corners and self-tapping screws. Cut out mounting gaps.
- Pull the board along the ends of the support. Secure the rafters to the support posts. Connect with each other.
- The sheathing is made from edged boards. A roofing covering, such as slate, is placed on top of it. Please note that in order to make the roof more airtight, experts recommend using plastic washers for self-tapping screws.
- Depending on the area of application of the canopy, you can lay boards on the floor or fill it with crushed stone, or pour a concrete screed.
The result was a stationary canopy on a foundation of supports. You can use it in this form, for example, as a carport. You can add side sheathing to the walls to create a gazebo. Building such a gazebo for a summer residence is a good option. On the one hand, there was no need to build a permanent structure, on the other hand, such structures will not only be multifunctional, but also solid, capable of withstanding any bad weather. You can install a welded metal structure as a frame, using metal pipes for supports.
Making an awning
The main essence of an awning canopy is protection from the sun, but not from rain. Wet fabric under the weight of water, as well as under the pressure of the wind, can disrupt the elegant design of the awning.
Of course, the most convenient option is a retractable awning with an electric drive and a remote control, but this option will cost more. So it makes sense to consider the possibility of making an awning with your own hands.
If we describe step by step the process of creating and installing an awning with our own hands, we can highlight the following main stages (consider the option of a regular window inclined awning):
- Draw a diagram of the awning - dimensions, height from the floor level at the top and bottom points of the canopy canvas, the width of the awning and the depth of its extension from the wall
- Choose a material for the canopy - it is best to take acrylic fabric, as it is moisture resistant and not afraid of sunlight

This is what the finished awning looks like - a façade version. It should be a lightweight and durable structure, so it is better to choose either thin-walled enameled steel tubes or aluminum ones as a frame. - Choose a frame material - aluminum pipes are best, as they are not subject to corrosion, are light in weight and strong enough to support an awning.
- Choose a folding mechanism - it’s easier to buy a ready-made mechanism, and then attach it to the wall yourself, connect it to the canopy fabric and frame

The folding mechanism is one of the main and most complex elements of the awning, so it will be easier to purchase a ready-made one and do the rest yourself. - After assembling the frame and cutting out the fabric, attach the folding mechanism to the wall, connect the fabric to it and place it on the frame.
Thus, the creation and installation of an awning, subject to the availability of materials and a folding mechanism, is a matter of one day, which will usually take you 6-8 hours of time.
Plastic structures
Recently, structures made of polypropylene, metal-plastic, even PVC plastic pipes are often used. They lighten the entire structure, are easy to install, strong and durable. It will not be difficult to make a portable sliding gazebo from them. Please note that structures made from PVC pipes have disadvantages:
- Insufficient frame strength.
- Deformed when exposed to direct sunlight.
- Toxic and have an unpleasant odor.
Using plastic, you can realize any idea, since it allows you to bend any shaped element. You can make a rectangular canopy, a gazebo, a semicircular shape, or a polygon shape. Use dense polymer, polycarbonate for coating.
Canopies and gazebos made of polycarbonate
The roofing of a polycarbonate gazebo significantly simplifies both the design and the method of its manufacture. This popular material has several advantages:
- Lighter weight compared to slate or metal tiles.
- Strong and durable material, not subject to corrosion, like metal, does not require antiseptic treatment against fungus and mold, like wood.
- Fire resistant.
- Easy to process. Due to the fact that the material can be bent and cut into intended shapes, it is often used by designers in the manufacture of original and unconventional, complex structures. Such a gazebo will become one of the decorations of the dacha, its distinctive decorative element.
Gazebo canopies are covered with polycarbonate if the structure is stationary in nature, since the material is not cheap and can be easily damaged during disassembly and transportation. The frame can be made of wood, brick, metal. If its size and weight are planned to be small, then the product does not need a solid foundation; it will be enough to fix simple metal pins in the ground. The only exceptions are gazebo canopies with a barbecue area, which are not recommended for use with a polycarbonate roof. They are built with a frame made of metal profiles or pipes, and corrugated sheeting, slate or tiles are chosen as roofing. A pipe is installed to remove the smoke. This is a mandatory element in this kind of buildings. If you ignore and do not install a chimney, while preparing barbecue, participants in the process may inhale carbon monoxide, which will undoubtedly ruin the picnic at the dacha. A more complex strip foundation will have to be built under a gazebo with barbecue canopy. The oven, designed to allow the entire cooking process to take place outdoors, is built of brick. Its construction needs to be thought through, a preliminary drawing drawn up, a place in the gazebo planned where the grill, firewood, shelves for kitchen utensils, and a set of accessories for the stove will be located. Such a gazebo should be located at a certain distance from the house or wooden bathhouse, which will ensure fire safety. Replant or uproot trees and shrubs that grow too close.
Construction of a gazebo with barbecue step by step
Necessary steps when building a gazebo:
- Making a strip foundation. Along the perimeter of the future gazebo, you need to dig a trench about 40 cm deep.
- Pour a layer of gravel onto the bottom as a cushion, tamp it down, and put reinforcement mesh.
- Build formwork from boards. Fill the foundation with concrete mortar. You can begin the next stage in a month, when the concrete has dried and strengthened.
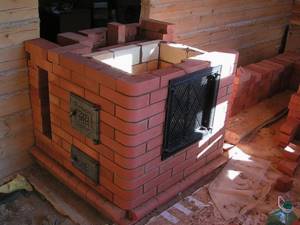
- The next stage will be the construction of a furnace made of refractory bricks. We use a solution based on red clay, which has fire-resistant properties.
- To make the building look presentable, the barbecue must be covered with facing bricks or cement mortar.

The procedure for erecting a grill oven in a gazebo canopy
The following procedure for constructing a grill oven is distinguished:
- Making a pedestal where firewood and stove accessories will be located.
- Construction of a furnace, firebox.
- Construction of a pipe with a valve to regulate draft.
- Carrying out decorative finishing works.
Making a gazebo for firewood
Stove heating requires the presence of a woodpile, which is easy to make for a dacha with your own hands. A neat gazebo canopy will fit organically into any interior and will protect the firewood from the rain. The construction of such a building will not require a lot of time and financial investment. By the way, the shape of such a structure can be not only rectangular, but also designer and unusual.

What functions does the canopy perform?
Sheds in the garden can serve different functions. First of all, they are intended for relaxing outdoors with family or friends. Protection from sunlight or rain allows you to ignore the vagaries of the weather and enjoy communication and a change of scenery in any conditions.
Sheds at the dacha have significant economic functions. For example, a structure attached to a country house will ensure that various works are performed under protection from rain or sun, which will significantly extend working hours.
Sergey Yurievich
Construction of houses, extensions, terraces and verandas.
Ask a Question
Usually around noon on a hot day, all life in holiday villages comes to a standstill due to the heat, but the construction of sheds makes it possible to use these hours more rationally. A canopy is no less convenient when it rains. For example, if you need to make minor repairs to a car, you simply drive it under a canopy and carry out all the work in comfortable conditions.
Rectangular structures with a metal frame
These structures include:
- Vertical metal posts, pre-fabricated using welding equipment, are deepened into the ground by 150 cm and filled with concrete mortar.
- A roof made of polycarbonate sheet is attached to the top with bolts and rubber washers (at an angle of inclination).
- You can make a concrete base or lay the floor with bricks. Such a foundation will prevent wood from rotting.
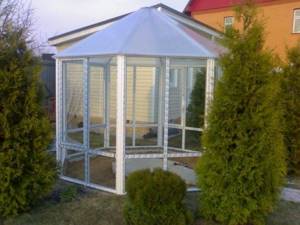
Setting up a garden tent
The stores currently have a sufficient selection of country garden tents. Usually their frame is made of plastic or aluminum pipes, and the tent itself is made of durable fabric, mostly synthetic. The windows in such gazebos are transparent and soft. The doors are draped with mosquito nets. Taking these factors into account, choose a place to place your tent that is away from the fire source. These are prefabricated and portable products. If you think about the dimensions, then such a structure can also be used for parking a car. Assembling such a gazebo canopy is not particularly difficult and is carried out according to the instructions that come with the product.

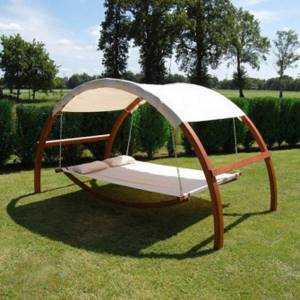
Hammock canopies for outdoor recreation
One of the most convenient devices for relaxation in a summer cottage is a hammock. Essentially, it is a rectangular piece of fabric or mesh material suspended on two supports. Since ancient times, summer residents hung a cloth between two trees and enjoyed relaxing in the shade. You can install a stationary hammock yourself without resorting to the help of trees. It is enough to choose a place on the site, dig in wooden or metal supports, concrete them and hang the fabric on thick and strong ropes or even chains. To protect from the sun, you can build a canopy from fabric or polycarbonate by attaching its sheet to the posts. It is worth adding that now there is a huge selection of ready-made gazebos with hammocks. The stands are made of wood or metal, the canopies are made of fabric or plastic. Stores offer a large selection of colors, configurations, and design solutions for hammocks.
These structures are collapsible. Assembled according to instructions. Such hammock gazebos can be placed in any corner of your summer cottage without thinking about supports, since they are portable. Of course, the price of such structures is corresponding. Before you decide to purchase, check out the offers on the Internet, where you can choose the appropriate option from the list of products. It’s not difficult to make the gazebos you need at your dacha yourself. All you have to do is select the materials, the appropriate tools, be patient – and get to work!
Article Rating
What is a country canopy
Sheds, which are built on summer cottages, are a supporting structure in the form of several vertical posts that support a roofing system of a flat or curved shape, on which a roofing covering made of one or another material is installed. Simply put, dacha awnings are lightweight roofing installed on high posts and used for protection from various atmospheric conditions.
The specificity of these structures is that the result is a roof without walls, a room that does not have enclosing structures. In some cases, ordinary curtains are used to cover the inside, creating an enclosed space like a tent. In essence, a canopy is the most simplified, small version of a gazebo, which can be quickly made without building a foundation, erecting walls and other elements of a traditional garden gazebo.
Choosing a floor covering
The first thing the construction of a gazebo or canopy for a summer house will begin with is the preparation of the floor covering. For an outdoor structure of a gazebo or canopy made of polycarbonate, it is not necessary to construct a permanent floor, since the gazebo will be lightweight. But still, for your own comfort, it is recommended to improve the ground surface so that there is no dirt under your feet during and after rains.
This can be done using a thin concrete screed (5-8 cm), or simply lay ceramic tiles and press them well. You can first remove the layer of soil on the site of the dacha chosen for construction and fill the pit with sand or crushed stone.
It is also possible to create a wooden platform under a canopy, but this is a more expensive option. And yet, if you decide to build it in the courtyard of a summer house or house, you will need to dig holes for small posts. The posts should be slightly above ground level.
The installed supports are poured with concrete, and when it sets, beams are laid on top to serve as the foundation of the future platform. The beams are located no further than half a meter from each other. For the floor itself, choose boards, plywood or any other wooden sheets.
Attention! It is necessary to treat the wooden structure with a special sealant against rotting, and cover the ends with moisture-resistant material.
Another option would be to fill the perimeter of the canopy or gazebo with clean, fine sand. To do this, dig a pit 15 cm deep and slightly wider than the perimeter of the structure itself, and fill it with sand.
It's up to you to choose whether to use coarse or fine sand, the only difference is in appearance. At the border between sand and soil, it would be advisable to dig a low border so that the sand and soil do not mix. Such a sandy island, especially if there is a body of water nearby, will look great on any summer cottage.
Making your own canopies
Polycarbonate construction
This material is considered one of the most modern and is perfect for constructing a protective canopy in the country.
The main advantages of polycarbonate:
- strength;
- durability;
- excellent resistance to cold, heat and precipitation;
- ability to take any geometric shape;
- ease of installation (to secure the sheets, ordinary self-tapping screws equipped with a rubber washer are required).
Using the described plastic sheets, you can protect any area of the site from precipitation. The main thing is to design and build a reliable frame, the material for which can be a wooden beam or a metal profile.
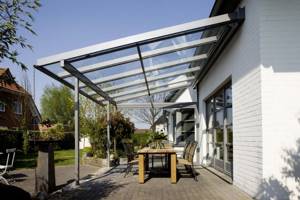
This design looks best right next to the house. Adjacent to the wall, the canopy creates a comfortable terrace for the dacha, and the sloping roof allows rainwater to flow down without leaving unpleasant and unsightly puddles on the polycarbonate surface.
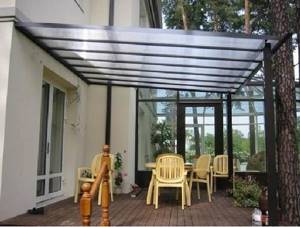
Polycarbonate canopy
The entire manufacturing process can be divided into several stages.
- For support pillars, take a wooden beam with a cross-section of 90x90 mm (the quantity is determined based on the size of the canopy). Remember that the front supports must be slightly shorter than the back ones to create a bevel.
Note! To prevent wood rotting, all parts of the canopy must be treated with antiseptic compounds before installation.
- To ensure that the supports are in the right place, you should make an initial marking of the area. Then, in designated places, it is necessary to dig holes about half a meter deep and 10 cm larger than the cross-section of the timber. Concrete pillars for the foundation are cast at this location. You can use special blanks sold in construction supermarkets. It is enough to dig them into the soil, which is then compacted well. The support beams will be fixed to the foundation using special brackets or metal corners.
- Considering that the structure is adjacent to the house, it is necessary to attach a horizontal cross member to the wall of the residential building, which will serve as a support for the rafters and sheathing. The latter are also attached to the crossbar using corners. If you limit yourself to self-tapping screws, the structure may collapse due to insufficient reliability of the connections.
- A beam of 70x70 mm is suitable for rafters, and no more than 50x50 mm for lathing. You should not use more massive lumber, as this will make the structure heavier.
Wooden frame for polycarbonate canopy
- Polycarbonate is attached to the frame using self-tapping screws. It is also advisable to provide a device for water drainage. Very elegant gutters can be purchased at construction supermarkets.
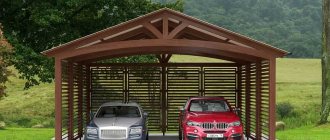
Using corrugated sheets
Galvanized sheets, distinguished by their excellent appearance and painted in various colors, are often used for the construction of canopies that protect personal vehicles from bad weather. Remember that, unlike polycarbonate, this material does not allow sunlight to pass through, so it creates a completely shaded area.
To make the structure more durable, it is better to make the frame from metal blanks. You can stop at four support posts, fastened along the upper edge with beams and sheathing.
The construction process is not much different from the construction of a polycarbonate canopy described above. The only point is that such a structure is rarely adjacent to the house, more often it stands at some distance from it.
Let's look at some small details:
- As in the previous case, you should mark places for attaching vertical metal posts, onto which a profiled pipe with a cross-section of 40x60 mm will go. The distance between the posts is about 1 meter, but depends on the thickness and weight of the profiled sheet used.
- In this case, a concrete foundation is required. Crushed stone is poured into a hole up to 60 cm deep, a support is installed and the pit is filled with concrete.
Advice! While the concrete is curing, do not forget to control the vertical position of the post. Otherwise, the canopy will come out crooked and may collapse during operation.
- After the concrete has completely hardened, which takes from 1 to 2 weeks, you can continue working on the construction of the canopy. For horizontal beams, a profile with a section of 50x30 mm is suitable. In this case, it is necessary to use welding, which sometimes becomes a problem for novice craftsmen.
- The last stage is the installation of the sheathing and installation of corrugated sheets. The best choice is ordinary self-tapping screws.
Canopy made of corrugated sheets with a metal frame
Fabric awnings
When you don’t want to waste precious time making complex and bulky structures, your choice is a lightweight fabric canopy.
The store sells ready-made frame structures, which include everything you need. You just need to mount it on the wall and enjoy your holiday.
The main advantage is the ability to quickly and without much effort fold the awning for a summer residence, using specially provided levers and mechanisms.
You can make a fabric canopy yourself, in which case its design will not differ much from the options discussed above. Unlike the polycarbonate model, it is possible to purchase brighter and more picturesque textiles that enliven and refresh the appearance of the site.
On a note! Remember that the fabric must be impregnated with a water-repellent composition, otherwise the first rain will force you to seek shelter in the house.
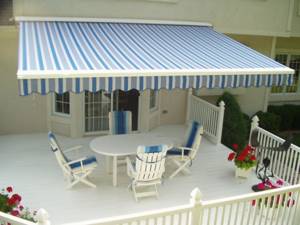
Fabric canopy at the dacha
Installing a gazebo
The assembly of a gazebo or canopy for a home or cottage can be divided into three stages:
- Assembling the frame; Installing the frame on the base; Fastening polycarbonate.
If you have prepared a drawing of the future building in advance, you can immediately begin assembly. First you need to dig holes 15-20 cm deep under the load-bearing supports, where iron, stone or wooden pillars should be installed.
After the load-bearing supports are fixed, it is advisable to wait a couple of days for the concrete to strengthen and securely hold the supports. Next, you can begin welding or another type of assembly (if it is wood) of the frame.
Fastening polycarbonate sheets is carried out by drilling a hole in it and the metal profile, slightly smaller in diameter than the fastening screw. It is best to use rubber washers to prevent water from getting through the screw.
Making a gazebo
Speaking of the gazebo, let's consider the most popular option - a wooden gazebo made from boards. As practice shows, such a gazebo can be made independently in 1 day, having the necessary materials, tools and a diagram with dimensions.
Required materials and tools:
- Board 40x150 - 1 cubic meter Ondulin sheet (Euro slate) - 10 pieces of standard size 200x95 cm Ondulin or Euro slate is an excellent roofing material that is resistant to moisture, has noise and heat insulation and retains its properties for a long time when exposed to atmospheric influences. Ondulin ridge element for creating a rib roofs - 5 pieces Wood screws with a length of 75 mm and a diameter of 4-5 mm - take with a reserve, 500 pieces Electric jigsaw Screwdriver or drill Installation diagram for the roof ridge. 3-meter ladder Tape measure Plumb line Using a plumb line, you need to make a symmetrical angle of inclination of both side panels of the frame.
The first step in building a gazebo (after drawing the diagram, of course) is creating a foundation. It is better if these are small concrete platforms protruding from the ground around the perimeter of the perimeter of the gazebo, or in main places - usually the corners. A frame is already placed on these platforms, which is then set to a vertical position at the same angles (measurement is done using a plumb line for the second side, and for the first - an inclination that is convenient for you).
The basic diagram of the example gazebo described here - with the dimensions of the main structural elements.
It should be noted that if you want to increase the slope of the side panels of the frame compared to the parameters indicated in this example, then the roof area will increase, as well as the required length of the boards for connecting the side inclined panels. So in the case of even minimal changes to the design given as an example here, be sure to draw a diagram, calculate all the dimensions and determine the connecting points of the boards.
If you did everything according to the instructions, you should have a wooden gazebo for about 8-9 hours of work.
Choosing polycarbonate
When building a canopy or gazebo with your own hands, the following types of polycarbonate are often used:
Monolithic polycarbonate. Externally it is very similar to glass, it can be transparent or colored.
The aesthetic appearance is combined with high strength, which glass does not have. It is often used for highly loaded structures at home or in the country. Profiled polycarbonate. This option is not inferior in strength to the sheet version; it differs only in the shape of the panel - they are wavy.
It is often used on roofs in combination with metal tiles, whose wave size is equal to the size of the polycarbonate wave, so they are easily joined. It is also convenient to make skylights on the roof from profiled polycarbonate. Cellular polycarbonate. This is the most common type of polycarbonate.
It is inexpensive and easy to use. It is quite possible to install a canopy or gazebo at the dacha from such polycarbonate alone. It is very flexible and plastic, which allows you to create any non-linear shapes from it.
Which polycarbonate is better to choose for a canopy or gazebo is up to you.