Choosing a waterfall scheme
We decide on the desired height. The waterfall must be located on a hill; if it is absent, then make it artificially. The number of steps will depend on the height. Then we determine how many waterfalls are needed. It can be done with upper and lower mirrors, but such a project will require a rather large area.
The easiest way is to make a waterfall like a falling stream. The circulation system will be located inside a building made of stones.
What types of waterfalls are there?
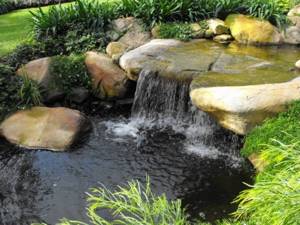
Natural waterfalls can often be found in mountainous areas, but it is quite possible to do this on your own site. First, make a small pond, then work on creating a small mound, install a special pump to pump water to an artificial hill - you can say that your home waterfall has been built in the yard. This type of construction is divided according to the following standards:
- Depending on height
- Along the width of the stream. There is a jet type and a waterfall, where there is a wide discharge line.
- Number of steps (cascading waterfall)
- Depending on the material used
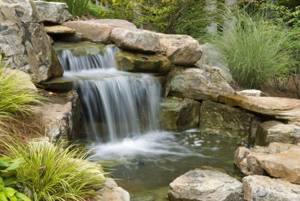
Cascade waterfall
Often structures do not exceed a height of 1.5 m. This is the optimal height for a conventional pump. If you have seen waterfalls and cascades, this will certainly not leave you indifferent. To do this, the bottom step should be as level as possible. The rest you can do at your own discretion.
Waterfall options
- If the stones are smooth and flat, then you can make a mirror water wall.
- If the stones have grooves and have an uneven surface, then it will be easy for you to make separate flowing streams that look very stylish.
- In order for the water to flow slowly and smoothly, it is important to select stones that have indentations. Then the water will fill them like a cup and slowly overflow further. Also, a flat water stream looks quite beautiful. To do this, you need to place a rectangular container at the very top, where one side will be higher than the other.
- If you want to create the effect of a rushing stream, then we recommend placing large stones under the stream itself. Then the splashes of water will scatter, which also looks quite impressive.
- Dry waterfall. If you have not heard such an expression, then perhaps you have seen it - water flows beautifully from the slope, but disappears somewhere below. Of course, water collects in the pit, it’s just not visible. Making it is also not difficult. To do this, the pit is hidden under a fine metal mesh. In such cases, the embankments are made of stone.
- Mini waterfall. There are such conditions that there is simply not enough space for a huge structure, or you simply do not have the opportunity to build it. In such cases, you can build a very miniature indoor waterfall, comparable in size to an ordinary aquarium, which will fit even in the smallest room. The body can be anything - even from flower pots. The lower part must be sealed.
Using a similar principle, many options can be constructed. How your small waterfall or fountain will look depends on your imagination.
There is also an option for water running down glass . This option has its own advantage - it increases air humidity. It's not difficult to build. This requires a tray - you can use some kind of plastic container. Place a tube filled with water in the frame around the glass, and make holes in it in the upper part. The pump is located in the tray itself. If air humidification is not required, such an artificial waterfall can be made airtight. To do this, an additional glass frame is made, which is glued together with silicone. This is, of course, more difficult to do, but not impossible.
If the stones need to be securely fixed, then two options are suitable for this:
- Secure them with cement mortar
- Use polyurethane foam. It, in turn, can look ugly on the edges of fastened stones. To solve this problem, immediately after gluing, sprinkle the exposed foam with regular sand.
Waterfall and stream at your dacha (video)
In the construction of a conceived idea, it is of no small importance how it will look as a whole on the site, fitting into the surrounding view. It is also important to consider the option when the artificial waterfall for the pond is turned off - whether this will violate the integrity of the landscape.
If you already imagine the end result in your mind, then you can safely begin to study the main stages of building a decorative waterfall.
Construction of a waterfall bowl
First, we decide on the size, shape and depth of the bowl. After this we dig out the pit. The depth must be at least 20 m. The foundation must be made on soil that has been previously compacted.
A significant factor in the efficiency of a waterfall is waterproofing, which must be of high quality and reliable. It prevents the banks and bottom of the reservoir from being washed away.

The highest quality material is considered to be PVC film or butyl rubber, which will help protect the structure. However, in winter, these materials will not protect the bowl from frost, so it is necessary to drain the water during cold weather. To avoid such problems, the bowl can be constructed of concrete, pre-reinforced with plastic film.
It is best to make a bowl only to collect draining water, but if you decide to take water procedures there, then the depth should be at least half a meter. If the waterfall is used as a decorative element, then 15 cm is enough, but at the same time decorate the bottom so that it is not visible in the small water column.
A pond looks spectacular if you add fish or special aquatic plants into it. In this case, the bowl should be installed from the 2 m level of soil freezing, then the flora and fauna will not be disturbed in winter. The water in such a reservoir does not drain from the bowl, but it must be made of concrete.
3D decorative panels “Waterfall” 500x500x30mm
We will tell you everything you need to know about 3D panels in this article. You will not find this information anywhere else, since none of your competitors will tell you this.
98% of decorative 3D panels sold in Russia are copies made in a “handicraft” way!
It's unfortunate, but it's a fact! The market is overflowing with offers to create a super profitable business on 3D panels for a minimum investment and, of course, many are carried out without realizing reality. As a result, clients receive panels of terrible quality, lose money and nerves. To avoid this, we will tell you how to identify the “buyers” and buy high-quality 3D panels at the best price.
This is the most important paragraph! If you don't want to go into details, you don't have to read any further, but be sure to read the next paragraph!
1 QUESTION THAT SOLVES EVERYTHING! Ask the following question on any competitor’s website that sells 3D panels, and everything will be clear:
“Could you provide a real photo and video of the joining of 2-4 panels?”
In 98% of cases, you will be refused directly or softly, avoiding the topic, since 98% of companies sell crooked 3D panels, cast from cheap copies, using a homemade method, without observing production and drying technologies.
REMEMBER! Curved panels are almost impossible to install and you will spend 10 times more money on their installation than the panels themselves cost. If you want to save your money, ask the manufacturer to give you a photo/video review of the joining of the panels. If he refuses, or if he does, but you see changes in the relief, immediately leave this site or store!
Important! so that the joint of the panels is clearly visible in the photo/video review. We ourselves made similar requests from competitors and always received photos of terrible quality, from above or from afar, where it was impossible to see the joint, and when we demanded a higher quality photo from the side of the seam, we received silence in response. Therefore, if you do not have the opportunity to touch the panels live, demand a high-quality photo/video connection, where you can clearly see the absence of differences in the relief!
Our perfectly flat 3D panels

Curved 3D panels of competitors
We recently launched a YouTube channel to show you our panels live, and we often come across various videos about 3D panels. To be honest, all the nonsense that the miracle masters spout on their channels hurts my eyes and ears. In this article, we will tell and show you everything about gypsum 3D panels as briefly as possible, but to the point, and help you save thousands of rubles.
The real situation of a simple buyer
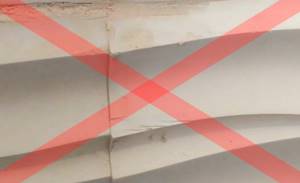
The question of repair arose and you started looking for some new solutions and the choice fell on 3D panels. Of course, this is the right decision, because... It is difficult to find a more practical, safe, beautiful and environmentally friendly finishing material. And you start monitoring (searching) on the Internet for 3D panels, and as a result, you find many sites where, through the eyes of an ordinary consumer, everything is the same, but the price differs tenfold and you choose the cheapest panels, because you don't see the point in overpaying. What do you get as a result? Right! What you see in the photo with the red cross.
This is not about the price of 3D panels, because... The cost of finished goods in each company will differ, mainly due to the quantity of products sold. For example, if our average turnover is 5000 pieces, then production costs will be distributed among the amount of products sold and produced, which will reduce the cost, and as a result, we can offer the lowest prices in the World for gypsum 3D panels. At the same time, if a company sells only 100 pieces per month, then taking into account all the production costs, it simply will not be able to offer a favorable price, because the cost will reach the average retail prices for 3D panels, which as a result will force the company to work in the red or make prices higher than the market.
We are talking about the quality of 3D panels!
How to make the right choice!?
We will not say that you need to choose something in the middle in the price category. This will not give a positive result.
We will not say that the material plays an important role, because... and that's not true. The brand of gypsum essentially plays a secondary role. When it comes to this issue, what is more important is the absence of any additives that unscrupulous manufacturers may add to the composition (metakaolin, cement, plasticizers and other chemical additives). We are opponents of all this chemistry and believe that if Gypsum is an environmentally friendly material, then it should remain so. Our panels contain only Gypsum G16 + fiber + water. But in fact, when you mount the panels on the wall and paint them with the “correct” paint, no one will ever understand what kind of gypsum the panels are made of and they can only be scratched with a nail using some effort. We will definitely consider this issue in a separate article.
PERFECT GEOMETRY OF 3D DRAWING! This is the most important thing in 3D panels!
All you need to do is ask the seller to combine 2-4 panels together and see if there are any differences in the relief. If you place an order remotely, then request a video and photo overview of the joining of panels.
Curved 3D panels. Consequences.
The cost of installing gypsum 3D panels is on average 3,000 rubles/m2. The cost of 3D panels with us is from 557 rubles/m2. As you can see, the installation cost is 5 times higher than the cost of the panels. When you hire a crew to install gypsum panels, the cost of installation does not include “correction of differences.” Therefore, when the foreman finally sees what he has to deal with, the estimate increases up to 5 times, because Correcting differences in a 3D drawing, similar to the one shown in the photo above, is comparable to the work of a sculptor both in price and complexity.
In fact, the installation of 3D panels is very simple and anyone who knows the word “Spatula” can handle it. BUT this is only if the panels have an ideal pattern geometry without differences.
Crooked panels cannot be installed perfectly! The differences will still be visible.
Why do 3D panels turn out crooked?!
The process of making 3D panels is not as simple as it seems and not at all as demonstrated on YouTube and by enterprising mold sellers. On the Internet you can find many stores selling molds for 3D panels and encouraging you to open your own business using this (“Minimum investment - maximum profit”). It is precisely these “would-be businessmen” who are the producers of crooked panels. In their garages, without following any production and drying technologies, which is called the “handicraft method”.
In fact, the production of 3D panels requires a lot of financial investments, only at the initial stage you will need more than 15 million rubles. And the promises “Minimum investment - maximum profit” look simply ridiculous.
98% of 3D panels on the market are hand-filled from plastic and silicone molds, sold freely on the Internet.
Plastic and silicone copies of 3D panel shapes always have differences in relief, and as a result, curved panels.
How to determine whether the 3D panels in front of you are of high quality or curves filled in using an artisanal method?!
This is not easy for an ordinary person who does not have this information. When choosing tiles, this question usually does not arise, because... due to complex technological features, there are practically no “handicraftsmen” there. What can you say about gypsum 3D panels?
We will point out to you the main features by which we ourselves identify “bushmen”:
1. The company does not produce custom 3D panels.
This is the simplest and most obvious way! If it is not profitable for “handicraftsmen” to make high-quality products, it is easier to buy a mold for 1000 rubles. and stamping curved panels.
Since the cost of creating new models is very significant, we distribute it among the cost of the finished product and thus can expand the range of 3D panels in unlimited quantities and offer the creation of new models to order completely free of charge.
The new model is cut out on high-precision equipment with numerical software, in other words, by computer, with an accuracy of 0.01mm, so the “matrix” or in other words “master model” turns out to be ideal, and as a result, the finished product will have a clear geometry of the 3D design, which, as you understand, is the most important thing when choosing 3 D panels.
Conclusion
The cost of 3D panels and composition may vary in any store. It does not matter. The most important thing is the accuracy of the geometry of the 3D drawing.
3D panels are a Premium-class finishing material, but by purchasing directly from our production, the Premium-class becomes more accessible to everyone.
By purchasing from us, you save hundreds of rubles on 3D panels and thousands on installation!
Watch video reviews of 3D panels
We have selected some questions that our clients most often ask.
1. What is included in 3D panels?
Our panels contain only 3 components: Gypsum G16 + fiber fiber + water.
2. What color are the panels?
Panels of natural gypsum color, i.e. white. Everything is ready to be painted.
3. What kind of paint can be used?
The panels can be painted with any paint: acrylic, latex, water-based paints, nitro enamels, as well as textured paints in ANY COLOR.
4. Is it possible to mount 3D panels yourself?
Of course yes. But only with perfectly flat geometry. By purchasing 3D panels from us, you will be able to install them yourself within a day, without experience. Unfortunately, you won’t be able to install curved panels from your competitors yourself.
5. What brand of plaster do you use?
We use G16 grade of gypsum.
6. Do you use fiber backing when making panels?
Yes, sure. We use fiberglass in the manufacture of panels. This is the main and only link. Our panels contain only 3 components: Gypsum G16 + fiber fiber + water.
7. What is the weight of the panels?
The weight of each panel is individual (indicated in the characteristics on each product page) and depends on the relief (pattern) and size of the panel.
8. Can the panels be cut to my size?
Yes, sure. The panels can be cut to any size, and holes can be made for sockets and switches. You can practically do everything that can be done with drywall.
9. Do you have all waterproof panels, or is this option paid separately? What is the cost of the surcharge then?
Waterproof 3D panels are our unique development, which allows the use of gypsum 3D panels in any wet rooms, even in those where there is direct contact of the panels with water. More details here
The cost of the surcharge is 50% of the price on the website (calculated automatically in the shopping cart).
10. How are the panels packaged and delivered?
The panels are packed in a corrugated box, 4 pieces each, with a backing. Delivery is carried out on a pallet with a rigid tie and subsequent lathing from boards, which ensures 100% safety of the cargo when delivered to any corner of the planet.
11. Who is responsible if broken panels arrive?
Breakdown of panels during delivery happens extremely rarely, approximately in 1 box out of 1000. But we still insure the cargo and if such a situation arises, we will immediately send you a replacement and we will take full responsibility for insurance proceedings.
12. Can I pay for the panels upon receipt.
Yes, this is an extremely rare opportunity in the building materials market, but we provide this service to our customers. The service is provided with the involvement of a third party (transport company). You pay 10% (but not less than 1500 rubles) before sending the goods and the remaining amount upon receipt. The transport company charges a 5% commission for processing funds.
Tweet
Waterfall location
It is prohibited to make a decorative waterfall next to any buildings. Water splashes will hit the walls of the building, and due to the increased content of vapors in the air, mold may appear on the house. There should be no trees nearby. The foliage constantly falls, thereby polluting the bowl. As a result, the pump may fail.
Also, tree roots grow quickly in dry weather and can easily damage the bowl. It is better to install a waterfall where there is partial shade after 12 noon. Under the open sun, algae will grow rapidly and the water will begin to bloom.
Making a florarium - waterfall
In the bowl that we have prepared, we begin to place the foam cuttings in such a way that outwardly it looks like a rock, with its own plumbs, cascades and pools where water collects.
We glue the foam layers together with liquid nails or a heat gun, and for additional reliability we pierce them all with toothpicks.
In order to create a realistic stone structure, as a visual example, you need to have a few found stones with you. Then, using a sharp knife, we cut the foam, giving it the structure of real stones.
After the work with the knife is completed, you can begin painting. To make everything realistic, you need to have several stones in front of you, moreover, it is worth considering that many stones look brighter if they are moistened with water.
Now, using a clear example, you can select paints by color and shade. First, the entire rock is painted gray with a thick layer of paint. Well, then, let's start adding realism.
Using a dry brush (a small amount of paint on the tip of the brush), we rub darker and lighter tones of paint (the protruding parts of the stones are lighter, and the cracks and depressions are darker). There are no rules here. In some places, we rub it with green paint to imitate moss.
Since our waterfall is not real, it is necessary to imitate the fall of water. For these purposes, we will need a transparent plastic bottle, from which we cut out an even strip of plastic and make cutouts on one side that resemble streams of water. To secure the plastic strip to the rock ledges, heat one edge over a candle and make a bend.
But, in addition to falling water, it is necessary to create an imitation of the water itself in the pools. For this purpose we will need epoxy or polyester resin. It is best to use transparent resin.
We dilute the resin according to the instructions and pour it into the pools. It’s okay if small bubbles form when pouring the resin, because in reality they are also present.
Additionally, you can lay out small pebbles along the edge of the pool, and place tiny fish figures in the center.
Apply a thick layer of any transparent glue or the same epoxy resin to the plastic strips that play the role of falling water. This is necessary to add volume to the water jets.
Several types of waterfall
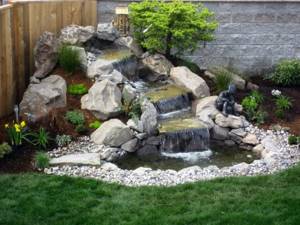
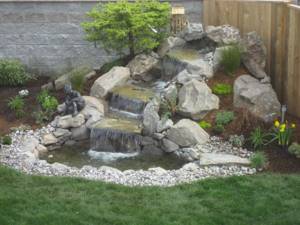
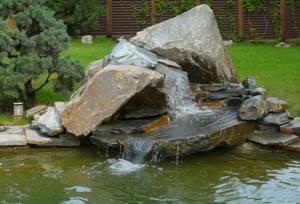
You can make a waterfall on the site using a ready-made form or cascade. In the first case, you don’t need to rack your brains about how to make the desired shape. In specialized stores today you can choose anything from a classic to a sculptural composition.
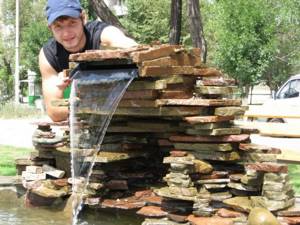
A cascading waterfall will require a large amount of stone. If it is not possible to purchase sandstone, then ordinary boulders are also suitable, but always with a flat, smooth surface. The stones must be fastened together by cementing. The waterfall will flow beautifully over uneven stones in several different streams.
How to make an artificial waterfall
Next, let's move on to practical tips on how to make a decorative waterfall in your dacha with your own hands.
In most cases, the appearance of a garden waterfall depends on the site. Therefore, just because you spied someone’s idea, this does not mean that it will fit into your landscape project.
Let's take a quick look at the stages of building your own waterfall:
- You need to choose a suitable place. Think carefully about the final picture of the entire site so that all landscape elements are balanced. If you don't have imagination, you may need to seek help from a designer.
- Waterfall device. Like any waterfall, the water needs to come from somewhere and flow somewhere. For us it will be some kind of landscaped depression in the ground. It’s up to you to decide what material it is made from, the main thing is that it is protected from water leakage.
- Construction of a mound. The embankment can also be created from the earth that will appear when creating a reservoir, since there will be quite a lot of it. To prevent the flowing water from destroying the mountain, it must be protected. It is best if it is a special film. The shape of the stream can be set using stones. The larger the hill, the higher your waterfall will be.
- Pump installation. The pump is selected depending on the power of the water flow, and in general, the volume of your pond.
- Fountain decoration. Depending on what kind of landscaping you have on your site, use various decorative elements to decorate the fountain. It could be wood, stone, glass, etc.
Step-by-step guide to building a waterfall in your garden (video)
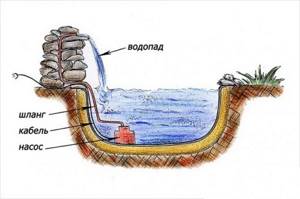
The picture shows a visual approximate diagram of the construction of a fountain.
These diagrams show a common method of building and decorating a pond with a waterfall with your own hands. To do this, you need to consider some points:
- Find a clean place. Usually, a 2 by 2 m area is suitable for this. It is better to think about the location of the country waterfall so that it is at least 3 m away from the house, and leaves and tree roots do not spoil the reservoir.
- Think about the geometry of the banks of the pond and what the elevation will be. You can draw a contour, for example, using sand.
- Make a hole and a mound. We recommend making the depth of the reservoir no more than a meter. This will be enough to beautifully decorate the bottom of the excavated earth to make a slide. It will need to be compacted well.
- Prepare the base so that the slab can be installed. This base can be made, for example, from bricks. When installing, be sure to use a level to ensure the slab lies level. The bottom of the pond can be made of different materials: concrete, film or brick. You can also buy ready-made PVC containers. It has many variants of shapes. In the case of a concrete waterfall base for a pond, first the waterproofing is laid, then the reinforcement is installed. Now you can fill the surface with concrete no less than 5 cm thick. Also, as an option, you can lay out the bottom of brick. However, this is a rather labor-intensive process. If there is a special film at the bottom, then before spreading it, you need to pour a 3-centimeter layer of wet sand at the bottom of the hole. The film is pressed against the stones.
- Embankment waterproofing. To prevent falling water from eroding the embankment, it must be protected from water. Butyl rubber is perfect for this.
- Installation of the stove itself. It must be placed so that the water falling on it is directed into the pond itself. If its shape does not allow this, use other stones and sealant.
- Pump mounting. Using the instructions, place the pump in water. Lead the hose from it to the top. Also run the power cable to the mains.
- Waterfall decoration. Disguise the supplied hose. This can be done with stones, and it is better if they are of different sizes. Start the system.
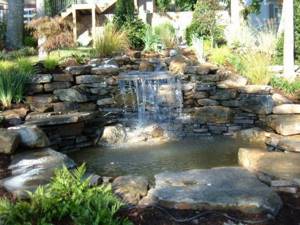
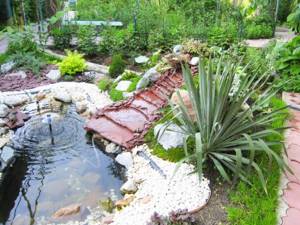
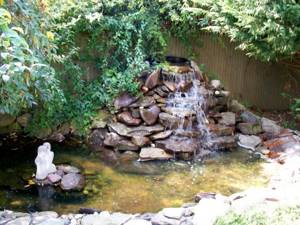
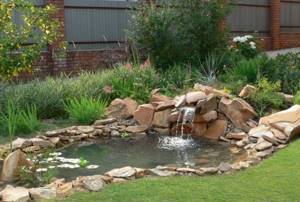
It’s quite possible to make a waterfall on your own property
Decorating a waterfall
A pleasant moment in completing the creation of a waterfall with your own hands is its decoration. The shore can be decorated with beautiful boulders, large shells, river pebbles, and flat stones. You can plant spray roses or other favorite flowers near the waterfall.
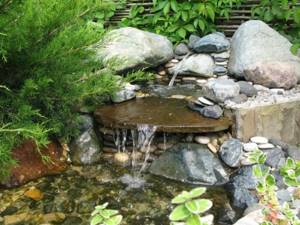
A gazebo or swing would also be a good addition. In the evening, you can decorate the waterfall in an original way with floating lanterns and glowing stones. Such a vacation will appeal not only to adults, but also to children.
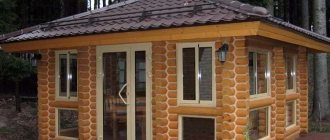
Making waterfalls for residential premises and winter gardens with your own hands
In addition to the compatibility of the design style and the design of an artificial waterfall, you need to take into account the proportions of the room and the size of the future structure. In a small room, a desktop installation would be the best option, and a large winter garden of a country cottage will allow you to create a large object from an alpine slide, a waterfall and a tank with koi fish. The location and type of reservoir - tabletop, wall-mounted, corner or central - also determine its size and shape.
Idea for a winter garden or living space
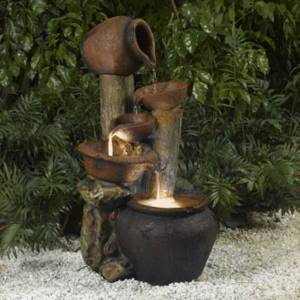
Tabletop waterfall - options and manufacturing technology
For small bodies of water, it is important to think over the external shape, since the design and technology of their creation are almost the same. The main object could be a rough stone, a beautiful exotic shell, a clay jug or bamboo stalks. As a base, you can use a flowerpot, a plastic container, a ceramic or wide metal bowl made of polished stainless steel.
Tabletop waterfall
Now about how to make a decorative waterfall “Weeping Stone” with your own hands.
You will need:
- the basis;
- easily processed stone (limestone, shell rock, tuff);
- mini pump;
- gravel, pebbles;
- PVC pipe;
- artificial plants.
Find a stone suitable for the size of the base of the structure and drill a hole through it. To raise the water to the spout level, you will need a mini pump. If you don’t find a suitable one in the store, you can use a device removed from an old household appliance (for example, an electric samovar) or make it yourself as shown in the video.
Video: how to make a pump for a fountain
Hermetically glue a PVC tube to the pump outlet, the outer diameter of which is 0.5–1 mm smaller than the diameter of the hole drilled in the stone. Pass the tube through the hole and cut off the protruding part. Place the resulting structure in a tank and decorate the free space of the base with gravel, beautiful stones and imitation plants.
Pour water up to half the tank, plug in the pump and check the operation of the waterfall. If the pump power is too high, cover the hole on the top of the stone with a small pebble - increasing the flow resistance will reduce the water pressure.
Scheme for creating a tabletop waterfall with your own hands
There is no need to install a water level indicator; you will simply add evaporating water by eye.
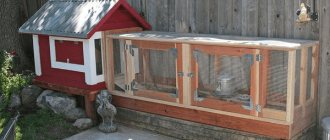
Corner waterfall - making a simple floor structure in eco-style
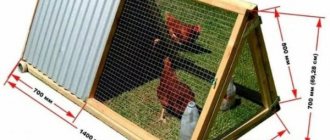
How to make an artificial waterfall larger than a tabletop one, but place it compactly? Corner waterfalls are convenient to place and can be installed, depending on the size, even in a bathroom or on a warm loggia.
To create this waterfall you will need:
- hollow building block;
- technical grid;
- mini pump pump;
- natural, or better artificial, flat stones;
- pebbles or crushed stone;
- fittings;
- wooden, metal or ceramic base tank;
- PVC pipe;
- PVC film (waterproofing).
Decide what size the waterfall tank will be for your home, since its dimensions are larger. If there is a height limitation for the structure, take this point into account. Make sure that the free height of the tank matches or is slightly greater than the height of the concrete block. If your base is wooden, you need to waterproof it by creating a liner from PVC film.
Make a template taking into account the overlap, apply it to the film, cut it out and solder it using a solvent or adhesive sealant. Secure the liner inside the wooden tank, having previously made a layer of sand at the bottom. For stainless steel and ceramic bases, an insert is not needed.
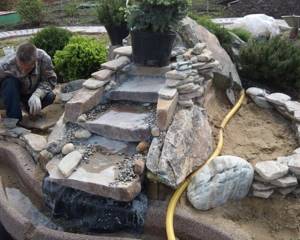
DIY corner floor waterfall installation
Place a hollow building block in one of the corners of the tank - it will be the main support of the structure being built on. Attach several metal rods using flexible clamps - they will provide rigidity to the decorative coating.
Place a mini-pump with a fixed PVC pipe in the tank and cover the entire area of the tank over the reinforcement with a metal mesh, bending the protruding edges over the outer walls of the tank and securing them there with glue, nails or welding, depending on the base material. Above the mini-pump, cut a small hole in the mesh and pass the tube and electrical cord from the pump out.
Place a layer of crushed stone or pebbles on the mesh, and in the corner above the building block, stack flat stones in a pile, securing a PVC pipe coming from the pump under the top one. Pour water into the tank and test the functionality of the structure. If everything works as it should, fasten the flat stones together with concrete mortar or glue and begin decorating the outer walls of the tank to your liking.
Waterfall for a winter garden - the next level of manufacturing complexity
And in the winter garden you can make decorative waterfalls for your home with your own hands. Such a structure involves installation in the center of the garden composition. Its base structure is the same as in the previous example. In this case, the pump should be a little more powerful; check before purchasing what height and how much water it can supply. A concrete column with a top, base and copper tube inside can be made in three stages using various formworks.
- Inside the vertically installed tin (drain) pipe, insert a copper pipe as indicated in the diagram, cover the holes with film and carefully pour concrete around the pipe. After complete hardening, carefully cut the pipe and clean the surface.
- In a flat cylindrical shape, for example, in the cut-off bottom of a used fuel tank, install a concrete pillar “upside down” and secure it exactly in the center with guy wires. Pour the concrete and wait for it to dry completely, then remove the form.
- Install a concrete “mushroom” vertically into the waterfall reservoir, securely fixing it, and fill it with a layer of concrete. The exit of the copper tube from the column should be slightly higher than the level of the hardened concrete of the base.
Connect the copper pipe to the PVC pipe coming from the pump, add water and test the design. These are all the stages of how to make an artificial waterfall simply and from inexpensive materials.
Waterfall design for a “Mushroom” type winter garden
Additional recommendations for designing a waterfall
The water in the reservoir needs to be changed periodically. You can water your garden with it by connecting a hose to the source tube and turning on the pump. Filling the reservoir is not difficult - reinstall the hose onto the waterfall pipe.
Electrical cables, lighting and other conductive elements do not need to be concreted. Otherwise, in case of malfunctions, the structure will have to be broken.

It is enough to simply disguise the theme with the same stones on the surface. All that remains is to activate the pump and our waterfall is ready for use.