Advantages of creating an artificial flower bed
Among the significant advantages of creating palisades from plastic are the following:
- Ease of making flower beds.
- Availability of basic material.
- Long service life.
- Possibility of quick replacement if flower garden elements are damaged.
- When using plastic bottles as a fence for a flower bed, the fence will serve not only an aesthetic function. Plastic acts as a limiter for the growth of plant roots and regulates soil moisture.
Plastic can be given any shape and color by repainting the elements in the shade you like.
Territory zoning
If the area of your summer cottage does not allow you to place such a flower garden, you can move to the vertical plane. To do this, mini-flower beds made of plastic bottles are attached to the fence and wall of the country house. Such a flowerbed will not take up much space, but will require more attention, since watering will need to be done much more often due to the rapid drying of the soil.
If this option seems quite simple and labor-intensive, it is worth considering the possibility of making a swan flower bed from plastic bottles. In this case, a five or six-liter container is used as a base, which is coated with white paint on the inside. The neck of a swan can be made from a piece of thick wire, bent into a characteristic shape, and pasted over with pieces of a plastic bottle, thereby imitating plumage. The soil can be poured directly into the “body” of the swan, i.e. a five-liter bottle, or in special flowerpots, which can then be installed there.
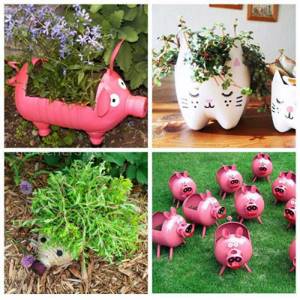
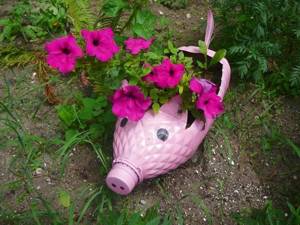
For those who find the swan too difficult to figure out, piglets may appeal. One large bottle is enough to make them. By cutting a hole for the soil, you can make ears and a tail from the samples. The inside of the bottle must be coated with pink paint. The bottle cap is a pig's heel. You just need to draw characteristic lines and put two dots. Also, don't forget about the eyes. They can be drawn in black. If desired, you can provide small legs from small bottles. That's it, the flowerbed is ready: you can plant flowers.
Advantages of bottle flower beds
In addition to reducing the negative impact on the environment, you can also note:
- The long service life of such a flower garden is due to the durability of the material used in its manufacture. This is especially true when growing perennial plants. A fence made of plastic bottles will not allow plant roots to grow beyond the flower bed;
- Possibility of preventing excessive drying of the soil;
- Possibility of replacing individual flowerbed elements if one of them is damaged.
Disadvantages of creating an artificial flower bed
Despite the large number of advantages of practical use, these flower beds also have significant disadvantages:
- Plastic is a fairly fragile material that requires additional strengthening when creating a flower bed.
- Some landscape designers are against the use of plastic as a material for decorating garden beds due to toxic impurities.

There are indeed many opinions regarding the practical use of plastic bottles, but the decisive choice remains with the owner of the summer cottage.
Scheme for creating an artificial flower bed
Despite the huge selection of techniques and varieties of artificial palisades, there is a single algorithm for working:
- Select a diagram or create a drawing yourself.
- Selection of material, painting or decorating it as desired.
- Digging a trench for subsequent installation of bottles (or several trenches if the flowerbed is multi-tiered).
- Installation of flowerbed elements, their strengthening in the ground.
- Planting flower crops if the palisade is combined, and the bottles themselves serve as a decorative fence.
Of course, the final work plan is determined by the type of flowerbed and its shape. But by adhering to a single algorithm, you can achieve a longer service life of an artificial flower bed.
Flowerbed decoration options
For an inexperienced designer who decides to decorate a flower garden with his own hands, it is better to start by building a simple fence for it.
However, despite the simplicity of the design, you should first outline its outline.
A small flowerbed usually requires 15 to 25 bottles of the same size.
Then the bottles themselves are pressed or screwed into the ground along the marked line. This will be easy to do if it is soft. You can level the height of the containers with a rubber hammer. Although the glass walls are quite strong, there is a possibility that the bottle will break if it hits a hidden stone in the ground when hammering it in. To avoid loss of building material, you need to do the following:
- Dig a shallow trench around the perimeter of the flowerbed and lightly press the necks into its bottom.
- Fill the trench with soil, screenings, sand, etc.
- The bedding should be compacted.
- Bottles must be immersed in the ground to at least half their height. This will ensure their reliable, long-term fixation.
The trench can act as formwork if the voids between the bottles are filled with concrete. True, in this case you will get a stationary flower garden, which will be impossible to move to another place.
You can fence a flower bed with bottles of the same color. Another option is to place dark glass bottles together with clear ones or alternate containers of one type with containers of another. In these cases, you need to calculate the alternation algorithm so that the composition looks solid.
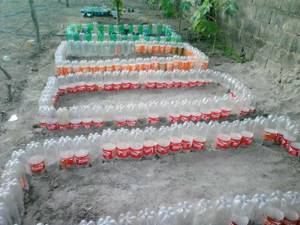
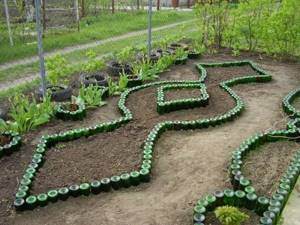
How to lay out a flowerbed with a complex configuration?
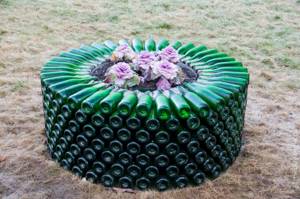
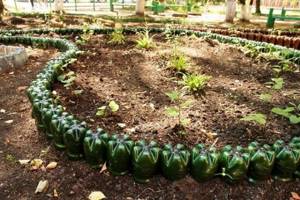
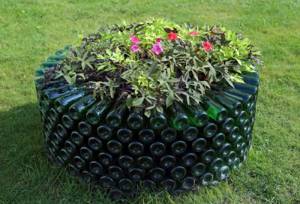
Figure 1. Multi-tiered flower bed made of bottles.
To create a multi-tiered flower bed, you need to select bottles of the same volume. Having gained experience, you can begin to create a flower garden of a more complex shape. If the bottles are sorted in advance, this will greatly simplify its construction.
It is difficult to lay out a symmetrical figure without preparation, but this is not a problem. So:
- First, on a sheet of paper divided into cells, you need to make a sketch of the future flower bed.
- Then it should be projected on the spot. It is better to divide the area for the flower garden into fragments in the same way as in the sketch.
- Now you need to drive 4 pegs into the ground. They will indicate the corners of a square or rectangular parallelogram into which the figure folded from bottles will be inscribed.
- Between them, along the perimeter, a cord is pulled or a line is drawn with a shovel.
- After dividing the sides into equal segments, the area can be divided into squares.
- Now you need to draw the contours of the future figure.
- All that remains is to bury the bottles.
Multi-tiered flower beds
In Fig. 1 shows how you can create a multi-tiered flower bed. Bottles of the same size are quite suitable for this. First, the main outline of the flower bed is laid out. The voids between the containers are properly sealed. Earth is poured inside the fence. Where the second level will be built, the soil must be compacted. Next steps:
- drawing the contours of the next tier;
- installation of bottles;
- compaction of the bedding between them;
- filling the level with earth.
From fragments of glass bottles you can make a panel or a picture that can be hung both indoors and outdoors, as it is not afraid of moisture.
The number of levels of the flower garden depends only on the desire of the owner of the site and the number of bottles he has.
The flower garden, laid out in the form of a flowerpot, looks original. The template for laying out can be the lid of a steel barrel, a hoop cut out of it, or the rim of a bicycle wheel. The bottom of the flowerpot should be filled with cement-sand mortar. Bottles are laid out on it (with their bottoms facing out). The first row in the solution needs to be slightly drowned. After the bottom hardens, the voids between the necks are filled with the solution.
It will be easier to build a flowerpot if you make formwork for it. It can be made from a galvanized sheet, rolling it into a roll corresponding to the internal diameter of the flower bed. The width of the formwork can correspond to the height of 2-3 rows of bottles. When laying out the flowerpot, it can be gradually raised.
Before laying each new row, you need to tie the necks of the bottles lying in the previous one with a solution. The formwork is removed after the mortar binding the containers in the last row has hardened. You can avoid using a barrel or hoop by laying the walls of the flower bed around a piece of pipe that will act as internal formwork. If you place the containers with their necks facing out, you will get a “musical” flower bed that will “sing along” to the wind.
Types of artificial palisades
All flower bed options that exist today differ in shape, size, composition and level of arrangement (tiers).
Each of the presented models has its own advantages and disadvantages, is distinguished by a rich pattern or a pleasant color shade, requires special construction skills (the ability to work with cement mortar) or is quite easy to create.
Vertical flower bed
This option is the easiest to create. The master does not require any special skills; you just need to find a ready-made sketch or diagram of the arrangement of bottles around the perimeter. Next, you must adhere to the following instructions:
- Mark the perimeter of the area for laying flowerbed elements.
- Prepare a shallow trench.
- Paint the bottles if required by the flowerbed requirements.
- After drying the products, install the plastic elements with the neck down. For a more durable frame, the side surfaces of the bottles can be treated with glue and installed close to each other.
The last step is to fill the bottles with soil and compact the soil.
Inside such a decorative fence you can plant flower crops, place a rocky garden with coniferous plants, or simply make a mound of small crushed stone of different colors (forming an ornament).
How to make a fence with your own hands?
There are many options for using plastic and glass bottles as flower bed fencing. You can make borders from whole bottles of the same or different shapes and sizes, or you can cut them into strips. The fence can be of almost any shape, as well as with a horizontal arrangement of bottles and a vertical one.
Vertical borders
Plastic
Along a pre-planned contour, it is necessary to dig a groove with a depth of about 7-10 cm and a width equal to the width of the bottom of the bottle. Then, bottles filled with earth, sand or pebbles vertically in a ready-made groove as closely as possible to each other. Gaps between them are not allowed. In this way the entire fence is formed.
Glass
A fence made of glass bottles will also look nice around the flowerbed; the construction principles are identical to plastic ones. The edging is formed from bottles dug in vertically. The groove should not be too deep, no more than half the height of the glass container.
Attention! The bottles need to be installed as closely as possible to each other , then fill and compact soil or sand into the remaining voids. It is better if the soil is clean, without clods and weeds.
You can form either one or several rows of bottles - both options will look equally attractive.
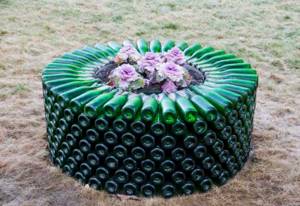
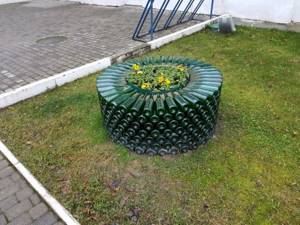
Fence with horizontal circular filling

The horizontal method is much more complicated; it will require certain skills and additional materials in the form of a base and fastening material. The base can be a car tire or an old barrel cut in half. Cement mortar is most often used as a fastening material.
Cement mortar must be applied to the outside of the base. It should be enough to tightly secure the neck of the bottle in it.
Bottles are installed horizontally from bottom to top, so it is important that the bottom tier is as level as possible . There is no need to rush to apply the solution - it should be enough for two or three bottles. This is to prevent premature drying, which can complicate the process. Each row is mounted on top of the previous one, so after installing the tier you should not immediately proceed to the next one. You need to wait until the solution hardens a little and becomes stronger.
Horizontal flower bed
You can place the bottles not only in a vertical position, but also lay the flowerbed parts horizontally. To do this, you will additionally need old tires or metal barrels, divided in half.

Further steps to create a flower bed:
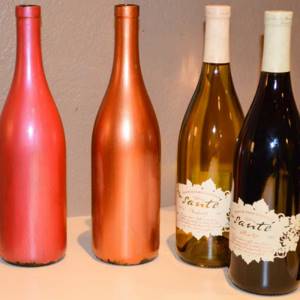
- Prepare the bottles directly. In this case, you can use not only plastic, but also glass containers. Before laying, the bottles must be filled with sand to give them the proper weight and strength. You can paint the surface of the flowerbed elements in any color, for example, with regular acrylic paint with an additional layer of clear varnish.
- Prepare cement mortar.
- Choose a location for the artificial flower bed.
- Place half a barrel or an old tire cut in half on the ground.
- Cover the inner surface of the base with cement mortar.
- Place the first row of bottles on top of the solution layer, with their necks towards the center of the frame.
- Next, cover each new layer with the solution on top, and stack the bottles to the desired level.
On the top tier of such a flower bed you can make a niche, fill it with soil and plant annual plants that do not have a large root system and special care requirements.

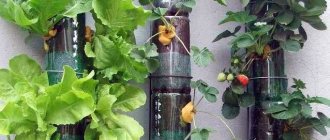
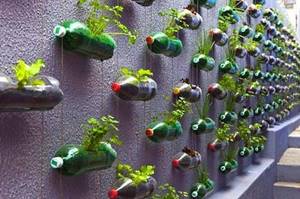
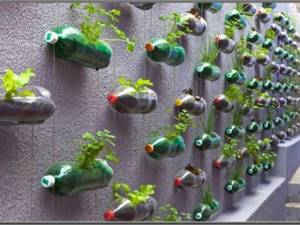
Hanging flower pots
Using ordinary plastic bottles, you can decorate a wall or fence, using bottles as hanging flower pots.
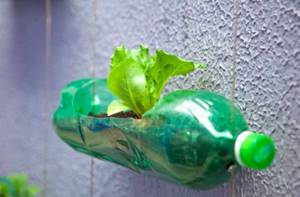
Step-by-step instructions for creating original hanging flower beds:
- First, you need to prepare the bottles: to do this, cut a rectangular piece along the side surface, of sufficient size for planting and caring for flowers.
- The bottle can be additionally coated with a layer of paint or varnish: the walls will become more durable, and the future pot itself will acquire a beautiful appearance.
- It is necessary to make several small holes on the opposite side to create good drainage and outflow of water.
- A layer of sand or expanded clay is placed inside the workpiece for drainage, and a layer of soil is placed on top of it. Flower seeds are planted.
- Next, you need to firmly attach the flower pot to the wall. To do this, you can use construction adhesive, which can withstand the heavy weight of the products.
For a stylish flowerbed design, you can arrange hanging pots in several tiers in a checkerboard pattern.
Crafts for the front garden: photos and master class
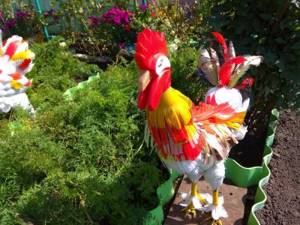
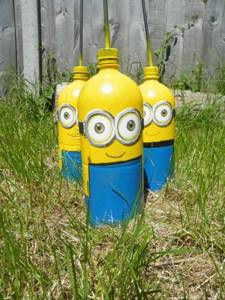
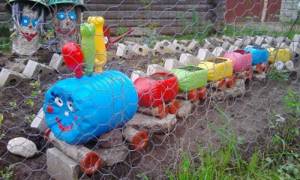
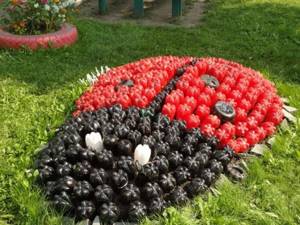
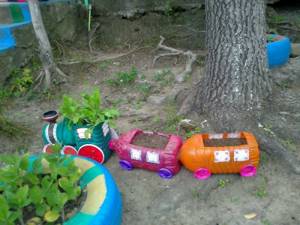
Old plastic bottles can be given a second life by making bright figures in the form of animals or birds from them. Such crafts will be a wonderful decoration for the garden and flower garden.
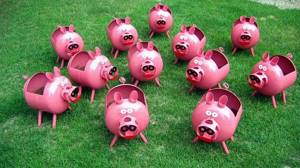
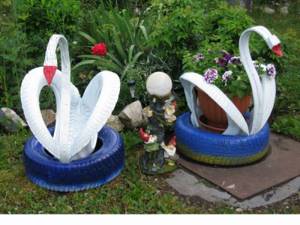
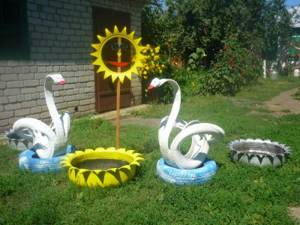
If you wish, you can create a whole zoo for your site. For example, a magnificent peacock, swan or penguin will look advantageous in a flower bed, while larger animals - piglets, donkeys, horses - are better placed in the garden.
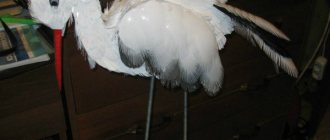
Swan
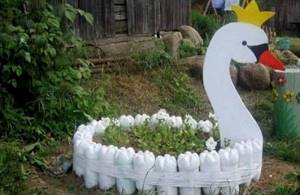
An original flowerbed in the shape of a swan can be created from plywood and plastic bottles. Additional materials you will need are a jigsaw, sandpaper, electrical tape and white paint.
The most labor-intensive stage is making the head. A swan head on a long neck is drawn directly on a sheet of plywood and then cut out using a jigsaw. It is advisable to sand the edges to remove irregularities and nicks.
After this, you can begin the foundation of the future flower bed. The number of bottles directly depends on the desired size of the flower garden. First of all, a shallow trench is formed in the shape of a circle or oval, into which the bottles are dug upside down. You need to leave a small gap between two of them.
The buried bottles are wrapped with electrical tape, and a swan's neck is inserted into the gap left. After this, all that remains is to paint the finished flowerbed and draw eyes and a beak on the head.
Recommendation! For painting it is best to use spray paint.
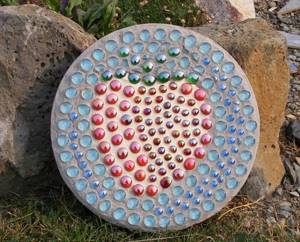
Mosaic
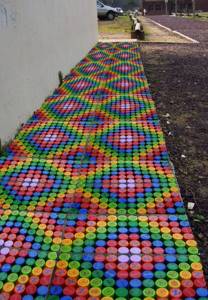
Flower beds made entirely of plastic bottles look impressive, and making such a garden decoration will be easy even for a beginner. To make a mosaic you will need multi-colored or pre-painted bottles.
The outline of the future composition is drawn in advance on paper, like a template for cross stitch. Then you need to think about the color scheme of the mosaic and calculate the number of bottles of each color that will be needed to create a flower bed.
The technology for laying out the mosaic is quite simple - the necks of the bottles are simply screwed into the ground in the order shown in the diagram.
Fly agarics
This video shows a master class on making fly agarics from plastic bottles:
Flowers
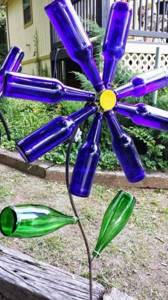
Elegant flowers made from plastic bottles in your garden plot will delight the eye regardless of watering, weather and time of year. In addition, such crafts are easy to make and fit harmoniously into the surrounding landscape.

The simplest and at the same time attractive option is daisies . They can be made from white milk or kefir bottles. A yellow cap is perfect for the core, the leaves can be made from green containers, and the stem can be made from rigid wire, reinforcement or wood, painted green.

The bottle is cut crosswise with scissors at the point where it begins to narrow. Several cuts are made on the resulting workpiece to form petals; their number depends on the wishes of the master himself. The optimal quantity is 7-8 pieces.
Attention! To make the petals look natural, they can be rounded at the ends.
Now, in order to “open” the flower, the petals are carefully bent outward. The cap is screwed onto the neck of the bottle.
The stem can be attached to the flower in two ways - with a self-tapping screw or using wire . In the second case, two holes are made in the lid.
However, you can decorate your summer cottage not only with a variety of fauna. Some craftsmen manage to create interior items , and sometimes even entire garden gazebos .
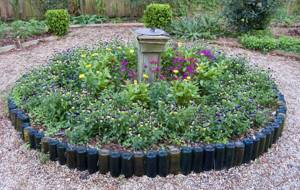
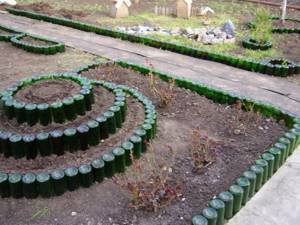
Multi-tiered flower beds made from bottles
An original solution for a summer cottage is a flower bed made of glass bottles arranged in several tiers. Glass containers will not only limit each tier, but will also become an excellent decorative addition to the flower garden. Scheme of step-by-step work:
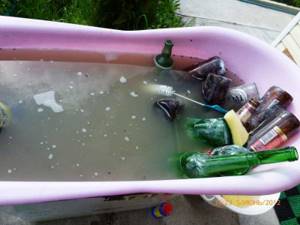
- Prepare the material: wash thoroughly, remove labels, paint or varnish.
- Make a plan for the location of the flower bed.
- Make a trench for the first tier: to do this, dig a small ditch in a large circle. Place the bottles with their necks down in the groove.
- In the second circle, of smaller diameter, arrange the bottles according to the already known pattern.
- The number of circles depends on the number of tiers for the flower bed.
- Between the circles of bottles, add soil, the height of which should vary depending on the distance from the center of the flower bed.
- Plant flower seeds or small shrub crops.
In modern landscape design magazines you can learn how to further decorate such a flowerbed with small stones, gravel, and garden figurines.

Border made of plastic bottles
Before you learn how to decorate a flowerbed with truly complex crafts, first try making a simple border.
The border can be made in two ways: horizontal and vertical. We'll look at each method in more detail.
Flowerbed made from large bottles
From large plastic bottles you can make a beautiful original flowerbed for a weaving flower or a bright annual. To make an interesting flowerpot, you need:
- Cut off the bottom of the bottle.
- Apply several layers of putty to the walls of the bottle, and paint the selected shade on top of it.
- Prepare a deep enough trench to install the flowerpot.
- Place the flowerpot in the trench with the neck down, sprinkle with soil.
- Place a layer of expanded clay and sand on the “bottom” of the flowerpot to form a drainage system.
- Lay the soil. Plant flowers.
Such flower beds made from plastic bottles are easy to construct and easy to maintain.
Hanging flowerbed
Make holes in two-liter bottles, fill with soil and plant seedlings. And hang the bottles themselves vertically along the wall.
Take some time out of your busy schedule and celebrate the floral world by creating bottle beds and contributing to the beauty and sustainability of the environment.
Artificial swan flower beds
From plastic blanks you can make not only decorative fences or pots, but also the flowers themselves. Plastic swans in the garden would be a very interesting idea. To work you will need to prepare:
- Several plastic bottles of various sizes.
- White paint and brushes.
- Decor elements.
- Scheme for making figures and the imagination of the master.
With the right approach, it’s easy to make a flower bed from plastic bottles in the shape of hedgehogs, birds, and other interesting figures with your own hands.
Such models will delight their owners with a stylish design and original pattern all year round; they do not require special care and are very durable.
Flower bed design ideas
Flower beds decorated with bottles can have a wide variety of shapes and appearance:
Hanging
You can easily build a vertical hanging flower bed from plastic bottles. All you need to do is cut the bottle lengthwise or cut a wide rectangular hole in its side, and then fill it with soil. After that, all that remains is to hang it or attach it to the wall.
Longline
Such a flowerbed in its shape resembles a pyramid, consisting of several tiers. It can be made from both plastic and glass bottles. The number of levels can be any and is chosen arbitrarily.
The process of making a tiered flower bed is extremely simple:
First of all, you need to determine the boundaries of the flowerbed and make markings. A groove 8-10 cm deep is formed along the contour, into which bottles filled with sand are placed. For greater strength, you can tighten the structure with metal wire.
When the lower tier is ready, soil must be poured inside it and compacted thoroughly. After this, the boundary of the second level is outlined, slightly smaller than the previous one. This tier is built in the same way as all subsequent ones.
Important! Bottles of the same volume are selected for each tier.
Flowerbed in the form of a mosaic
This model also does not include the use of fresh flowers. To create a mosaic flower bed you need:
- Prepare a plan diagram for the arrangement of flower garden elements.
- Paint the bottles in different colors according to the main drawing.
- Bury the bottles in the ground with their necks down, placing them along the pattern.
This flower bed is very simple in its implementation.
Choosing paint to decorate bottles
Today there are the following types of paints:
- Acrylic types. Rich saturated color. Absolutely safe for humans.
- Aerosol models. Very easy to apply, but to give a glossy shine you need to apply a layer of clear varnish.
- Enamel. Most often used for pre-coating workpieces before main painting. Gives plastic additional strength.
- Stained glass paints. Used to decorate small elements of artificial flower beds.
The choice of paint depends on the model of the flower bed, its size and shape, as well as the general style of the garden area.
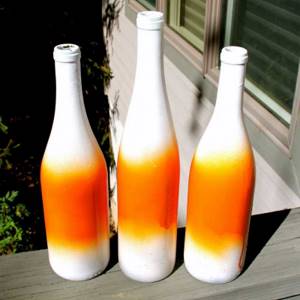
Bottle painting methods
Today, there are several main methods of painting plastic and glass blanks:
- Classic brushes allow you to conveniently apply paint or varnish to a plastic surface.
- Spray can. Fast spraying of paint and an even layer on the surface of the bottle. However, the use of a respirator is required when working.
- Foam sponge. Helps apply color combinations when forming a design on the bottle.

Regardless of what kind of flower beds you plan to create in your garden plot - from plastic or glass bottles, an artificial flower garden will give the area an interesting appearance.

In addition, artificial flower beds do not require careful care, which determines their particular popularity among designers and summer residents.
Procedure for preparing materials
To make a standard flower bed, 1.5 and 2-liter bottles of carbonated drinks, beer, fermented milk products, etc. are suitable. The denser the plastic of the bottle, the stronger and more durable the fence will be. For the border, it is better to use colored containers; in extreme cases, they can be pre-painted. When forming the fence of a simple flower bed, bottles of the same size or color are used, and when creating “mosaic” fences, you can combine containers of different types and colors to create a pattern. Here you must adhere to the chosen alternation pattern so that the border has a neat appearance. Before using the bottle, you must remove the label and wash it. You can paint the inside of containers by simply pouring paint into it and shaking well. Such bottles will retain their color longer than those painted on the outside.