Loading…
Loading…
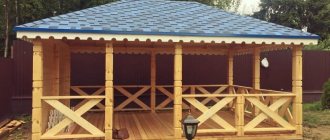
Many owners of private houses are thinking about building a place where they can relax in the fresh air. A metal gazebo is the best possible option. Such a structure will not only make you healthier, but will also create a wonderful place for reflection. In the gazebo you can sit with friends, relax on your own, put a barbecue there and grill kebabs. The main thing is that all this is in the fresh air and close to your home.
Making a gazebo from metal is a long process, but quite simple. You need to have drawings with you and know what exactly you want to see. Why metal? The characteristics of this material speak for themselves. It is strong, reliable, and can serve its owner for many years. Wood has long been out of fashion, because it is affected by insects and precipitation. What can you say about iron gazebos?
A metal gazebo canopy is another important element that you can also make with your own hands. Theoretically, you can create many different units; they will complement the overall design and make use more convenient. But first you need to decide on the types of metal gazebos. They are different, the frame and design features may differ.
On the topic: do-it-yourself gazebo made of wood, drawings, dimensions and photos!
DIY metal garden gazebo - varieties
The manufacture of metal gazebos begins with the creation of drawings.
And before them you need to think and choose the best option. To do this, you need to understand all the features of your garden and site. If it is large, then the gazebo can be large with extensions. When space is small, you can make a small structure. Summer gazebos made of metal are small but cozy, ideal when resources are limited. So, gazebos can be of different shapes, all this is decided by the owner when creating the drawings. Round, square, elongated, diamond-shaped and so on. It all depends on the surrounding area and taste. The drawings of the metal gazebo frame are also different, because it is installed in several ways:
- Special wells are drilled under the racks into which pipes are inserted. Next, the holes are filled with crushed stone, the level of the pipes is leveled, everything is compacted and filled with concrete.
- The structure always has several vertical pipes that need to be concreted directly into the ground. They represent a support on which other elements rest. If you use this method, then a foundation is not needed. You can make a bottom trim, which will create a floor. But a popular option is paving slabs or bare concrete. Metal poles for gazebos need to be purchased in specialized stores.
- The second method is to create a foundation. It is located at a shallow depth and belongs to the columnar or ribbon variety. Sometimes you can pour a monolithic slab and lay out the entire area with tiles. The frame must be constructed separately, and then installed and secured on top of the foundation. The lower trim and drains are ready - it’s time to install. Collapsible metal gazebos are very popular, because they can be transported in an emergency, but they weigh a fair amount.

Many people ask about which option is better. Everything here is individual and depends strictly on the situation. The first option is more reliable and stronger, because the racks are literally walled up in the ground. And it costs less, because there is no need to create a lower frame and foundation, which allows you to save personal funds. But if you don’t create a floor, then this is just a summer gazebo, the structure will be open. For the closed version, the second method is more suitable.
Gazebo configurations
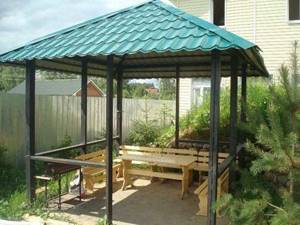
Garden and park structures for recreation, as a rule, have a quadrangular or hexagonal shape, but there are also octagonal options. The more angles in the frame, the more complex the assembly process, but such designs look more original.
Polycarbonate is suitable for covering a round-shaped gazebo, which bends easily and allows you to create arched and spherical structures.
To create an enclosed space, the walls are completely sheathed - such buildings are protected from the negative effects of weather conditions. In turn, open gazebos allow you to enjoy unity with nature and fresh air.
How to build a gazebo with your own hands from metal - assembly options
Metal is always joined by welding, practically. This method is in great demand due to the reliability of the design in the future, as well as the speed of work. But if you want a small summer gazebo, then you can consider the option of a collapsible structure. If your site is not guarded, then a large amount of iron may attract the attention of thieves. And rest assured, even though it weighs a lot, they will figure out how to steal it.
You can weld a metal gazebo with your own hands, but it’s better to make additional protection. The design has several modules that need to be welded together. Then connect them with special bolts. This can be done with a collapsible gazebo, which is a metal frame with an awning and a small roof.
How to weld a gazebo of this type? The prefabricated model begins to be created from the frame. First you need to make it for each side, and then assemble it with bolts and secure it.
A do-it-yourself welded gazebo is very easy to assemble. The frame needs to be divided into several faces. If it has a quadrangular shape, then there will be a similar number. Four separate circuits are created, they have jumpers on them. If the shape is hexagonal, then you need the same number of elements.
What are the advantages of metal gazebos?
The main advantage of metal gazebos is that they can be installed on absolutely any soil, even unstable. Moreover, if desired, some varieties of such structures, unlike the same wooden ones, can be moved from place to place.
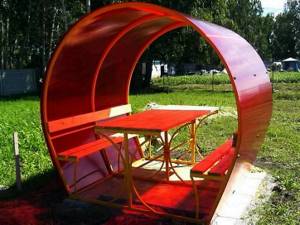
The second advantage of such structures as gazebos for summer cottages made of metal is the variety of designs and a very aesthetic appearance. Typically, such structures have an unusually beautiful, original shape. If desired, you can choose an option that is ideally suited to the design of the site, both in classical and modern, folk and almost any other style.
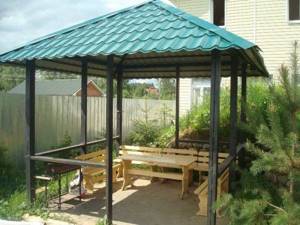
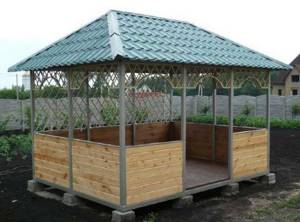
Photos of metal gazebos, comfortable and beautiful:
1
Another advantage of metal structures is their extraordinary strength and durability. A steel gazebo will not become covered with a white coating of mold, like a wooden one, will not begin to rot and will never be damaged by insects. At the same time, iron structures are much cheaper than chopped and cobblestone ones. They are also much easier to assemble.
Types of materials used
Often gazebos are created from profile pipes. Working with such material is very simple; you do not need to be a qualified builder. Welding a gazebo with your own hands from a profile will not be difficult if you have at least a little knowledge of welding. The main problems that may arise during use appear at the manufacturing stage. Unevenness, incorrect seams and other troubles.
The wall in such gazebos is at least 2 mm. Also, do not forget that you can create a gazebo from round pipes. This option should have a similar thickness. But it’s difficult to cook them; you need experience. There are also advantages - the price of such metal is significantly lower than the profile version.
It is also worth considering the option with a metal corner. Here the thickness is slightly higher - 3 mm. A gazebo made from a corner has less rigidity, so more material is used. With the right approach, the visual characteristics of this option will look better than all analogues.
The angle and profile pipe are made of aluminum, not steel. Therefore, their weight is less, which is ideal for collapsible gazebos. But the price is much higher.
Projects and design
Before building an iron gazebo, you need to choose a suitable project.
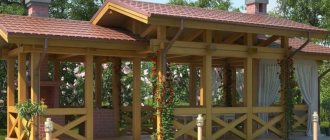
Combined with house
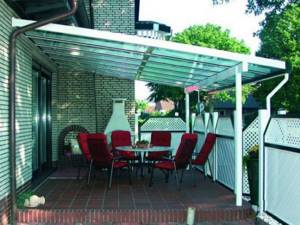
Gazebo attached to the house
This arrangement of the gazebo is acceptable if the dacha plot is not large in size. This leaves more space in the garden or yard. The advantage of this option is the convenient location of the dining area. In addition, less material is used for construction.
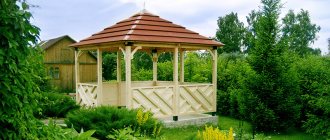
Separate
It is better to make a gazebo with a metal grill separate. The shape of such a structure can be round, rectangular or square. Choose it taking into account the location of the grill. To install it, you need to assemble a complete frame. It is better to weld metal elements together.
Unusual shape
Non-standard options include octagonal gazebos, structures with a domed roof, and stylized buildings. They require more materials and certain construction skills, so they will cost more.
Design
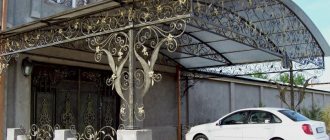
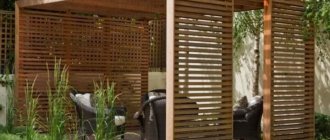
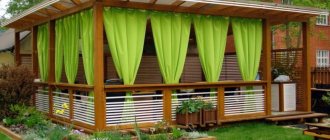
The design of the frame structure must fit into the overall design of the area around the house. The simplest type of decoration is forged elements. If you can’t make them yourself, you can purchase ready-made products to suit every taste. To decorate the summer version of the gazebo, fabric is used: curtains, drapes.
Frequent decorations of the design are fresh flowers and climbing plants. Lanterns can be hung under the roof.
The choice of decor depends on the type of building, its purpose, the design style used and the financial capabilities of the owner.
Gazebo made of metal pipes - creating a place to relax
We will tell you how to make a gazebo from a profile pipe. This is an excellent option, the material is very strong and reliable. But it’s expensive, so you’ll have to spend money. But you can’t skimp on such things, because they can last you for decades. Reliability, excellent visual characteristics, long service life - these are just some of the advantages for owners of such a building.
Building a metal garden gazebo with your own hands begins with acquiring all the necessary materials. So, the profile pipe comes in different sizes and you should choose:
- If you want to make a light roof from corrugated sheets, metal tiles or bitumen tiles, slate, then 50 by 50 mm is an excellent option.
- A roof made of heavy slate and tiles will put pressure on the structure, in which case consider dimensions of 75 by 75 mm.
Jumpers do not require a thick profile, so dimensions can range from 20 to 30 mm. But everything is individual, the design can be large, then the thickness can easily reach 50 mm. The cross-section also depends on the dimensions of the building. Also take into account the weight of the finishing material that will be used to cover the frame of the metal gazebo.
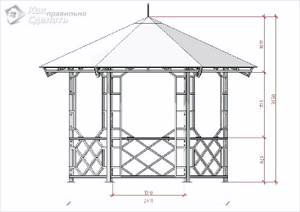
To make a square gazebo as in the photo above, you need to use the following list of materials:
- pipes for piping 50*50*2 mm - 12 meters;
- profile pipes for the lintel:
- 40*40*2 mm - 14 meters;
- 20*20*2 mm - 6 meters;
- 40*20*2 - 30 meters;
- metal strips 20*4 mm, 2 m long.
Metal gazebo - create markings and install
Now let's get to the most important thing - the beginning of construction. Select a suitable area on your site. In general, it needs to be prepared in advance, but this is not a problem. If grass grows there, then the top layer of fertile soil must be removed. Otherwise, all the vegetation will begin to rot right under your floor. In this case, the unpleasant odor will persist for years.
We dig out a pit, which must have strict dimensions according to the drawings. Focus on them, only in this case the gazebo will turn out to be of high quality. If the soil is dry, then fill it with sand or soil from the site. In the case of clay consistency, then you need to fill everything with a similar material - clay. You need to create your own drawings of metal gazebos yourself, but you can also use an example.
Pipes can be immediately installed in the ground; in this case, they need to be well primed. Next you need to drill several holes, each no more than 90 centimeters deep. The width depends on your tools. If the drill is wide, then the diameter will be appropriate. We insert a pipe into the hole and fill it with a large amount of crushed stone.
Instead of crushed stone, you can use construction waste to save on materials.
After the container is filled with crushed stone or construction waste, the pipes must be carefully aligned. This process must be carried out by several people, because stability and the entire final result as a whole depend on it. Next, the crushed stone must be thoroughly compacted. It is advisable to secure the pipes so that they do not tilt to one side. We pour the concrete solution on top; it must be liquid in order to seep inside well.
If you are thinking of checking the installation level of the rack with a building level, then you are very mistaken. This must be done with a special plumb line, because it has less error. Therefore, acquire these tools in advance. Also pay attention to the magnetic plumb line, in the body of which a small magnet is placed. The advantage is that it is easy to use - you just apply it to the desired place and it sticks there.
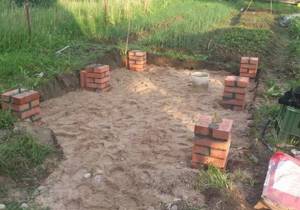
If you want to raise the level of the gazebo from the ground, you can use foundation blocks, which are very popular. Just cut several small elements with dimensions of 200*200*400 mm into two pieces. Use a good grinder; the disc should be diamond-coated. You will receive several cubes that need to be distributed over the entire area of the future gazebo.
One in each corner and four more in between. Place them in a checkerboard pattern, 4 pieces each. Below we suggest looking at the picture that shows the location of the blocks. This will help you understand it and execute it one to one. The blocks in the middle make the structure more rigid; the pipe will not bend under the weight. But without support, this can happen at any moment.
Metal gazebo - interesting facts and the next stage
Concrete is excellent at drawing out moisture, so we recommend lubricating it with bitumen mastic on all sides. You can also use resin if you have this raw material on your site. There is no point in buying it, then mastic is better. You can also lay out several rows of roofing felt. But the quality of this material is very low; after a couple of years it will completely crumble.
All blocks must be placed on the same level. To maintain the accuracy of each angle, we advise you to use small pegs as well as threads. We stretch them and thus check the diagonals and dimensions. Each top of the block should be in the same plane so that the gazebo does not turn out crooked or skewed. How to do it?
- We stretch several threads, check and align them, then align the blocks evenly.
- You can use slats, or rather boards. We put a level on it, it should have a small error and be checked. Each block must be set to this level.
- A laser level will also work. But the weather must be cloudy or cloudy; the sun will not allow you to work with it. Visibility will be minimal, although now there are laser levels that solve this problem.
If each pipe is fixed into the ground in advance, then you will not have to place blocks, and this will save a lot of time.
Making the bottom trim and racks
Several sections of square pipes need to be mounted on the exposed blocks. We recommend using a profile pipe with dimensions of 50 by 50 mm. If more than 10 people will gather in the gazebo, then it is better to take a larger option. Also expect that the thinner the profile pipe, the shorter the service life.
All pipes are laid, then you need to check them horizontally with a level. Weld the entire structure in each corner. You need to make a couple of jumpers from a pipe with dimensions of 40 by 20 mm; they, in turn, will create support between the floor boards and the foundation.
Each pipe must be carefully painted using a primer. Pay special attention to weld seams. The racks have a height of 220 centimeters, this allows you to “not prop up” the roof with your head. These elements can weigh a lot, so they need to be secured additionally. Mounting jibs are an ideal option that can simply be welded and make the structure more rigid.
You need to place the pole straight and check everything using a special plumb line. Again, a magnetic option would be ideal. Each jib must be clamped with a clamp. The pillars will stand almost firmly, at which time you can carry out welding work. An assistant is not needed, at most for insurance, but you can do without it. Boil the pipe around the perimeter, and then further, along with the jibs.
Create the railings and top railing
The ideal height of the railing is a meter, but in some cases it can be less. The railings in general are not the main detail; you can do without them. But the design will look unfinished and raw. In this case, you can simply glaze everything with polycarbonate. These are modern railings. Sometimes an opaque finish is used to cover a certain part of the gazebo from prying eyes.
The middle frame of the railing is best made from a pipe with a diameter of 40 by 20, the cross-section is similar to the top frame. You can weld a couple of posts between them to improve the load-bearing capacity of the structure.
Finish - creating a roof
Roofing is the last stage in our work. For example, if you use bitumen shingles, then the rafter structure can be wooden. The frame can be made of a simple block with dimensions of 75 by 40 mm; for the sheathing we use soft tiles. That is, lining, this will make the visual characteristics more attractive.
You need to hammer several pieces of wood into each end of the drain so that the plug goes inside the pipe 10 centimeters and this is the minimum. The piece sticks out 5-7 centimeters from the top. The rafters need to be attached to them. If they are too long, they can be cut almost completely. We leave a small part, in case you need to cut a corner.
How to secure the rafters from above?
We cut out four pairs of wooden rafters, the length is two and a half meters. They need to be combined with each other as in the picture above. The height from zero to the top point will be a meter. Don't connect everything at once, start with two, then add one at a time. The wood needs to be impregnated with an antiseptic and cut off at the bottom corner, that is, on the ground. After all, working with the rafters at the top will be inconvenient.
We place an auxiliary board in the center, and nail a block onto it, again in the center. The length of the latter is no less than 85 centimeters. Now the entire structure needs to be raised to the top of the gazebo. The top rests on a block - this is the rule. We center the entire structure, using a plumb line we check the verticality and distances from the center to the stop of each leg of the frame. We attach the rafters to each plug, remove the board and trim, and install the sheathing.
And remember that we just gave a standard example of a do-it-yourself metal gazebo. You can choose each material, dimensions and much more yourself. We recommend that you refer to this article, this will help you do the job correctly. But you shouldn’t make it your drawing. Consider your own desires, the characteristics of the site, the climate of your area, soil strength and financial capabilities.
Calculation of material and size of the gazebo
First of all, it is necessary to purchase materials. For gazebo posts you need the following profile pipes:
- 50×50 mm if slate, bitumen tiles, metal tiles or corrugated sheets will be laid on the roof;
- 75x75 mm if tiles or slate will be laid on the roof.
For jumpers, a thinner profile can be used: 50×50 mm – maximum, minimum – 20×30 mm. If you plan to build a large gazebo, then accordingly it is better to take a larger profile section and vice versa. Also consider the weight of the material with which the frame of the gazebo will be sheathed.
To make a square metal gazebo with a size of 3000×3000 mm and a post height of 2200 mm, you will need the following set of materials:
- pipes for piping 12 m – 50×50×2 mm;
- profile pipe for jumpers in the following name: 30 m – 40×20×2 mm, 6 m – 20×20×2 mm and 14 m – 40×40×2 mm.
- metal strips 2 m 20×4 mm.
Tips for purchasing materials
Having developed the drawings of the gazebo, you can begin purchasing materials. It is advisable to make a full purchase so that in the midst of work you do not have to stop everything and rush headlong to the construction market. It is necessary to take into account the tools and consumables.
For a gazebo measuring 3x3 m you need:
- profile pipes with a cross section of 75x75x2 mm, from which the racks are made;
- pipes with a cross section of 75x75x2 mm for piping;
- pipes 50x50x2 mm and smaller cross-section for jumpers;
- steel strip 4 mm thick to make gussets or jibs.
Often in markets, for a fee, the client cuts the material to specified dimensions. Don’t waste money on this, it will pay off - you won’t have to hire a long length during transportation, and there won’t be any problems with storing a long profile pipe.
In addition, cutting metal is an unsafe activity; let professionals do it in an equipped place. When welding a gazebo, you will understand the usefulness of this advice.
Types and methods of assembly
In addition to different shapes - rectangular, hexagonal, octagonal, round - the metal frame can be installed in two different ways:
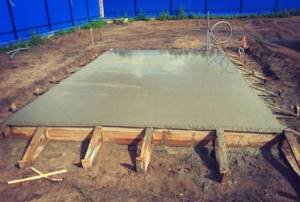
- The vertical pipes of the frame are concreted into the ground. The rest of the structure is then attached to these racks. With this method, the presence of a foundation is not provided. In principle, having made the lower frame at some distance from the ground, you can lay the floor, but most often with this method of making an iron gazebo, the platform is concreted or paving slabs are laid out.
Wells are drilled under the metal racks, a pipe is inserted, and the empty space is filled with crushed stone. The pipe is aligned straight, the crushed stone is compacted, then filled with liquid concrete
- First, a shallow columnar or strip foundation is made, sometimes a monolithic slab is poured, the area is laid out with tiles, etc. The frame is constructed separately and secured after at least the lower frame and racks are ready. If the foundation is columnar or strip, the pipe is placed on it and connected in place: only a crane can lift the finished structure.
This is a gazebo made of a profile pipe on posts
Which way is better? It depends from which side you look. If from the point of view of fastening reliability, the first one is better: the racks are walled up. This option is also more economical: there is no bottom trim and no costs for making a foundation. But such a structure, if it is without a floor, is only a summer gazebo. For winter, closed, you will need a floor.
A gazebo on a foundation is better from the point of view that it initially assumes the presence of a floor. In addition, the elevation, even if it is small, protects against splashes and dirt getting inside.
Assembly methods
Traditionally, metal is joined by welding. It's fast and reliable. But in the case of a country summer gazebo, a collapsible structure may be needed. After all, it is very unsafe to leave a large amount of iron in an unguarded dacha for the winter. In the sense that it could easily be stolen. In this case, the modules are welded, which are then connected to each other with bolts. As a rule, such collapsible metal gazebos consist of a frame to which an awning is attached, or other similar quickly mounted or dismantled fencing and the same lightweight roof.
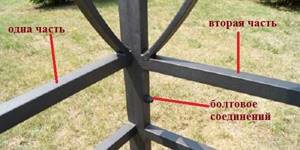
For a prefabricated metal gazebo, frames for each side are welded separately, then assembled with bolts
The frame in collapsible gazebos is divided along its edges. If it is quadrangular, four separate circuits are welded with all the necessary jumpers. In hexagons there are six of them, etc.
Key points in preparing for the welding process
Assembly of racks with transverse parts and decorative filling is carried out by welding. To do this, you will need a small-sized conventional or inverter welding machine. Models operating from a household electrical network are suitable. When working with welding machines of any type, arc welding safety precautions must be observed.
An important element is the choice of electrodes for welding. One of the best options is the use of ANO-4 anodes, intended for welding carbon steels in which the carbon content does not exceed 0.25%. These are brands - St. 3, St. 10, St. 20 of small thickness. Electrodes of this type ensure the formation of a high-quality weld with good resistance to the formation of porosity and hot cracks. For beginners, you can use inexpensive universal brands ANO-21, ANO-36. The diameter of the electrodes is selected depending on the thickness of the metal being welded. The most commonly used electrodes are 3 mm in diameter.
The current strength is selected by the electrode. When using a welding transformer, you can choose the current based on the following calculation: per 1 mm of diameter - 30-40 A. And if you use a welding inverter, then for an electrode with a diameter of 3 mm, 80 A is the maximum value, and for a diameter of 2 mm the current is sufficient - 20-30 A. Important - the electrodes must be recently purchased, old ones may be damp.
Before starting welding work, the metal must be prepared for welding. The surface of the elements to be welded must be cleaned manually with sandpaper, a metal brush or a grinder with a grinding wheel.
Thanks to hydrogen welding, you can work in a safe environment and produce excellent results. Cold forging is a very interesting and very creative activity. You can read more in this article.
Metal buildings are very durable and reliable, and besides, you can make them yourself. Detailed instructions at https://elsvarkin.ru/prakticheskoe-primenenie/stroeniya-iz-metalla-dlya-doma-i-dachi/ link.
Step by step construction
Before proceeding directly to construction, it is necessary to prepare the site chosen for it. To do this, the top layer of soil, about 15 cm thick, is removed from the area and carefully leveled. Next, markings are applied, namely: the location points of the supports are determined (they must be on the same line, and their distance from each other is adjusted by calculations in the drawing). This operation is carried out using stakes installed in the corners of the future building and rope. After this, you can proceed directly to the construction of the gazebo.
Foundation
A gazebo, the dimensions of which do not exceed 4x6 m, does not need much strengthening, and therefore a columnar foundation would be the best option.
Find out in more detail how to strengthen the gazebo so that it does not wobble, using a columnar foundation.
For this:
- Using a garden drill, you need to make a funnel about 50 cm deep in the corners. The bottom should be covered with a layer of sand 5 cm thick.
- Next, install supports with reinforcing bars welded at the ends.
- The voids between the walls of the recess and the pillars must be filled with concrete, making sure that they maintain a clearly vertical position.
- After pouring, it takes several days for the solution to completely dry and thoroughly fix the supports.
If the dimensions exceed the standard ones or a barbecue is to be installed, a strip foundation will need to be poured.
To do this you need:
- Dig a trench at least 50 cm deep.
- Build wooden formwork along its perimeter.
- Fill the inside of the formwork with a layer of crushed stone about 5 cm, and then mount the frame from the reinforcement.
- Pour concrete over the reinforcement.
Basic rules for safe welding work
Safety precautions when welding require mandatory compliance with the following rules:
- All welding work must be carried out in well-ventilated spaces. This is especially true if the electrode materials or base metal contain chromium and nickel. That is, if you are working with stainless steel. The safest from a health point of view are electrodes with rutile coating. They produce a minimal amount of gaseous emissions and have reduced sparking. If exhalation of vapors cannot be avoided, use a protective mask with filters.
- To avoid hot metal particles getting into your eyes, beat off a fresh seam while wearing a protective mask or goggles. You also need a mask to work with an angle grinder.
- Do not handle the product after welding. Elements can be hot, even those remote from the welding zone.
- If you work with unbuttoned clothing, you may suffer arc burns. According to the rules, clothes must be tightly buttoned, sleeves tucked into gauntlets, boots must be tight with tied laces. Clothing must be dry and free of oil stains. You should wear a woolen hat on your head.
- Do not carry out work in the rain. Remember that you are working with electric current and it would be a good idea to place a rubber mat under your feet.
- Wires cannot be extended. The reliability of each contact should be monitored. Otherwise, an arc may occur in the most unexpected place.
- Ensure compliance with fire safety regulations. It is best to place all used electrodes in a bucket of water. When working with flammable structures, asbestos sheets must be used to protect them. Primary fire protection equipment must be located near the work site.