Peculiarities
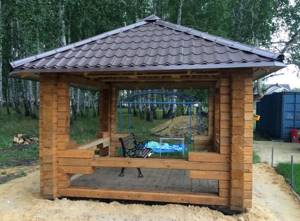
Wooden gazebos for summer cottages are more common than metal or brick ones. They make outdoor recreation more enjoyable, easily combine with any landscape design, and decorate the site. Many summer residents choose wooden beams for construction. This material has many advantages:
- Wood is an environmentally friendly material. It combines well with other buildings on the suburban area.
- Wooden beams are a cheap building material. The cost of processing it is minimal. Therefore, the construction of the frame is inexpensive.
- Assembling walls from bars is easy for beginners with minimal builder experience.
- It takes several days to build a gazebo from timber.
Wood is not a durable material. Every few years, a structure made of bars is coated with special products to prevent rotting and damage by pests. Then, with timely treatment, the gazebo will last for several decades.
Brick gazebo with grill and barbecue
For those who are more of a mason than a carpenter at heart, we offer step-by-step instructions for building a gazebo with a brick barbecue. Let's skip the steps of finding a location and marking the structure. All this was described above. Let's get straight to the point.
Construction of a brick gazebo with barbecue. Step by step instructions
The brick structure will weigh quite a lot, so this time the foundation must be made solid and reinforced. After it is ready, we lay the walls.
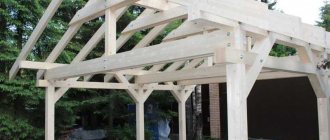
The rafter system can be made in the same way as for a wooden gazebo.
It is better to lay out the first row dry.
We are building a firewood shed . It will also be the basis for the barbecue and smokehouse.
We continue to lay out the brick barbecue with our own hands. Next up is the firebox and tabletop. If desired, you can arrange a niche for dishes.
DIY gazebo with barbecue. Step by step photos
For the cauldron we will need to install a stove . Below is an option with removable rings.
The barbecue base is ready. It's time to lay out the fireclay brick .
a fire-resistant mixture in the masonry .
The next stage of building a gazebo with a brick barbecue with your own hands is organizing a chimney and forming a channel for the smokehouse.
a Russian stove in our gazebo . We form a pod for her.
Each row must be reinforced with wire .
We put up the walls at the same time. We check the accuracy of the work using a level.
We are finishing the stove vault .
In our case, the back wall of the oven had to be pulled out.
The work will take quite a lot of time, but the progress will warm the soul.
We continue to build a brick barbecue with our own hands. We install the smokehouse doors . We finish the arches over the barbecue, hob and stove.
You can always entrust the stitching to an assistant.
A stainless steel mesh can be installed above the stove . In the future, it will be good to dry berries and mushrooms or dishes on it.
We recommend: How to quickly and efficiently build a permanent terrace?
We have already described how to sew up a roof.
Do-it-yourself gazebo with barbecue and barbecue. Photo
This concludes the step-by-step instructions for building a brick barbecue. The gazebo-barbecue complex is ready for delivery.
We supply water to the sink from behind the gazebo.
It can be covered for the winter. the pipe three-channel.
This way the traction will be more stable. Don't forget to cover the entire masonry with a special impregnation with a water-repellent effect .
It will take about a week to dry the structure. At this point, the construction of a gazebo with a brick barbecue with your own hands is completed.
Materials
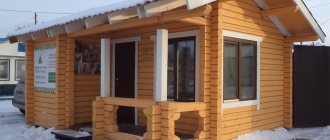
To make a simple but beautiful gazebo, different types of timber are used. This material does not require complex finishing methods. A structure made from it looks beautiful and retains its strength for decades if properly processed. Traditional elements such as balusters, gratings, and slats are suitable for decorating buildings made from this material.
Profiled
This material is one of the most common. Gazebos and other summer cottage buildings are often made from it. It takes little time and energy to build a frame from it. After all the work is completed, the finished walls have almost no large gaps or noticeable cracks. Due to the characteristics of the material, the joining occurs very accurately. Wood is an environmentally friendly material. The timber does not emit toxic substances even when burning.
During the production of parts for construction, wood is subjected to complex processing in several stages. It is dried in chambers that provide optimal humidity. Because of this, the structure made of profiled bars retains its correct geometric shape for a long time. A special drying method destroys fungi and microorganisms that destroy wood fibers.
Advice! When using bars that have dried naturally, it is treated with special antiseptic impregnations that prevent rotting.
Properly processed profiled timber successfully withstands temperature changes, high humidity and wind load. The profile is made so that no moisture gets into the assembled structure. The wood structure contains microscopic pores through which air penetrates into the building.
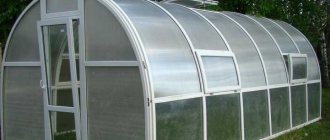
Glued
Along with profiled timber, glued timber is often used for the construction of gazebos. Its basis is made up of lamella boards connected to each other with a special compound. Buildings made from it are especially attractive. The material has a small mass. Therefore, the construction does not require a capital foundation. Like other types of wooden building materials, laminated veneer lumber does not emit hazardous substances. Building a gazebo from it takes little time.
One of the disadvantages of laminated veneer lumber is the cracks that appear on the end parts of the material. They do not impair performance, but make buildings less beautiful. Bars glued together from boards are less resistant to temperature changes characteristic of the Russian climate.
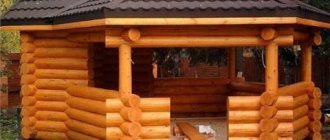
Rounded
Construction of a summer house from rounded logs takes little time. They are easy to process, retain heat well inside the room and provide air access. The disadvantage of round logs is their heavy weight. Therefore, a house made of rounded logs is built on a reinforced foundation. After some time, gaps form between the elements. Therefore, careful sealing of the seams is necessary.
Mini beam
Some summer residents build gazebos from mini-timbers. The material is ordinary wooden boards, 145 mm wide and 45 mm thick. For ease of assembly, the elements are equipped with a tongue-and-groove locking system.
Advantages of mini beams:
- ease of assembly;
- with proper processing, the design remains attractive for a long time;
- the locking system is very reliable;
- there is no need to adjust the building material to size;
- there is no need to finish the finished building inside and out;
- good thermal insulation qualities;
- neat, aesthetic appearance of the finished structure.
Beam size 100 by 100
This material is inexpensive. Therefore, it is used in many ready-made models for self-assembly. It successfully withstands heavy loads. Therefore, for a gazebo built with your own hands from 100x100 timber, it is possible to install a massive roof. The structure of such elements is reliable and simple, although it does not have high aesthetic value.
Beam with a section of 150 by 150
The material is massive and very durable. It successfully withstands the weight of a heavy roof. A beam with a section of 150x150 looks larger and has more mass. During construction, the consumption of such building material is very high. Therefore, in order to save money, it is cut in half. For an ordinary summer house, the use of bars of such a large cross-section in the construction is impractical.
Material with a section of 150 by 50
This type of timber is especially popular and is often used in the construction of gazebos. For country houses, it is used in the construction of the rafter system and for laying the floor. The top trim is also made from this timber so as not to waste excess building material on the roof.
How to assemble a gazebo
The most convenient way is to create step-by-step instructions for yourself and follow them step by step. Then it is impossible to confuse anything or make a mistake. In this review we will look at how to assemble a gazebo from 100x100 timber with your own hands, but the work is the same for all options. There are several stages, if you look at each one separately, then everything is simple and clear.
Prepare a project
It’s better not to just take pictures or photos; it’s impossible to evaluate all the design features from them. It is worth preparing a full-fledged drawing or sketch; there is no need to create an ideal project; a diagram with detailed dimensions of all parts will suffice. If you buy a ready-made kit, there will be drawings with parameters; all you have to do is study them carefully. If you draw on your own, remember the following:
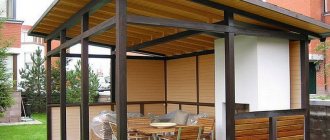
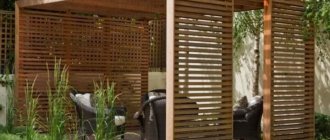
- Determine the type of structure. The open one is used in the summer for outdoor recreation. Semi-open is used if it is necessary to limit the view from the road and neighboring areas. It is possible to relax indoors both in summer and in the off-season, or even in winter, if you install a stove or special heaters inside.
- Choose a place on the site. Find the area on which to build the structure. There are several important points to consider. Firstly, ensure convenient access, secondly, select dimensions that will ensure comfort, thirdly, take into account the parameters of the lumber. Usually they come in lengths of 3, 4.5 and 6 meters, so that there is no waste, it is better to choose a project with these dimensions.
- Prepare a drawing indicating all important points. In addition to the type of construction, as well as dimensions, take into account the height, think about what to make the roof from, and what kind of floor to lay. If there are additions, such as a hearth or stove, create a safe area, protect the wood with trim, or lay out a portion of brick.
- Make a foundation project separately. Pay attention to the places under the support pillars if the structure is columnar or made of concrete foundation blocks. Consider the depth of the bookmark. If you build a hearth, then make a separate base for it, not connected to the base of the gazebo.
When purchasing a ready-made gazebo, you still need to assess the location on the site, take measurements and determine the appropriate parameters. If you do not measure the space, it may turn out that the purchased gazebo will clutter the space, make it difficult to pass through, or shade the beds.
Manufacturers can make a gazebo project from timber according to the buyer’s request. Drawings and dimensions are individual, made in one copy, this option is 30% or more more expensive.
Prepare the site and make the foundation
When choosing a site for construction, take into account the type of soil, the depth of groundwater, and the height of the site. It is better to place the gazebo on a hill so that the base is not flooded by water in the spring. Leave a passage for the car, if necessary, think about how to lay a path to the gazebo. Carry out the work like this:
- Measure the area and figure out where it is best to place the structure. Remember about the indentations - you cannot place them closer than 1 meter to the fence of the site. It is better not to place it near other buildings or under a large tree, since moss will form on the roof there from constant shading and dampness.
- Place pegs in the corners of the future building. Drive in pegs for guidance and stretch construction cord or simple twine between them. Check the diagonals to make sure the markings are straight. If the sides are long, add pegs in the middle to keep the cord tight.
- Dig a trench or holes for the foundation. Dig a trench to a depth of 20 to 40 cm, taking into account the type of soil, as well as the weight of the structure. Dig holes under the posts in the place where the vertical supports will be located. For reliability, add several supports in the middle; then it is convenient to lay floor joists on them.
- Place the formwork, it should be no less than 20 cm above ground level. If blocks are placed, then display the appropriate height. Stones or broken bricks can be poured into the foundation as filler to save concrete. On soft soils, it is better to install a reinforcement cage to prevent the base from cracking.
- Leave the concrete to gain strength. Allow at least 2 weeks before starting the next part of the work. It is better to cover the surface with film so that the water does not evaporate and the material dries evenly.
Important!
If you prepare a solution from 1 part cement, 3 parts gravel and 3 parts crushed stone, then you do not need filler in the pits.
When pouring, be sure to pull the cord horizontally for guidance. Otherwise, you will then have to add some supports, and some, on the contrary, will have to be cut off in order to place the structure on a level base.
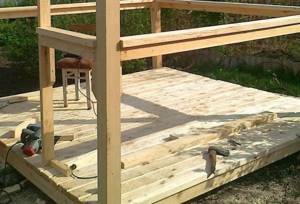
Secure the bottom trim and joists
Make the base from a strong beam, it will support the weight of the entire gazebo. Typically, elements with a cross-section of 150x150 mm are used, and the same material is chosen as for the rest of the structure. They can be pre-treated with bitumen or mastic on the bottom and inside to protect them from dampness. Carry out the work like this:
- Make cuts along the edges of the beam to half the depth along the width of the elements. That is, cut the upper part in one part, and the lower part in the second, to connect tightly at the junction. Try it on and, if necessary, modify the joints. Be sure to measure diagonally to make sure the harness lies evenly.
- Fasten the parts with self-tapping screws or special screws, they are called wood grouse. Drill a hole 2-3 mm smaller than the diameter of the fastener and tighten the joint in 2-3 places. Add perforated corners on the inside for additional rigidity, screw them in with thin self-tapping screws.
- Prepare floor joists. Use a beam with a cross-section of 150x50 mm, measure the length and cut pieces of the required size. Place no further than 80 cm from each other. Make an indent of no more than 30 cm from the edges. They must be laid perpendicular to the location of the floor board.
- Secure the joists. They use different installation options: either regular nails, which need to be driven in diagonally, or self-tapping screws, which also need to be screwed in at an angle. But it’s easier to buy steel beam supports or use corners, they are much more convenient and stronger. When laying, control the plane; the easiest way is to pull the cord in 2-3 places.
Do not forget to treat all lower parts with an antiseptic. The easiest way is to apply it with a brush in 2-3 layers. But it’s best to make a hole in the ground, cover it with oilcloth, pour antiseptic into it and dip the timber. The composition will be absorbed much deeper, so it will protect the tree for decades.
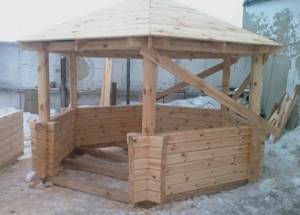
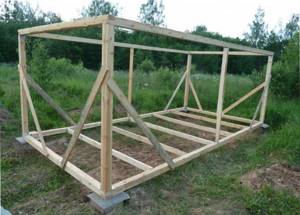
Assemble walls or install supports
If the gazebo is closed or semi-open, then build the lower part according to the instructions. Select elements according to their markings and place them one on top of the other. An open structure needs to be assembled differently: install vertical posts, then fasten them. Features of the work:
- When assembling walls from timber, study the instructions, find the parts with the indicated markings, and arrange them so that you can quickly find what you need. Lay out in order, align the ends, fasten from bottom to top. In a closed gazebo, be sure to seal the joints with tow or special tape.
- When installing racks, install one element at a time. Work together to simultaneously check the vertical with a level and fix it in the desired position. Use steel angles on both sides. Secure the supports with braces and remove them after installing the top trim.
- Carry out work on days without rain. There should be no water in the joints, otherwise the material will begin to rot in a couple of years. If it starts to rain after assembly, it is advisable to cover the frame, if this can be done.
- Use self-tapping screws for fastening; they are stronger than nails; the connections will not loosen over time. For installation, it is better to pre-drill holes, especially if the fasteners are long.
When assembling walls from simple timber yourself, it is important to cut even pieces. The most convenient way is to make a pattern from a lath, then measure with it. When installing vertical posts, it is advisable to measure the diagonals; if there is a difference, it is easier to correct the inaccuracy at this stage.
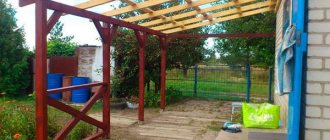
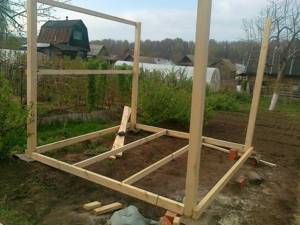
Install the top trim
Make the base for the roofing system separately, do not place it on the top beam of the wall. When assembling the open version, use a beam of the same cross-section as for the lower trim. Prepare it in the same way - cut the ends in half to connect the parts at the corners. The step-by-step process looks like this:
- Carefully place all four elements on the structure. Check the diagonals with a tape measure, correct the position if there is a run-up. Make sure that the beam lies well; if somewhere the surface is uneven, correct it so that the parts fit snugly against each other.
- Drill holes from top to bottom for cap screws. Choose a length so that the fastener enters the base no less than 10 cm. Choose a recess at the top so that the screw head does not protrude beyond the surface. Tighten carefully so as not to turn the fastener into the wood at the end.
- Add 1-2 corners at each corner to strengthen the structure. Screw them in with self-tapping screws no less than 5 cm long.
Important!
You can get by with just the corners. But in this case, you need to choose elements with a width of at least 100 mm and a thickness of 2 mm or more.
Build a roof structure
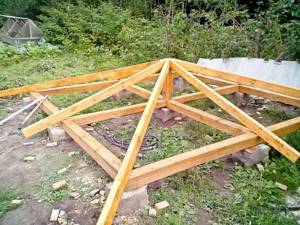
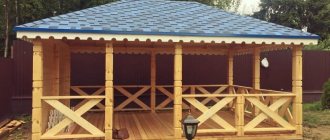
Make the roof slope at least 30 degrees. Then the water will drain well, and the snow will not linger and create a load in winter. Choose a design that is easy to assemble, especially if the master is a beginner and has little experience in the work. Remember the following:
- It is easier to connect spans on the ground. Make one element first, make sure it fits properly, then prepare the rest. If the roof is hipped, then you need to assemble it locally and prepare the parts below according to size.
- Secure the rafter structure with angles and steel plates. Set it exactly, level it, then fix it. Make sure that the part does not move during installation.
- Lay a sheathing of boards or slats with a thickness of at least 25 mm. Make a small distance between the parts so that the flooring is rigid. Use self-tapping screws for installation.
- Cut and secure moisture-resistant plywood or OSB board if soft roofing will be installed. When installing, leave a 2-3 mm gap between the sheets so that they can expand during temperature changes.
- Lay roofing material. It is most convenient to use bituminous shingles, lay them from bottom to top according to the instructions on the package. Cover the skates with special elements.
It is better to lay the roof on a warm, clear day. Choose fasteners recommended by the roofing material manufacturer. It is advisable to install a drainage system so that when it rains, water does not flood the entrance and prevent you from entering inside.
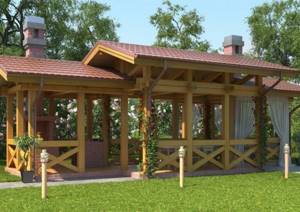
Projects of gazebos made of timber
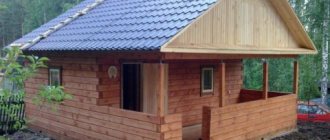
Before starting construction of a summerhouse, the best place for it is determined. A good choice would be a site next to a natural or man-made body of water. The building is oriented so that its windows offer the most beautiful view of the site. To keep it warm and light inside, one of the sides should be well lit by the sun.
Important!
There are no plans to build a large gazebo on a small summer cottage. Otherwise, they clutter up an already small area.
To build a gazebo with a barbecue, carefully choose a place taking into account the direction of the wind. For the hearth in the diagram and design, a separate foundation is provided that is not connected to the base of the walls. The picture shows the location of all the details of the building: furniture, barbecue or stove. Large stoves and barbecues are placed in the corners of the building; on the contrary, there is a dining area.
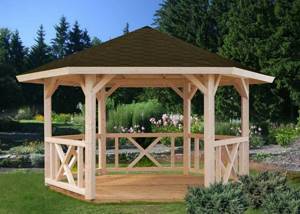
The designs and sizes of country gazebos vary. The location of the elements inside and other features of the project depend on the length and width of the building. The shape of the building is preliminarily determined. If the gazebo is spacious, they provide an area for household needs and the possibility of glazing.
According to the shape of the gazebo they make:
- rectangular;
- square;
- round;
- in the shape of a polygon.
Additionally, the sketch indicates the general appearance of the roof. The following options are possible:
- single slope;
- gable;
- tent;
- hip;
- multi-slope.
Flooring
The floor in the gazebo must be protected from precipitation, rotting, frost-resistant, and resistant to mechanical damage. In the same time:
- look aesthetically pleasing;
- be safe;
- cause pleasant tactile sensations from touch.
Stone is a cold, heavy material, wood requires periodic, painstaking care, and expensive composite decking boards are extremely fragile in the cold and are often made from low-quality polymers.
Note!
Often, wooden gazebos use floorboards made of pine, spruce or larch.
Floorboard sizes vary from manufacturer to manufacturer, the most common are:
- length from 3 to 6 m;
- width 8-13.5 cm;
- thickness 28-40 mm.
Wooden floorboards can be tongue-and-groove, edged or decked:
- A tongue-and-groove board means that it has a special “tongue and groove” fastening at the ends. By joining the ends along the entire length and forming a reliable lock, the connection is tight and without cracks.
- Deck or deck board is a wooden flooring with a variety of surface shapes that can be smooth or grooved.
- The difference between an edged board and a regular one is the absence of a wane (part of the side surface of the log that remains after sawing it). In other words, edged board is an ordinary unplaned board from a sawmill.
May be interesting Do-it-yourself decorative cover for a septic tank: original ideas with photos Garden gazebos: varieties, materials, amazing ideas with photos Peat toilet for a summer house, which is better?
There are four ways to attach tongue and groove floorboards:
- on nails, followed by filling the heads with textured wood putty;
- fastening with self-tapping screws into the groove of the board;
- fastening with clamps (fastening brackets intended for hidden installation);
- use of nails with decorative heads.
There are two ways to attach larch deck or terrace boards:
- using special hidden fasteners;
- using special self-tapping screws for stainless steel terraces.
After installing the boards, antiseptic treatment of the wood is carried out. If necessary, grind the surface and then coat it with varnish or paint.