How to make devices for arranging a tandoor
Such accessories for tandoors are sold in stores . But they are easy to make with your own hands. This will save money. In addition, homemade tandoor accessories are better suited for a specific device.
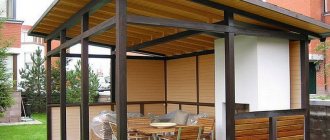
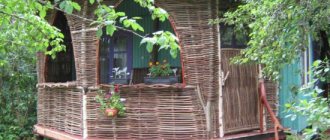
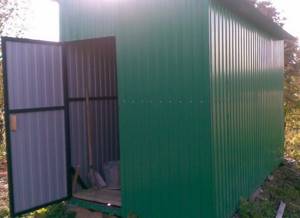
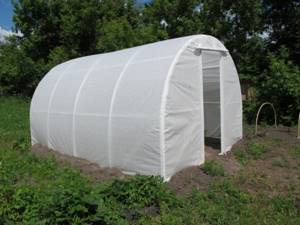
Do-it-yourself canopy or umbrella at the dacha
The purpose of a canopy or umbrella is to protect both the stove itself and the person who cooks on it from the rain. A roof wouldn't hurt a person even on a hot sunny day .
For this, a small canopy, the size of which is about 2-3 meters, will be sufficient . The support will be 4 pillars. If one of the sides of the roof is enlarged, a small seating area will fit nearby.
Then you won’t have to carry the prepared dishes far. But in this case, more supports for the structure will be needed. They are placed every 2-3 meters . The exact distance between supports depends on the weight of the roof.
When lighting a tandoor, the fire can rise quite high . Therefore, the canopy is made about 3-3.5 m high.
The materials for the canopy are non-flammable to ensure fire safety. Therefore, the supports are made of metal, and polycarbonate, metal tiles, slate , etc. are used for the roof.
Reference! of roofing material are suitable for construction . In this case, the canopy will fit better into the local area.
To install support posts for a canopy, do the following:
- Mark places for supports.
- Dig holes about a meter deep.
- Place a layer of sand and compact it thoroughly.
- Place a profile pipe and secure with guy wires. Using a level, check that the supports are strictly vertical.
- Fill the holes with concrete .
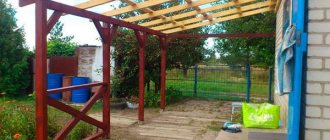
The racks for the canopy on one side are made 30-50 cm higher than on the other. Thanks to this, water and snow will not accumulate on the roof.
It will take 2-3 weeks for the concrete to completely harden . After this, you can assemble the canopy roof:
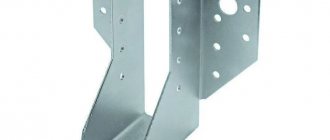
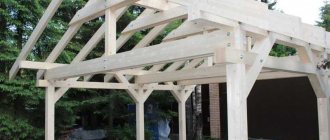
- Weld metal pipes to the posts to form a square or rectangle.
- Add additional cross beams . The step between the beams should not exceed 2 meters.
- Cut the roofing material to the required size.
- Fasten the sheets to the beams.
The method of fastening the sheets depends on the type of material.
Case
A case is used to protect portable devices. is stored in it and transported if necessary.
Fabric covers protect the tandoor from moisture and dust . Therefore, their manufacture requires a waterproof material that is easy to clean from dirt.
Reference! Modern synthetic fabrics, for example, dense polyester, from which tents and awnings are made, have similar qualities.
The easiest option is to sew a tandoor cover from two pieces of fabric . The bottom of this accessory is round, and the neck of the case is tightened with a thick rope or strap.
Photo 1. Ready-made cover for tandoor, height – 100 mm, diameter – 65 mm, Ukraine.
To sew a cover for a tandoor:
- 2 rectangles from the fabric which will be 20-30 cm larger than the height and width of the tandoor itself.
- Sew the 2 short sides in a semicircle .
- Connect the long sides
- Fold the remaining sides 1.5-2 cm and hem. Leave a small hole so you can thread the twine through.
- Trim excess fabric.
- Turn the product right side out and insert the rope .
How to make a stand
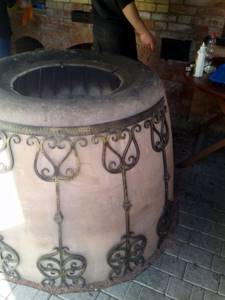
Portable devices cannot be placed directly on the ground, so special heat-resistant tandoor stands are made for them. To make the stands not only comfortable, but also beautiful, it is better to make them from separate forged elements.
Do-it-yourself barbecue canopy: step-by-step instructions
Grilling shish kebab is a ritual observed by true connoisseurs of meat cooked in the fresh air, as reverently as the Japanese organize their tea parties. Gourmets will not be delighted if the process is interrupted by cold rain. A barbecue canopy will save the situation. What it is, what the features of such structures are, we will tell you in our review.
Brazier and its varieties
To understand the issue, you need to have an idea of all the initial conditions. Here we come up against the grill itself. In the classical sense, it is a metal box, 15-20 centimeters high, where the griller lights the coals and prepares food on them.
The same structure, but made of brick, is usually called a “barbecue.” The meat cooked there undergoes the same heat treatment and does not differ in taste from that fried on the grill.
And finally, the third vessel, suitable for preparing shish kebab, is called a tandoor. It is a huge ceramic jug with a firebox at the base. Skewers with meat are lowered into the container where cooking occurs.
The one thing that braziers have in common is a source of open flame. It may be flooded with rain or cause a fire. But there are differences. Tandoor and stone grill are stationary areas. These braziers cannot be put in the trunk or taken into the wild, while metal (iron) structures are more mobile. That’s why we immediately think about options and settle on stationary ones.
Types of barbecue canopies
So, it is necessary to build a “roof” for the brick or steel brazier that the owners plan to place in the garden. The design depends on what kind of canopy is needed: on the barbecue so that it does not drip or behind the collar. Here, traditionally, you can choose two ways:
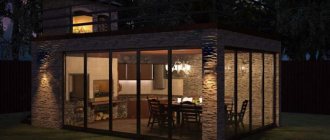
- Build a real pavilion where you can place an outdoor grill and an entire kitchen with appliances and a dining table. This is convenient, especially when cooking barbecue means a collective process carried out by a certain number of cooks.
- Make a barbecue canopy in the form of a small canopy that protects the brazier itself, ideally the one who is fiddling with the skewers.
In the first case, you will have to make a good investment: pour a strip or monolithic foundation, build a permanent roof, take care of an exhaust hood or a full-fledged chimney (pipe). A summer kitchen is a serious structure; problems with its construction arise at the stage of choosing a suitable plot of land.
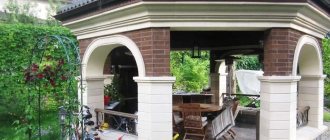
In the second option, too much spending is not expected. Sheds for a barbecue house for a summer residence did not drive anyone into loans. But here you need to understand that in this case you still can’t do without a gazebo or an open veranda. You either already have a similar summer dining room, or sooner or later you will have to start building it.
No less interesting than the design is the division of barbecue shelters according to the type of materials used. Theoretically, stone, wood, and metal can be used as such. In practice, timber (board) cannot come into contact with fire.
They are used when arranging spacious sheds for preparing barbecue (read: summer kitchens) in combination with stone aprons that protect lumber from its destructive proximity to fire.
On the street, under a spacious wooden canopy, if you really want to, you can even build a Russian stove, but is it worth it?
Look at the awnings over the barbecue area. In them, brick or cobblestones are always adjacent to a lath or timber.
It's a completely different story for metal hearth canopies. If you look at the photo, you will see non-bulky, self-sufficient structures. They almost always do without stone, and wood is used for decoration and functional inserts, but in such small quantities that it cannot become the root cause of a fire. We will now start making the structure.
DIY canopy
There are many models of canopies on the market that are installed over a country barbecue. But they almost always ask for more than they are worth. Therefore, we propose to save money by making such protection against precipitation with your own hands. We will display the semantic part of the process graphically, so follow the photo diagrams.
It is important to have the necessary set of tools and be able to use them. You will need:
- electric welding machine;
- pipe bender;
- electric drill;
- Bulgarian;
- roulette;
- square;
- marker;
- brush (spray gun).
From materials:
- sheet material 10 mm thick;
- sheet steel 1.3 mm thick;
- profile pipe with a cross section of 40×40 mm;
- profile pipe with a cross section of 40×20 mm;
- profile pipe with a cross section of 30×20 mm;
- steel rod with a cross section of 10×10 mm;
- wooden table top.
We take a profile 40×20 mm. We bend it with a pipe bender so that on a segment of 1750 mm the bending depth is 180 mm. You will need two blanks. Further from the 40x40 mm pipe, cut off two more sections 1750 mm long, connect the whole thing into two racks.
To give the structure working rigidity, weld two jumpers. For them, take the same profile with a cross section of 20×40 mm
To add volume to the structure, connect the racks with two rods made of forty profile and one from a pipe with a cross-section of 40x20 mm. Dimensions and location are shown in the diagram.
Two arcs with a span of 2 meters and a deflection depth of 450 mm will help to outline the contours of the roofing part of the canopy. On the back side, the structure must be tied with a rod 1320 mm long, but on the front side this cannot be done.
As a sheathing, use a profile of a smaller cross-section, for example, 30 × 20 mm (20 × 20 mm). It will take 4 trims.
Please note: on the side where the grill will be, we placed three battens, and on the opposite side - one. The meaning of such “savings” will become clear only after installing the “cap”. In fact, this is not an exclusive decorative attribute, but a kind of chimney.
After scalding the frame with sheet steel, the picture will look like this.
The next material you will have to work with is a metal rod with a cross-section of 10×10 mm. First make a harness out of it.
And sew it up with this simple pattern.
It's time to install a pre-prepared brazier made of centimeter steel.
Now we need to smooth out all the welds and coat the structure with heat-resistant paint.
Install the countertop and anchor the canopy to the deck covering. Job is done. For today we say - see you soon on the pages of the blog “Modern Estate”.
Source: https://sovusadba.ru/postroiki/navesy/kak-za-odin-den-sdelat-naves-dlya-mangala-iz-metalla.html
Gazebo with tandoor and barbecue: photos, prices, construction
The gazebo has long ceased to be an ordinary place for relaxation and gatherings. Now it’s interesting to cook food almost next to the feast. This can be done with the help of a tandoor and a barbecue complex, which may include it.
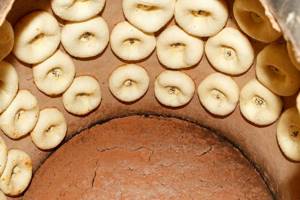
Tandoor is a jug-shaped device for cooking. It belongs to Asian culture, although it is currently widespread throughout the world. You can use it to fry meat, bake bread and prepare other dishes.
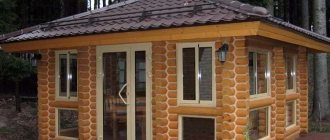
Below we will show the most successful examples of gazebos with a tandoor, which can stand either separately or as part of a large stove complex. Let's consider full-fledged construction taking into account fire safety requirements, and also estimate the average prices for the finished option.
About other accessories
Lid stand
The thing is irreplaceable. It does not need to be purchased only if it has a hinged lid mechanism or its own stand, where you can safely put the lid.
Cover for tandoor
It is recommended to cover all tandoors with a cover, so this is one of the necessary accessories
Heat-cutting stone
An accessory designed to make life easier. You don't have to wait a lot of time for the tandoor to cool down. It comes with some tandoors
Examples of gazebos with tandoors
Undoubtedly, the proposed cooking option is not as common as a classic grill or barbecue. It is preferred only by knowledgeable people who are already familiar with this method of cooking and get a kick out of it.
Therefore, before even considering purchasing such a device, it is highly recommended that you familiarize yourself with it somewhere with friends or in an establishment. Quite a few places offer tandoori food, so finding one shouldn't be difficult.
I was given a tour of a regular kebab shop in the city center, so I am very familiar with this “thing” and the food cooked on it.
Having decided to install a tandoor in the gazebo or next to it, you will get a very original fireplace that will be extremely interesting to guests and acquaintances. Perhaps you will be the only people in your life who feed someone from this particular oven.
There is nothing overly complicated or unpleasant about this installation. It’s just unusual for us, lovers of barbecue and charcoal-baked fish, so doubts creep into our heads: “Do I need all this at all?” I’ll ask a counter question: “Why not?”
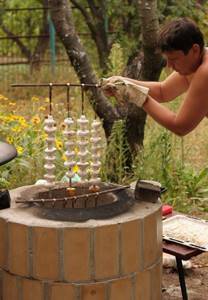
Tandoor in the Uzbek way: step by step progress
The optimal way to make an overseas stove with your own hands involves the use of improvised means - a wooden barrel. It will allow you to easily achieve the required cylindrical shape of the product. It’s good if you can choose an option made of oak.
To use it in construction, the barrel will have to be prepared. The item selected is slightly larger than the expected finished oven. It is convenient to do the preparation while the clay mixture is “ripening”.
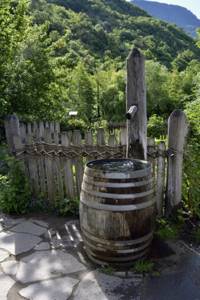
A barrel with pre-loosened iron rings is filled to the top with water. In this way, the wooden frame lasts up to 5 days. During this period, the necessary swelling of the wood occurs. After the scheduled period, the barrel is emptied. The noticeably heavier object turns upside down.
Next, you should dry the product a little. 1 day is enough for this. The next step will be treating the inner surface of the barrel with sunflower oil.
No need to skimp on consumables. The quality of the finished tandoor for the dacha depends on the thoroughness of processing. The oiled base is left to soak for another 1 day.
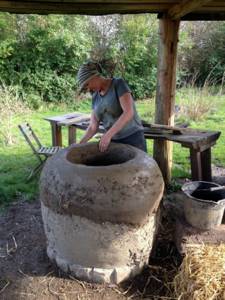
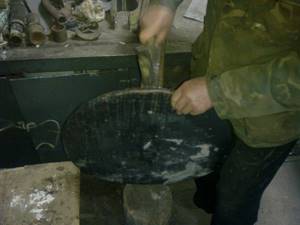
After all the preparatory work, the crucial moment of sculpting the tandoor comes. To do this, it is necessary to roll sausages from the matured clay mixture, approximately 7 cm in diameter and about 50 cm long. The resulting blanks are rolled into ribbons and cut according to the dimensions of the wooden base.
The finished strips fill the entire interior space of the barrel. They should be placed in such a way that the working material overlaps. At the same time, in the upper region of the product, not just an overlap is made, but a narrowing is simulated. This will be required for the oven to function properly. The appearance of the finished tandoor resembles a jug.
Building a tandoor on your own
I would like to say a few words about the construction of a tandoor. Like all types of ovens, it requires certain knowledge and skills or simply following the instructions. If you don’t want to take risks with construction, then you can always buy a ready-made option. We'll talk about prices a little later.
First, I would like to provide video instructions from Alexey Kandalov , who showed step by step the construction of a tandoor in his dacha. I suggest adopting someone else’s experience and studying their approach to this process.
Foundation
A small monolithic platform made of concrete mortar is used for the foundation. It is made with reinforcement, in this case massive steel rods are used.
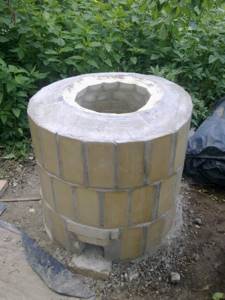
Bricklaying
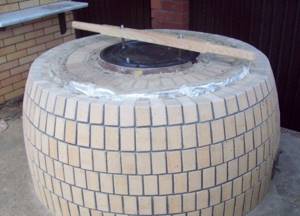
Fireclay bricks and refractory composition for furnaces are used for construction.
The width of the lower internal base is 60 cm, and the upper one is 40 cm. The masonry is made in three layers.
Thermal insulation
To preserve heat, the outer surface is sheathed with mineral wool (ursa), then pressed with mesh and finished with mortar.
Final finishing, firebox and decoration
A practical ready-made tandoor must be supplemented with a metal grid on top, on which skewers with food will be hung. Additionally, it is necessary to make lids to retain heat (during cooking) and protect from rain.
Finally, a little decoration never hurts. The owner decided to use shells.
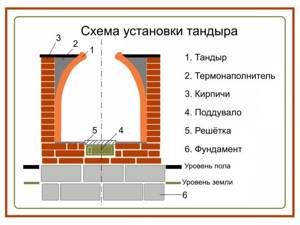
Drawings with dimensions
As it turned out, building a tandoor is even easier than finding decent drawings for it. We selected the project, installation diagram, as well as the dimensions of all its components. Pay attention to the upper and lower diameters, as they are different for all masters.
How to choose?
Tandoor hoods come in a wide variety. Umbrellas are offered in different sizes and from different materials. If it is necessary to obtain a specific design and size of the device, it is possible to order the production of a hood according to individual measurements. You can also find beautiful, decorated devices from private entrepreneurs, small sellers, and craftsmen in your city.
What is important to consider when choosing:
- The size of the hood should correspond to the size of the tandoor - not exceed its area, but also not be small. If you have to make a choice in one direction, then take a slightly larger hood.
- The island type is suitable for those who install a tandoor in a room with the ability to bring the pipe through the roof or connect it to an existing combustion waste disposal system. For other cases, it will be more convenient to mount it to the wall - the wall type.
- Stainless steel is a priority. This material, although heavy, is reliable and durable. Some manufacturers make more economical models of umbrellas from fragile materials. However, during operation, deformations are observed, which is explained by the constant exposure to substances contained in smoke and high temperatures. The result is that the condition of the hood deteriorates, its surface is deformed (even despite the absence of mechanical damage), and functionality deteriorates.
- Copper is suitable for use as a final coating. With its help, a beautiful decorative layer is created, which is quite stable and easy to clean. Such models are also quite suitable for choice.
Read also: Polycarbonate canopy pictures
Manufacturers and prices
Here are examples of umbrellas that are sold on the stove equipment market.
Exhaust umbrella D100:
- Price: 1,430 rubles.
- Manufacturer: Alfa-Steel (Russia).
- Mounting type: hinged.
- Dimensions: height 50 cm, diameter 50-60 cm.
Dome umbrella ZVNK:
- Price: 4,200 rubles.
- Manufacturer: Gamart (Russia).
- Material: stainless steel.
- Type: dome.
- Dimensions: diameter 40 cm, height 40 cm.
AISI exhaust hood:
- Price: 9,000 rubles.
- Manufacturer: Russia.
- Material: AISI 430 stainless steel, gloss 0.5 mm.
- Type: dome.
- Dimensions: width 1 m, length 1 m, height 40 cm.
- Powerful large model. It is recommended to install for large tandoors, which are used in private kitchens, cafes, and restaurants. Can be used in the home.
Cost of finished tandoor
On the Internet you can find many stores that offer tandoors at a variety of prices. In general, its manufacture does not require much material or effort, however, there is an opportunity to buy a ready-made version.
I will give prices from, which offer tandoors from 8 to 30 thousand rubles. The main indicators are the weight of the structure and its dimensions. We do not advertise, we simply recommend what is good in our subjective opinion.
To purchase a stove, please contact this company.
Armenian tandoor: secrets of making it yourself
The construction of a stove in the Armenian style begins with the preparation of drawings. It is difficult to produce this design option without using ready-made circuits. You can always find drawings of tandoors on useful resources, such as our portal.
There are many varieties of Armenian stoves. The location of the tandoor can be above ground or underground. This can be a camera with a horizontal or vertical orientation. The easiest way is to make a standard block installed above the ground.
Making a tandoor from brick begins with preparing the materials necessary for the work:
- sand;
- clay;
- cement;
- brick.
Preliminary work also includes choosing the location of the future furnace. If it is planned to build a stationary installation, then it would not be superfluous to provide shelter in the form of a canopy. After choosing a suitable location, the main work begins:
Construction of the foundation. To create a solid base (especially in the case of a large tandoor), a standard version of a concrete mixture is used.
A recess is first constructed and filled with gravel and sand. A solution based on sand and cement is placed on top of such a “cushion”. A foundation constructed in this way will require time to dry (2-3 days).
According to the drawings, markings are made and the brickwork begins to be created. The first row is made with a hole for blowing. Subsequent lines are made according to the drawings, focusing on the need to gradually narrow the furnace.
The finished brickwork is coated on all sides with fireproof clay. The seams are filled with dry material. The outer surface is treated with a creamy solution. For decorative finishing, you can use ceramic tiles, small stones, and broken glass.
After waiting for the clay to dry completely, test kindling is performed. Small brushwood is used as fuel. Prolonged heating will allow the clay to burn and harden. Next, the tandoor is used as usual.
The production of the Armenian version of the stove can be simplified using a template (cauldron or barrel).
Building an Armenian or Uzbek stove with your own hands is not such a difficult task. The main thing is to strictly follow the instructions. And looking through a photo of a tandoor made by yourself, you understand what a beautiful thing the end result can be.
How to make a tandoor in the country and a canopy for it with your own hands?
From our material you will learn how to make a tandoor at your dacha with your own hands, as well as how to build a canopy over it, the nuances of construction and installation.
Have you decided to install a homemade tandoor in the ground at your dacha? An excellent solution, because thanks to this oven you can bake flatbreads, bake, fry or smoke meat, fish, and prepare vegetable dishes. And in general, such a stove is universal. It’s also economical, since you only need a little wood to kindle it, and it holds the heat for quite a long time.
Tandoor is a traditional Asian oven, the design and capabilities of which are determined by living conditions in Asia. There is little fuel, large families - it was necessary to come up with a universal hearth that could be lit with a minimum of wood, but cook a lot of food.
The traditional tandoor is built from a mixture of fireclay clay and sheep's wool, but the technology for making it is difficult for a beginner. Therefore, if you want to make a proper stationary tandoor in the garden with your own hands, you should pay attention to simpler options. There are a lot of them.
Basic criteria for choosing a tandoor for home and garden
In many respects, the choice should be based on personal needs, for which it is useful to know about the available sizes of roasters and their design features that may influence this, for example, the width of the neck. Otherwise, you should pay attention to the overall quality of the product and the consistency of its individual elements.
Types of tandoors
There are several dozen varieties of tandoors, but in a global sense there are stationary and mobile (portable) ovens. The first ones have impressive dimensions and weight (from 200 to 1000 kg), are mounted directly on the ground or a previously prepared foundation, and trained stove masters are involved in their assembly. Stationary tandoors are popular in the commercial segment (restaurants, cafes, snack bars), where performance is important. In the private sector, they prefer modern mobile ovens, the selection and operation of which will be discussed further.
For ease of segmentation, portable tandoors are divided into three types according to their weight.
- A small tandoor (up to 50 kg) can easily fit in the trunk of a car, and one person is enough to transport it. Good for outdoor trips, starts up quickly, satisfies the needs of a company of 4-5 eaters.
- A medium tandoor (from 50 to 100 kg) is a fail-safe option for hospitable hosts or a large family of 8-10 people. Such a stove can be easily moved around a suburban area, adapting to weather conditions.
- A large tandoor (from 100-150 kg) is the best choice for infrequent but crowded meetings. It requires 3-4 people to move or the use of special equipment, so it is usually installed at the workplace at the beginning of the summer season, and removed under a canopy for the winter.
Mobile tandoors are usually equipped with a forged frame and handles for easy transportation.
Materials and quality
A mobile tandoor must be made of high-quality fireclay clay , without the admixture of cement and other materials. This clay is characterized by high heat capacity, fire resistance, food safety and long service life. The surface of the oven must be uniform, without visible foreign inclusions. You should also pay attention to the quality of the welds of the steel frame around the entire perimeter of the body. This element determines how strong and durable your tandoor will be. The thickness of the steel strips must be at least 4 mm .
The wall thickness of a good small or medium tandoor is at least 30 mm , and a large one is 50-70 mm or even more. Wall thickness directly affects the heat capacity of the furnace. This is why large tandoors retain heat for up to 3.5 hours, while small ones allow you to cook in it for only about 1.5 hours. True, this time is enough to bake in it up to 3 servings of thick pieces of shish kebab or a couple of whole chickens and even a leg of lamb, if the oven has the appropriate size. But thick-walled braziers allow them to be used in winter.
Capacity
In many ways, the size of a tandoor is determined by its shape, of which there are quite a few. It can be spherical, cylindrical-conical, oval, in the form of a jug (ogival shape) or a barrel, and even a straight pipe. A standard Uzbek tandoor has a neck with a diameter of 0.35-0.7 of the inner diameter of its lower back; in Tatar ones it is wider - already 0.5-1.0.
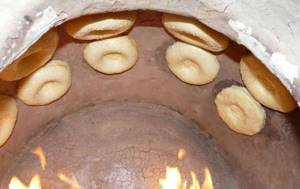
Ovens with a narrow neck (up to 25 cm) are effective in roasting meat and fish. A large tandoor with a 30 cm neck will allow you to bake large pieces of meat entirely, for example, a leg of lamb or a poultry carcass. Hemispherical and cylindrical-conical roasting pans with a very wide neck are good for baking: it is convenient to mold lumps of dough onto the large inner surface, the container is appropriate. But this is already an option for a stationary structure.
The internal volume of the firebox and the width of the neck also determine the size of the cooking accessories. Small mobile tandoors with a neck diameter of 21-25 cm usually hold no more than 8 skewers, which is enough to simultaneously feed a small family of 4-6 people. The average tandoor usually has a larger neck, about 31-34 cm, which allows the simultaneous use of 12 long skewers (for about 8-10 eaters) and additional cooking accessories, such as multi-level grates, herringbones, grill plates and hooks for hanging large pieces of meat.
Large ovens with a 35+ cm neck hold 16-20 skewers and can feed a large crowd. They weigh a lot, so their mobility is quite limited. In medium and large jug tandoors it is relatively comfortable to cook flatbreads (especially with a baking stone) - small ones are not suitable for this.
Type of fuel
The gold standard is wood. But not every tree is suitable. In Central and Central Asia, saxaul is used to fire tandoors, which grows only there and has ideal qualities for this. Sometimes elm and plane tree wood is used. Of the last two, only the plane tree can be found here, but it is considered a valuable plant and is not allowed for firewood.
In Russia, eastern stoves are heated with wood, which is suitable for lighting barbecues and grills. These are mainly beech, hornbeam, acacia, ash, birch or fruit trees for additional aroma (cherry and apple are especially good for this). Softwood firewood is not suitable because it is carcinogenic due to its resins when burned. Charcoal is also not suitable - its intense heat can lead to cracks in the tandoor, which are almost impossible to repair. Coal generally saturates the walls of the furnace with stinking coke gases and it can only be thrown away.
Electric tandoors are also popular, where heating is carried out by powerful heating elements. They are, of course, good indoors, but it would not be fair to compare them with real wood-burning roasters. Heating elements dry out the air, causing baked goods and other foods to dry out or even burn. In a wood-burning tandar, when heated, moisture accumulates in the walls of the oven, and during cooking it gradually returns to the firebox, maintaining an ideal microclimate in it - the dishes turn out juicy and do not burn.
True, there are advanced models of electric tandoors, where heating is carried out by an electric coil wrapped around a standard clay vessel and insulated with a reliable thermal screen. Moisture is supplied to them in portions, controlled by high-precision electronics. Their prices are appropriate.
You can rarely find gas tandoors, which are in demand in catering establishments. They are convenient and practical, but also not much different from a regular oven. Then it’s better to buy a high-quality gas grill - it has much more possibilities.
Thermal lock
Heat loss in mobile tandoors is mainly minimized by a neck with a thermal lock and an additional ring made of fireclay clay. The lid, usually two-piece, also serves the same purpose - a small cap on top will allow you to create draft or look into the fryer without losing heat for long cooking. It is good if the handles of the lid are framed with insulating material, for example, leather, which makes it possible to remove it without gloves.
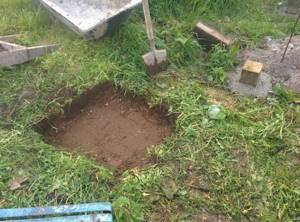
Do-it-yourself tandoor in the ground
This is probably the most traditional option, because in Asia such ovens are built in the ground. But you need to take into account that you will have to install a tandoor on the site permanently, so the installation location must be chosen carefully. This should be a hill with dense, stable soil and a low groundwater level. There should be no trees or other vegetation around. These are all the requirements.
How to make a tandoor in the ground? Immediately dig a hole. Its dimensions depend on the desired capacity of the furnace, but the standard is a depth of about a meter, a width of about 50 cm. The bottom of the pit is compacted and filled with 10 cm of sand, which also needs to be compacted. A steel grate is laid on a sand bed and filled with concrete. The base for the oven is ready after the solution has completely hardened.
The second stage is laying out the walls of a homemade tandoor. This requires fireclay bricks and clay mortar for masonry (it is better to take ready-made ones for stoves). A regular circle is drawn on the base, and the first row is laid out along it. A hole is left in it for installing an asbestos-cement pipe - it is needed to supply air to the firebox. The pipe is installed at a slope of 45 degrees. The pipe is completely covered with soil, one end is located next to the firebox, the second is brought out above the ground. A damper must be attached to the open end to block the air flow.
Next, lay out the second row, shifting the bricks halfway, lay the grates and continue laying. The eighth row is laid out with a 0.5 cm shift of bricks, and such a shift should be in each row - the top of the tandoor should have a dome shape. As a result, with a base diameter of 1 m, the neck of the furnace should have a diameter of 0.5 m. The above-ground part should be about 25 cm high. After erecting the walls, the furnace is thoroughly coated with clay inside and out. After the first layer has dried, another layer of clay mixed with straw is applied to the outside. The resulting space between the walls of the tandoor and the pit is filled with sand, clay or even salt (the material must accumulate heat).
Do-it-yourself tandoor - step-by-step instructions for quick production at home (100 photos)
Oriental dishes are gaining popularity year after year. Everyone likes food prepared by a professional chef. Attempts to realize masterpieces with one’s own hands often fail. It's not a matter of lack of skill, but of the necessary devices. For example, the right tandoor will be an excellent addition to a summer cottage or country house.
It will make it much easier to cook flatbreads, shish kebab or pilaf. It is not difficult to implement the idea of building such a stove with your own hands. You just need to carefully study the technology for constructing a suitable option.
Uzbek model: economical and practical construction
The version of the stove invented by the Uzbeks is suitable for particularly zealous owners. A single addition of fuel will allow the cooking process to take place within 3 hours. Creating a design takes time, but does not require significant expenses. Thanks to this technology, it will be possible to create a stationary or mobile tandoor.
The Uzbek stove model can vary significantly depending on the wealth of the owner and the region in which it is used. The main material for making the structure is clay. There are special fittings inside (inserts made of kaolin or refractory bricks).
A pitcher-shaped clay tandoor is the most economical choice. It allows you to be as careful as possible with fuel consumption.
To create the base, they use not only a special type of clay (“live”, with a high content of kaolin), but also animal wool (camel or sheep). Both materials are mixed, the resulting composition is aged for about a week. Time allows the solution to “mature”. At the same time, daily intervention in this process is inevitable: the composition needs to be “stirred”.
The finished material, aged for a week, is used to sculpt the base of the furnace. There are plenty of technologies for this. We will consider the most common and affordable way to make a tandoor oven yourself below.
Tandoor in the Uzbek way: step by step progress
The optimal way to make an overseas stove with your own hands involves the use of improvised means - a wooden barrel. It will allow you to easily achieve the required cylindrical shape of the product. It’s good if you can choose an option made of oak.
To use it in construction, the barrel will have to be prepared. The item selected is slightly larger than the expected finished oven. It is convenient to do the preparation while the clay mixture is “ripening”.
A barrel with pre-loosened iron rings is filled to the top with water. In this way, the wooden frame lasts up to 5 days. During this period, the necessary swelling of the wood occurs. After the scheduled period, the barrel is emptied. The noticeably heavier object turns upside down.
Next, you should dry the product a little. 1 day is enough for this. The next step will be treating the inner surface of the barrel with sunflower oil.
No need to skimp on consumables. The quality of the finished tandoor for the dacha depends on the thoroughness of processing. The oiled base is left to soak for another 1 day.
After all the preparatory work, the crucial moment of sculpting the tandoor comes. To do this, it is necessary to roll sausages from the matured clay mixture, approximately 7 cm in diameter and about 50 cm long. The resulting blanks are rolled into ribbons and cut according to the dimensions of the wooden base.
The finished strips fill the entire interior space of the barrel. They should be placed in such a way that the working material overlaps. At the same time, in the upper region of the product, not just an overlap is made, but a narrowing is simulated. This will be required for the oven to function properly. The appearance of the finished tandoor resembles a jug.
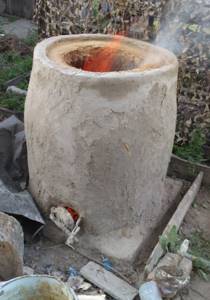
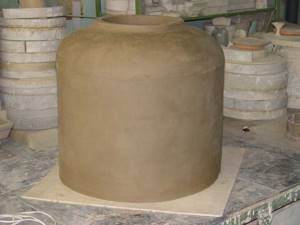
When the barrel is completely lined with clay strips, the inner surface is smoothed. The presence of unevenness is ultimately reduced to a minimum.
The final stage of making the oven base is drying the clay walls. This process will take approximately 1 month (subject to weather conditions). To do this, the barrel with clay interior is placed in a dry place with good air circulation.
The drying process is periodically monitored: the clay should gradually peel off from the wooden walls. After the drying period, the barrel is freed from the steel hoops, the wooden layer is removed, releasing the clay oven.
The finished tandoor is installed on a pre-built foundation. A fire-resistant barrier is created around the stove: brickwork is made. The tandoor itself is coated with fireproof clay or covered with a special heat-resistant solution.
The working chamber of the furnace is equipped with a grate. This will improve the airflow and functionality of the product. Installing a chimney pipe will ensure draft stabilization.
Before the first heating, the inner walls of the furnace are treated with cotton oil. The initial heating of the furnace is carried out within 24 hours. Only a combination of actions will ensure reliable operation of the structure in the future.
Armenian tandoor: secrets of making it yourself
The construction of a stove in the Armenian style begins with the preparation of drawings. It is difficult to produce this design option without using ready-made circuits. You can always find drawings of tandoors on useful resources, such as our portal.
There are many varieties of Armenian stoves. The location of the tandoor can be above ground or underground. This can be a camera with a horizontal or vertical orientation. The easiest way is to make a standard block installed above the ground.
Making a tandoor from brick begins with preparing the materials necessary for the work:
- sand;
- clay;
- cement;
- brick.
Preliminary work also includes choosing the location of the future furnace. If it is planned to build a stationary installation, then it would not be superfluous to provide shelter in the form of a canopy. After choosing a suitable location, the main work begins:
Construction of the foundation. To create a solid base (especially in the case of a large tandoor), a standard version of a concrete mixture is used.
A recess is first constructed and filled with gravel and sand. A solution based on sand and cement is placed on top of such a “cushion”. A foundation constructed in this way will require time to dry (2-3 days).
According to the drawings, markings are made and the brickwork begins to be created. The first row is made with a hole for blowing. Subsequent lines are made according to the drawings, focusing on the need to gradually narrow the furnace.
The finished brickwork is coated on all sides with fireproof clay. The seams are filled with dry material. The outer surface is treated with a creamy solution. For decorative finishing, you can use ceramic tiles, small stones, and broken glass.
After waiting for the clay to dry completely, test kindling is performed. Small brushwood is used as fuel. Prolonged heating will allow the clay to burn and harden. Next, the tandoor is used as usual.
The production of the Armenian version of the stove can be simplified using a template (cauldron or barrel).
Building an Armenian or Uzbek stove with your own hands is not such a difficult task. The main thing is to strictly follow the instructions. And looking through a photo of a tandoor made by yourself, you understand what a beautiful thing the end result can be.
DIY tandoor photo
Save the article to your page:
Post published: 22.11
Join the discussion:
Source: https://landshaftdizajn.ru/tandyr-svoimi-rukami/
Installing a tandoor in the country
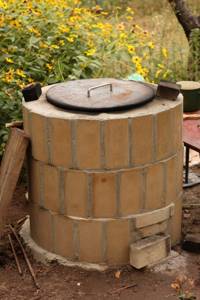
What other options are there besides earthen? You can build a simple tandoor with your own hands at the dacha from the same fireclay bricks. The principle of construction remains the same, the difference is that the walls are completely above the ground.
For such a tandoor you need a concrete base (depth 10 cm plus 10 cm above the ground). The walls are laid out in order, using a special template in the shape of a sail. This template is made from a block - its height is equal to the height of the tandoor. A block is nailed perpendicularly to the bottom, the length of which is equal to the radius of the base. A block is nailed into the upper part, the length of which is equal to the radius of the tandoor neck. In the middle there is a block of the same length as the bottom one. All three bars are connected by a flexible strip of plywood.
The template is used when laying out the walls of the oven, adjusting their shape. As for the principles of masonry, they are the same as in the “earthen” version.
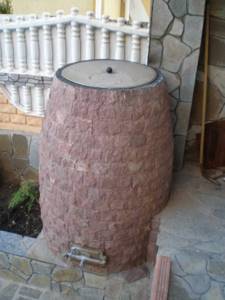
We use a barrel to build a tandoor
Another option for making a tandoor at the dacha is using a barrel. Wooden hoops with poorly fitting hoops or plastic are used. The bottom line is that the barrel is used as a mold, which is coated with a mixture of fireclay clay, sand and sheep wool in a ratio of 1: 2: 0.5.
A wooden barrel is soaked in sunflower oil and left overnight. The next day, the inner surface of the barrel is coated with a clay solution, the layer thickness is 30 cm. The clay must dry, this will take about a week. After this, the barrel is dismantled and the clay oven is fired.
With a plastic barrel, the principle of building a tandoor is the same. It is filled with water and the barrel expands. The outer walls are coated with clay mortar. After the clay has completely dried, the water is drained from the barrel, it decreases in size, after which it can be easily removed from the tandoor, and the oven itself can be fired.
Making a hood with your own hands
It’s not difficult to make a hood yourself; all you need to do is stock up on the necessary materials and tools. Let's consider the technology for collecting tandoor hoods.
Materials and tools
What you will need for work:
- sheet of metal (stainless steel) 2 mm thick - 2-3 square meters;
- corners;
- Bulgarian;
- welding machine;
- level for measurement;
- high temperature resistant metal adhesive;
- metal varnish, resistant to high temperatures;
- sealant;
- primer;
- paint for covering the surface of metal elements;
- brushes
All types of paint, sealant and varnish used must be heat resistant.
Step-by-step instruction
When producing a hood, you need to understand which shape suits you. The easiest way is to cut the sheets to the same size; you also need to take into account the hole in the middle of the hood, which will correspond to the size of the pipe. If you are not sure that you will be able to make a perfectly even format, make the opening larger, and the empty space can later be covered with sealant.
When cutting sheets of metal, you can use the diagram below.
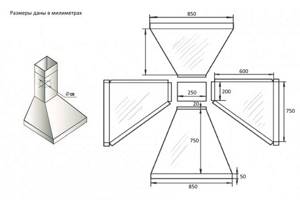
Drawing of a tandoor hood
Recommendations for making a tandoor umbrella:
- Processing metal corners. They usually contain factory grease, which will not ensure reliable fixation. To do this, take a damp cloth and work the surface of the metal.
- Mark the metal based on the data indicated in the drawing. This drawing is general and the format may differ from the one you need. Think over the design of the dome, select the parameters. Redraw the drawing on paper and transfer your measurements.
- The material is cut with a grinder. Don't forget to wear safety glasses before working. Cutting is carried out into different elements, which will subsequently be attached to each other according to the specified scheme. When choosing the size of pipe connectors, you need to take into account its cross-section and diameter.
- All elements of the hood must be assembled sequentially, as carefully as possible, symmetrically and accurately. At this stage you will need a welding machine.
The diagram shows bent metal elements. How to do this job carefully:
- fix the sheet of metal so that it does not move - you can lay it out horizontally and place a heavy object on the sheet;
- set the support along which you will bend;
- Using a hammer, bend the sheet, striking evenly along the entire perimeter of the sheet.
Before starting work, familiarize yourself with the principles of working with a welding machine if you have not previously had experience using this device.
Installation and connection
The indoor tandoor hood is installed depending on the type of mounting. It can be island or wall-mounted. First, the finished hood is secured to the pipe with clamps; on the other hand, the pipe is secured to the exhaust duct of the wall. Depending on the materials used in the manufacture of pipes and the design of their fastening, the umbrella can be installed on a temporary elevation until complete fastening is ensured.
An important principle of the work performed is to ensure free air movement. To check the finished installed structure, you can light a match or lighter and bring it to the pipe. If the light fluctuates, the installation is working; if not, you need to check the correct fastening.
During installation and connection there should be no gaps or damage in the system elements (all of them are filled with sealant).
An interesting option for installing a hood can be seen in this video: