Types of canopies
If we consider the types of canopies, there are three main types:
- cantilevered;
- attached;
- standing separately.
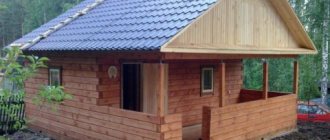
The simplest of the canopies is the canopy over the porch. It protects the owner of the house from rain and sun when he opens the door. It is made in the form of a console, which rests on the wall of the house on one side, and the other is free.
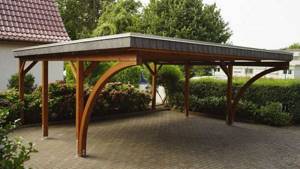
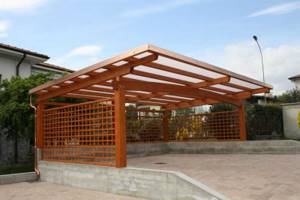
Sheds are considered wooden if the pillars, rafters and roof sheathing are made of wooden material.
Criteria for choosing materials for construction
Before you start working on making a canopy, you should consider several important rules when choosing materials:
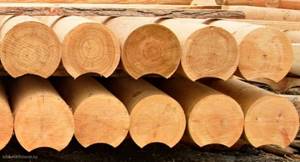
- To make supports, it is best to use rounded logs with a diameter of 10-20 cm. Glued or profiled timber measuring 10-15 cm in a diagonal cut is also suitable for such work. When creating a small canopy for use as a porch, the support posts can be made from logs with a diameter of 5-6 cm, or you can use beams measuring 4x5, 5x5, 6x4, 6x5 or 6x6.
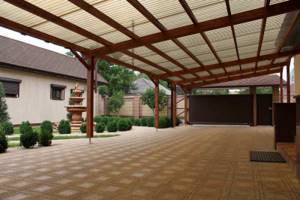
- The type of roofing material depends on the type of canopy, as well as the type of structure of the rafter system. A universal material is polycarbonate. It is lightweight, so it does not weigh down the extension, and can also be placed on any awnings. Corrugated sheeting is also a suitable option. It has a low cost and can easily be installed on both a single-pitch and a gable roof. Soft tiles can also be used as roofing material. However, this material requires dense lathing. With its help it is convenient to cover roofs in the form of a dome or tent.
- The height of any log canopy located on the street should not be less than 2 m. In the absence of special requirements for this parameter, the optimal height is 2.5 m.
- An extension to the house looks more harmonious if it is made along the entire length of the adjacent wall.
- The structure constructed at the porch, in terms of its dimensions, should extend 30 cm from the steps in both directions.
- A building that will be used as a place to relax must have a minimum size of 2 m2 per person. At the same time, the optimal size of the canopy for barbecues is 6x4 m.
When selecting material for construction and calculating its quantity, it should be taken into account that any shed must have a sloping roof. The minimum angle of inclination that allows any precipitation to be quickly removed from the surface is 10%.
Types of roofs for canopies
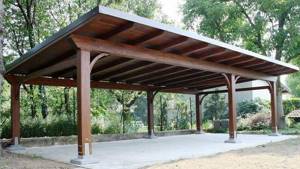
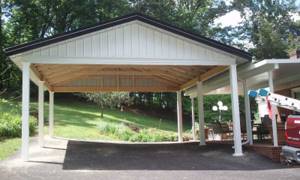
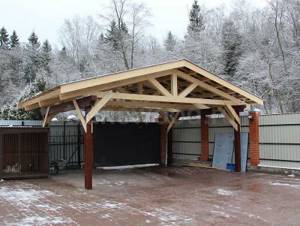
Most often, the simplest types of roofs are performed. These are single-pitched, double-pitched and arched.
The lean-to form of the canopy is simple in design, cheap and popular. However, it is not suitable for awnings with a large surface area.
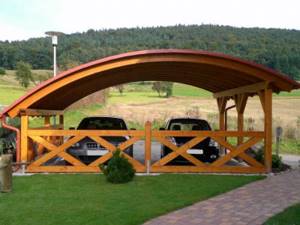
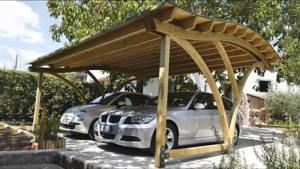
The arched roof looks very interesting, but making it from wooden elements is difficult. Because of this, wooden sheds with such a roof structure are rarely made.
Purpose of canopies
Canopies are widely used as protection:
- Porches. They install a canopy over the porch, thereby decorating the entrance and solving the problem of maintaining comfort.
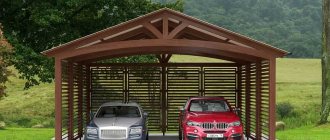
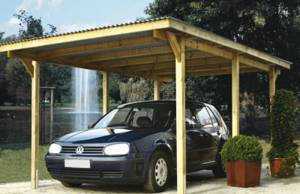
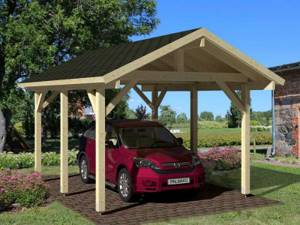
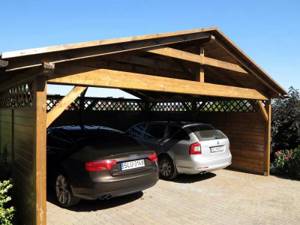
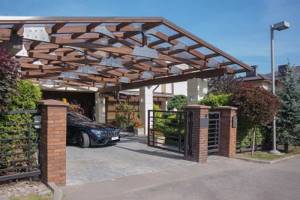
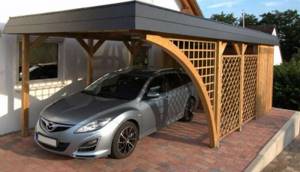
- Car parking. By the way, it will cost less than a stationary garage, but will perform the protective functions no worse.
- Woodpiles of firewood.
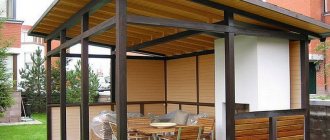
- A dining area or barbecue area with tables, benches, soft sofas, and additional cabinets.
- A playground for children with a sandbox, a slide, and a swing.
- Garden equipment.
It is convenient when there is a canopy over the path running from the gate to the front door, and there is also a terrace attached to the wall of the house.
Let's consider what can be used for the construction process
Materials
Although the decision to build a canopy made of natural wood has been made, you need to understand that there are its derivatives from completely different materials, and the task is to choose exactly those types of wood that help solve certain problems. To begin with, all substantial canopies (more than small canopies) require support posts. If the canopy is small, then a beam with a diameter of 0.1 to 0.2 meters will suffice, but for larger terraces it will be necessary to use rounded logs with a large thickness. The sheathing and rafters are also made from boards or timber, but the diameter should not be large - you need to choose it, paying attention to the weight of the structure and additional loads in the form of wind gusts or snow. As an alternative material, laminated wood is used, the surface of which is brought to the quality of furniture, but this is an expensive material, and it is extremely difficult to do it yourself. For the construction process of outdoor structures, it is better to choose the best wood without visible defects, which is dried according to technology and thoroughly moistened with antiseptics.
A metal frame is used as a base for a canopy made of wood materials in the form of an arch, i.e. from steel pipe, profile or even forged rods. At the same time, for certain style trends that are focused on maximum antique authenticity, no metal structures can be considered acceptable, and even bars are not suitable - instead, poles and logs are used, which are almost unprocessed, but in some cases you can use garden dead wood. But the latter case requires subtlety of design taste, since otherwise, instead of a beautiful canopy, you get a terrible bungalow, which was put together in a hurry. In a large number of cases, wood should not be used as a roof as such, because the canopy on top needs to be covered with something. Usually they opt for inexpensive solutions, such as ondulin or polycarbonate sheets. It would be wise to cover the attached canopy with the same materials that cover a private house (only if we are not talking about expensive tiles).
Project preparation
At first, it seems that a wooden canopy assembled with your own hands may seem like a very simple design for making a drawing - as soon as you come to such a decision, the likelihood of making critical mistakes will increase many times over. In fact, without pre-drawn diagrams with the exact parameters of all the details, it will not be possible to build a single (even the most primitive) structure, unless we are talking about something reliable and durable. Before drawing up a drawing, you need to correctly answer several questions. The first will be what territory can be occupied for construction, how much free space there is for the deployment of the project. Next, let's look at why you are building a canopy and, therefore, what size it should be to meet the established requirements.
When the size of the canopy for the porch of a wooden house is determined, you can estimate what materials should be used for the construction process. By solving this question, the designer will be able to approximately calculate the weight of the structure. Here, take into account the additional load in the form of wind and precipitation - at a minimum, you need to inquire about the maximum snow level over the past few decades in the region chosen for the construction process. Based on the knowledge that has been obtained, you need to think about not just the thickness of all individual supports, but also the total number, the distance between supports, etc.
How to build a visor yourself
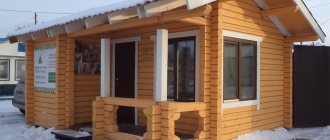
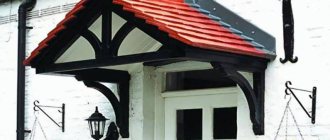
If you don’t want to bother with a full-fledged canopy, and you still don’t need a large area that is covered, you can cheaply and quickly (even without a base) assemble a small canopy, which you don’t even need to attach - it’s simply nailed over the front door, and You can assemble it almost on the floor. There are at least 4 possible canopy options, which differ in shape - arched, gable, figured and single-pitch. For a beginner in assembling such structures, it is best to create single-pitch projects - it is rightfully considered the simplest and is most likely to be assembled correctly. The dimensions are determined in this way - the width is 0.5 meters greater than the width of the porch, the length is approximately 0.8 meters, and the optimal slope is 30 degrees.
Attach to the building a light canopy on the console - a kind of vertical structure, which is best assembled from a strong beam with a cross-section of 7.5 cm, which can withstand the entire weight even with snow that has accumulated on top, as well as under conditions of a sharp wind gust. For the sheathing, thinner wood will be useful - the same timber can be used even with a cross-section of 5 cm. At the same time, the canopy does not have elements that are reliably protected from exposure to the atmosphere, and therefore absolutely all material must be treated with a hydrophobic composition or at least painted with resistance to water paint. Afterwards, the master’s task is to create a flat-type frame (or a pair connected to each other at an angle to obtain a gable surface with further stuffing of plank roofing and roofing material, if provided. Attaching the structure to the wall surface is required using long anchors that go into the thickness of the house is at least 2/3.
How to make a canopy over a porch
In this case, everything will start with a drawing, in which even the slopes, which cannot be more than 35 degrees, must be carefully thought out. The structure will be drawn so that any of the people living in the house feels comfortable under the canopy and does not have to bend down. When preparing the required wood derivatives and tools for working with it, mark the area, outlining places to dig in supports and the general contours of the future canopy. If water from the ground in such a place comes close to the ground, be sure to treat future support pillars with waterproofing compounds. In many cases, it is enough to dig them into the ground 0.5 meters deep, but on loose soils it makes sense to concrete the holes to increase the degree of stability.
If you do choose the method of pouring concrete supports, no future operations can be carried out until everything has hardened. Here you will need to be patient, since a couple of weeks will be enough for the concrete to set perfectly. It will not be possible to make strapping and create lathing before complete hardening, since “reliable” supports that are concreted will turn out to be unstable and skewed. The sheathing and rafters can be connected with nail supports or with self-tapping screws, which are more popular at the moment. Moreover, at the end of the assembly process, the entire structure must be treated with special means that protect against mold and rot. Only after this is it important to proceed with the installation of roofing material, which will be attached in a similar way - with nails or self-tapping screws. Certain projects, in addition to purely functional porch parts, involve all kinds of decoration options. If your project included decorative elements, you almost always need to install them on a fully assembled canopy. The video tells how to make a wooden canopy for your house with your own hands.
What is used for roofing
Choosing a material for the roof is another task if you make a canopy with your own hands. Even simple slate is used for sheds for household needs, although there is a more modern type of roofing - ondulin.
They try to finish the wooden canopy attached directly to the house with the same material as the main building. Recently, it has become profitable to use polycarbonate, especially since it differs in shades and degree of transparency.
Awning - waterproof material will well protect play areas and recreation areas from the sun and bad weather. It can be attached to the frame either directly or movably.

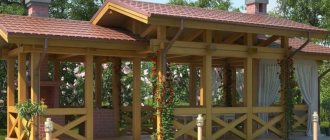
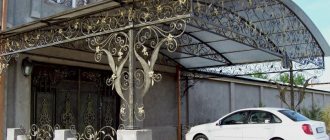
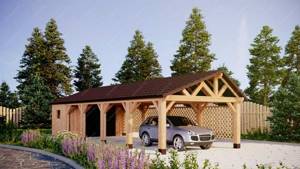
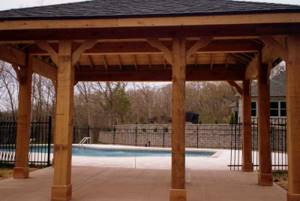
Wooden canopy for cottages and houses
But wooden canopies for the house or for the dacha have been known for quite a long time, so it is not surprising that such products are very popular today. A canopy for a summer cottage made of wood perfectly resists wind, precipitation, and scorching rays of the sun. Structurally, such canopies are made of wood and covered with slate, wood, polycarbonate and other materials. The covering of a wooden canopy can be transparent, multi-colored or tinted, depending on the wishes of the customer.
Today, such products are successfully used for arranging covered recreation areas and summer areas, verandas or terraces, which are effectively illuminated naturally and at the same time provide a sufficient level of protection from precipitation or scorching rays of the sun.
Canopy material
For wooden poles, choose a rounded log or timber. Side dimensions or diameter are acceptable in the range from 10 to 20 cm.
To select the sizes of boards for rafters or sheathing, you need to perform rather complex calculations, which take into account snow and wind loads, slope angles, weight of roofing material and other values.
SNiPs and GOSTs should be followed. Professional help is needed.
Wooden canopies made of polycarbonate
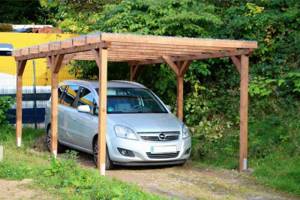
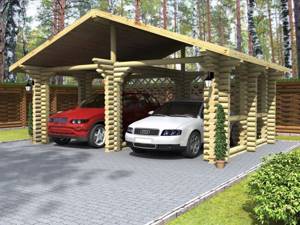
Recently, car wooden carports made of polycarbonate have become increasingly popular. They perfectly resist wind, precipitation and fire.
Structurally, this canopy is made on wooden poles (coniferous), all posts and beams of the canopy are treated with a protective composition for wood and tinted, the color of the glaze coating on the wooden parts of the canopy is being discussed. Pillars made of timber are mounted on metal bases fixed in the ground or on concrete columnar foundations, the decision is made based on the condition of the soil and depends on the wishes of the customer, the price of strengthening on the foundation is negotiated separately.
Foundation for canopies
The first step when starting to build a wooden carport for a suburban home is to secure the posts and posts in a secure position.
This can be done in different ways:
- Dig a hole for each post and concrete it in it. Care should be taken to waterproof the lower part of the support.
- An anchor is concreted in the hole and a pole is attached to it.
- A foundation is made with mortgages and all the racks are attached to them.
Things to consider
In order not to feel uncomfortable under the canopy, you should maintain a height of at least 2 m.
If you choose a canopy for games or rest made of polycarbonate, you should duplicate it inside with fabric sun protection.
To make a wooden structure last longer, it should be treated with an antiseptic and painted or varnished.

In any case, it is better to entrust the construction of canopies to professionals in their field. After all, you need to pour the foundation, install lighting, ensure the strength of the structure and build the roof.
On the other hand, wooden sheds can be built using a simple set of tools, and if you have the skills to do the work, you can build a shed yourself. You should decide what needs to be done after carefully weighing all the pros and cons.
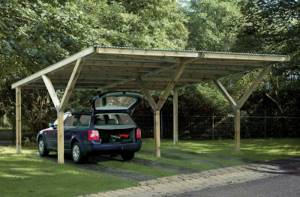
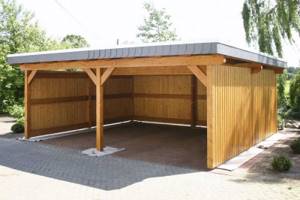
Technology for constructing an autonomous carport
Before making an autonomous canopy from logs for subsequent placement of a machine under it, it is important to familiarize yourself in detail with the technology of the work. In this case, construction should be carried out in stages, with a clear sequence of actions:
- Calculations are made of the required amount of materials, and a drawing of the future design is prepared.
- All materials and tools necessary for the work are prepared.
- The site allocated for construction is being prepared.
- Installation and assembly of structural elements is carried out.
Failure to comply with the work technology may result in the production of an unreliable structure.
Calculation and drawing
The required amount of basic building materials is calculated based on the expected dimensions of the future building:
- Assuming placement under a car canopy, its length can be up to 6 m. For ease of parking a vehicle, the length of the canopy should be the length of the car, increased by 2.5-3 m.
- The width of the structure is calculated based on the dimensions of the car. It should be the width of the machine increased by 1 meter.
- When using a canopy made of logs to shelter a passenger car from bad weather, the height of the building is 2.5 m. For trucks and special equipment, the height of the canopy is taken such that when driving under the canopy, at least 30-40 cm of free space remains above the roof of the vehicle.
- The maximum distance between support posts should be 3.5 m. The best option for making a carport from logs is to use 6 supports, 3 on each side.
Before you start building a log canopy, don’t be lazy to make a drawing.
When calculating the number and length of logs needed to create supports, it is necessary to take into account the type of roof of the building. For straight and gable logs, all logs must be the same length. And when creating a pitched roof, one half of the logs must have a greater height to ensure the required angle of inclination of the roof. However, for the construction of an autonomous canopy, a gable roof type is most often used.
A drawing of a future structure can be made without observing proportions, however, with the obligatory indication of all elements necessary for construction and their dimensions.
Tools and materials
To create a canopy from logs you will need the following construction tools and consumables:
- Hand drill or shovel;
- Screwdriver or screwdrivers;
- Hammer;
- Wheelbarrow or container for earth and garbage;
- Building level;
- Drill;
- Roulette;
- Pencil or marker for marking logs and wooden beams;
- A set of keys;
- Fasteners in the form of nails, screws, bolts, galvanized self-tapping screws, as well as corners;
- Antiseptic solution for treating wood against rot and parasites;
- Bitumen mastic. Necessary for processing logs in places where they are dug into the ground. It is a waterproofing material and helps protect wood from rotting;
- Cement and sand or crushed stone;
- Water;
- Logs;
- Beams for creating sheathing for the roof;
- Roofing material.
Logs for a canopy
When using corrugated sheeting as a roofing material, cutting and installing it will require a welding machine and a hacksaw for metal, or a grinder.
Preparatory work
This stage includes preparing the wood for use. All wooden elements must be thoroughly treated with 2 layers of antiseptic. The part of the logs that will be buried in the ground must be additionally treated with bitumen mastic.
Also, during preparation, markings are applied to the area suitable for construction. The construction area is thoroughly cleared of debris and leveled. According to the diagram, the installation location of each support log is marked. At these points, using a hand drill or shovel, holes are prepared for the logs that will support the carport. Their depth depends on the size of the logs and the expected height of the canopy. The minimum recess should be 50 cm.
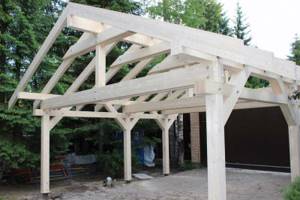
Fixing the posts and assembling the roof
During the process of assembling the structure, supporting rounded logs, to the top of which the canopies will be attached, are inserted into the prepared holes. After leveling the pillar, the hole around it is filled up and compacted with crushed stone, or filled with pre-mixed cement. When using cement, further work can be carried out only after the composition has completely hardened.
Subsequent actions have the following sequence:
- From above, all the logs are connected to each other along the perimeter, as well as across them with wooden blocks. Self-tapping screws can be used to secure these support beams. The dimensions of the beams can be 10x10 cm.
- The supporting beams are further strengthened with spacers that are attached to both sides of each support log. Beams or boards with dimensions of 5x10 cm can be used as load-bearing beams.
- Rafters made of beams measuring 15x5 cm are mounted to the load-bearing beams at a distance of 10-12 cm from each other.
- Boards or beams measuring 10x5 cm are mounted across the rafters in the upward direction. They are fastened using corners and self-tapping screws. The height of the elements depends on their location. In the middle of the rafters, these boards for the top ends are the largest, gradually decreasing towards the edges of the structure.
- The beams forming the top of the ends are connected to the supporting beams using inclined rafters.
Upon completion of the work, roofing material is laid on top of the inclined rafters. In this case, the canopy canopy looks beyond the level of placement of the supporting rounded logs. This will protect not only the car standing under the building, but also the wooden supports themselves from the effects of atmospheric phenomena. The end parts of the roof can be covered with boards or a solid sheet of plywood of a suitable shape.
Having suburban real estate, many owners think about modern methods of saving energy and, possibly, preserving the ecology of our planet. Such owners have a good alternative to classic sources of electricity, namely solar panels, which need to be installed on the roof of any of your buildings. You can get acquainted with solar panels on the website: https://e-solarpower.ru/solar/solar-panels/flex-panel/. Although buying panels seems like an expensive undertaking, in the long run they will pay for themselves many times over.