When constructing urban high-rise buildings and industrial facilities, the basis of a flat roof is usually a reinforced concrete slab. But for private houses, especially frame and wooden ones, such a choice is most often unacceptable. In this case, a flat roof is built on wooden beams. Its main advantage is its light weight, which reduces the load on the walls and foundation.
The installation of such a roof is simpler and cheaper than using heavy reinforced concrete slabs. But the functionality is the same. Therefore, this option of a flat roof is often chosen by those who want to build it with their own hands.
For which buildings is a flat roof on beams suitable?
The main share of such roofs falls on private houses and cottages, whose owners value futuristic style, convenience and practicality. Also - for covering verandas, terraces, balconies, garages. As a rule, all these buildings are wooden or frame, requiring a lightweight roof structure. But this is not a mandatory rule. The wall material can be anything - brick, aerated concrete, foam concrete, etc. In this case, wooden beams often crash into the mauerlat - a wooden beam that runs along the perimeter of the walls and is connected to them using anchor bolts or studs.
Flat roofing is especially attractive to developers because its horizontal surface can be used as a usable area. Moreover, this is possible even for a roof with wooden beams at its base.
Of course, you shouldn’t use the freed up meters for a parking lot, swimming pool or tennis court. Still, such projects require a more monumental foundation. But wooden beams can easily support an open terrace, an observation deck, or a home greenhouse. The main thing is to make the calculation correctly and not skimp on the thickness of the lumber.
Roof decking
Three main materials can be used as roofing material for a flat roof:
- bitumen;
- liquid rubber;
- various types of membranes.
Bitumen is the main material that has long been used for finishing flat roofs. Along with it, various polymer additives are used that increase the effectiveness of the coating. Bitumen is not used in its pure form for flat roofs, but as part of rolled materials: roofing felt and euroroofing felt. The base is fabric or other material, which is coated with resin on both sides. Due to its elasticity, bitumen guarantees high waterproofing and elasticity in cold weather. Laying such material requires some skills, but it is not difficult to cope with, since the only main tool you need is a burner. The disadvantage of this solution is the need for frequent repairs, as well as the lack of vapor permeability.
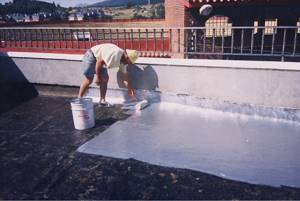
Liquid rubber is increasingly being used for flat roofs. The advantage of such a roofing solution in a country house is its integrity. There are no seams, which increases strength and stability. When applying liquid rubber to the roof, you should be very careful. The best option would be to use a two-component composition. This makes it easy to adjust the amount of hardener to control the curing speed. When applying the product to the roof, you should be careful to ensure that the layer is uniform and there are no layers.

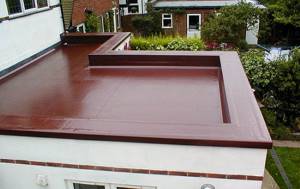
Instead of the listed components, a membrane can be laid on the roof, as can be seen in the photo. There are several types of them. The most common membrane for use on roofs is PVC membrane. Its disadvantage is its high flammability. The other flooring is an EPDM membrane. Its cost is slightly lower than that of PVC. Its disadvantage is the impossibility of repair after damage. The first type of membrane can be easily repaired with hot air. The last type used for flat roofs is TPO membrane. It has good UV resistance and can also be installed without geotextiles. Hot air is required for installation. The service life of such a product for a flat roof is slightly lower than that of EDPM material. A video about the construction of a flat roof can be viewed below.
Types of flat roofs on beams
The following types of flat roofs can be built on wooden floors:
- unexploited;
- exploited;
- inversion
That is, all possible types - without restrictions.
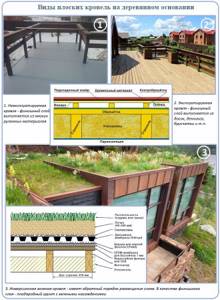
An unused roof is a regular one, completed with a waterproofing topcoat. It is intended solely to protect the premises from environmental conditions and has no other purpose. It is forbidden to use it as a place of rest, move in large groups, or install terrace furniture and flowerpots. The covering of such a roof is designed for the fact that 1-2 people will periodically climb onto it, solely for maintenance of the structure.
A used roof is already more interesting and complex. In addition to its direct protective functions, such a roof plays the role of additional usable space for the homeowner. The design pie ends not with waterproofing (prone to damage), but with a protective covering - paving stones, decking, wooden flooring, paving slabs, turf layer, crushed stone or gravel.
Inversion roof is an inverted roof, a qualitatively different option. It can be either exploited or unexploited. Its peculiarity is the inverted order of placing layers in the pie. If in a conventional roof the waterproofing is laid on top of the insulation, then in an inversion roof the opposite is true. The waterproofing lies under the insulation, and the vapor barrier is completely excluded from the structure of the cake. Due to this, the waterproofing is protected from the street environment and its service life is increased.
However, under the influence of unfavorable street conditions, the insulation becomes insulated, so the choice of this type of insulation in inversion roofs is limited. Only EPS (extruded polystyrene foam) and nothing more! This material has virtually zero water absorption, high density and strength. On top of the EPS in inversion roofs is loaded with washed gravel, paving stones, paving slabs or a turf layer.
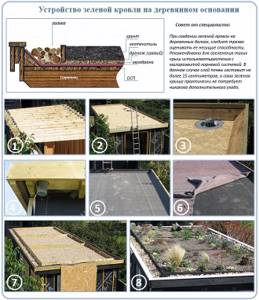
An interesting option for used roofs (including inversion ones) is green roofing .
It can also be supported on wooden beams. The pie of such a roof ends with a soil layer on which plants are planted. There are other elements that are not used for other types of roofs: a drainage layer (gravel, expanded clay, crushed pumice or geomats), a filtration layer (geotextile).
Projects of houses with a flat roof
Number of projects 127
- 7 rooms
- 5 bathrooms
House Project DOK-480 / Evolution
- To favorites
- 480² Total area
- 14 x 18m Construction area
from 8,640,000 rub.
Construction time individually
- 5 rooms
- 2 bathrooms
House project Cube-3
- To favorites
- 89.44² Total area
- 10 x 9m Construction area
from RUR 1,207,440
Construction period 80 days
- 1 room
- 1 bathroom
Modular house project - M45
- To favorites
- 45² Total area
- 6 x 8m Construction area
from 607,500 rub.
Construction period 35 days
- 2 rooms
- 2 bathrooms
House project "Askold"
- To favorites
- 121² Total area
- 10 x 8m Construction area
from 1,633,500 rub.
Construction period 70 days
- 3 rooms
- 3 bathrooms
Kristen House Project
- To favorites
- 523² Total area
- 22 x 30m Construction area
from 7,060,500 rub.
Construction period 150 days
- 5 rooms
- 2 bathrooms
House Project DOK-8 / Fellini
- To favorites
- 202² Total area
- 11 x 11m Construction area
from 3,636,000 rub.
Construction time individually
Available at the exhibition
- 3 rooms
- 2 bathrooms
Tadini House Project
- To favorites
- 157.8² Total area
- 11 x 9m Construction area
from 4,600,000 rub.
Construction period 75 days
- 4 rooms
- 1 bathroom
House project VH "66-17" Callisto
- To favorites
- 109² Total area
- 15 x 10m Construction area
from 1,471,500 rub.
Construction time individually
- 3 rooms
- 1 bathroom
House project Modern-77
- To favorites
- 77² Total area
- 12 x 10m Construction area
from 3,880,000 rub.
Construction time individually
- 4 rooms
- 2 bathrooms
House Project DOK-165 / Gardi
- To favorites
- 165.82² Total area
- 9 x 8m Construction area
from RUR 2,984,760
Construction time individually
- 3 rooms
- 1 bathroom
Cascade house project
- To favorites
- 75² Total area
- 9 x 7m Construction area
from 1,012,500 rub.
Construction period 14 days
- 4 rooms
- 2 bathrooms
Project of a house with a flat roof c15-143 m²
- To favorites
- 143² Total area
- 8 x 19m Construction area
from 1,930,500 rub.
Construction time individually
- 2 rooms
- 2 bathrooms
Cube house project
- To favorites
- 61.92² Total area
- 7 x 9m Construction area
from 835,920 rub.
Construction period 65 days
- 3 rooms
- 2 bathrooms
Tatra house project
- To favorites
- 106² Total area
- 10 x 11m Construction area
from 1,431,000 rub.
Construction period 80 days
House project "Amur"
- To favorites
- 30² Total area
- 6 x 5m Construction area
from 687,220 rub.
Construction time 5 days
- 5 rooms
- 1 bathroom
Taiga House Project
- To favorites
- 134² Total area
- 9 x 9m Construction area
from RUR 1,064,959
Construction time individually
- 2 rooms
- 1 bathroom
House project "Yana"
- To favorites
- 140² Total area
- 9 x 17m Construction area
from 1,671,000 rub.
Construction time 5 days
- 5 rooms
- 2 bathrooms
Project of a house with a flat roof from 15-248m2
- To favorites
- 248² Total area
- 15 x 13m Construction area
from 3,348,000 rub.
Construction time individually
- 3 rooms
- 1 bathroom
House project No. 3
- To favorites
- 86.1² Total area
from 1,162,350 rub.
Construction time individually
- 5 rooms
- 2 bathrooms
House project “2-storey frame house 90 m2”
- To favorites
- 90² Total area
- 11 x 7m Construction area
from 1,215,000 rub.
Construction time individually
View all projects
The usual hipped roofs, forming an attic or attic, to a certain extent limit the spatial possibilities of a country house. Initially, they tried to solve this problem by using attic floors, and over time, waterproofing technologies made it possible for houses with a flat roof to appear, and most developers now have a catalog of projects for such structures. Of course, they are somewhat unusual for our traditions, but interesting from an architectural and practical point of view.
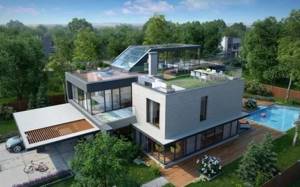
Carefully thought out project with a flat roof Source domnomore.com
Flat roof frame on a wooden base
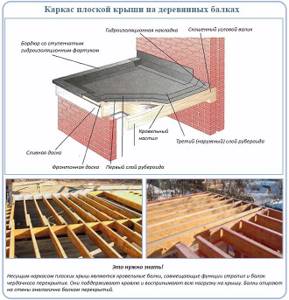
The frame of the described roofs is made of wooden beams laid like an interfloor ceiling. Full-size timber lumber or composite lumber (laminated veneer lumber) can be used. Often beams are made from boards with a section of 100x150 mm.
The beams are laid with support on the walls, similar to interfloor ceilings. If the building is wooden or frame, then the beams rest on the upper crown of logs or the upper frame. If it is brick or block, then on a pre-fixed Mauerlat. A timber with a cross section of 150x150 mm or 150x100 mm is usually used as a Mauerlat. It is mounted on the upper chord of the walls using anchors or studs. To protect the wooden Mauerlat from the wall material, 1-2 layers of waterproofing (roofing felt) are laid between them.
Cuts are made on the beams for the Mauerlat, they are laid and secured with metal corners or nails. The pitch between the beams is maintained at 50-120 mm (depending on the calculated load).
When installing beams, it is important to ensure a roof slope of 1-6°. Despite the fact that the roof is called flat, it is not absolutely horizontal. A slight slope is necessary to ensure that water moves towards the drain and thus prevents it from stagnating.
You can create the required slope in the following ways:
- Immediately lay the beams with the desired slope. Then, if a horizontal ceiling is supposed to be installed under the roof in the room, it is made suspended or sewn onto a horizontal sheathing.
- Lay the beams horizontally, and nail wooden plates of different heights to them to maintain the required angle.
- Lay the beams horizontally, and form the angle using different thicknesses of thermal insulation laid on top of the frame.
- Use beams with unequal allowance in height.
Most often, the first option is used, that is, the beams are immediately laid with a slope. The easiest way to do this is to attach a strong beam or board along the top of the load-bearing wall, which will raise the frame(s) on one side. Instead of a transverse purlin, you can also install short radial beams extending from the central double diagonal beam.
The importance of correct installation
Work on creating a horizontal roof should be trusted only to experienced, highly qualified, trained specialists. Otherwise, cottage owners may subsequently face a number of serious troubles.
Most often, homeowners with such fears face the following problems:
- swelling, formation of sinuses and deep cracks;
- rapid destruction of hydro- and heat-insulating layers;
- mechanical damage that occurs after the placement of television antennas or the design of a recreation area;
- Also, flat roof building materials are negatively affected by microbes, mold and other harmful organisms, so during its installation it is necessary to use special protective compounds.
Don't forget about safety
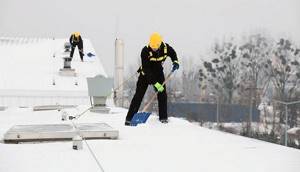
When installing a flat roof in a country house, special attention should be paid to ensuring safety. Parapets or railings are used to fence it. To organize the former, decorative stone or brick is used. True, in this case the process of installing waterproofing becomes more complicated.
That is why installing railings looks much more profitable. They do not reduce the total roof area, but they should not be installed in those regions where there are sharp temperature changes and cold winters.
Flat roof pie: what's inside?
A flat roof pie on a wooden frame can have a different structure. There are many design options, many of them are posted on the Internet. And they will all work!
Option 1. Roof with insulation over beams
Flat roof insulation layers can be laid on top of the beams. For example, a proven working option (classic roofing with insulation):
- floor beams;
- lathing (if necessary);
- continuous cladding made of plywood, CBPB, OSB;
- vapor barrier;
- insulation – EPPS, mineral wool;
- waterproofing material – polymer membrane.
When using EPPS insulation and PVC membranes simultaneously in the structure, a separating layer (geotextile, fiberglass) must be laid between them. The fact is that these two materials are incompatible and when they come into direct contact, the PVC is destroyed.
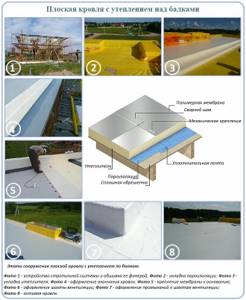
The polymer membrane is fixed to the insulation mechanically or loaded with ballast. Crushed stone or gravel (for all types of roofs), paving stones (for maintained roofs), and soil (for green maintained roofs) are used as ballast. However, when choosing ballast, you should soberly assess the reliability of the wooden frame and its maximum load.
If the final coating is to use a weld-on waterproofing or an EPDM membrane with adhesive fixation, a change is made to the scheme discussed above. It consists in laying sheets of plywood, OSB or DSP between the insulation and waterproofing.
This results in the following diagram:
- floor beams;
- lathing (if necessary);
- continuous cladding made of plywood, CBPB, OSB;
- vapor barrier;
- insulation – EPPS, mineral wool;
- plywood sheets, OSB, DSP;
- waterproofing material.
Installation of a built-up roof traditionally requires the use of a gas burner, therefore, according to existing fire standards, it is not allowed on wooden structures. Therefore, they act as follows. The first layer of waterproofing is nailed or glued to a wooden base, and the second layer is fused, as it should be. It is also convenient to use euroroofing felt with a special adhesive base, for which cold installation without heating with a torch is recommended.
The installation of a membrane roof on a wooden base is shown in the video:
Option #2. Roof with interbeam insulation
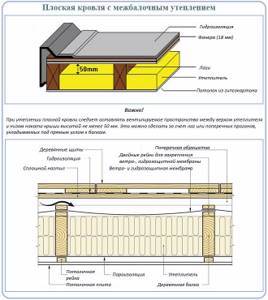
Another principle of assembling a flat roof pie is associated with laying insulation in the space between the beams. This option is more convenient than the first if EPDM membranes with adhesive fixation or fused roofing are used as waterproofing.
The following roofing pie scheme is often used:
- floor beams;
- vapor barrier (between beams);
- insulation (between beams);
- lathing (if necessary);
- continuous cladding made of plywood, CBPB, OSB;
- waterproofing.
In principle, a similar system is used in the formation of classic pitched roofs.
Option #3. Roof with internal insulation
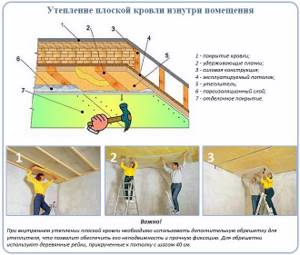
In this case, sheets of plywood, OSB or DSP are sewn onto the supporting structure (beams), and waterproofing is laid over them. The remaining insulating layers of the roofing pie are sewn on the side of the room.
A rough ceiling (made of boards or sheet materials) is fixed to the beams; planks are screwed to it, perpendicular to the load-bearing beams, in increments of 40 cm. Polystyrene foam boards are placed between the planks, gluing them to mastic or glue. A vapor barrier film is sewn to the insulating layer. Cover the insulation cake with a finished ceiling.
Design diagram (top to bottom):
- waterproofing;
- continuous sheathing made of sheet materials;
- beams;
- rough ceiling;
- insulation;
- vapor barrier film;
- finished ceiling.
An example diagram would look like this:
Option #4. Inversion roofing on beams
Or you can go against all “traditional” solutions and build an inversion roof on beams. Due to the fact that the waterproofing will be covered with insulation, that is, protected from loads, exposure to oxygen, UV rays and precipitation, its service life is significantly increased.
When constructing an inversion roof, you can use the following diagram (from bottom to top):
- beams;
- continuous sheathing;
- waterproofing;
- separating layer (when using PVC membrane as waterproofing);
- EPPS insulation;
- separating layer – geotextile;
- ballast, paving slabs, decking, etc.
The principle of inversion roofing is often used to install green roofs. For example, you can do this:
What to do with precipitation

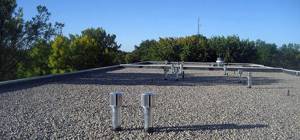
It is easier to install a drainage system on a pitched roof. A flat roof has a large area of interaction with precipitation. That is why channels for a different type of drainage are installed on a flat roof. Flat roof drainage can be done from outside or inside the building. At the edge of one of the sides of the roof, which is at the maximum slope, grooves are formed that direct water into the channels. There is an option to install pipes for drainage from the roof from the inside. In this case, special fungi with nets are located on the roof. There are several of them and a slope is made to each one. Water can go directly into the sewer. The mesh prevents clogging by fallen leaves or other components.
What topcoat should I use?
The wooden base of a flat roof, along with its advantages, also has features with a minus sign. This is an increased fire hazard and low load-bearing capacity (compared to reinforced concrete slabs).
To waterproof such a roof, it is advisable to use materials that do not require hot installation. Ideally, polymer membranes. When choosing built-up bitumen-polymer coatings (from the Euroroofing felt series), the first layer of material is installed mechanically, and the second - by fusing. In order to minimize the possibility of fire in structures during installation, it is recommended to use non-combustible CBPB boards as continuous cladding (on which the waterproofing is laid).
When constructing serviceable and ballasted roofs, you should also remember that excessive load on a wooden base can be fatal. Therefore, if the load-bearing capacity of the beams used is small, lightweight materials should be selected for the finishing coating - decking, deck boards, rubber paving slabs (rubber mats), etc.
If everything is done correctly (calculate the load, select the elements of the roofing pie), then a flat roof on beams can become not only excellent protection from adverse external conditions, but also a place to relax. You just have to want it!
Regular used roof
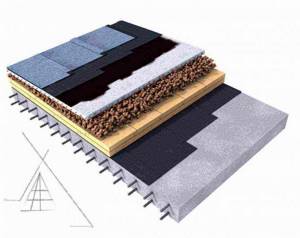
Until recently, when developers were not yet so inventive, all flat roofs were erected using the traditional method. This means that the sequence of layers will be in such an order that the thermal insulation material is at the bottom of the waterproofing. Operated roofs are much more expedient, but you will have to pay a little more money for their installation.
A standard roofing surface in use has the following layers:
- Reinforced concrete slabs as a base
- Screed is poured over the slabs
- Waterproofing product
- Metal grate with drainage channels
- Thermal insulation boards
- Strengthening mortar layer
- Finish coating
As a thermal insulation material in exploited roofs, it is better to use solid varieties, for example, expanded polystyrene or foam glass. If the last product is not affordable for you, then buy the first one. As a rule, the surface of such roofs is covered with paving slabs. A noticeable disadvantage of such a roof is that during operation the thermal insulation material may begin to deform, and this will lead to a decrease in protection.
We advise you to study - What is the difference between an apartment and an apartment?
