Types of roofs for house extensions: selection of design
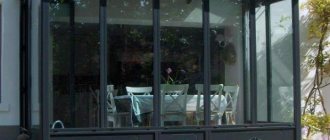
Suburban developers are “insatiable” in their claims to increase the area of the house. Either they lack a recreation area, and then an extension appears at the house in the form of a terrace or veranda, or they have nowhere to park the car, and then a garage grows right next to the house. But the topic of this article is not about extensions, but about the roofs of extensions to the house. We will deal with them, that is, we will tell you what forms they come in, what materials are used for their construction, and how these roofs are built.
Complex roof structure over the extension
Extension to a house roof to roof - installation instructions
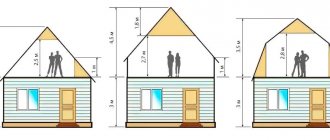
Some may think that an extension is a utility room, and there is no need to show much creativity when arranging the roof. But there are also extensions that outshine the house itself with its beauty and functionality. And it is for these reasons that the upper part of the building above them can be different: either single-pitched or multi-pitched.
In principle, an extension is erected not only to expand the living space, but also to equip a summer veranda or kitchen , and therefore a simple lean-to structure is often built over them.
But if you need to add a large room to the house, even larger than the area of the main building, then arranging a broken type of roof will be quite reasonable.
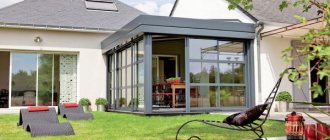
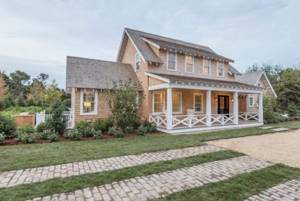
A gable roof is suitable for verandas or summer terraces when you need to expand the main area or create an additional place for relaxation. So the choice of design depends on the functionality of the attached room.
Roof requirements for an extension:
- It cannot be a single structure with a residential building;
- A small indentation from the newly built walls is provided;
- The roofing material is laid overlapping, which ensures water resistance;
- Since the extension will be located below the level of the main building, all precipitation will roll onto it, so the requirements for waterproofing are very stringent.
Types of roofs for extensions
Before moving on to the analysis of roofing structures that are used today for the construction of extension roofs, it is necessary to identify their main elements. We will not go into too much detail about the features of each element; they are clearly marked in the photo below; we will simply note the main ones, which are necessarily present in the roof structure. This:
rafters
, bearing the main load of the roof on the slopes that form it:
Mauerlat
, evenly distributing the loads from the rafter legs onto the walls of the building;
ridge run
, which forms the ridge of the roof and holds the upper ends of the rafters.
Let us immediately note that in a log house the functions of the mauerlat are performed by the upper crown of the building, in a frame house the upper frame is performed. As for the ridge girder, it is installed in a system of layered rafters.
Roof structure elements
So, we’ve sorted out the roof elements, let’s move on to their varieties.
Let's start with the fact that the roof over the extension to the house is selected according to two criteria:
Depending on the design
rafter system of the main house to which the extension is attached.
How is it located
extension relative to the house.
As for the location, the extension is usually erected from the facade of the building or from one of its sides.
Now, as for the shapes of the roof structure of the attached room.
Shed roof
This type of roof is the most popular among country developers because this design is the simplest and cheapest. But it should be noted that pitched roofs are available in different variations.
The first option is shown in the photo below. Here you can clearly see that these are just rafter legs, one end resting against the wall of the attached room. The second end can be fixed to the wall of the main house, or racks can be mounted under them, which themselves rest against the floor beams.
Shed roof extension
The peculiarity of this design is the formation of a cold roof, so it is often erected over non-residential premises such as a garage, veranda or some kind of utility block. The thing is that the volume of the attic space under such roofs is small. It is rarely used. It is this type of pitched roof that is erected over open terraces attached to the main house. In this case, the roofing system may not be covered with roofing material. But since the Russian climate means a lot of precipitation, even open recreation areas are covered with roofs.
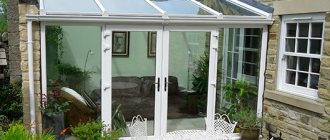
Open terrace with a pitched roof On our website you can find contacts of construction companies that offer roof design and repair services. You can communicate directly with representatives by visiting the “Low-Rise Country” exhibition of houses.
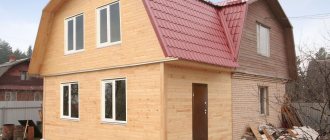
A completely different option for a pitched roof, when the task is to attach a room to the house that will be used for housing. There are other requirements for the design of the rafter system, where thermal insulation measures must be carried out. One option is the design shown in the bottom photo.
Please note that, in fact, one of the roof slopes of the house is redone so that it also covers the extension. That is, the overall roof becomes asymmetrical. But at the same time, it retains all the qualities of the insulated roofing structure under which the attic is organized.
The modification of the rafter system consists in simply extending the rafters with boards whose cross-section coincides with the cross-section of the rafter legs. And then they are all laid with their lower ends on the wall of the extension. Be sure to install a support post under each rafter leg: timber, board, double board.
Shed roof connecting the house and the extension
In general, the option shown in the top photo is very interesting. The reconstructed slope can be left untouched. That is, purchase new rafters and install them without affecting the old slope. The only thing is that you will have to dismantle several sections of roofing material at the ridge girder to install new rafter legs.
But it should be noted that roof reconstruction carried out in this way requires calculations. After all, the load from installing elongated rafters increases. Accordingly, the area of the slope increases, and this means changed snow loads. And all this will affect the external facade wall of the extension. Therefore, based on the calculations carried out, it is necessary to purchase building materials from which the extension and rafter system of the new slope will be erected.
Gable roofs of extensions
It should be noted right away that this is not the most popular option. It is difficult to tie it to the rafter system of the main house. More often, an extension with a gable roof is a roof structure, one gable of which is adjacent to the wall of the main building. The photo below shows just such an option.
Extension to a house with a gable roof structure
But we must pay tribute that of all gable roofing structures, this is the simplest. Because it is assembled as a separate element. That is, not tied to the roof of the house. Hence the simplicity of construction. How it's done:
carry out installation
Mauerlat;
is installed on the racks along the attached room, which are mounted on the floor beam
;
rafters are installed across the ridge
;
carry out laying and fastening of roofing material
, hem the pediment and ceiling.
And since the extension is a small structure, the cost of its roof will be minimal.
I would like to draw attention to the fact that such a roof can be used to cover extensions built both on the facade of the house and on its ends. In this case, the attached building does not have to be located exactly in the middle of the wall of the main building. The photo below shows this option.
An extension offset from the middle of the house wall
The second option for a roofing structure with two slopes is a continuation of the roof of the main house. In fact, this design is not much more complicated than the previous ones. You just have to spend the same amount of lumber on it as on the roof of the main house. The end result is a common roof: both over the house and over the extension.
The third option is a gable roof, erected over the extension so that it is wedged into the roof structure of the house from the side of the slope. That is, it turns out to be an extension to a house with a sloping roof in terms of the overall structure.
Common sloping roof over the house and extension This might be interesting!
In the article at the following link, read about installing a roof on a balcony: types of structures and prices + examples in the photo.
And the last option with gable roofs is a common roof structure. Typically, this structure is erected if several rooms are attached to the main house, which together form almost one building equal to the house. That is, the old roof is completely dismantled, calculations are carried out, and a project is made in which the ridge is formed at the junction of two buildings: the old house and the extension. After which the new building is covered with one roof. In essence, it turns out to be a version with a pitched roof for the extension, only a symmetrical roof is being erected.
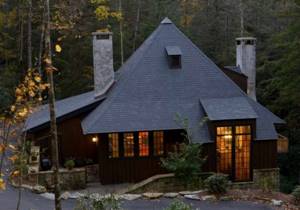
Hip and half-hip roofs
Hip roof shapes for houses with an extension are considered one of the most complex. They contain a large number of elements and components, and therefore the cost of purchasing building materials is considerable. At the same time, many elements are adjusted strictly to size, which guarantees a large amount of waste.
The photo below shows a hip roof project in which the ridge is attached to the wall of the main building. Fastening is usually carried out on special metal brackets or on racks, but with additional fastening to the wall with anchors.
It is necessary to understand that the hip roof consists of different slopes, which differ from each other in shape. Two of them are triangles, the other two are trapezoids. In the project shown in the photograph, a trapezoidal slope is the front one, and two triangular ones are the side ones. At the same time, there is no second slope in the form of a trapezoid, because the roof is being built over the extension, which means that something should not be enough.
Extension covered with a hip structure This might be interesting!
In the article at the following link, read about proper control over the progress of construction - technical supervision.
Hip roofs
This roof option for extensions is used very rarely. It's not only complicated. There is one point in the roofing system of the attached room - a ridge unit, which is attached to the wall of the building. And it is at this point that the greatest loads are placed on the wall and foundation of the house. Therefore, very often a support post made of timber or folded bricks (blocks) is installed under the roof ridge assembly.
And this element in the design of the extension will have to be somehow played up in the future. After all, this is the protruding part. It performs purely technological functions and does not carry any design load.
Tent covering of the attached room
So, we have looked at all the roofing structures that are being built over extensions today. The choice is actually great. Of all the proposed options, simplified designs are most often chosen, which require minimal costs. But, as the practice of suburban construction shows, not all developers follow the path of saving. The thing is that the transition of the roof to the extension is the most vulnerable place in terms of leaks.
Definition of a sloping roof
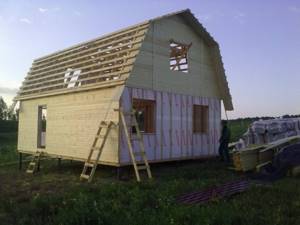
The name of this type of roof is the basis of its design features. This roof has an original shape, combining slopes and broken lines. In fact, a sloping roof is a subtype of a gable roof, which has a more complex structural shape. In most cases, this roof is used when an attic is installed underneath it. By using a different type of roof, you can achieve a less acceptable result, since the attic space will be much smaller and the walls will be “cut off.”
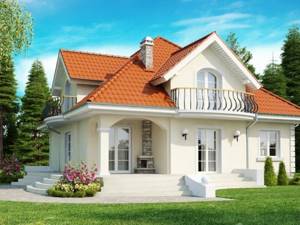
However, it is not only because of the attic that a sloping roof is built. Many simply liked it due to its complexity, originality and interesting appearance. With the help of such a roof design, you can create a chic private home, emphasizing its individuality and sense of taste of the homeowner.
The main advantage of a sloping roof is that the attic floor will have spacious shapes and high ceilings. If the roof of the house is gable, then the ceilings will not be so high, since the construction of a tall and complex structure will be required. Having created such a gable roof, you may encounter a problem, because such a roof will not be able to meet the main functional requirement - protecting the house from the vagaries of weather in the form of rain, snow and wind. The last factor will most affect a high-raised gable roof, which is unable to cope with high wind loads. A sloping roof is designed to withstand these loads, since its upper part has a small angle of inclination, but its lower part is lowered sharply, thereby guaranteeing the fulfillment of the functional duties of the roof.
Useful tips
It cannot be assumed that the roof over the extension is some other structure. This is an ordinary roof with all known parts, elements, assemblies and fasteners. When constructing it, you will have to make calculations to determine the loads. It is also insulated, shaped and constructed. The only thing that happens often is that this structure is smaller in size than the roof of the main house. In all other respects, this is a traditional construction option.
Therefore, pay attention to these nuances:
roofing material
the extension must be exactly the same as the roof of the house;
all wooden structural elements are treated with antiseptics
and fire retardants: the first fights mold and fungi, the second increases the fire resistance of the structure;
roofing material is chosen taking into account the angle
slope of the slopes;
minimum cross-sectional size of timber for Mauerlat
– 150x150 mm;
minimum cross-sectional size of rafter legs
– 150x50 mm.
The main mistakes during the construction of an extension roof
Inexperienced developers do not pay enough attention to compliance with building codes and regulations; they believe that an extension is the simplest object and does not represent anything complicated. As a result, not only leaks appear on the roof, but also the stability of the entire structure is compromised. What should you pay attention to?
If the foundation of the house is treated with due attention, then the extension can be built almost on the stones. The reasoning is that the extension is light, the load on the foundation is small, a real foundation is not needed. This is a big misconception; a weak foundation causes vibrations in the extension and facade walls of the house. Due to such vibrations, cracks inevitably appear between the roof of the extension and the main building, allowing water and snow to enter through them. It is almost impossible to completely get rid of cracks; you will have to carry out routine repairs annually to eliminate leaks.
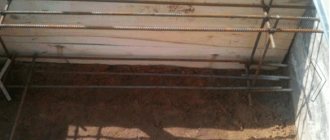
Important. The depth of the foundation of the extension should be the same as the depth of the foundation of the house. To increase the rigidity of structures, it is recommended to additionally connect them together using rods of construction reinforcement.
Foundation for an extension to a house
Until now, some builders recommend connecting the walls of the extension and the house together. This is done in several ways.
- For bricks, niches half a brick deep are made in the facade wall.
- If the extension is made of concrete blocks, then every three rows they are fixed with pieces of reinforcement.
- Wooden walls are tightened with staples or metal corners.
An example of joining the walls of a log building with the walls of a wooden house
These measures can only slightly increase the stability of the extension. But, as mentioned above, only a solid foundation fully guarantees the immobility of the structure and the tightness of the roof.
Two types of roofs are used for extensions.
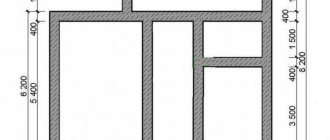
For example, we will take a simple type of roof for an extension - flat, adjacent to the façade wall made of foam blocks.
Step-by-step construction instructions
Before starting work on the roof, you need to prepare the materials. To work you will need:
Lumber.
- The rafter system is made from edged boards 150×50 mm or larger; for soft roofs, it is necessary to prepare materials for the sheathing. It can be made from unedged boards of the second or third grade, approximately 20 mm thick, and slats.
Edged board 50x150x6000
Important. Unedged boards must be sanded, otherwise bark beetles will damage the wood within a few years. To protect wooden structures, impregnation is necessary. It is recommended to use a comprehensive one that simultaneously protects against pests and fire.
Wood fire protection agent
Nails and screws
To make a roof, you need ordinary measuring and carpentry tools. Using electrical equipment is much simpler and easier, but if they are not available, then such a small roof can be built manually.
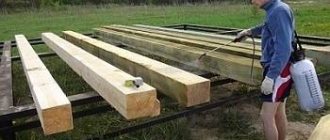
Step 1: Saturate the lumber. You can buy any antiseptic; they all do their job quite well. A prerequisite is that the boards must be dry. The antiseptic is diluted with water, the proportions are indicated by the manufacturer. Impregnation is done at least twice on all sides. Before starting work, lay the boards on a clean and flat surface; they can be impregnated with a brush, roller or pneumatic spray gun.
Impregnation of lumber in this case is carried out with a roller
Step 2. Install the Mauerlat. It must lie on a flat surface; for this, the upper plane of the last row of the building must be leveled. For work, a cement-sand mixture or tile adhesive is used if it remains after any facing work. Open bags of tile adhesive should not be stored for more than 2-3 weeks, it is very hygroscopic and will absorb moisture and harden. In order not to throw away the glue, use it for other construction work at the first opportunity. You can level the surface with a wooden trowel or a metal spatula. Make sure that the plane is not only level, but also strictly horizontal.
Applying tile adhesive
For the Mauerlat it is necessary to use 50×150 mm boards or timber; as a waterproofing layer it is better to use ordinary roofing felt. But there are substitutes here too. If thin foam polyethylene remains during flooring, it does not need to be thrown away. This material does not allow moisture to pass through and perfectly replaces roofing felt. Cut the waterproofing into strips 2–3 cm wider than the board and staple it to the surface of the Mauerlat.
The material is fixed with a stapler
Step 3. Fix the Mauerlat to the reinforcing belt. There are several mounting options:
- when laying the last row of the extension, install metal studs between the seams;
- the studs are concreted when pouring the reinforcing belt;
- fix the board to the wall with special dowels.
In our case, the third option is best suited for several reasons. Firstly, the extension is small in size, the loads on the rafter system are insignificant, there is no need to provide for very reliable fixation of the elements. Secondly, a board is used as a mauerlat; it can be easily drilled on site without preliminary marking. Thirdly, work is greatly simplified and accelerated. There is no need to measure each stud, move a heavy beam several times on a thin wall, or drill deep through holes strictly at right angles.
Dowel diameter 12 mm, length ≈ 150 mm. How is it fixed?
- Place the board exactly in place, check its position, and correct errors if necessary.
- Prepare your instrument. To drill holes in the wall, you will need a drill with pobedit surfacing Ø 12.5–13 mm and a length of at least 200 mm. Why is such a long drill needed? The length of the dowel is 150 mm, while the depth of the hole in the wall is only 100 mm. If the drill has the same dimensions, it will be impossible to remove concrete dust from the hole. As a result, the dowel will not enter the hole to its full length; fixing the Mauerlat will not ensure its stable position during various loads from the rafter system.
- Stand on the board, first drill holes in it using an ordinary drill.
At this point, the preparatory work is completed, and the installation of the roof beams for the extension can begin.
Installation of floor beams
To increase the strength of the structure near the wall, they should be fixed to a board nailed to the masonry.
Step 1. Place a board of the same thickness as the Mauerlat on the opposite wall of the extension. Check their position, they must be located strictly in a horizontal plane, otherwise the ceiling will be sloped. Temporarily place another one on the horizontal board on its edge; the beams will be fixed in this place. If there is an exit of the floor beams from the main building, great, you can use them to navigate the position of the ceiling and other roof structures of the extension and attach the board to them.
Layed board, checking horizontal position
Important. Be sure to provide a waterproof seal between the board and the wall. It should perform two functions: protect the board from moisture from the wall and prevent leaks into the cracks. It is recommended to choose foamed polyethylene as waterproofing. Its pores are closed, which ensures tightness. And high ductility indicators completely compensate for all possible fluctuations in the size of the cracks.
Step 2. Attach the waterproofing and sealing to the board and mark holes for screws approximately 10 cm long and 7 mm in diameter.
If the ends of the ceiling beams of the house do not protrude from the wall, then they need to be fixed with special dowels. The board must be firmly attached and subject to significant multidirectional loads.
Practical advice. When screwing large-diameter hardware into any board, it is necessary to make holes for them. If there are no holes, then greater tensile forces appear and the board may crack. And such an element will have to be changed; the rafter system is made only from intact and healthy boards.
The diameter of the hole being drilled should be 1-1.5 mm less than the diameter of the hardware; it should not wobble. First, the board is fixed to the outer holes and its position is checked. If everything is normal, then you can tighten the remaining screws.
Step 3. Secure the beams in place. There are several mounting options, but the simplest and most reliable is to use special perforated metal elements (stands, stops, holders). They are sold in construction stores and are affordable to all developers without exception. This is an excellent solution for inexperienced builders; the beams are fixed firmly, easily and quickly. In this case, there is no need to maintain greater accuracy of the elements; a spread in length within the range of 1–1.5 cm is not considered critical. Make markings and secure the holders; it is better to fasten them with self-tapping screws. The lower plane of the holders should be located in line with the plane of the board; due to this position, the ceiling beams will be horizontal. The pitch of the beams is ≈ 60 cm.
Fixed metal holder
Practical advice. First fix the fasteners with only two self-tapping screws, screw in the rest only after the final alignment of the ceiling beams.
Step 4. Place the prepared and impregnated beams in place one by one, and at the same time equalize the distances between them.
Step 5. Screw the boards to the Mauerlat using self-tapping screws.
Calculation of the slope of a pitched roof
In terms of design, the simplest roof is considered to be a pitched roof. However, even this type of extension roof requires some preparatory work. The first thing you will need to do is complete the roof design. At this stage, a drawing is drawn up indicating the planned slope of the slope.
It is worth noting that the slope of the roof directly affects the efficiency of its functioning, as well as the durability of the roofing covering. Of course, competent calculations will significantly simplify and speed up construction. The amount of roofing material used for an extension with a pitched roof will increase as the angle of the slope increases.
The calculation of the slope will depend, first of all, on the climatic conditions in a certain region. This angle will be steeper the more precipitation expected in winter in a particular region. A correctly selected value will allow timely and complete removal of rain and snow from the roof surface. At the same time, if a particular area is characterized by strong gusty winds, the slopes should not be made too steep.
The roofing material that will cover the extension to a house with a sloping roof also affects the slope:
- for slate or tiled roofs should be from 22º;
- roofing material laid in 2 layers requires a minimum slope of 5º, and in 3 layers - from 15º;
- The slope of the corrugated roof must be at least 12º;
- metal tile roofs can have slopes with an angle of 14º;
- ondulin, like roofing felt, is laid on slopes with a minimum slope of 6º;
- soft tiles are mounted on roofs with slopes inclined at least 11º.
Common practice shows that the maximum roof slope for an extension to a hipped roof is 45º. It is worth noting that the choice of roof slope angle will be largely influenced by the expected loads on the rafter system caused by wind and precipitation. A design error can result in additional costs if the extension falls due to excessive loads.
How to calculate a sloping roof
In order to assemble the structure efficiently and not experience difficulties at all stages of construction, you need to prepare accurate calculations and a drawing of the sloping roof.

All calculations are divided into two stages: calculation and calculation of all required materials and checking the structure for stability and load-bearing capacity of the rafter system.
You can calculate the first part if you know the final values of the length of the rafters, intermediate beams and roof area. Knowing these data, errors and the amount of waste material, a complete set of components is calculated.
You should not calculate so that the total amount goes to zero, since unexpected expenses may appear during the construction process.
The second stage is more complex and requires precise compliance with all forces and influences on the structure and support. Please note:
- Total weight of the finished roof.
- The influence of individual elements such as roofing, insulation material and rafters.
- The distance between the eaves overhang and the central ridge.
- Slope angle.
- Installation step of rafters and parallel beams.
- The influence of additional elements such as stairs, scaffolding and building materials.
- It is necessary to make allowances for the weight of workers.
- If double-glazed windows are installed, you need to take them into account.
- Ventilation.
- Drains and barriers.
It is necessary to familiarize yourself with the standards for calculating the drawing of a sloping roof. This stage is considered the most important during the entire construction period, since incorrectly selected rafter lengths or insufficient thickness of the load-bearing beam can pose a danger to the lives of builders and residents of the house. On the Internet you can find special programs that help you carry out calculations.
After the design has been calculated and all the indicators allow construction to proceed, you can begin purchasing the material.
Necessary materials for the roof of a house extension
The rafter system of an extension with a pitched roof is made of wooden beams, on top of which the roofing covering is laid (read: “How to make a pitched roof for an extension to a house with your own hands - instructions for building a barn roof”). The frame is made of hardwood, which has been thoroughly dried, treated with antiseptics and primer. Additionally, it is worth opening all wooden elements with fire retardant substances. Such treatment can significantly extend the service life of the rafter system.
So, to create a roof over the extension you will need:
- beams for rafters, supports and other structural elements;
- edged board for cladding ends and sheathing;
- waterproofing and insulating material;
- roofing covering.
As for roofing coverings, as a rule, a gable roof with an extension is covered with the same type of material. At the same time, each owner proceeds, first of all, from his own material capabilities.
The thickness of the beams will depend on the expected loads of rain and snow, as well as the total mass of the roofing material. In this case, beams with dimensions between 120×120 mm and 150×150 mm can be used.
- electric saw or hacksaw;
- drill;
- axe;
- screwdriver;
- knife;
- hammer and furniture stapler;
- nails and screws;
- roulette and level.
The consumption of screws or nails is 8-10 pieces per 1 m2. As for the material for insulation and waterproofing, a margin of 10-15% is added to the total surface area for joining, trimming and overlap. The rafters are calculated based on the maximum distance between them of 1 m.
Extension to a house with a sloping roof
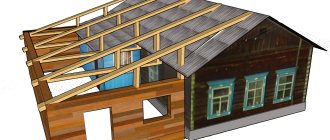
The arrangement of this type is a little more expensive than the previous options, but the structure itself will be much more functional: under such a roof you can build an attic, additional room, which is especially important for a large family.
The peculiarity of this design is a two-stage rafter system: first, the lower tier is mounted, a frame for the second tier is installed on it, and then everything is assembled under one ridge.
The steps are almost the same as for other types of installation: after installation of the rafters, the sheathing, waterproofing and roofing material are prepared.
Installation sequence
If the preliminary design did not provide for the arrangement of a house with an extension under one roof, it is worth making sure that there is a gap of at least 5 cm between the roof of the main building and the additional room. In addition, it is important to correctly tie the extension to the wall of the main house so that rain or snow does not seep into the gap.
In order to attach the roof of the extension to the house as reliably as possible, construction must begin with laying the Mauerlat. It should be thicker, the steeper the slope and the heavier the roof covering.
This beam should be fixed to the walls as firmly as possible, since rafter legs will later be attached to it where the walls of the main house and the extension will connect. In this case, the installation of the rafters is carried out in pre-made grooves in the Mauerlat. Between adjacent rafters there can be a distance of 60-80 cm, but not more than 100 cm.
Please note that the slope of all rafter legs must be the same. Otherwise, due to distortions, water will flow under the roofing material and destroy wooden structures.
Upon completion of the construction of the rafter system, insulation work begins. In cases where the length of the rafters is too long, additional supporting elements are placed between them. On top of them, perpendicular to the rafters, a polyethylene film, roofing felt or other material for waterproofing is spread. To ensure tightness, the insulation is laid with an overlap and the joints are taped with construction tape. The roofing material is fixed to the rafters using a stapler.
Installation of a sloping roof
Although a sloping roof is considered difficult, you can build it yourself. At the initial stages, you need to determine the dimensions of the structure and the optimal drawing. If the roof is made incorrectly, it will leak or be poorly ventilated.
Construction stages:
- Selection of materials and their purchase in the required quantities.
- Carrying out measurements and calculations.
- Treating wood with special solutions and antiseptics.
- Installation of floor beams.
- Assembling and installing the frame of the side walls.
- Construction of the upper slopes.
- Waterproofing, thermal insulation, sound insulation and wind insulation.
- Covering the roof with roofing material.
- Installation of water drainage equipment.
- Installation of roof windows.
Installing a sloping roof is a complex and time-consuming process; if you are not ready for this or do not have special construction skills, then it is better to hire a team of professionals who can do everything turnkey in the shortest possible time. Roof insulation is a particularly difficult process, which is best entrusted to people who understand all the nuances and subtleties. If all the processes are carried out independently, then you need to do this as carefully and thoroughly as possible, because a mistake can be fatal.
How to join the roof to the wall
The junction of the walls of the house and the roof above the extension is additionally sealed to prevent water from flowing into the cracks. At this stage, you should also decide how to connect the roofs of the house and the extension. First, the top layer of roofing material is rolled out over the surface of the roof of the extension and heated with a blowtorch. After this, the material is glued to the main wall.
At the next stage, the sheathing is attached over the waterproofing layer. It is fixed perpendicular to the rafters from a 5x5 cm batten. The pitch of the sheathing is selected based on the type of roofing. If it is a solid material, then each sheet should be supported by at least two bars. For soft roofing coverings, a continuous sheathing is made of particle boards or edged boards.
The final stage of building a roof over an extension is the installation of the roofing covering. The method of laying it depends on the type of material. Be sure to make sure that the coating is laid in a continuous layer without gaps. Finally, the side parts of the roof are covered with edged boards.
Is it necessary to insulate the roof of the extension?
Work on insulating the roof above an extension can reduce heat loss, as well as increase the efficiency of heating, if it is provided in such a room. In order to carry out insulation work, it is necessary to make a rough ceiling before installing the waterproofing layer. The selected insulating material is laid on it, covered with a layer of waterproofing, and then all other installation work is carried out.
The inside of such a ceiling can be covered with plasterboard or moisture-resistant plywood. Don't forget to also insulate the ends of the roof to reduce heat loss due to side winds. In this case, any available material can be used
The external decor of the end parts of the roof above the extension can be made with any finishing materials as desired.