General provisions for constructing a veranda
Modern construction of country houses and country cottages at the design stage involves the construction of a veranda for the house.
In order to save money, customers remove the process of constructing extensions in order to further complete it with their own hands. Let's consider the main points that you need to pay attention to from the generalized experience of building terraces yourself. Parameters by which verandas differ:
- How is it located in relation to the house: corner construction, at the end or along the facade of the house.
- Degree of protection: open or closed (glazed) extension. Using modern materials, you can turn a closed veranda into an open one; this is achieved with sliding doors.
- What type of construction is it made of: built-in - a common foundation with the house or attached - its own foundation.
- Construction shape: rectangle, semicircle, polygon.
What is a veranda
A veranda attached to a house can be made a separate part of it, but it can also be built on a common foundation. In old buildings they forget about it and later try to build it on a separate foundation. By insulating your terrace, you can spend time there all year round.
Types of verandas
Verandas as extensions to a house are divided into different types: according to the type of walls, windows, insulation, perhaps it’s even a winter garden.
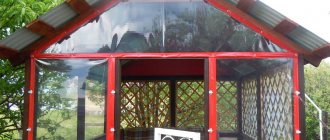
One of the types is the closed type of veranda. In this category we can also include extensions made of polycarbonate, metal-plastic structures, wooden and insulated ones.
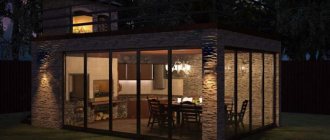
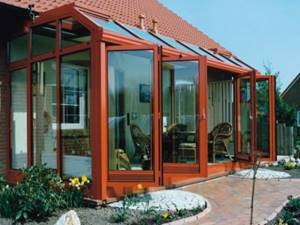
A polycarbonate veranda is an excellent example of modern design. For this type of construction, you do not need to build a full-fledged foundation; you can simply clear the ground under the house and knock down the insulated flooring. Metal profiles are attached to the flooring, and on their basis a polycarbonate profile is formed and attached. Such a veranda at the dacha can easily be transformed into an open type; transparent walls can move and slide apart without any problems. You can simultaneously ventilate the room and hide from insects. The design is lightweight and will not pose any problems in maintenance, but the main thing is that the materials will not break a hole in your budget.
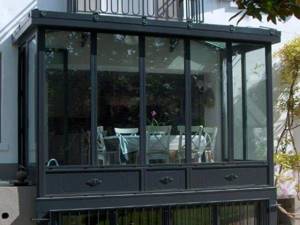
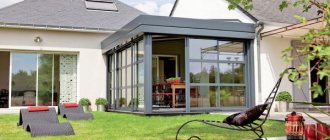
A veranda made of metal-plastic structures is a quick but expensive way to build this kind. There are many advantages when arranging a building from plastic metal profiles. A summer veranda made of metal-plastic can perfectly serve as both an open and closed structure, and in the cold season, heat loss will be minimal. Mosquito nets can be easily attached to metal-plastic structures, so that in the summer midges and mosquitoes will not annoy you, and you can safely enjoy the fresh air. When choosing this kind of structure as the walls of your veranda, you must be prepared for the fact that it will be difficult to choose an interior for it, and the cost of such walls will not be cheap.
Wooden verandas are made from beams like a Russian hut. This design is heavy, so the wooden veranda is built on a full foundation. This type will look great with large windows, and strong walls will protect from bad weather and strong winds. If desired, the extension can combine both an entrance hall and a dining room.
The insulated veranda is ideal for Russian winters. Its walls are lined with mineral wool and lined with chipboard. In winter you will not be afraid of bad weather, and in summer the walls will provide shelter from the heat.
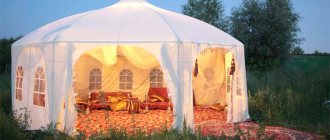
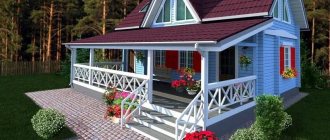
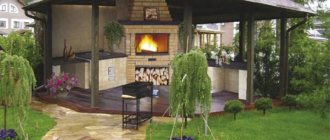
An open-type veranda is perfect for residents of the southern regions; residents of central Russia will not appreciate its advantages. This terrace will decorate your home. A number of its advantages are commensurate with its disadvantages. Yes, in the summer you will enjoy fresh air and gather with family and friends. You can hide from insects with textile curtains and a catcher. But when it gets colder, you will have to give up outdoor recreation.
Open verandas are stylish and beautiful, but they are not suitable for most of Russia. For cold regions, the most optimal type is the closed type.
Veranda project
We must not forget, when designing an extension to a house, that its purpose is to improve the performance of the main structure: make it spacious, add beauty, comfort. A closed terrace also has the function of improving the thermal performance of the house. For the correct construction of the summer extension structure, you must follow the rules that are indicated in the developed project.
What does the project consist of:
- We determine where in the main house we will add a veranda. The main aspect is maintaining the aesthetic perception of the entire architecture of your own home together with the veranda. Important! Experts recommend setting up a veranda in regions with high summer temperatures on the western or eastern side of the main house. It will be less exposed to direct sunlight.
- It is necessary to indicate the location of the entrance to the terrace (veranda). The entrance from the outside and the entrance from the house are indicated. You can make a through passage through the veranda when the door to the house is opposite the entrance to the veranda; this method is not recommended, as there is a risk of drafts.
- We select the type of doors and their installation location.
- We determine the total size of the summer room located along the house. The length is often taken equal to the length of the wall along which the veranda is built. The width is usually taken in the range from 3 meters to 7 meters, the main thing is to maintain the proportion. When choosing the dimensions of the veranda, we relate them to the overall dimensions of the house in order to maintain a single ensemble of the exterior of the building.
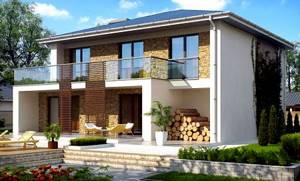
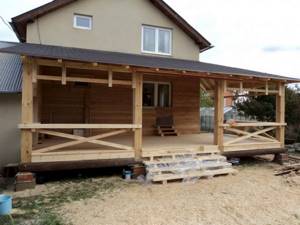
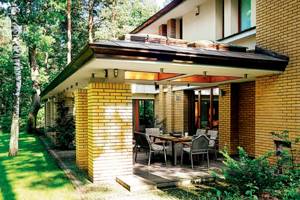
A good example of building a veranda with your own hands, when the design is done at the design stage of the entire house.
Advice! Experts do not recommend saving on the project ; this will reduce the cost of documents permitting the extension and guarantee its correct construction.
Installation of a terrace
Now let's move on to the main type of work. By installing our brick wall, which is actually a thermal panel. Each part of the thermal panel consists of three layers:
- The first layer is a rigid base;
- The second is insulation and waterproofing;
- The third layer is the finish.
The first layer of base helps maintain the shape of the entire panel. The insulation serves as thermal insulation, which helps retain heat.
An example of a terrace on the second floor of a panel house
Well, the last layer is a ceramic tile finish, which is a good addition to the appearance. Thermal panels are connected to each other using a special method called “tongue and groove”. This name means that there will be no seams on the facade of the house. All thermal panels will look like a solid real brick wall. In addition, such a connection will help retain heat on the veranda.
In the 19th century, brickwork decorated almost every house in the Russian Empire. But the technologies that exist today were not even dreamed of back then.
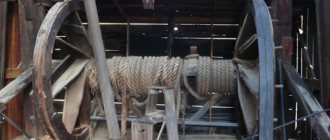
A foundation is made on screw piles next to the house for further fastening of the veranda. If you locate your veranda in a house that is located in a low area, and there is a source of water nearby, then after winter ends, the foundation of your house or veranda may not withstand the influx of water. Using screw piles, you will be completely safe, as they are absolutely reliable and will never let you down.
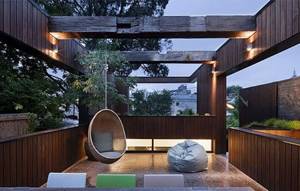
An original solution for an open-air terrace
Thermal panels have various additional elements, thanks to which you can sheathe a house or veranda very neatly. For example, there are special panels for window openings or door jambs. Such special panels differ in color from the main facade. The color of these elements is darker than the main color of the thermal panels. Thus, we will emphasize the geometry of the terrace by enclosing the door and window openings.
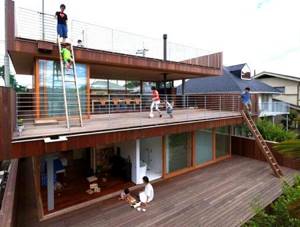
If you don’t have a canopy in your house to spend time outdoors, then an open terrace on the second floor is the choice for you. In summer cottages, such a structure is simply necessary. A special decking board is used to cover the terrace. This board has passed the test of time. It is laid on open terraces, piers, gazebos, in general, wherever there is sun and rain, frost and snow. This board can survive in the most extreme conditions, and all thanks to its clever composition and waterproofing.
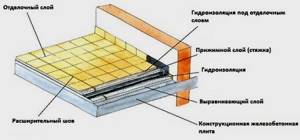
Scheme of waterproofing the terrace on the second floor of the cottage
It consists of sawdust and polyethylene. Wood gives it natural beauty, and polyethylene gives it durability. Next, you can decorate your terrace with decorative “dirk” columns. Thanks to modern technologies, such decoration is light in weight and highly durable, which is important for a building on the second floor. Basically, such decorations for the terrace are made of polyurethane foam.
Due to its low weight, the load on the terrace façade is minimal. Despite the fact that these decorations are mostly white, if you want to keep the same color, it is better to reapply white paint. This is necessary because the polyurethane material can turn yellow in the sun, but thanks to paint it retains its original appearance.
How to build a veranda in a wooden house?
Let's go through step-by-step construction of a veranda in a wooden house with our own hands. It should be noted that an extension to the house can only begin after it has completely settled. Log houses, or those made of timber, are actively shrinking over the course of three years; during this period it is better not to build an extension, otherwise the walls may warp. For those who don't want to wait, experienced builders recommend building a transitional porch structure with the house that allows the frame to play.
How to start construction?
The reconstruction of the house must be reflected in the permitting documents. To obtain these permits, you must contact the regional architecture department and submit the following documents:
- The right to own a plot of land (the land on which the house stands).
- Design documentation of the main structure.
- Written consent of all registered residents in the house for reconstruction and addition of a veranda.
- Application from the developer for registration of an extension.
It is advisable to start preparing documents for a construction permit 3-4 months before the start of work . From the general experience of private developers, this is a lengthy procedure.
You can build an extension without permits, but in this case problems may arise when the house becomes an inheritance or you want to sell it. The reason is the change in the total area of the house, since the veranda is part of it, and the total area of the residential building is taken into account with it. The BTI department may view this as an unauthorized decision to increase the area for housing. This is especially true when the terrace is closed and heated.
There is no need to get carried away and make deviations in the dimensions of the terrace, which are indicated in the project. A simple check will easily reveal this, and a fine will follow with adjustments to the documentation. What unauthorized developers can expect from adding a veranda to a house is specified in the law of the Russian Federation .
Planning an outdoor terrace
Before you start designing an open terrace for your house, you need to decide on its location and type of construction.
Choosing a location for future construction
When planning the arrangement of a terrace, you should consider the following parameters:
- illumination of the sides of the house;
- features of the site's topography and soil type;
- view from the site;
- landscape of the territory - the extension should be combined with the design of the yard and the design style of the house.
An interesting solution for houses located on a slope is a multi-level terrace. Such an extension simultaneously serves as steps.
Accommodation options:
- Terrace to the house. This is the most popular solution, as it can be implemented in almost every building. The design requires a reliable foundation . It can be made from different materials: brick, wood, metal.
- Detached extension. Accommodation on a free plot of territory. The recreation area can be built on a raised block foundation or a monolithic foundation .
- "Ring" terrace. The extension needs a solid foundation and proper calculation. It is possible to combine the open part of the terrace and the closed veranda .
Which material is better to choose
Wood is most often used to build an open area. This is the optimal solution if you plan to build a terrace with your own hands.
Useful: Glass wool is a classic insulation
Advantages of wooden buildings:
- ease of processing lumber;
- lightness of the material and the possibility of constructing a “lightweight” base;
- attractive appearance - wood creates a special atmosphere of comfort and coziness ;
- versatility - a wooden terrace looks organically with houses made of different materials.
Cons of wood:
- risk of fire - it is better not to set up a barbecue area ;
- the need to treat wood with protective compounds to prevent rotting and damage by insects.
A brick terrace is a durable structure that is easy to maintain. However, its construction requires significant financial costs . In addition, such an extension is not suitable for frame and wooden houses.
Development and approval of the project
Having decided on the type of terrace, its placement and material of manufacture, it is necessary to draw up a sketch of the future extension.
The project plan should show:
- the exact configuration, area and dimensions of the extension;
- foundation type;
- weight of the structure;
- type of flooring, roof structure and fencing option.
The size of the terrace should be commensurate with the dimensions of the house . Tiny extensions adjacent to a spacious building look ridiculous.
Layout tips:
- the terrace should not be less than 4 square meters. m - it is very difficult to make such an area comfortable;
- it is better to give preference to a rectangular extension - there should be a visual correspondence between the main part of the house and the configuration of the terrace;
- if you plan to install a fireplace or stove, then it is necessary to strengthen the foundation and consider the water supply to the site.
The project must be agreed upon and approved. Without obtaining permits, the terrace will be considered a self-construction , which will complicate the sale, rental or other real estate transactions in the future.
Preparing for construction, choosing material
After determining the construction site of the veranda, it must be prepared. The construction site begins along the selected wall, so before starting all work you need to:
- If there is a canopy over the main entrance, remove it.
- Dismantle the porch.
- Clear the entire area under the veranda of debris and bushes.
- Prepare a place for storing building materials. It will be much easier to build a summer extension when the materials for it are selected in advance.
What tools and materials will we need?
When making a wooden extension with your own hands, you will need the following tools:
- Having construction skills you need: a hacksaw, an ax.
- Power tools: sledgehammer, hammer.
- Marking: tape measure, plumb line, level, marking cord, corner.
- For the foundation: shovel
If a metal frame is being made, a welding unit and a grinder with a disk for cutting metal are additionally prepared. This type of frame is considered the most economical for building an extension.
A brick or wooden veranda would look better . Important! Make sure the materials of the extension and the main house match.
A wooden summer extension requires the following material:
- Lumber: beams, logs, boards, slats.
- Elements of wooden fasteners.
- Mixtures that perform protective functions for wood.
- Construction material: crushed stone, concrete.
- You will need drying oil and roofing felt.
- Choosing the material for the roof of the veranda.
- Window and door systems.
In the design of an additional room for summer recreation, using metal corners, instead of wooden materials, a metal profile and compositions for metal processing are used.
Recent Entries
Chainsaw or electric saw - what to choose for the garden? 4 mistakes when growing tomatoes in pots that almost all housewives make Secrets of growing seedlings from the Japanese, who are very sensitive to the soil
For a better view, you can make an extension (walls and roof) from polycarbonate, the panorama will be complete and clear. The positive properties of this material include the ability to retain heat well; it can be used for walls and roofs.
Advice! Materials that will be used in construction and that require pre-treatment must undergo this process first before construction.
Foundation for the veranda
The first thing you need to do is determine the type of foundation for your veranda. A popular type is a columnar foundation , since it is not tied to the base of a capital construction (house).
If the veranda is being built for a long time and thoroughly, it needs a strip foundation. Before making a foundation, you need to refer to the house construction documents, which indicate what soil it stands on, from this you can choose the type of foundation for the extension . Parameters to pay attention to:
- What is the soil's ability to absorb moisture?
- What is the composition of the soil at the site where the veranda is being built?
- To what depth does the soil freeze in the region where you live?
- How close to the surface is groundwater?
- General provisions for soil stability.
When choosing the type of foundation for the veranda, we pay attention to the foundation of the main building, its design, and the condition of the load-bearing walls. After selecting the foundation, markings are made on the soil for further work.
Advice! A small wooden veranda will sit quite well on a columnar foundation at the corners of the extension. For wide and long verandas, the installation of pillars is used at intervals of 600 millimeters along the length and width of the extension.
Columnar foundation, how to make it?
The foundation (foundation) for an extension is just as important as for the main house; it must be made of high-quality material. Work order:
- We dig holes for the pillars to a depth of at least 100 centimeters; its depth cannot be less than the depth of the foundation under the main building. The level of soil freezing is taken into account; the hole should be deeper than this level.
- At the bottom of the dug holes we make a cushion, this is a mixture of sand and crushed stone. The pillow can be made in layers, sand, crushed stone.
- Fill the pillow with concrete.
- We lay out support columns from brick when the main house is brick. If the main house is wooden, wooden beams are used as columns. Metal supports or asbestos pipes are used in columnar foundations for a frame veranda.
The veranda looks beautiful when it is located on the 2nd floor of the house . In this case, the ground part of the extension support is laid out at the level of the main foundation under the house. When a house with a high base is recommended, the veranda should be built according to its level.
Making a strip foundation
It is used if a heavy veranda with glazing is planned. To equip it, a trench is dug along the perimeter of the future veranda and formwork is installed. It is placed a little higher than it is planned to fill the foundation with concrete.
After pouring the foundation with concrete, it is periodically moistened with water until it is completely formed; this is necessary for uniform hardening of the foundation.
How to Improve the Look of Your Deck
At the end of the deck installation, painting is the best method to further enhance the appearance. One of the most common and generally used colors in which terraces are painted is white, it emphasizes the importance of the structure.
It is better to use polycarbonate sheets for laying the terrace roof. This material is transparent and allows the terrace to be illuminated by the sun, and also has waterproofing properties. Thanks to this, everything will remain airy and graceful.
An example of arranging a terrace on the second floor
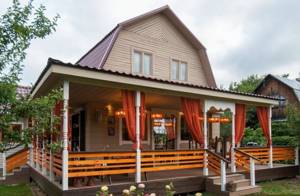
In classical Russian estates, it was customary to use forged elements for fencing. Our estate is modern, and it will be suitable for specially purchased fences for the terrace, which are assembled simply like a construction kit and at the same time have different widths, lengths and heights. You can choose the height and frequency of the racks yourself.
Making a veranda frame
For a wooden house, the frame of the veranda begins with laying the timber on supports in the lower frame. In the corners we use “dovetail” for cuts, so it is better to join the timber at the corners .
For reliability, nails are used; dowel fastening is possible. Recommendation! Often the bottom trim is made double, then logs and veranda posts are attached to it.
Timber for a wooden veranda is used with a cross-section: 100x100 or 180x80 millimeters. When logs are used in the harness, their cross-section should not be larger than 120 millimeters. The supports near the wall are made higher than the rest to form a pitched roof. When the frame is mounted, horizontally installed beams are the basis for the window sill , if glazing is provided. The top trim completes the installation of the veranda frame; it is the basis for the rafters and creates rigidity for the entire system.
Temporary spacers must be used to avoid distortion in the frame structure.
Veranda roof
Once they have decided on the material for covering the roof, they begin to install the sheathing on the rafters, which are attached to the top trim.
Structurally, the following types of roofing are offered for verandas :
- Single pitch roof. This is a simple design and easy to implement. Requires a slope from the main wall of the house towards the street.
- Gable roof. It is used if the veranda is attached to the end of the house with a narrow side.
- Polygonal roof. Its design is varied, the main thing is to maintain a slope for water drainage.
The rafter system is installed based on the selected material:
- Lathing for metal tiles, slate and ondulin
- Solid decking is made for flexible roofing materials.
Veranda floor
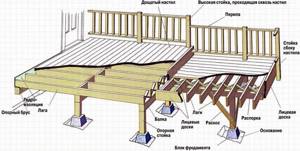
Making the floor with your own hands is simple:
- We install the logs on the lower frame of the veranda structure. The distance between the lags is no more than 100 centimeters. We install them perpendicular to the floorboard.
- We cover the logs, checked by level with a floorboard.
If you plan to build an open veranda , many agree on installing a floor with a slight slope to allow water to drain. The board is fastened with self-tapping screws, the length of which is twice the width of the board. It is necessary to impregnate the floorboards with a solution that resists the creation of fungal deposits.