Varieties of finishing elements
To arrange a plastic garden path, you can use both improvised (homemade) means and ready-made gratings or plastic modules. In the first case, you will have to show your imagination and spend a lot of time, since the first time the appearance of the finished product can be frankly disappointing. But it is possible to complete the track at low cost. With finished products everything is much simpler, you just need to decide on the color scheme and material, and you can start installation work, but from a financial point of view, it will be more expensive.
Paths can be made from various materials
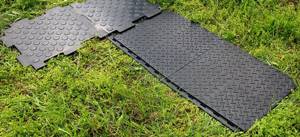
Plastic modules are panels of different sizes. Most often we are talking about the size of 30x30 cm (the size directly depends on the shape). This type of arrangement of plastic paths allows you to hide all the flaws and unevenness of the site.
Advantages and disadvantages
Plastic panels have a number of undeniable advantages over other materials, namely:
- Ease. When delivering material to the site and installing it, weight plays a significant role. In this case, all loading and unloading work can be done independently, without resorting to outside help.
- Affordable price. For many buyers, the issue of price comes first. Plastic panels will cost about 15–20% less than concrete panels, and in comparison with ceramic tiles their cost is 5 times lower.
- Easy to install. In most cases, installation of plastic panels does not require soil preparation or the use of any special tools.
- Strength and durability. Despite their small thickness, plastic tiles can withstand heavy loads, and their service life is more than 10 years. Such panels can easily withstand temperature changes and are resistant to snow, water, frost and other natural factors.
- Plastic does not react biologically, which means that the paths are safe to walk barefoot.
- Wide range of colors. The selection of different color schemes will allow you to create not just a path in your dacha or garden plot, but a real work of art that everyone around you will admire.
Compared to the positive aspects of this material, there are not many disadvantages. The main disadvantage is that plastic is a synthetic material, which means it is not environmentally friendly.
Vertical method of making a border
When looking at a photograph of a flower bed made of bottles made using the vertical method, everyone mistakenly believes that it is complex, but it is not.
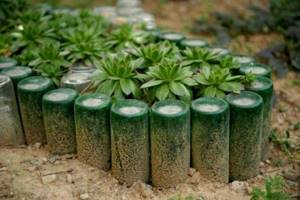
The vertical method is simpler than the horizontal one. You will need plastic bottles of absolutely any capacity.
c11edd7d4ec829a6cff194cca84e509e.jpe
6037b377d72f49c72964a7ebb1d030ce.jpe d4ab21d19073106d529ca85316adb6f0.jpe
It is preferable not to take bottles with soft plastic, but to opt for hard plastic. When filled, bottles made of hard plastic will hold their shape more steadily.

You need to bury it in a pre-dug trench of shallow depth. You will get a good, rather high fence. The only drawback is the weak stability of this design.

Laying technologies
The installation method directly depends on the selected material and the area on which installation is planned. Despite the simplicity of working with the material, it is necessary to perform certain preparatory work, mark the site, and mark the boundaries. When using multi-colored plates, it is worth considering in what order they will be stacked.
Modular board
Modular coating is a material that is made of pure plastic. When laying a modular track, you must adhere to the following algorithm of actions:
- At the initial stage, it is advisable to remove the top layer of soil. You don’t have to do this, but doing this will extend the life of the finished garden path.
- The trench is cleared of roots and debris, after which it is necessary to compact the soil.
- Stone screenings or crushed stone are poured into the prepared base.
- To ensure the durability of the structure and protect it from the germination of weeds, it is advisable to lay geotextiles, pour sand on top and compact it tightly.
- Next, the modules are stacked. If there is a slope (even a small one) on the surface, work begins from the highest point. A rubber mallet is used to tightly join polypropylene panels.
- When the flooring is laid, it must be compacted.
We follow the instructions for laying such paths.
See also: what is geotextile for garden paths.
When performing work, it is necessary to constantly monitor the height difference; it should not exceed 5 mm. Otherwise, it will be impossible to achieve tight adhesion of the panels.
In cases where temporary paths are involved, plastic slabs are laid directly on the ground, without creating a base. In this case, they can be easily dismantled and, if necessary, moved to another place.
Polymer sand analogues
This polymer coating is made from a mixture of different components: a polymer mixture, color pigment and a number of special additives that create a special texture on the surface of the material that allows it to withstand various environmental factors. In addition, a special filler is used for such tiles. This can be stone chips, various synthetic or natural fibers, sand, sawdust. The highest quality and most durable tiles are those that use quartz sand as a filler.
The technology for laying such tiles consists of the following steps:
- Using pegs and twine, you need to mark the shape, the bend of the path and, depending on its width, calculate the number of tiles.
- Remove the soil to a depth of 10–15 cm, then clear the formed trench of debris.
- Drainage pipes are laid at the bottom, which must be covered with sand and compacted. This type of work must be performed with the highest possible quality, since the service life of the paths will depend on how tightly the sand is compressed.
- Next, a sand-cement mortar is prepared in a ratio of 1:4. Having poured the solution, it must be allowed to harden for some time, after which the tiles are laid on it.
- To prevent moisture from accumulating, the formed seams are filled with a dry mixture of sand and cement in a ratio of 1:6.
- At the last stage it is necessary to arrange the borders. They should protrude 3–5 cm above the surface of the path. If voids have formed between the tiles and the curbs, they are filled with a dry sand-cement mixture.
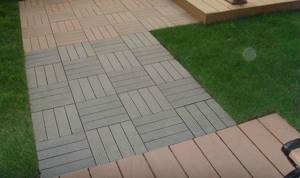
Decking
The term “decking” refers to garden parquet, which contains a mixture of chloride, polymer and wood flour, the percentage of which ranges from 50 to 80%. The lower part of such plates is equipped with special holes that provide ventilation and allow you to get rid of excess moisture.
The process of installing paths made of this material coincides with the technology of laying modular slabs. In particular, it consists of the following stages:
- Preparation of a flat and strong base, which will be the main reliability and durability of the finished structure.
- Experts recommend using a screed made of sand and cement as a foundation.
- The mixture is placed in a layer of 3 cm, after which it should harden, and decking is laid on top.
- To drain water, there should be a gap of 1–5 mm between the component parts of the structure, as this will ensure water drainage.
Available materials
You can not only purchase a plastic path ready-made, but you can also make it yourself, and the costs will be several times less, although you will have to put in some effort and spend more time.
Most often, plastic bottles are used as available materials, but there are also options with lids, different pieces of plastic and other materials.
To equip a path, a trench about 20 cm deep is prepared from whole plastic bottles, with stone, broken brick or other construction waste placed in the bottom layer. Next, the surface is covered with sand and thoroughly compacted.
The prepared bottles are filled with sand or soil and then laid horizontally. To ensure that the bottles fit tightly, a board is placed on them, which you should walk on for 15–20 minutes. To fill the voids between the bottles, a sand-cement mortar is used, and when it sets, the structure is considered ready.
To give the path an original appearance, you can fill the bottles with multi-colored pebbles, foil, colored paper and other colored materials.
Decor for the garden - photos of ready-made examples
Armed with imagination, in addition to interesting plastic garden paths, you can make a good fence for the site.

If you buy glue and fasten the lids together in the shape of a circle, you will get an unusual table for tea drinking.
Thematic material:
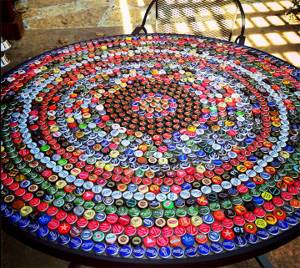
Photo: cork table
Mosaic lovers can be patient and try to create a whole picture that will delight the eyes of others for many years.
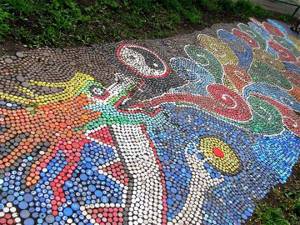
Photo: mosaic of lids
A simpler, but no less interesting option is to use whole bottles, turned upside down, as a fence for a flower bed.
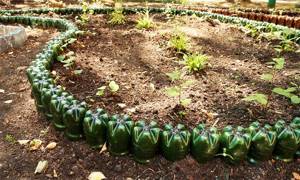
Photo: flowerbed border
By choosing corks according to color and shape, you can create wall compositions. They will become an interesting decoration for a fence, walls of outbuildings, gazebos, bathhouses, and houses.

Photo: other crafts
This is how you get original decorative elements from unnecessary things, which are easy to make yourself. And if you invite children to help, landscaping the site will turn into an exciting creative process for the whole family.