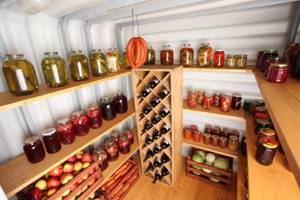
A cellar at the dacha will allow you to store food for a long time and with high quality.
A do-it-yourself cellar at the dacha is a good opportunity to ensure long-term, high-quality storage of food. And since, if the cellar is built correctly, it stably maintains the same temperature all year round, it is simply irreplaceable for storing not only canned goods and pickles, but also vegetables and fruits. A cellar at the dacha is an absolutely necessary thing for those who have a vegetable garden or orchard at the dacha.
A cellar is a building necessary on a summer cottage and on any private estate.

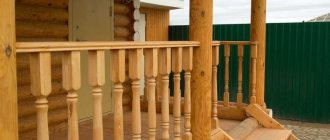
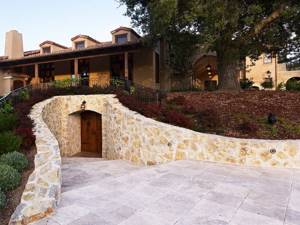
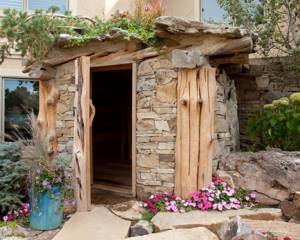
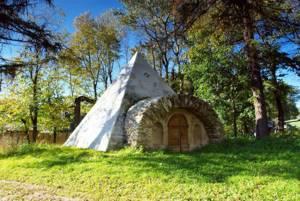
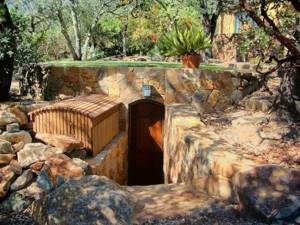
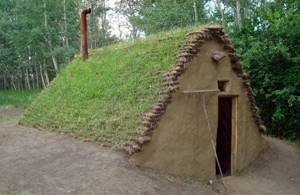
Magnificent cellar in the form of a fairytale house
Cellar in the country: main types
Despite the structural features of construction, cellars can be divided into three types (diagrams of cellar construction, depending on type, are shown in Fig. 1):
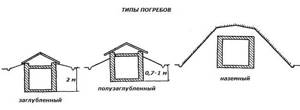
Rice. 1. Diagram of the structure of the main types of cellars.
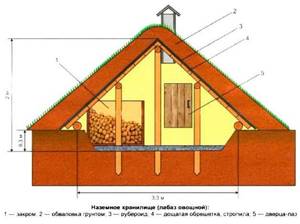
- ground - arranged in the case of a very high (0.5 m) groundwater level. It could be simply an insulated box made of wood, a wall cellar (attached to the main wall, in fact - another room, only with embankment, the diagram is shown in Fig. 2) or a brick storage with embankment (Fig. 3)
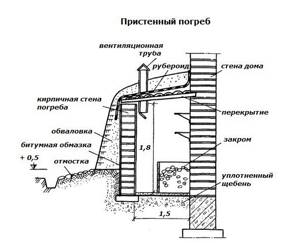
Rice. 2. Scheme of a wall cellar
Rice. 3. Ground cellar with embankment.
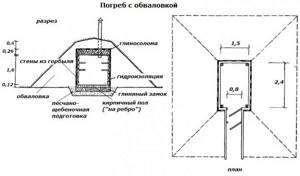
- semi-buried cellar - arranged in places where the groundwater level is located within 1.5-2 m from the surface of the earth. A diagram of a semi-buried cellar is shown in Fig. 4.
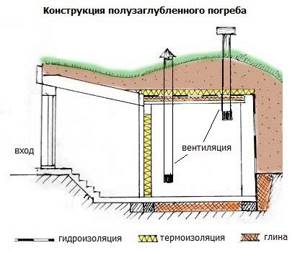
Rice. 4. Scheme of a semi-buried cellar
- To build it, you will need to dig a pit 0.8-1 m deep. The base is erected from brick or concrete, raising the walls to a height of 2-2.2 m. The ceiling is made of wood, concrete or slate. The entire structure is sprinkled with soil on top. The entrance to such a cellar is arranged at ground level, with a vestibule, stairs and a second, necessarily insulated, door. In principle, all construction operations, including waterproofing, ventilation and insulation, are similar to those carried out during the construction of a deep basement.
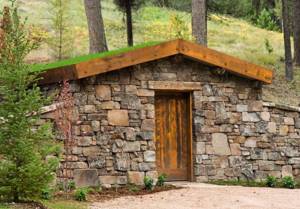
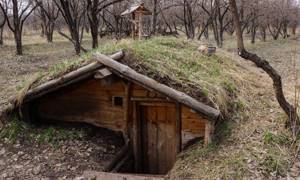
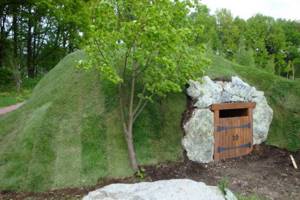
Beautiful cellar in the country, made of natural stone
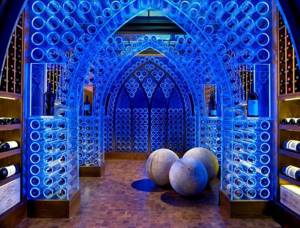
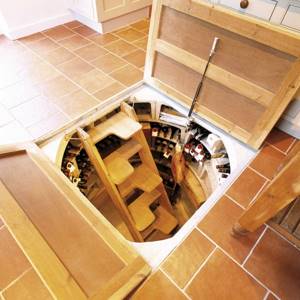
A cellar is a small cold room for storing vegetables and fruits, preparations and wines, meat and dried products
- a recessed cellar is the most common type; it can be either separate (having its own cellar, Fig. 5) or located under the house, summer kitchen or garage. Therefore, we will consider in detail below how to build a cellar with your own hands at the dacha.
Rice. 5. Scheme of a separate cellar with a cellar.
Features of above-ground cellars
The main difference that ground cellars have from other types of structures is their location relative to the soil level. This device is located completely on the surface, which distinguishes it from underground, buried completely or half into the ground (read Semi-buried cellar: proper manufacturing).
Above ground basements can be:
- Standing separately, as an autonomous structure.
- Wall-mounted. When one of the walls of the cellar is an already existing wall of a building: a barn, house or other building. The wall-mounted above-ground cellar does not discord with the surrounding landscape.
Both building options, despite their external differences, have a number of advantages:
- They occupy a small area of the site.
- Absolute exclusion of flooding.
- At any time of the year, excellent functionality and at the same time absolute energy independence.
- Ease of use, which is due to the fairly large size of the cellar, which distinguishes them from ordinary household refrigerators.
The disadvantages of the structures include:
- Occupies, albeit a small, part of the site
- The existing landscape is disturbed, which can be minimized if the cellar is built in a wall-mounted version, along with the house.
- It is necessary to carry out additional hydraulic engineering work.
- The storage must be maintained in proper form:
- clean up in a timely manner;
- carry out disinfection;
- carry out antiparasitic treatment.
Before building a ground cellar, it is necessary to select its optimal option.
There are three main types of above-ground storage structures:
- The labez is ordinary with embankment.
- Basement without embankment.
- Wall-mounted above-ground cellar.
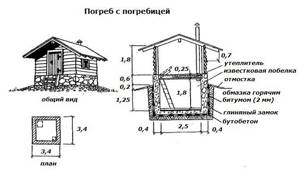
How to make a labez with bunding
A ground cellar with an embankment is the simplest structure, more reminiscent of a hut, for the construction of which boards or logs are used.
Tip: When constructing a building, it is not at all necessary to purchase new materials; previously used ones will do. Then the price of the structure will be much lower.
Scheme of a ground cellar with soil embankment.
Instructions for the construction of such a basement are as follows:
- For the walls of the structure, skinned logs are used, the diameter of which is no more than 25 cm, they are covered with bitumen or fired to a height of 50 to 60 cm, this will help double their service life.
- The treated edges of the logs are dug into the ground along the entire perimeter of the future building.
- The upper ends are tightly tied together with long poles. The result is a complete structure.
- The sheathing is made from a “slab” with hewn edges, and the roof is made from boards.
- The cracks formed are caulked. The best material for this is moss.
- The walls from the outside are protected from ground and capillary moisture by coating them twice with fairly hot bitumen mastic; you can also use pure bitumen.
- The structure is covered with roofing felt, which forms the necessary waterproofing of the cellar.
- The end side is sewn up with boards of two rows and a layer of roofing felt is laid between them.
- The entrance doors to such a cellar are made double.
- The structure is filled or embanked with peat soil, which retains heat well.
- Grass or creeping plants are sown on top; it can be covered with turf.
- On the north side there is an entrance with an insulated door and a small canopy over it.
- A not too deep ditch is dug along the perimeter of the structure, which protects against the ingress of water.
- Ventilation is installed in the cellar. For the hood, you can use a wooden box in which a control valve and a pair of pipes are built in:
- an exhaust hood is installed under the ceiling;
- the flow is located 50 centimeters above the floor level.
Tip: The resulting hill after embankment can be turned into a kind of art object on a plot of land. Plant ornamental plants here or turn it into an alpine hill.
A general view of the cellar with embankment is shown in the photo.
Cellar with embankment
The optimal dimensions of such a structure are 4 x 8 meters; the cellar can last up to 10 years.
For those who do not want to clean their basement every year, you can use the construction of a prefabricated cellar structure. It is erected in early autumn and dismantled in the spring.
After this, the soil is dug up with a bayonet shovel to its depth, the soil is treated with a five percent solution of copper sulfate.
Tip: It is necessary that the edges of the roof hang down almost to the ground. Externally, a built cellar should look like a hut. And the snow that falls in winter will serve as natural insulation.
How to build an above-ground basement without embankment
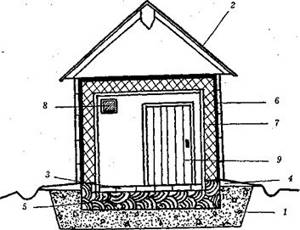
Scheme of a cellar without embankment
This design is an outwardly ordinary outbuilding.
Here are the positions:
- 1 - basement pillow.
- 2 – roof covered with roofing felt.
- 3 – floor made of red brick.
- 4 – blind area.
- 5 - clay protection against rodents.
- 6 - sheet covering.
- 7 – wall.
- 8 – window for ventilation.
- 9 – entrance door.
Building a ground cellar with your own hands is quite simple, provided you follow the sequence of work:
- The marking of the future above-ground cellar is being made.
- The turf is removed.
- A hole up to 60 cm deep is dug, and the earth is collected in a heap for later use.
- The prepared site is thoroughly compacted and leveled.
- A drainage pad is installed, which creates the necessary waterproofing. For this you can use:
- expanded clay;
- fine gravel;
- coarse sand.
- Reliable protection against rodents is created: well-diluted and kneaded clay is laid out in a layer of about 12 centimeters on a prepared pillow.
- Red bricks are sunk flat into it. The gap between them is chosen to be minimal.
- Placing the bricks on edge, the side walls are laid out. Sand, clay and lime make up the mixture for the bonding mortar between the bricks. The masonry should rise at the same time as a shovel bayonet from the ground level.
- The ceiling and walls are being installed. To do this, you will need thick boards up to 50 millimeters. They are sewn in two rows, each lined with heat-insulating material, which can be:
- expanded clay;
- Styrofoam;
- moss.
- The finished walls are sheathed with roofing felt, which will prevent the occurrence of unwanted drafts in the vegetable storage area.
- On one of the end sides of the above-ground cellar there is a manhole with two doors - internal and external.
Tip: In extreme cold, it is necessary to lay insulation between them.
- The construction of a small vestibule will help make the thermal insulation of the storage facility more reliable. A ventilation pipe is also installed on the same side.
- A roof is being constructed, which can be:
- single slope;
- gable.
You can use any roofing material for it: slate or roofing felt.
- A drainage ditch up to 50 cm deep is dug along the entire perimeter of the above-ground cellar and a blind area up to one meter wide is equipped, with a slight slope leading from the storage facility, which can protect it from flooding.
DIY cellar at the dacha step by step: tips and tricks
For the construction of a semi-recessed, and especially a recessed cellar, it is very important to accurately determine the location of construction, and more precisely, to determine the level of groundwater. To do this, you can use the help of professionals (expensive, but reliable), or you can try the folk method, which gives a fairly accurate result. To do this you will need a glass cap, a piece of wool and a fresh egg. In the place where you planned to build a cellar, place a piece of wool on the ground, an egg on top of it and cover them with a glass cap. Leave this “construction” overnight, and evaluate the results in the morning:
- wool and eggs in dew - the level of groundwater is insignificant, here you will have to limit yourself to an above-ground cellar
Fairy-tale style cellar
The cellar may well become one of the decorations of your site
- there is dew on the wool, and the egg is dry - groundwater lies deep enough to build a semi-buried cellar
- Dry eggs and wool are an excellent place to build a deep cellar.
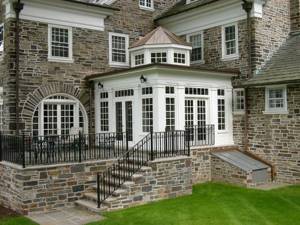
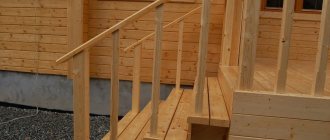
Cellar located under the veranda
Advice! The best time to build a cellar is in the summer, when the groundwater level is lowest.
It is best to build a cellar in the summer
If the construction of a cellar is planned in a house (more precisely, under the house), then it is better to place it under non-residential (unheated) premises, ideally under a veranda (the temperature there is lower than in the rest of the house, it is easier to arrange ventilation, and in winter the veranda will protect from frost). If the layout of the house allows you to arrange a cellar only in the heated part of the building, additional thermal insulation of the ceiling will be required (for example, lay foam plastic 5 cm thick on the ceiling) and good ventilation, otherwise it is impossible to ensure optimal storage of food.
If the cellar is located under a heated room, then you need to take care of its thermal insulation
Cellar interior in the style of oriental fairy tales
After this, you can begin the practical part of construction.
DIY basement construction under the veranda
Before you begin work on constructing a cellar under the veranda, it is important to determine the configuration of the structure, its depth and materials for construction. You also need to understand that building a basement under any building requires deepening its walls along the entire height. However, the basement can be buried halfway, but only on the condition that the main structure is raised to the same height or is above ground.
GWL is an important indicator!
The choice of materials for the construction of the basement and its dimensions are determined taking into account the level of groundwater. The optimal depth of the basement is 1.8 - 2 m, since in this way a person can stand at his full height. According to the standards, the depth of groundwater should not be less than 0.5 m, therefore, the GWL indicator should be no more than 2.5 m.
You can check this using special maps of groundwater occurrence or yourself. To do this, you will need to cut a hole about 3 m deep and lower a pole (probe) into it and leave it in the hole for 3 - 4 hours. After pulling out the pole, make sure that it is dry; if not, measure the distance from the wet boundary to the ground surface.
Materials for building a cellar
When constructing monolithic residential buildings with basements, it is important to choose the right materials for the construction of cellar walls, taking into account the upcoming loads. For these purposes, you can use clay bricks, concrete blocks, rubble stone, monolithic concrete - all materials that are allowed for use by building codes when constructing permanent buildings.
The thickness of the cellar walls should not be less than:
- Concrete blocks: foundation base 400 mm, wall – 250 mm;
- Monolithic concrete: foundation base 300 mm, wall – 200 mm;
- Rubble stone: foundation base 800 mm, wall – 600 mm;
- Ceramic brick: foundation base 640 mm (2.5 bricks), wall 380 mm (1.5 bricks).
The construction of a cellar foundation made of cellular concrete is prohibited by building codes due to the high hygroscopicity and insufficient strength of the material.
Features of the cellar base structure
It is imperative to equip a drainage system; for this, crushed stone is poured onto the bottom of the pit, on which a sand “cushion” is laid (the thickness of the base should be 20–25 cm). The drainage system helps remove water, which will prevent stagnation of moisture under the cellar floor. Between the layer of sand and crushed stone, it is advisable to place a layer of geofabric, which will prevent mixing of materials.
Features of the structure of the supporting part of the foundation and floor
Provided that the basement walls act as a foundation, the order of work on the construction of the structure is carried out according to the following scheme:
- Roofing felt is laid on the base of the foundation along the entire perimeter. This will protect the room from unnecessary importance.
- Determine the dimensions of the foundation base (8 mm is usually sufficient for basements).
- Vertical trenches are created at the bottom of the pit, which are subsequently filled with concrete (a kind of permanent formwork) if a monolithic foundation is intended to be used.
The upper horizontal surface and the floor of the cellar will be at the same level after installing the concrete screed. To waterproof the side walls of block and brick masonry, you can use plastering, which is performed during the masonry process. For example, after laying 3 - 4 rows, the outer surface of the wall is reinforced and plastered. It is advisable to do waterproofing both outside and inside, which will reliably protect the basement from dampness. It is advisable to add water-repellent and anti-frost additives to the masonry mortar and plaster mortar.
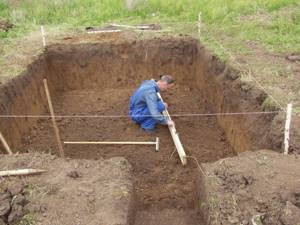
Digging a pit
The construction of a cellar at the dacha with your own hands begins with marking the foundation pit, while adding from 0.5 to 1 m to the planned dimensions - this will make it easier to waterproof the cellar. First, the top fertile layer of soil is removed - it can later be used to create flower beds, terraces, alpine slides, etc. After this, the pit itself is dug (Fig. 6).
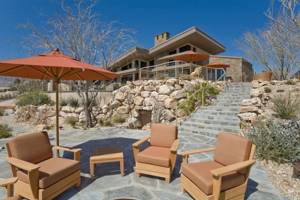
Before building a cellar, you need to choose the right place
A cellar is practically the same refrigerator, but with slightly different dimensions, and without the constant costs of repairs and electricity
Advice! To prevent the earth from crumbling down and the soil to hold stronger, the walls of the pit are made not vertical, but with a slight slope, and the steepness of the slope is selected depending on the type of soil (the harder it is, the smaller the slope).
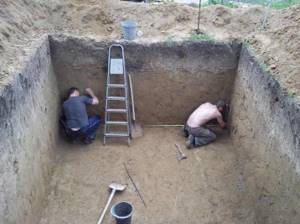
Rice. 6. Digging a pit
To make sure that water is not seeping through the walls somewhere, the pit is allowed to stand for some time. Places where water appears are sealed with so-called “clay tampons” - they dig out a ditch (up to 50 cm deep) and trample it with crumpled fat clay, compacting it tightly.
Construction of the cellar bottom
A layer of sand and gravel mixture is placed in a dug pit (for an in-ground cellar) or on the mainland soil (for an above-ground one) and compacted. Depending on the available materials, the bottom of the cellar is made of concrete, adobe or wood.
The concrete floor is laid on a layer of welded reinforcing mesh and covered with the same mesh. The mesh is sealed on top with a cement screed.
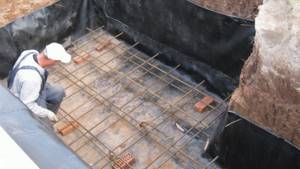
Reinforcing mesh for laying the bottom of the cellar
To achieve the required initial strength, the concrete floor is cured for a week. To prevent rapid surface drying, the floor is sprayed with water and protected with burlap or plastic film.

Filling the bottom of the cellar with concrete
The wooden bottom of the cellar can be made from debarked and antiseptic logs or, better yet, from used railroad sleepers. Logs or sleepers are stacked tightly and fastened together with construction staples. Gaps and cracks are sealed with oily clay mixed with tow, firewood or moss.
At the bottom of the cellar, two layers of roofing material are laid with an overlap of at least 10 cm and the joints are sealed with bitumen mastic. The roofing felt sheets should lie on the bottom with the middle part of the roll so that they can subsequently be folded onto the walls of the cellar. It is obvious that both layers of roofing felt panels are located in mutually perpendicular directions.
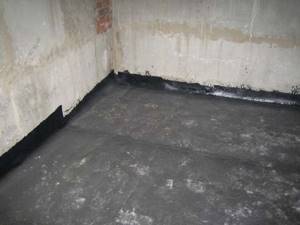
At the bottom of the cellar, roofing felt sheets are laid in two layers perpendicular to each other. The panels should overlap each other 10 cm and overlap approximately the same on the walls of the cellar.
Subsequently, a wooden flooring is laid on the concrete or wooden bottom, the boards of which are stuffed onto logs (at least 5 cm thick) with slots up to 10 mm. This flooring arrangement promotes better ventilation.
Flooring on plywood joists
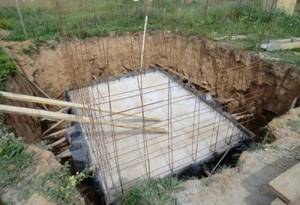
Cellar base

To obtain the base, the bottom of the pit is leveled and compacted, after which a sand and gravel cushion is made and the first layer of concrete 5-10 cm thick is poured. Ruberoid is laid on top of the first layer in 2-3 layers or melted bitumen is poured (waterproofing layer, Fig. 7) , after which they are concreted again, pouring a layer 10-15 cm thick. If walls are built from brick (half a brick thick), then this base will be quite enough as a foundation. If the walls are made of concrete blocks or some of the walls of the cellar are continued as load-bearing walls of the house, then a separate foundation will be required.
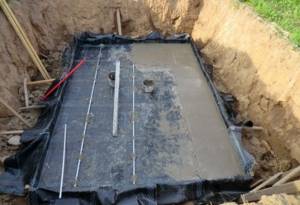
Rice. 7. Waterproofing the base of the pit
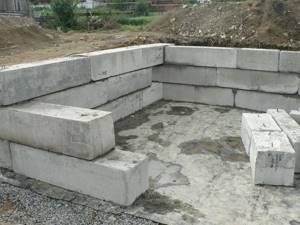
Walling
You can use different materials to build cellar walls. Most often, bricks, concrete blocks are used for this (Fig. 8, most often they are used to build load-bearing walls of a house on them), rubble, and cinder blocks (Fig. 9). Another option is to pour monolithic concrete walls; in this case, the walls can be integral with the base, for which purpose the reinforcement for the walls is initially fixed in it (Fig. 10), then the formwork is installed and the mortar is poured (Fig. 11).
Rice. 8. Cellar walls made of concrete blocks
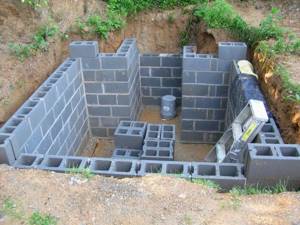
Fig.9. Cinder block cellar walls
Rice. 10. Installation of reinforcement for a monolithic concrete wall
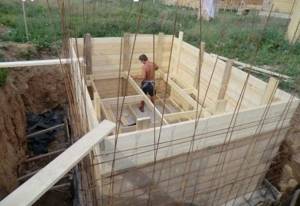
Fig. 11. Installation of formwork for pouring cellar walls
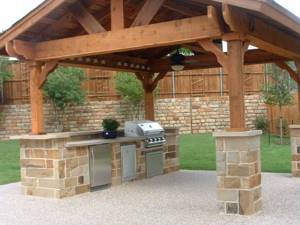
How to combine a basement with a summer building
There is a big difference: building a basement along with a kitchen, or trying to integrate it under an existing building. In the first case, you can plan and calculate everything in advance - even if you build without a project. As for a kitchen that is already in use, it may not be possible to dig even a small cellar under it.
So:
- It all depends on what kind of foundation is under it, because kitchens are different. If it is just a canopy on four pillars, with a natural base, or even paving slabs laid on it, then there are no problems - you can carry out excavation work. The only limitation is that the area of the pit, in this case, cannot correspond to the area of the kitchen.
It’s easy to make a cellar in such a summer kitchen
- It must be borne in mind that soil cannot be removed in the immediate vicinity of the existing foundation of any structure. This way you can disturb the spatial position of the structure, and the building will settle. Even if there is a monolithic foundation strip under the kitchen that could serve as a basement wall, doing this is still risky.
- In the cramped conditions of an operating structure, it is not easy to perform such technological operations as compacting a sand cushion, reinforcement, and concreting. And then, if there is a monolithic concrete slab at the base of the summer kitchen, it is completely impossible to make a recess under it for a cellar. It is much easier then to make it not under the kitchen, but next to it.
A plastic cellar is an excellent option for a summer kitchen
- The only possible option for constructing a cellar under an existing building is to install concrete rings in the recess for the cellar. And even then, this is only possible where there are no enclosing structures that could prevent the products from being rolled inside. In general, no matter how you look at it, a cellar under the summer kitchen must be provided during the construction of the latter.
Then, you can use any options: from a plastic cellar to a monolithic concrete basement. Therefore, we will talk about building a summer kitchen with a basement from scratch, and you can figure out for yourself which of our recommendations may be useful to you in a particular situation.
Where to start
It is impossible to build anything without deciding on the configuration of the building, the height of the buried and above-ground parts, the internal layout, the design of the walls and roof. If you decide not to contact designers, but to do it on your own, you will have to think about all this yourself. We hope that we can help you in this matter.
So:
- Decide on the overall dimensions of the building, draw a plan on graph paper, preferably on a real scale. Since this is a summer kitchen, there is a high probability that it will have a stationary stove. Mark on the plan the place where it will be located, since you will have to build a separate foundation for it.
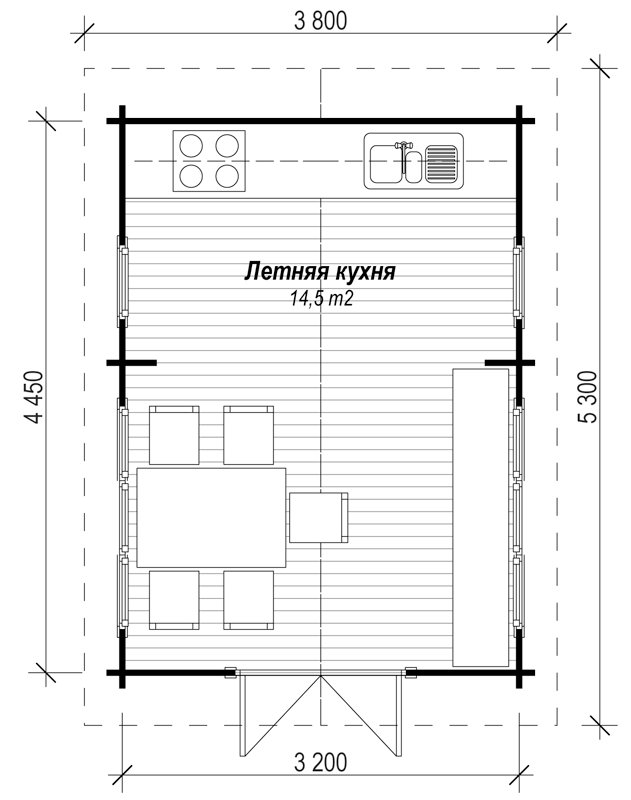
Approximate execution of the summer kitchen plan
- The drawing will look something like the picture above. The only thing here is that you still need to mark the location of the foundation for the barbecue oven, if one is to be built. Ideally, its supporting part should be adjacent to the contour of the cellar wall. If you are going to supply water and electricity to the kitchen, you need to immediately think about where the inputs will be located.
- Do not forget to mark on the plan the location of the trenches in which the pipes will be laid. You may want to make a septic tank next to the kitchen, where used water will be drained, or provide a drainage pipeline with a tie-in into the existing sewer system.
Excavation: excavation for a cellar and communication trench
In general, your drawing should reflect all the necessary information, since excavation for communications will have to be done in parallel with digging a foundation pit for a cellar. If, of the vertical structures, your summer kitchen will only have pillars that support the roof, then decide on their cross-section, and also apply them to the general plan of the building.
Floor installation
The choice of material for flooring is largely determined by what loads it will have to withstand during further operation. It can be produced:
- wood - beams or logs on which boards or beams are laid on top. Since there is always high humidity in the cellar, all wooden elements must be treated with an antiseptic
When building a cellar, all wooden elements must be treated with an antiseptic
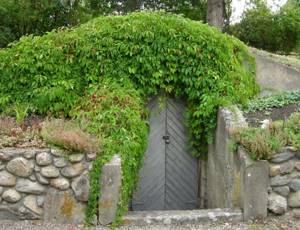
Country cellar decorated with climbing plants
- metal beams on which concrete slabs can be laid. In this case, it is necessary to especially carefully process and seal the seams (joints of plates)
- monolithic concrete floor - poured in the same way as monolithic walls
Anyone can build a cellar with their own hands at the dacha
Ladder
The simplest, but very inconvenient option is an extension ladder welded from pipes or knocked down from wood. It is advisable to include in the project a stationary staircase made of iron, concrete or metal; it is both more convenient and safer to use:
- the minimum width is 30-40 cm, but about 50-60 cm is better, it will be convenient to climb

A beautiful cellar will delight your guests for a long time
- if you plan to lower heavy, large-sized loads into the cellar that need to be carried by two people, then the width of the stairs should be at least 80 cm
- the maximum permissible slope is 75 degrees, but such a staircase will be within the capabilities of the young and energetic. To make the stairs comfortable, but not take up much space, the optimal slope is 45 degrees - it’s quite easy to climb (the flight is not very long) even with a load in your hands
- step height – 15 – 20 cm, width – 25-30 cm

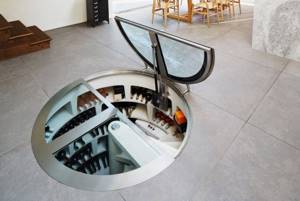
You can purchase a ready-made cellar in the form of a capsule, which you simply have to hide in the ground
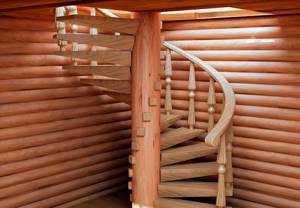
Wooden cellar
Peculiarities
A comfortable wooden staircase to the cellar with your own hands is important for a safe descent.
The tradition of constructing underground storage facilities has been known for a long time, since previously we did not have refrigerators at our disposal, and there was a need to keep food supplies fresh. Here one interesting feature of our soil came to the rescue.
The fact is that the top layer of soil freezes in winter or warms up in summer to a depth of no more than 1 - 1.5 meters for central Russia. In the northern regions this value increases for winter, in the southern regions for summer. Below this depth, an approximately constant temperature remains throughout the year at a level of 5–9 ˚С, which is comparable to the temperature in a modern refrigerator.
The natural thermoregulation of the earth allows food to be stored all year round.
Important! You can check the temperature regime of underground layers by measuring the temperature of spring water in winter and summer. As a rule, it remains around +8 ˚С.
There are three main types of cellars according to the depth of immersion in the ground:
- Ground. This type of design provides for a minimum depth of up to 25–30 cm, since such structures are installed in places with a very high groundwater level. In essence, this is an ordinary shed or storage shed for storing vegetables;
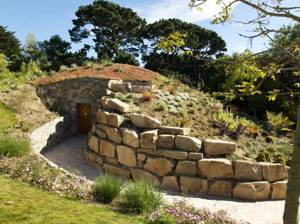
- Semi-recessed. A depth of up to 60 cm is provided here; in this case, groundwater should be no higher than 1.5 - 2 meters from the soil level. Often the towering upper part of the structure is covered with a thick layer of earth and turf for better thermal insulation;
- Recessed. Structures whose depth exceeds 1.5 meters are considered completely buried. As a rule, such cellars are completely buried underground to a depth of 2–3 meters.
The elevated part of the semi-buried basement is covered with earth and turf.
Important! The most effective option will be a completely recessed one. It is guaranteed to protect your supplies from freezing in winter and overheating in summer.
Materials for construction can also be different.
The most commonly used are:
- Rubble stone. Allows you to build strong and durable structures, but the work will be labor-intensive, and the price of the material and its delivery will be significantly high;
- Brick. It is better to use ceramic bricks, as their moisture resistance is higher. A good material for a basement, but quite expensive and labor-intensive to work with;
- Concrete plates. It is possible to construct the room from reinforced concrete blocks and slabs, but this will require the work of a crane. The design will be very strong and durable;
- Monolithic concrete. You can install formwork in the pit and fill the walls with concrete. If it is possible to order ready-mixed concrete, then this option is well worth considering;
- Wood. A traditional, time-tested option that is distinguished by an excellent microclimate, complete environmental safety and availability of materials.
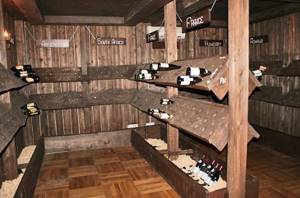
Wine cellars are made of wood due to its ability to maintain an optimal microclimate.
When choosing wood as a building material for a cellar, you should remember its features, such as fear of moisture, rot and mold.
To ensure maximum protection from these factors, you should select the right species, correctly treat the material with antiseptic and fungicidal impregnations, and also perform proper waterproofing of wooden structures.
The ceiling of a wooden cellar also needs effective protection.
Important! Wood is the best option in terms of microclimate and environmental safety inside the cellar, provided that all requirements for protecting the structure from moisture and mold are correctly met.
Selecting a location

You can place the cellar in a wooden house or on a plot.
Once you have decided on the type of structure, its depth and the materials from which it will be constructed, you need to find a suitable location for the basement. There are two main options:
| Cellar location | Features and Benefits |
| Under the house | Cellars are often located under a residential building. This is beneficial from several points of view: the house protects the basement from surface moisture and frost, it is convenient to go down into it without going outside, and it is easier to install communications. However, if the cellar was not taken into account and dug during the construction of the house, subsequently it will be very difficult and inconvenient to work |
| On a plot separate from the house | This arrangement will require more serious protection from precipitation and frost. At the same time, you are not limited in choosing the size of the room, and the work will not be constrained by the foundation walls. Again, basement odors will not penetrate the house. |
A basement inside the house is convenient.
Usually, when building a house, the presence of a basement is provided for in the project, and it is dug out and strengthened at the stage of laying the foundation. Working in a built house will be much more difficult and costly.
Important! If you want to have a basement inside your home, take this into account when designing. Digging and arranging a basement inside a finished building is extremely inconvenient and difficult.
If you decide to place the cellar on a site separate from the house, then you should carefully study the landscape here. The best option is a flat, open place located on a small hill.

A slight elevation is the optimal place.
It is important to take into account the overall ensemble of buildings on the site. Cellars are not placed near compost pits, toilets, septic tanks, sewers, or enclosures with livestock. But near a summer kitchen, a house, or a utility shed, it would be quite appropriate.
It is advisable to provide a convenient and short path from your kitchen to the cellar, since you will have to walk along it quite often. It is better to turn on the lights twice: from the house and directly in the cellar.
Consider a convenient location in relation to other objects on the site.
Important! Trees and plants with a powerful and developed root system should not be planted near the cellar, as this can destroy the waterproofing of walls and ceilings.
Waterproofing basement walls
To ensure water resistance, concrete and brick walls are additionally plastered with cement mortar. After the layer of plaster has completely dried, bitumen mastic is applied to the outside of the wall, onto which roofing material is glued (Fig. 11), after which soil is backfilled.
To ensure the watertightness of your building, it is necessary to waterproof the walls
Advice! To improve waterproofing, instead of backfilling with soil, you can make a clay castle. To do this, clay is mixed with water and coarse sand until a plastic mass resembling plasticine is formed. The resulting mass is placed in a pit between the walls and the ground, compacting it very tightly.
Rice. 11. Waterproofing cellar walls using bitumen mastic and roll materials