How to make a decorative castle with your own hands
Everyone wants to make their site original and special.
But how to do this? Here various decorative figures will come to the rescue, but they require costs. Therefore, you can build a castle with your own hands on the site. This will not be a problem for those who do at least something with their own hands. In addition, this does not require special expenses.
Decorations for the site
There are now many options for decorating your territory :
- Entire zoos are literally built from old tires. There are swans, cats, giraffes and elephants.
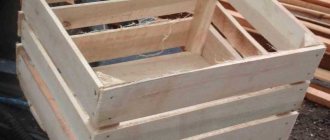
- You can make flower beds and flower beds from unusable logs and stones.
- You can create figurines for the garden from polyurethane foam and bottles.
- And if you use cement and have some skills in working with it, you can create simply magnificent sculptures that will decorate any area.
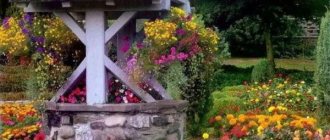
You can also build a castle with your own hands from scrap materials or even build a whole kingdom that will delight not only children, but also adults. This building will add mystery to the garden, and to make it look more alive, you can make a rock garden or rock garden.
To obtain a more durable and long-lasting building, you should use a cement-sand mixture . For the composition it is better to use 2 parts sand and 1 part cement. Before starting, it is advisable to dry the sand - the drier it is, the easier it will be to sift and subsequently use.
Most often, castles are quite large in size, and besides, their construction is a little difficult. To deal with this, you can try to line up some parts separately, after which they can be easily assembled in the right place, like using cubes. Here's how to make your own castle.
Construction for building a castle
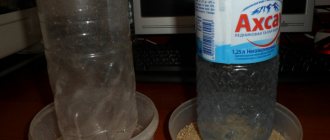
To build a tower from an iron sheet, you need to roll up a cylinder of the required size and fix it. It must be fixed so that it can be easily disassembled after use. To reduce the solution consumption, a bottle or jar should be placed inside the cylinder, but it must be taken into account that the thickness of the solution around the ballast should be about 5 cm.
When pouring the solution inside, make sure it is thick. After which it needs to be allowed to harden for several hours so that the formwork does not crumble when removed.
The height of the formwork should be chosen in this way: it should be approximately equal to the tower; if it is smaller, it should be disassembled and assembled above the already set part.
You can cut the solution after it has set. To perform such work, the following tools are used:
- chisel,
- screwdriver,
- scalpel or similar blade,
- blade from a hacksaw for metal,
- strips of tin that will help form the elements of the castle.
A castle made of simple cylindrical shapes will look a little boring, to avoid this you should experiment and use a chisel to imitate stonework, chips or cracks at the bottom of the castle to give the castle the effect of antiquity. Using a knife you can make windows and loopholes.
The roof is constructed from tin cones, and they can also be used as a mold for mortar. The roof should be knocked out of the mold only after the solution has reliably hardened.
Making walls
To make walls, a rectangle of the required size is assembled from boards, after which it is placed on a flat surface, which is previously covered with a piece of film or roofing felt. The solution is poured into the resulting frame. To make a window or door in the wall, you should pre-position the frames in the desired location.
After the solution has been poured to the required height, stones or crushed stone can be inserted into the lower part to create a kind of imitation of the foundation, or using a knife, draw grooves - characteristic gaps between the foundation stones.
When the solution has hardened, the frame is removed and, if required, details are added: windows, loopholes, etc. After this, the walls are left to dry for another day.
It is better to choose a sunny day to build a castle . It is best to place it on a hill, which can be a pile of stones. To ensure that the walls stand securely, a foundation is built for them, on which a thin layer of cement is then applied. And only after that is it worth installing the walls. They can also be strengthened in another way, for example, the internal cavity is filled with stone, rubble or mortar.
Since simple concrete castles look gray and dull, many people paint them. For this, acrylic paint is used. This decorative element will become a real decoration of the garden, and both children and adults will be happy with it.
5) Prepare the landscape
When building a castle, you may have to move a significant amount of earth, which is not cheap.
It is often forgotten that the castle’s fortifications were built not only through architectural techniques, but also through landscape design. Huge resources were devoted to moving land. The scale of the Norman land work can be considered outstanding. For example, according to some estimates, the embankment built around Pleshy Castle in Essex in 1100 required 24,000 man-days.
Some aspects of landscaping required serious skill, especially the creation of water ditches. When Edward I rebuilt the Tower of London in the 1270s, he hired a foreign specialist, Walter of Flanders, to create a huge tidal ditch. Digging the ditches under his direction cost £4,000, a staggering sum, almost a quarter of the cost of the entire project.
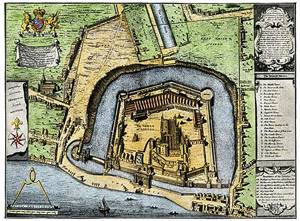
An 18th-century engraving of the 1597 plan of the Tower of London shows how much earth had to be moved to build the moats and ramparts.
With the increasing role of cannons in siege art, the earth began to play an even more important role as an absorber of cannon shots. Interestingly, experience in moving large volumes of earth allowed some fortification engineers to find work as garden designers.
Advice
: Reduce time and cost by excavating the stonework for your castle walls from the moats around it.
How to build a mini castle from stones in the country
In their garden plots, people often realize their fantasies or what they saw during their travels, ideas they spotted on the Internet on various sites, and then build rock gardens, garden sculpture, original flower pots, wooden crafts, garden scarecrows and much more. This gives the dacha plot its uniqueness and makes it special. It is useful to involve children and grandchildren in such activities; they really like to take part in creativity and decorating the garden.
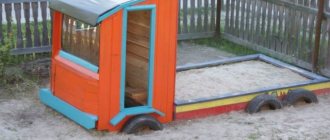
One of the types of such crafts on the site is the construction of mini castles from natural materials, most often from small stones, river pebbles, and coarse gravel. This is a very exciting activity. You need to start building such a castle out of stone by choosing a suitable place on the site. It is convenient to place it near a children's playground, for example, or near a recreation area for the whole family. An area of 1-2 square meters in size is suitable for this, depending on the design.
It is advisable to draw a sketch of the future castle on paper to scale, determine how many towers it is planned to build, whether they will be connected by a fortress wall, an arch, and sometimes they make a small ditch around the castle through which a bridge is built. It is useful to look in books or on the Internet for photographs of real or miniature castles when developing your castle project.
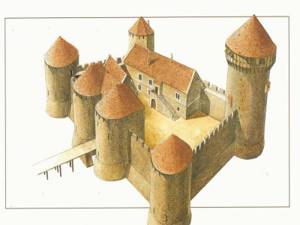
Structural elements of a modern castle
Castle architecture is usually associated with the Gothic style. It is characterized by various spiers and pointed roofs. And although there are many varieties of castles alone, we can highlight the elements that are most inherent to this architectural structure.
Structural elements:
- Ditch and hill. They served as a natural defense for the castle, and therefore, if you want to make an authentic structure, you will have to build them too.
- Courtyard. This is the name given to the protected area inside the fortress wall.
- Donjon. This is the name of the central tower of the building where the owner lives. We can say that this is a fortress within a fortress.
- Defense towers. They had loopholes and teeth, which were often round.
- Fortress wall. This is the name given to the wall with battlements at the top (warriors hid there).
- Gates. To strengthen security, castles were equipped with watchtowers, and the entrance was blocked by an arch. There was also such an important element as a drawbridge.
The layout of the castle territory previously depended on the terrain. It could be circular, triangular, rectangular. But these are nuances that need to be chosen at the stage of searching for ideas.
Tricky DIY locks
Hello, master! How can you design a cunning internal lock for a garage at your dacha? If it's easy, can you give me some advice?
Roman, Moscow.
Hello, Roman from Moscow!
You know, the main thing is not to outsmart yourself. Among our shabby circles there is a story about how a certain man hung a sledgehammer in his garage, which, if you don’t know about it, when opened, should hit the burglar in the forehead. Naturally, the man one day, drunk, forgot about this, with all that it entailed.
There is no trick against scrap except another scrap. Everything can be opened, another thing is that sometimes this takes a lot of time, and a thief does not always have this time.
I already talked about some tricks on my website. Therefore, perhaps I will repeat myself a little.
I consider several methods to deter burglars to be the most effective.
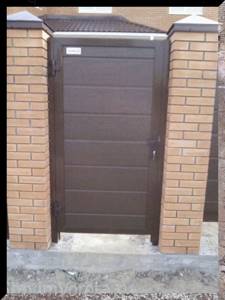
First. When two more gate leaves made of reinforcement (ordinary grille) are installed behind a regular garage door. And a simple padlock. But it is hung not from the outside, but from the inside. And it is covered from the outside with a welded plate. That is, it is impossible to see it, even if the outer gate is opened. And you have to open it by putting your hands behind the plates, by touch.
We did this and always laughed when the burglars, having opened the first gates, did not know what to do next. Moreover, all the garage things were already visible through the bars.
But this is not always feasible for a number of reasons.
Second option. A regular rack and pinion lock (with a plate key and not a round key). And a sheet of rubber about a centimeter thick (approximately 10/10 centimeters in size) is attached to one gate leaf from the inside. With a couple of bolts. The point is that sometimes, without opening the lock, bad people bend the metal of the gate and try to saw through the lock tongues with a hacksaw blade. The blade rests on the rubber and cannot cut. In my garage one day they knocked down the outside padlock, peeled back the trim and started trying to saw off the top tongue of the rack lock. But then they spat and finished.
Third option. When an external conventional padlock is covered with a welded box so that it is almost invisible. This ensures that the lock can be knocked down or cut down only after cutting the box. And this is somewhat difficult in the absence of access to sources of electric current, even if you have an angle grinder.
In addition, you can use a regular rail inside the garage, like a latch, which moves freely inside the supporting brackets and is closed in one position and open in another. To open, a key is used in the form of a pin, at the end of which a plate hangs on an axis. The owner first practices with the door open and, if necessary, sharpens and adjusts the key for free opening. What is achieved by inserting the key to a certain depth into a hole made in the metal of the door (gate), up to the mark made on the key.
Details
Castle - components
The castle is a complex of buildings that combine defensive, fortification, and residential purposes. Unlike walled cities, castles are not public buildings.
They belong to the feudal lord and are intended for him, his retinue and family, as well as his overlords visiting him. Quite often, castles are confused with a fortress, but as a future king you must distinguish them: if a fortress is just a piece of land with different buildings, and it is also surrounded by a wall (for example, like the famous Danish Viking fortresses), then the castle is a single building in which there are bridges, walls, turrets, residential and other types of structures, united into a single architectural ensemble. The larger the castle, the more prestigious the owner.
The fortress courtyard, the area inside the castle walls, can be densely built up - these include residential buildings for servants, barracks, and premises (warehouses), as well as churches. At the same time, the immediate beauty of the castle and the height of the walls are not always an indicator of defensive qualities. History knows many examples when castles that were quite poor and squat at first glance became the bones in the throat of the best conquerors of the world.
Selecting a site for construction
It may seem, what difference does it make where to start building a feudal lord’s castle? High towers, thick walls, a deep moat - no army is afraid. But we should remember that a castle is not just a unit of fortification, but also housing, and even a potential center for a future settlement. In order for the castle to meet all the necessary requirements, take into account a number of extremely important features on the ground.
Relief
This is the first thing you should pay attention to when choosing a site for construction. The nature of the surrounding terrain is important, and the ideal point would be a knoll or other high ground where a huge complex of defense structures could be physically erected. Height is very important for a huge number of reasons. Firstly, the higher it is, the more difficult it will be for potential enemies to get into it. Steep slopes are completely impassable obstacles for siege weapons and cavalry, and sometimes even for infantry with heavy armor. Even if by some miracle the attackers were able to climb the steep mountains, it would not be difficult to throw them off. An ideal option would be a high hill, which can be climbed only along one single serpentine road with a small width - such a road, which is additionally protected by rings of fortress walls and several gate sections, will be a difficult test even for a huge army. For every meter that the fighters walk under a hail of stones, arrows and hot oil, the enemy will pay with dozens of lives of their fighters.
Resources
This is another important factor. Access to well or spring water, as well as the logistics of the castle and surrounding buildings, if there are any. Oddly enough, the most popular tactic for taking a fortress will not be an assault, which is a very risky undertaking, but a long-term siege. So, your castle can suddenly turn from a reliable fortress into a real crypt - if the castle is isolated for a long time from access to drinking water and food, you can expect starvation, loss of spirit, and under extreme conditions, a wave of cannibalism. The castle is a construction from the Middle Ages, and canning was not invented at that time. If the territory allows, you should set up a vegetable garden or garden inside the castle walls - roast rats and lean rutabaga porridge at some point may become the only source of food.
Interestingly, the extremely favorable location of Heidelberg Castle made it possible to found a huge city at its foot.
Water is not only a drinking resource, but also an alternative transport route. A castle that stands on a river near a river will always have access to running water, which will act as additional protection against raids (it is much more difficult to storm fortifications by swimming than on land), and also through retreat in case of emergency. Remember that a castle is prestige, but personal safety is most important! It is also important to have sources for obtaining building materials at least close to the site. If the timber can still be floated down the river at the very least (in general, these are additional risks), then dragging blocks from quarries that are located very far away is not only a thankless task, but also extremely expensive. But you, as a king, need to spend some money to organize drinking parties and feasts, since otherwise your vassals will leave you for another, more generous lord.
A castle in the country - easy! bookmark 46
How to make your plot or garden unique - this is the dream of many owners. Many people love to decorate their own estate, dacha, or yard, but not everyone has extra money that could be spent on decorative figures. But this is not a problem for those who at least know how to do something with their own hands.
It doesn’t even require any special expenses.
For example, a fairy-tale kingdom on the garden site will be a good gift for both small and adult dreamers.
Even a mini-castle built at the dacha will add mystery to the area.
Mini castles for the yard or garden are quite large in volume, and building it completely is a little difficult.
You can try to make some parts of the castle separately, so that later in any part of the garden or at the dacha you can assemble it from ready-made elements, like from cubes.
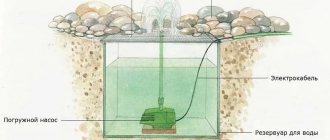
An example of a design for building a castle in a country house
easy to disassemble. To reduce solution consumption, cans or bottles can be placed inside the cylinder, but the thickness of the solution around the ballast must be at least 5 cm.
The solution for pouring should be thick enough. It must be given several hours to set to such a state that the formwork does not crumble when removed. The height of the cylindrical formwork must be selected as follows: it should be approximately equal to the height of the tower; with a smaller size, the formwork will need to be disassembled and assembled slightly higher than the already set lower part.
Making a castle for your dacha is easy if you have a pair of “golden hands”.
The main material is sand and cement for the longevity of the composition. 2 parts sand and 1 part cement.
Elements of a standard design.
Let's start with the turrets.
A cylinder of the required radius is rolled up from a sheet of iron (mine is about 2-30 cm). The cylinder is fixed with wire or self-tapping screws
Anything can be placed inside the cylinder - bottles, cans - to reduce the consumption of the solution, but the thickness to the ballast should be at least 5 cm. Fill with a thick solution.
We give it several hours to set to such a state that when removing the formwork it does not crumble.
We immediately begin to cut the damp, slightly set solution.
The cutting technology is the same as that of sandboxes. For cutting, a set of tools is used that is available to everyone.
Do not forget to make windows, loopholes, using a knife to pick out the desired recess.
Fill the mold with the solution and after partial setting, carefully remove the formwork cylinder and make the required number of windows, teeth - as your imagination dictates.
The roof can be made from tin cones; you can also use this tin cone as a mold for pouring mortar. After complete setting, carefully knock our roof out of the mold. Don't forget that we are still preparing individual elements of the castle. We'll put everything together later.
Let's start building the walls. Our walls will be either fortress walls (1) or a building element (2).
There is no difference in their production.
We assemble a rectangle of the required size from boards 5 cm wide. We place it on a flat surface, having previously placed either a film or a piece of roofing felt so that the solution poured later is not absorbed.
You can place a metal arch in this frame - this will be a door or gate. Pour the solution into the frame. Where no windows or doors are planned, you can add crushed stones or broken bricks to the bottom to save mortar.
After the solution is poured to the desired height, you can take nice crushed stones and stick them into the base of the foundation so that their flat edges protrude above the general plane of the solution by about 5 mm.
Making a lock
Making a decorative castle with your own hands is a fascinating and time-consuming process. This structure will be an interesting decoration at your dacha.
A fairytale kingdom on the garden site will be a good gift for both small and adult dreamers.
Before you start making a lock, prepare the necessary materials and tools.
- Foam sheets.
- Insulation for pipes.
- Crumbs of stones or marble.
- Set of acrylic paints.
- Construction adhesive.
- Screws.
- Polyurethane foam with a gun.
- Curly screwdriver.
- Thin hacksaw.
- Set of felt-tip pens.
- Brushes.
- Construction spatula.
- Insulating tape.
- Mass for modeling.