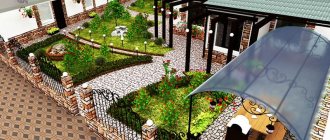
Problems with water in their summer cottages make many people think about building a well.
The reason for the lack of water is especially acute in the summer, when it is needed to water the garden.
Drilling a well will help find a solution in this case, but this will require special equipment.
In turn, building a well with your own hands will save money and solve problems with water supply.
Choosing a place
When choosing a place to build a well, it is important to correctly determine its quantity and quality, as well as the composition of the soil . For the well, you need to choose a place away from possible sources of household pollution that enter the soil.
Therefore, it is recommended to place the well away from the toilet, garbage heaps and places where dogs are walked. All of the above should be no closer than 30 meters from clean water.
If there is an autonomous sewer system, it will need to be improved and made airtight . The fact is that groundwater will gradually end up in household wastewater , after which the taste of clean water will deteriorate, and it itself will become unsafe for health.
It is better to install the well in an elevated place, and for convenience, closer to the house.
It is recommended to construct a well in the fall or winter; at this time of year the water is at its maximum depth
In spring there is a high probability of getting into high water . As for the soil, it should be noted that a large presence of sand and earth will make drilling , but clay soil and a large number of large stones, on the contrary, will create many difficulties.
Do-it-yourself well construction time
You can’t dig a well whenever you want. The most suitable time of year for arranging this type of source of drinking liquid is the end of August or the beginning of September (provided there is a very dry summer). In this case, the groundwater level will drop very low, and will not be an obstacle when searching for a layer of drinking liquid. Also, such work can be performed in winter after 10–14 days of severe frost. Under these conditions, all soil liquids located in the upper layer will freeze and will not be able to interfere in any way.
Types of wells
There are three types of wells: shaft, key and tube. Let's take a closer look at their features:
- Key.
- Shakhtny.
This is the simplest and most economical type of well.
This is the name given to the water that springs up from underground. The presence of such a spring near the dacha is a godsend. However, experts advise collecting water and testing it for potability.
The key well can be made of wood or concrete . The main thing is not to forget to remove the surface layer of soil (10-20 cm) and when installing the well, it is important not to damage the beating key, otherwise it may stop working.
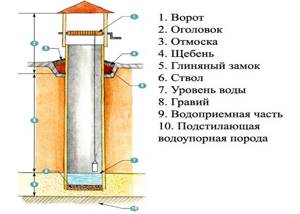
A shaft-type well is usually installed in those places where it can justify itself. Where there is no open outlet of water to the surface, but it exists at a depth of no more than 25 m.
When constructing a well of this type, it is important to remember: it is necessary to maintain a balance in the supply and use of water, so that unused water does not stagnate and spoil.
The shaft well includes three components :
- head (located above the earth's surface);
- well trunk;
- water intake component.
Mine wells are convenient because during droughts they always have water due to additional reservoirs (zoomrs).
To ensure a guaranteed supply, you need to make the lower, underwater part of the building a little wider, and make it into a tent.
- Tubular.
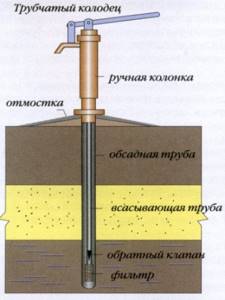
It is used to supply water. The pipe is inserted using a drill. It is installed in the aquifer.
In the absence of water pressure , the pipe is supplied with a pump; in a pressure water layer it can be used without a pump. To construct a tube well, it is necessary to carry out drilling work .
A well of this type is much more expensive than a mine well, since the soil is drilled. In turn, it is much more profitable because the water does not stagnate and is always suitable for use.
Well location
In order to begin work on arranging a source of clean liquid for drinking, which in this case will be a well, you must first determine its location. There is an opinion that for this it is necessary to use special frameworks, etc. But, as practice shows, this is not entirely true.
The best guide in such a situation will be your neighbors. If they already have a well equipped and there is liquid in it for drinking, then you just need to find out how many concrete rings it consists of and buy yourself the same amount, plus one or two.
As for the choice of location, the standards established by the SES should be observed. One of the requirements that must be observed is the distance of the well from sewers, manure collection sites or cesspools (the distance must be at least 50 meters). This is necessary so that during heavy rainfall, water mixed with various impurities cannot “reach” this source. Otherwise, such a source will emit an unpleasant odor and may only be suitable for technical needs.
Also, a mandatory condition will be distance from home (at least 5 meters). This is necessary so that the foundation and, accordingly, the walls of the building do not lose their strength. Often, due to ignorance, homeowners neglect this requirement, and within a few years their house becomes covered with cracks in the places closest to the source of drinking liquid. Therefore, in order not to regret your mistakes over time, you need to do everything correctly from the very beginning.
Tools for work
To build a well you will need the following tools:
The winch is very convenient for raising and lowering materials; you just need a tripod to use it. It will need to be installed above the well.
The materials for the well will be: cement, sand and gravel
Stages of work
Building a well is not an easy task, and therefore, to facilitate and speed up the work, it is recommended to invite assistants .
Digging a pit
After the location of the well has been determined, a hole . Digging a hole for a well is carried out by one person, the rest of the assistants are at the top. They will lift the soil, transport it and lower the materials down.
First, a hole is dug to the depth of one ring. ring is placed in it , and all the soil is removed from under it, gradually deepening this ring. Having gone some further, a second ring .
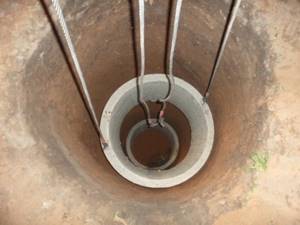
The approaching aquifer can be identified very easily; a strong decrease in temperature and increased humidity in the underlying soil will be felt in the hole.
This stage of well construction is the most labor-intensive and responsible, so it will require a lot of effort and patience. Wet soil must be removed very quickly. You may need a powerful mud pump .
If it is not at hand, then having reached the aquifer, you will need to make every effort and dig very quickly another 2-4 m deep (the rate of water flow in the well depends on it).
gravel 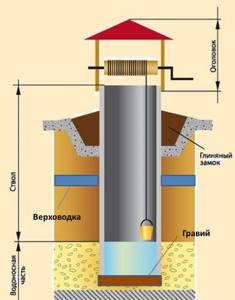
To prevent surface water from flowing a linen cord placed between the rings will help. The joint between the rings must be cemented. A clay castle is placed on the surface of the well (around it) . The wet clay removed from the hole during digging is placed around the well and compacted using a log.
When the well is filled with water, it will need to be pumped out until it becomes clean and transparent.
Making blind areas
contaminated high water and melt water entering it In addition, with blind areas the structure looks much prettier and more convenient for collecting water.
The blind areas are installed a year after the construction of the well
Time is necessary for the rings to settle well and seal.
If blind areas are built after the structure is completed, displacement of the upper rings may damage them.
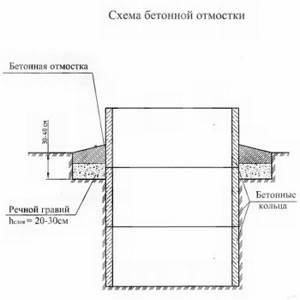
However, it has one drawback: if water gets on the surface of the layer, sticky dirt . As a result, additional costs to cover with protective material.
Making a concrete blind area : initially a gravel cushion is laid, formwork is installed on it, into which concrete is poured. reinforcement mesh embedded in the formwork will help increase the service life of the blind area
Concrete blind area requires waterproofing of the outer walls of the well. This will help to avoid rigid adhesion of the last ring of the well to the frozen surface of the blind area.
Roof
The arrangement of the roof must begin with trusses , which is a rigid structure to which the sheathing is attached. A strong board (3 cm thick, 180 cm long or the height of the roof) is suitable for this. Installation of the crossbar and jibs must be carried out using a board (2.5 cm).
the material for the roof at your discretion: board, metal sheet, roofing felt, etc.
Insulating a well for the winter
Many people prefer to live outside the city on their own property, so the problem of water supply to housing cannot but be alarming. To solve it, it is enough to equip a well. Since the structure can collapse from low temperatures, it must be insulated. For this purpose, you can use any insulating materials.
The construction market offers various types of thermal insulation materials that allow you to insulate a well for the winter. It is better to choose those that are cheaper. Insulation may not be used if the surface of the well water is below the freezing level of the soil. The building will need to be thermally insulated if there is a lot of water in it. In this case, the insulation procedure is mandatory.
Insulation material must be purchased to protect a well used in winter. If the operation of a suburban area is seasonal, then when laying the structure there is no need for thermal insulation. Pipes for winter water supply must be laid below the soil freezing level. The space that the rings and the well house form should be insulated with your own hands with a material that allows you to retain heat for a long time.
Before insulating a well for the winter with your own hands, you need to dig a hole 1.5 m deep, and then lay heat-insulating material around the concrete rings. It can be polystyrene, which has a stable structure and retains its shape even under a layer of soil. It is not affected by mold and mildew, but is not resistant to sunlight.
To increase the service life of polystyrene, it must be painted and then covered with foil. Izolon is a very convenient material used as insulation. On one side it has an adhesive base, and on the other - foil. The listed materials not only have good thermal insulation qualities, but also an affordable price.
Decorative option
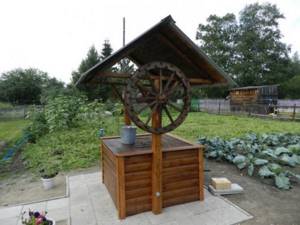
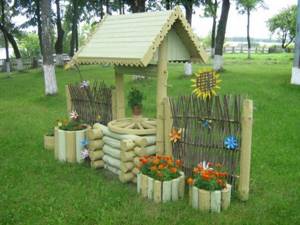
Decorative well is in fashion today. It is a dacha decor and some summer residents equip it with all the details so subtly and neatly that it cannot be distinguished from a real building. Below are photos of decorative wells in the country, which can be done with your own hands.
