Every summer resident and amateur gardener dreams of growing vegetables all year round, but our climatic conditions do not allow such luxury. Those who have a private house are lucky and can build a permanent greenhouse on the site and install heating there. Here it will be possible to study all year round, but of course the costs will be very high for construction and subsequent provision of heating. But city dwellers can only dream about this.
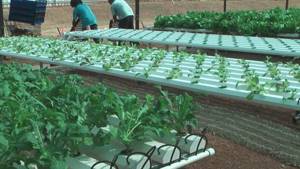
But what about amateur vegetable growers, and how to grow vegetables and herbs in your own apartment during the winter season? The author was puzzled by a similar idea for growing plants in the winter season in his own apartment. I began to look for answers to my questions on the Internet and realized that this problem was not bothering him alone and he had many like-minded people. On one of the sites, he saw a hydroponic installation made from plastic sewer pipes, adapters and tees assembled into a single structure, and having its own aeration system, that is, a constant supply of oxygen to the roots of the plant - this is necessary so that the roots of the plant do not rot from water, because There is no soil in the installation and the roots are in water.
Aeration in this installation is carried out by an oxygen pump for aquariums. Through tubes, air enters the barrels to create bubbles fixed exactly in the place where the roots of the plants are located. And after looking at the visual example, the author was inspired to make his own hydroponic installation with his own hands. I bought a pipe and tees, at a pet store I bought a pump, tees, tubes and barrels for bubbles. And I set about creating the installation. So let’s take a closer look at what the author needed to assemble this structure.
Materials:
sewer pipe, adapters, tees, pump, barrels for bubbles, tubes, expanded clay, pots, plug, polystyrene foam, varnish, plastic rod.
Tools:
hacksaw, drill, knife.
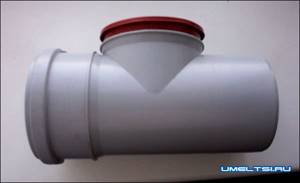
First of all, the author cuts off the upper connecting part of the tee with a hacksaw.
Schemes for arranging a home garden
The fundamental difference between hydroponics and traditional farming is the absence of soil; instead, a nutrient solution is used. Many people believe that such methods harm plants. Nevertheless, this crop passes all tests for nitrates, which means it is safe for humans.
Most often, cucumbers, tomatoes, strawberries and salad herbs are grown using this method. Although some enthusiasts manage to grow watermelons and even bananas at home, it is true that such crops require a lot of nutrient solution.
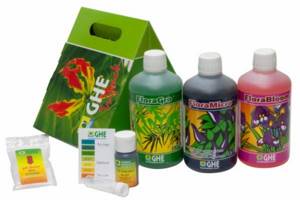
There is no need to worry about the nutrient solution, the hydroponics industry is now on stream and such a solution can be bought at any garden store. In terms of financial costs, winter vegetables on the windowsill are no more expensive than their price on the market during the season.
Solutions for growing plants.
Hydroponics cultivation is carried out in 2 directions:
- Active - here special equipment (pumps, pumps, etc.) is used to supply fertilizers, nutrient solution and air to the roots;
- Passive - this direction is based on the physical properties of moisture: rising up through the capillaries.
We will leave the passive direction alone, because throwing seeds into a nutrient solution and waiting for them to grow does not require much intelligence, but the harvest is also modest. Therefore, we will analyze schemes for actively growing crops.
Another disadvantage of passive growing is that you need to constantly monitor the liquid level in the tank. Otherwise, the roots of the plants will dry out and they will either die or be seriously damaged.
Automatic power supply will allow you to grow crops with virtually no human intervention.
How to assemble the system yourself
| Illustrations | Recommendations |
| Frame. |
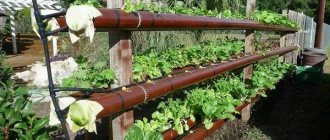
We will use a sewer pipe with a diameter of 110 mm as the body. Holes for pots with plants are immediately cut in the pipe. The diameter is selected individually depending on the size of the pots.
The pipe needs to be plugged on both sides, but it is better to install an adapter on the edge where the supply hoses will enter.
To supply air, it is better to buy not an ordinary aquarium, but a linear sprayer. The price for it is only 200 rubles. per meter section. Suction cup holders are included. The photo shows how such a sprayer is installed in a pipe.
We took a sewer pipe for making the tray that was almost 2 m long, so we had to install 2 meter linear sprayers, respectively, to supply air to each. Since the compressor is located at the bottom, a check valve must be installed on the air hose, otherwise water may flow into the compressor when turned off. Plus, a shut-off valve is installed on each hose.
Conclusion
In the step-by-step guide, I showed the general principle of assembling such systems. The assembly of the rest of the circuits shown in the article is similar and with a small correction it will not be difficult. If you have any questions, write in the comments, I will try to help.

Everyone can try to grow cucumbers indoors in winter and early spring, but not everyone necessarily succeeds. Before that, I tried everything, but they had enough of something, the fruits grew the size of a little finger and immediately dried out. So I thought that a special approach was needed, and I decided to make my own hydroponic setup for growing cucumbers.
Don’t be afraid of the “buzzword”; in fact, everything is very easy and simple. I will describe the progress of my work on the manufacture of a hydroponic installation.
Pros and cons of hydroponic setups
Do-it-yourself home hydroponic installation is quite simple; it has a lot of positive and a number of negative qualities, the latter of which are much smaller. Among the advantages is that plants, being in an enclosed space, are not exposed to the harmful effects of fungus and mold. Plants gain the ability to fight all kinds of diseases well, but all kinds of pests are still dangerous for them. However, you will be able to easily deal with pests immediately by removing them. Despite the fact that the positive features of hydroponic systems are so pronounced, there are also negative qualities. Among them, we can highlight the fact that plants must be constantly monitored. But such a minus is nothing compared to the fact that the plants will grow without weeds, which must be constantly removed from the territory of the summer cottage.
In addition, growing plants this way does not take up much space. With the advent of hydroponic systems, growing crops has become much easier, even in areas with harsh climates. Hydroponics is not a closed system, which means that it will need to constantly add nutrients to work, but aquaponics partially solves this problem.
DIY hydroponic installation made from plastic pipes
I bought plastic sewer pipes at a plumbing store; you will also need four tees, four 90′ angles and a plug (one is enough). The main thing you need to pay attention to here is that the diameter of all parts is the same 110mm.
The kit must include seals.
We take any file (a hacksaw will do) in three tees and cut off the middle bend along the edge.
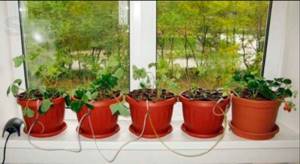
We will insert pots for flowerpots (3 pcs.) into these cut openings. We buy flowerpots in advance, you can use the simplest and cheapest ones, the main thing is that the diameter of the flowerpot is suitable for installing them inside the outlet.
At this stage it looks like this.
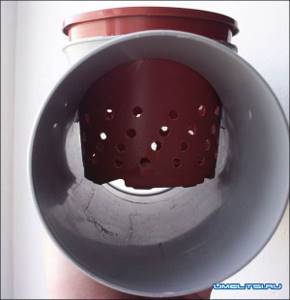
Using a drill and a drill with a diameter of 8mm, I drilled holes in the bottom and in height only in the lower part to the middle of the pot, as in the photo.

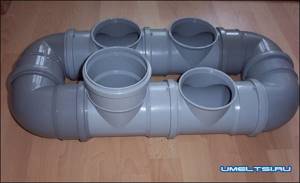
I connected all the pipes, making sure to use o-rings (you’ll have to struggle a little because the pipes are difficult to fit in with the seals). You can do it smartly and at the same time make your work easier, connect two halves at a time and only then put it all together. Before assembling the pipes that will be the basis of the hydroponic installation, the seals can be lubricated with some liquid dishwashing detergent.
In the end, this is what we got.
To continue the work, I will tell you the very principle of operation of the hydroponic installation. In this installation, the roots of the seedlings are dipped directly into the water (more precisely, into a solution with various nutrients and beneficial substances), from there the plant takes as much liquid as it needs, which is why we must definitely control the liquid level. For this purpose, we will make a float with a scale.
Another nuance is that when the roots are constantly in water they can rot, to prevent this you need oxygen, an aeration system (oxygen supply to the water).
To do this, a float with a scale was made; it will be necessary to make such a system.
In order to make an aeration system, I went to a pet store, aquarium department, and bought: a compressor, barrels for creating bubbles, two meters of tubes, tees.
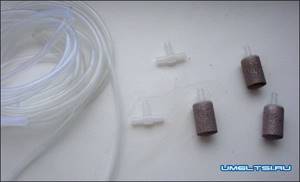
To make the float, I needed polystyrene foam and the tip from a spinning rod (it will serve as the basis). The edge of the tip from the spinning rod, which was thicker, was pre-lubricated with glue and stuck into the foam.
DIY hydroponic system
Hydroponics is a fun and effective way to grow plants. There are a dozen different options for hydroponic systems. But the essence of the method is the same - the substrate is water, or rather a nutrient solution that is prepared from clean water, fertilizers and other additives. Let's try to figure out what essential elements a hydroponic system consists of and how to build it yourself.

The concept of “hydroponics” has been developing for many centuries - even the Indians of South America wove the first floating platforms from reeds, which were filled with volcanic mud from above, sown with crops and lowered onto fresh lakes. Since then, people have already found out that a plant absorbs nutrients from the soil with the help of water, which means that by creating the correct nutritional formulas, it is possible to grow plants directly on water, without using soil.
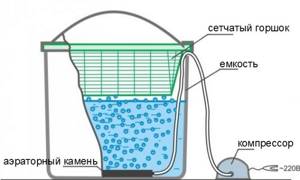
Perhaps one of the simplest and most effective hydroponic systems to use is the Deep Water Culture (DWC) system. In general terms, it is a kind of container with a nutrient solution, which is aerated and mixed using a compressor. This container holds a pot for hydroponic systems with a plant whose roots are dipped into the solution. The container can be a utility bucket, a container for storing things or children's toys. We recommend using plastic - a cheap material that does not rot or leak. The volume of the system is the same as in the case of land cultivation - at least 20 liters per plant.
When choosing a container, the question of its transparency may arise. We know that exposure to light produces algae, which appears as a green or brown slime on the roots and sides of the container. Algae themselves do not cause much harm, but they compete for plants both for water and nutrition, and for oxygen. To protect yourself from this trouble, you can opt for opaque containers. Dark colors such as dark green, navy blue and black provide the best protection from direct light. However, there are often cases of successful cultivation in completely transparent containers.
It is best if the selected container is equipped with a tight-fitting lid. Then securing the pot will be as easy as shelling pears - mark a circle with a marker according to the size of the pot, cut a hole and install the pot. You need to work with plastic carefully, one awkward movement and there will be a crack or even a chip. Therefore, first you should drill several holes on the circle with a drill, and then slowly finish the job with a sharp knife. You can, of course, make a lid from another material, for example, plywood or an old fiberboard lying around, but in this case remember that from constant contact with moisture the material can become moldy and bring infection to your hydroponics.
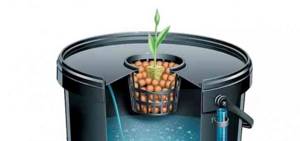
The seeds of the plant are planted in a mineral wool plug, which is fixed in the pot using expanded clay (do not forget to rinse it before use). The pot in which the plant will grow must be mesh so that the roots can easily penetrate through it and fall into the water. The nutrient solution must be well aerated, since without oxygen any solution, no matter how good fertilizer you pour into it, will become a dead substrate. The easiest way to aerate water is with a compressor, like those used in fish aquariums. Since oxygen dissolves very poorly in water, the compressor mainly performs the function of mixing the water, otherwise it will instantly go rotten. It is difficult to say exactly what capacity the compressor should be, but the minimum calculation is 80 l/h per 20 liters of water. You can increase the efficiency of the compressor by using an aerator stone, which is placed on the compressor tube.
As you can see, there are not so many components of a hydroponic system - a container, a lid, a pot and a compressor. And all this is easy to buy separately. Therefore, if you are interested in assembling the system yourself, try it and enjoy. Well, in general, you can always buy ready-made ones, and it’s good that you have a choice.