Wicker fence - pros and cons
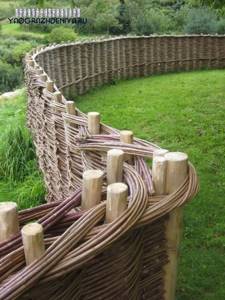
The main advantage of a wicker fence is its unusual decorative appearance. It looks much more original than a fence made of boards, picket fences or corrugated sheets. At the same time, it is also environmentally friendly - only natural materials are used. You can build it yourself, and most of the material will cost almost free. In addition, it does not require many workers to create it; you can even do everything alone. Also, such a fence can have any shape.
However, a willow fence also has disadvantages. This is, first of all, a fire hazard. Such a fence has more decorative than protective value, so it is unlikely to protect against penetration into the site. Repairing a wicker fence made of willow is difficult - if one twig is damaged, the entire section will need to be dismantled. Also, it does not suit all architectural styles and will look best next to a rustic-style house.
Types and varieties of willow for hedges
You can create a hedge from almost any willow, but there are varieties that are more suitable for this purpose than others (Figure 4).

Figure 4. The best decorative varieties of crops: 1 - spherical, 2 - rosemary-leaved, 3 - reticulated
Popular decorative types of willow are:
- Globular: a cultivated variety that is distinguished by a spreading spherical crown with gray-green leaves. Life expectancy is up to 75 years, and the culture retains its decorative appearance even in winter, due to its golden-yellow bark.
- Rosemary leaf: distinguished by the original red-brown color of the shoots. The height of the crop is up to 2 meters. As a rule, it is used to create hedges in combination with other plants.
- Net dwarf: a very unusual variety of willow, because the height of an adult plant does not exceed 30 cm. Due to this, this variety is used only for creating low decorative fences.
Holly
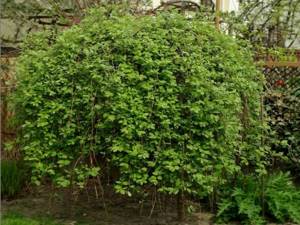
One of the most unpretentious varieties of willow, therefore it is most often used to create hedges. In nature, the height of the plant can reach 8 meters, but in summer cottages the growth activity of shrubs is usually corrected by pruning (Figure 5).
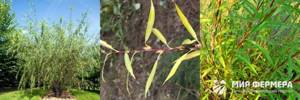
Figure 5. The holly variety is most often used to create fences.
This type of crop loves moist soil, but does not tolerate stagnant water at all, so the soil in the area where the fence is created needs to be drained. Moreover, the crop grows well even on poor and sandy soils. It is this variety that is used for weaving furniture and baskets.
Types of willow
However, not every willow can be used for a fence. The following types are recommended:
- goat willow,
- hemp willow,
- almond willow,
- red willow,
- laurel-leaved willow.
Goat willow is considered the most suitable for a wicker fence. It grows in moist soils and has smooth bark.
Hemp willow grows near bodies of water. Young shoots have green-brown bark; the branches of this willow are very elastic and flexible. The shrub itself reaches a height of 8 m. For weaving, it is best to choose branches that are 2-3 years old.
Laurel willow is even taller - up to 14 m. A wicker fence made from it is strong and durable thanks to the strong core of the shoots. This shrub grows on moist and peaty soils. Laurel leaf willow has dark green bark.
Almond willow is also a good choice for making your own willow fence. It grows in moist soil and peat bogs, has yellowish or greenish-brown bark, and after steaming the branches become bronze in color. The advantages of this species are easily removable bark and easily split branches.
The red-colored variety is least suitable for weaving willow fences - it has a thin core, so the wattle is short-lived. It is better to use a waistcoat for small items such as baskets and decorative items. The talnik has branches of a reddish tint.
How to make a willow fence
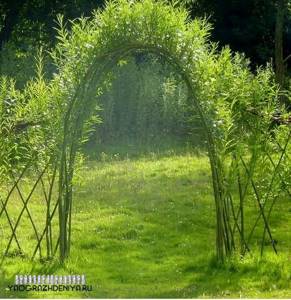
In a living fence, willows have an excellent ability to quickly take root and settle into new conditions. Do-it-yourself willow fence and step-by-step instructions with all working stages are presented below:
- Choosing a location - the main criterion is illumination, and the best level can be considered direct rays of the sun for 4-5 hours a day. It is known that willow trees can grow in less comfortable conditions, that is, in partial shade. But it will be difficult for cuttings or seedlings to create dense thickets, and the shoots will be thinner and more fragile.
- Marking - according to previously calculated parameters, the boundaries of the fence begin, using pegs and a rope stretched between them. If an extremely dense and impenetrable fence is important, then you need to plant the plants in 2 rows.
- According to the markings, a trench is dug with a depth of 0.6 meters and a width (longitudinal) of 0.5 meters. If container plants are replanted with a lump of earth on them, then the trench is made 0.1-0.2 meters larger.
- The seedlings must be placed in a trench, maintaining a distance of 0.2 meters between them.
- The trench should be filled with a previously prepared soil mixture, peat and compost (in equal proportions).
- It is not necessary to apply mineral fertilizers, and the additive will improve growth, but if the soil is rich, then the plantings will actively develop even without it.
- The planted shoots are tied to pegs that are driven into the ground. If it is important to secure the seedlings at a certain angle, then it is worth preparing a slatted frame in advance and installing it along the trench.
- The soil around the plants needs to be loosened and watered. If you water the willow fence constantly and abundantly from the very beginning, then there will be no problems with growth even on sandy, dry soil.
- It is recommended to intertwine seedlings with each other in order to obtain a dense structure in the future no earlier than 6-12 months later. By that time, the plants will get stronger, and the trunks will lose their original fragility.
To learn how to make a willow-type fence, watch the video.
Procurement of material
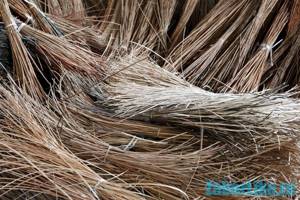
It is best to harvest willow twigs for the fence in winter and early spring, when the plant is dormant. Branches 1-2 years old are suitable. They should not have a reddish tint and be fragile; rods with a loose core are also not suitable.
You can harvest willow in the summer, during the period of sap flow. Then the rods are dried before use.
The rods should:
- have a core 1.5-4 cm thick,
- be straight and flexible
- have no growths or protruding knots.
The willow is cut using pruning shears or a garden knife, and then tied into armfuls. When you bring the material home, clear the rods of leaves and branches.

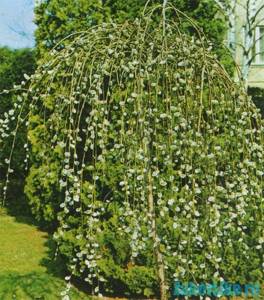
Willow planting
Willow is famous for its many varieties and because of this it is popular among gardeners and summer residents. One of the popular varieties of this plant is “Holly willow”. It looks laconic in design, either as a separately planted plant or as a hedge. One of the advantages of Norway willow is its undemanding nature and frost resistance.
- Soil preparation. Willow is an unpretentious plant, it grows quite quickly and does not require various tricks with adding fertilizers before planting. However, if the soil is poor, you can add fertilizer in the form of organic and mineral fertilizers.
- Favorable time of year for planting. Seedlings without a root ball are planted exclusively in early spring. Seedlings with a root ball can be planted from spring to November.
Planting willow seedlings in a hedge - Landing. In order for a willow hedge to be long-lasting and dense, planting diseased seedlings should be avoided. It is also worth weeding out shoots with spots or unusual colors.
When starting to form a fence, you should dig several trenches along the planned area. The depth of the trench should be approximately 60 cm and the width 50 cm. Depending on the shape and density of the hedge, an even distance between plantings must be maintained. The optimal distance between seedlings should not exceed twenty centimeters. If there is a lump of earth on the seedlings, then the depth of the trench increases by another 10-20 cm.
After placing the seedlings, you should mix the soil, peat and compost in a one to one ratio and fill the trenches with the resulting substrate. Many experts advise applying mineral fertilizers to the soil.
Undoubtedly, this improves growth, however, if the soil is rich, this may not be necessary. When the seedlings are planted, they should be tied to pegs driven into the ground. But you can also knock down a frame of slats in advance and tie all the shoots to it at an angle, as described above.
Note: seedlings can be bought in stores or specialized nurseries that sell various plants. You can also buy them second-hand in markets, but then no one will be responsible for the quality of the plant. Even when purchasing seedlings in so-called nurseries, it is worth making sure that they are stored correctly. They are usually sold in small containers or wrapped in burlap. The soil of the shoots should not be dry, regardless of the packaging.
Storage
Since willow is harvested in winter, and you will most likely weave a fence in summer, the question arises: how to store the material?
Before putting away the twigs collected in winter for storage, boil them for 5 minutes in boiling water. There is no need to remove the bark - thanks to it, the willow is stored better. The treated branches are stored in a not too humid, ventilated room with a temperature of 0 to +40 degrees. If the bark was removed immediately (this can be done later, in the summer), then the material is stored in a heated room.
If the willow was harvested in the summer, then it is cleared of the bark and immediately laid out to dry in the sun, and if the weather is rainy, then under a canopy. The twigs are laid out in an even layer separately from each other; you cannot put them in a heap - this will cause the willow to darken. Drying usually takes 2 days in good weather, and a week in damp weather.
If there is a need to store willow, it can be stored in the attic or basement. Dried rods are stacked.
To clear the bark from the rods, use a simple device called a “pincher.” To make it, you need to take a thick branch and split it lengthwise; at the splitting point, wrap it with tape or tape so that it does not split further. A willow rod is inserted into the gap and pulled through.

Weaving
How to make a fence from willow branches? Before weaving the fence, the rods are soaked in water to make them flexible. The time required for this differs in each case, so check the condition of the branches - they should bend easily.
To make a wicker willow fence with your own hands you will need:
- pruner,
- pegs and cord for marking,
- wire,
- stakes or thick branches to support the fence,
- vine,
- mallet,
- hammer and nails.
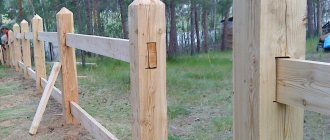
First, make markings and mark the locations of future supports. Coniferous wood stakes are driven into the selected places, deepening them by 35-50 cm. You can also take metal pipes or wooden blocks.
To prevent the supports from starting to rot, their lower part is treated with liquid roofing felt or fired. Pipes or bars are also treated accordingly. To avoid distortion during construction, the supports are connected with horizontal planks, which are removed as we weave.
Thick (thicker than 3 cm) rods are dug between the supports at a distance of 40 cm from each other. They will also be further intertwined with horizontal thin rods, and the upper parts, which should protrude above the fence, will form its even upper edge.
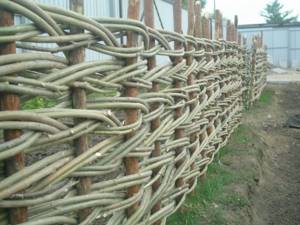
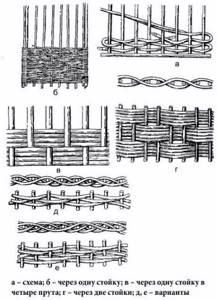
Horizontal weaving of a willow fence is similar to basket weaving. The tip of the rod is nailed to the first support, and then passed between the next ones, bending around them from one side or the other. The diagram is shown in the figure. This is the simplest way of weaving - chess, for this you do not need to be a master. There are others that are more complex.
You can weave from 2-3 rods at once, it is important to ensure that they are parallel at all times. Every 3-4 rows are compacted with a mallet to obtain an even and neat wattle fence. To make a wicker fence more durable, wire is passed through 7-8 rows of rods.
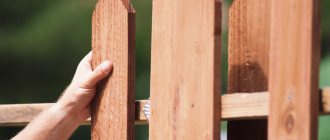
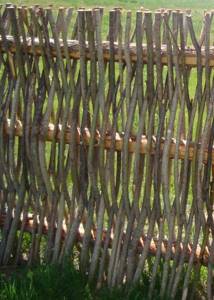
Vertical weaving of a fence is also easy. To do this, horizontal strips are nailed to the stakes at a distance of 20-30 cm from each other, and willow twigs are passed between them, as in the photo.
The willow twigs are connected using wire; it is advisable to do this unnoticed. Thin and flexible vines can be woven together, the ends turned inside out and trimmed. On the outer supports, the rods are bent and secured with wire or cut and screws are used.
Watch the video tutorial on weaving a fence.
Planting scheme
Almost all types of willow are planted according to the same pattern.
- To grow a living willow fence, we select a well-lit place. In partial shade it will grow, but will be more elongated and less branched.
- Depending on the desired configuration of the fence, we dig a trench at least 30 cm deep. This can be a flat, semicircular or other shaped trench.
- To plant plants from containers or with a root system in an earthen coma, we prepare places slightly wider than the container or earthen coma and about fifty centimeters deep. If the soil is heavy, add sand to it.
- We plant the cuttings at a distance of about twenty cm.
- The best results will be achieved by backfilling the trench with seedlings with a mixture of soil, sand, peat and compost.
To create a specific fence configuration, we stretch the rope on pegs or build a frame in close proximity to the trench with seedlings. He will help you in the future create a willow fence with your own hands. The frame can be made of stakes located at a distance of about one and a half meters from each other. They need to be placed when planting plants, so as not to injure the roots of rooted plants.- Place poles between the stakes horizontally to the surface of the ground. Each pole is attached between three stakes, going around the outside of the stakes with a winding strip. Poles are not the only option for horizontal fastening between stakes.
In the future, between the stakes you can stretch wire or other material in several rows in height, which will help in the first years to form the plants in the form you intended. The height of the poles, wire or other stretched material placed between the stakes will be the height of the shaped part of your fence. And the frequency of their horizontal arrangement will determine the frequency of bends in the willow branches that you can give to them as they grow.
After landing
- To begin with, let the cuttings or seedlings take root well and settle down in a new place.
- After some time (this can be done next year), we begin weaving a fence from seedlings. You begin to give the fence the shape you planned by arranging the frame. These can be vertical branches that you will direct straight up, bending them between poles or wire.
Weaving
- You need to start planting plants by a pole or wire one by one from different sides of the pole (we start planting the first branch in front of the lower pole.
- Then we pass it behind the second pole and bring it to the front side of the fence.
- Further along the course of growth we direct it in the same order.
- We start the second plant from the back side of the lower pole, after which we bring it to the front side, bend it around the second pole from the face and direct it again to the back side of the fence.
- Further formation of the fence occurs in the same order up to the top of the transverse poles or wire.

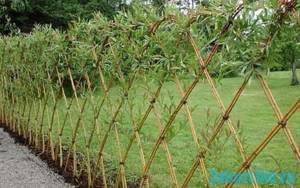
In the form of rhombuses
A willow fence made in the shape of diamonds looks interesting.
- To do this, direct the branches of rooted plants alternately towards each other and bend them around a pole or wire.
- To form a diamond-shaped fence, the presence of transverse poles or wire is not necessary. In the initial phase, at the intersection points, the branches can be tied together with soft material that will not damage the bark of young plants.
- Over time, the branches will thicken, the places where they intersect will become denser and will be able to hold the desired shape well.
- Such plants should be planted at a smaller distance than 20 cm, or planted in two rows, arranging the plants in a checkerboard pattern. Then a straight fence will create a continuous green line.
Other Features
Forming a fence in the form of a fence or diamonds is not suitable for species with fragile branches. These plants are formed into an upright fence, pruned on both sides.
Talnik combines species of willow that have a shrubby form.
Chernotal has very plastic branches. It is readily used to create living fences and tunnels. To do this, one or two year old branches are cut with a sharp knife in early spring or autumn. In the spring, rooting is carried out in the same order as described above. Branches collected in the fall can be stored until spring, placed in a container with a small amount of water. Rooting is carried out in the spring.
Weaving a fence from willow is just as easy as from seedlings of another type of plastic willow. Planting and forming a willow fence is no different from the same operations with other types of non-fragile willows.
Protection and decoration
In order for a wicker fence made of willow branches to last a long time, it must be coated with antiseptic varnish. The required shade can be given with stain or colored varnish. If you want the vine to be lighter in color, bleach it with hydrogen peroxide.
To decorate the fence you can use:
- climbing plants,
- sunflowers - they are planted near the fence,
- pots and jugs that fit on support stakes,
- garden sculptures that are placed along the tine.
You will see photos of beautiful wicker willow fences below.

Overview of the main types of wood
The best wattles are obtained from one- or two-year-old willow shoots. Young growth is distinguished by such properties as strength and elasticity, tendency to bend and resistance to fractures. It is these characteristics that make it possible to weave high-quality fences. Harvesting twigs should be done closer to winter or at the very beginning of spring, while the trees are in the hibernation stage.
A suitable willow for weaving a fence is selected from the following varieties:
- Almond willow "whitebush";
- Red-flowered willow "talnik";
- Hemp willow;
- Laurel willow;
- Goat willow.
White climber or almond willow
The vine of this variety of willow is most suitable for weaving. The plant looks like a small tree or shrub. Recognized by its brown bark with a yellow or green tint. Whitecrest grows on moist soils and peat bogs. The main advantage of almond willow, important for creating a wattle fence, is the simple splitting and convenient removal of the bark. Steam treatment gives the material an attractive bronze tint.

Talnik or red-flowered willow
The tree is “dressed” in shiny bark of reddish and brown shades. Its rods are usually used in the production of haberdashery products, since the wool has a small core. There is no need to bother with weaving a fence from red willow, because... it will be short-lived.

Hemp willow
This representative of the flora is found in nature in the form of large shrubs up to 8 m in size. Habitat is areas near water bodies. It is better to weave fences from hemp willow branches from plants that are 2-3 years old, while they have increased elasticity. Young plants are easily identified by their green-brown bark.
Laurel willow
A mature tree can reach 14 m in height, so the master will have to climb up to get good twigs. However, the work is worth it - long-lasting fences are made from laurel willow. The plant chooses wet meadows and peatlands as its habitat. Its bark is dark green. The thick, durable core allows you to weave strong, reliable fences from laurel-leaved willow.
goat willow
A massive shrub with smooth bark grows on different soils, mostly wet. People familiar with the technique of weaving willow fences consider the goat variety to be the most suitable for this purpose.
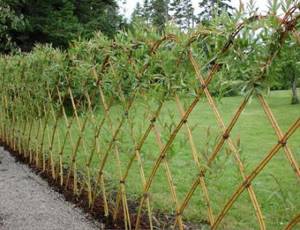
Willow hedge
You can also build a hedge from willow twigs, which will be covered with green leaves in the summer and, over time, produce new shoots. The fact is that willow takes root easily, even if you just stick a branch into the ground. This property can be used to decorate the garden. It is best to weave a hedge from willow in the spring, before the sap begins to flow.
As when creating a regular fence, support stakes are driven in for a willow hedge. They are fastened with several horizontal strips at the top and bottom. If you want to position the vine vertically, then the stakes are driven in at a distance of 1-1.5 m, and the planks are placed 25-35 cm from each other.
If the fence is in the form of a grid, then the supports are placed more often - at intervals equal to the width of the grid cell, and horizontal strips - at intervals equal to its height.
Next, weaving begins. To do this, willow rods are stuck into the ground to a depth of 15-20 cm every 20-30 cm. For vertical weaving, the rods are installed strictly vertically; if mesh - as in the photo, then at an angle.
The places where the branches adhere to the horizontal planks are fixed with wire, tape or rope. If the branches are in contact with each other, then in these places the bark is cut off on them so that they adhere to each other with wood, and they are tightly wrapped with tape. After some time, the willow in these places will grow together.
In order for the willow to take root well, sand is added to the ground. Don't forget to water your hedge on time. Over time, it will need to be adjusted: cut off excess shoots, loosen the wire fastenings, since the branches thicken as they grow, replace dead branches with new ones.

Step-by-step instruction
There is nothing complicated in creating a willow hedge, but to create a beautiful fence you need to strictly follow the instructions (Figure 2).
Note: The crop reproduces very easily and takes root easily, but to protect young plants and stimulate their growth, the area will have to be constantly cleared of weeds at first.
Step-by-step instructions for creating a fence look like this:
- Preparation of planting material: seedlings can be purchased or prepared independently. If you prefer to harvest it yourself, it is better to cut the cuttings in March. Harvesting from November to March is also allowed, but in this case the branches will have to be stored in trenches or frozen at a constant temperature of -4 degrees.
- Cuttings: they are cut from one-year-old shoots of young growth. It is advisable to make a cut at the base, but you can also take the middle part of the branch. The length of the cutting should be 15-30 cm, and on the segment itself there should be 5-7 viable buds. The lower oblique cut is made directly under the kidney.
- Treatment of cuttings: it is advisable to soak the cuttings for two days in water, and then treat them with a growth stimulator. But this condition is not mandatory, because willow takes root well even without additional stimulation.
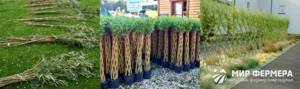
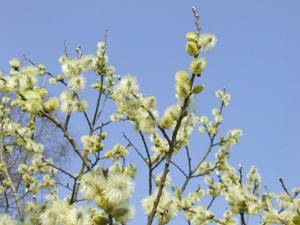
Figure 2. Planting material can be prepared independently on the river bank.
After this, they begin to plant cuttings. This stage is the most critical. If the soil on the site has not yet thawed, you can first plant the branches in boxes with sand, and then transfer them to a permanent place (Figure 3).
What else can you weave from?
Plants from which you can weave a fence are not limited to willow. Can be used:
- hazel (hazel) branches,
- grapevine,
- birch branches,
- boards,
- plastic panels.
The vine is thin, but can withstand high humidity well. Birch branches make a powerful structure that can be used to fence off an area. Vertical weaving is used, for example, such as in the photo.
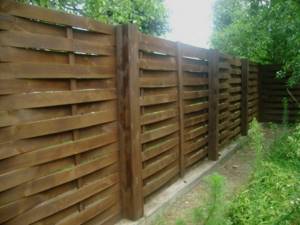
A wicker fence made of boards looks much more interesting than a regular one. The principle of its manufacture is the same as that of wattle from other materials.