You can argue for a long time which bathhouse is better made of timber or logs. Building a bathhouse from timber with your own hands looks like assembling a children's construction set. Self-construction does not require much experience or knowledge. It is enough to have the desire and clear instructions for installing a timber bath. The advantages of timber as lumber for DIY construction are obvious:
- Expensive craftsmen are not needed to build walls;
- the bathhouse gives a minimum shrinkage of 10-15% from timber with natural humidity;
- the cost of timber is cheaper than logs;
- timber is lighter in weight compared to logs, therefore easier to install;
- timber is purchased in the required quantity and, if necessary, it can be purchased in addition.
How to build a bathhouse from timber with your own hands, how to choose a foundation for a bathhouse from timber, calculate the amount of timber for a bathhouse - read about all this in our article.
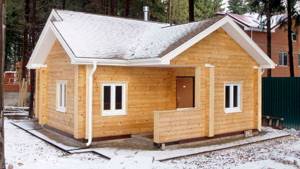
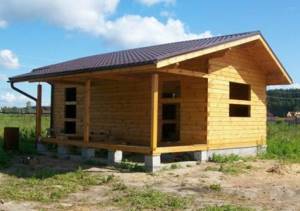
A sauna made of timber built with your own hands brings moral satisfaction for many years.
Choosing a bathhouse project
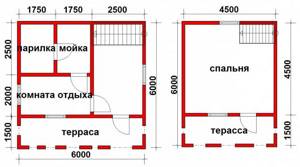
Start by choosing a project for your future timber bathhouse. On the Internet you can find not only photos, but also ready-made calculations. The design can be very simple (four walls) or a whole house-bath complex. A detailed plan for timber bathhouse projects will help you subsequently calculate the need for materials.
When building a bathhouse from timber, you can fit into a fairly modest budget, but such savings will only occur if you do most of the work yourself. This requires certain skills and a sufficient amount of free time. If you have neither one nor the other, then it is better to buy a turnkey bathhouse from a trusted construction company. Professionals will help you choose a project and tell you where you can really save money without sacrificing quality.
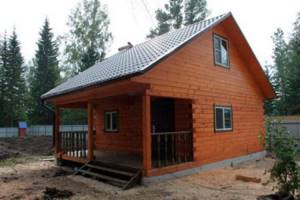
Bathhouse made of timber with attic and terrace
The most popular type of bathhouse, which is most often found in summer cottages, is a bathhouse with an attic floor and an open terrace. On the ground floor there is traditionally a dressing room and a steam room. The second floor is used as a relaxation room where you can relax after bath procedures. In the summer, gatherings with family and friends are held on the terrace.
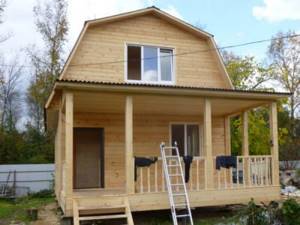
Bathhouse made of timber with attic and terrace
Bathhouse with a large terrace
For a long relaxation with barbecue or barbecue, you can create a wide open terrace under the same roof with a bathhouse. A stove is placed right on the terrace, and the area nearby is landscaped with tree plantings and a pond.
Bathhouse with an open terrace for summer relaxation and barbecue
Bathhouse with veranda
A one-story bathhouse with a veranda is the simplest option. The veranda should be made wider and glazed. In this case, it can be used as a summer room or kitchen.
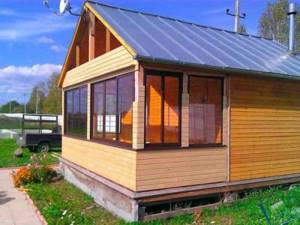
Bathhouse with glazed enclosed veranda
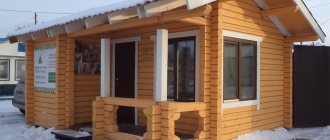
Bathhouse with porch
With a minimum budget or a small area, build a bathhouse with a regular porch. In summer, it is convenient to place a tea table on the porch and enjoy nature.
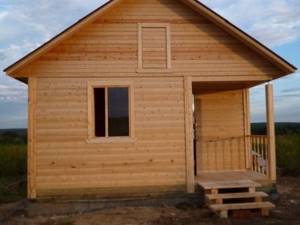
Traditional bathhouse with porch
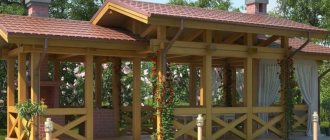
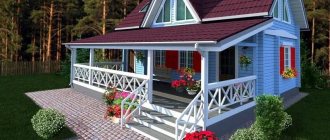
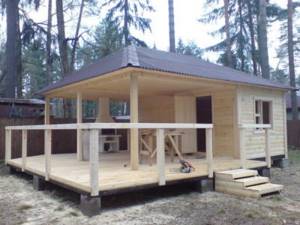
Bathhouse with veranda and wide roof
This solution has its advantages. The attic turns out to be larger in area and can accommodate two lounges. The foundation is compact, and the veranda has a common roof with the bathhouse.

Bathhouse with attic and wide roof
House-bath
This project includes a country house and a bathhouse in one building. A log house-sauna is compact, but at the same time has all the necessary premises for a full-fledged home: a kitchen-living room, a bathroom and rest rooms. You can live here with a small family during your vacation, as well as come for weekends in the winter.
Spacious bath house
Some features
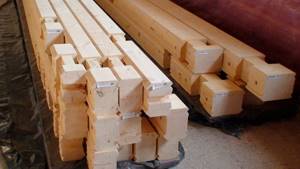
The most suitable material for building a bathhouse is wood. Many people prefer profiled timber because of its aesthetic appearance, strength and ease of masonry. The material can be either solid or consist of lamellas glued together - sawn boards. If you approach the issue from the point of view of economy, then the choice can be made on profiled timber with natural humidity. It is clear that it will take some time for drying, however, if the technological rules are followed during the construction of the bathhouse, the quality of the structure will be at the highest level.

Variant of the plan diagram of a bathhouse made of timber.
Any type of timber has specific dimensions. After drawing up the design of the structure and determining the parameters, material for construction is purchased, in particular timber with a cross-section of 100x100 mm. It comes in several varieties and is characterized in terms of moisture content:
- Timber made of wood with natural humidity, it does not exceed 20%. The material must undergo natural drying after the construction of the bathhouse.
- Ready-made dry timber, the humidity of which is usually 15%. It differs from the first material in that the moisture content in it remains practically unchanged.
The weight of the timber is usually limited by humidity and type of wood. Coniferous trees and larch are mainly suitable for baths. A beam with a section of 100x100 can be planed or edged - it depends on what kind of mechanical and technological processing it was subjected to. Planed timber with a smooth outer surface has an aesthetic component. A beam of this size comes in the form of solid wood, laminated veneer lumber, profiled sawn material and can have a square cross-section.
A bathhouse made of 100x100 timber involves the construction of an inexpensive building. A beam with such a cross-section is the optimal choice. Its most inexpensive types can be used as structural insulation and interior decoration. For the construction of the bathhouse itself, it is advisable to choose profiled and glued material.
Option for a two-story bathhouse made of timber.
As for the price, in a market economy it tends to vary within certain limits. In this matter, it is best to rely on the quality of the product, since the same material can have an excellent price from different manufacturers.
Is it possible to build a high-quality bathhouse at the lowest cost? In this case, you will have to work a little and be patient. To do this, you need to use profiled timber that has not undergone forced processing. You can also use a bathhouse project without an attic. A beam with a section of 100x100 is considered small, so it is relatively inexpensive, but it will require more effort during the construction process itself.
Before you begin construction, you need to create a bathhouse project. To do this, you should take into account all the nuances, including natural climatic conditions, location, nature of the soil and terrain. In any case, laying the foundation and the durability of the building directly depend on these points. In addition, we must not forget about the availability of communications. It is also important to ensure that costs associated with the heating process are minimized.
Material selection
How long the bathhouse will last depends on the quality of the building materials. Therefore, it is so important to purchase a good timber without defects. Many sawmills offer ready-made kits for building a bathhouse at a fairly cheap price. You should refuse such offers. In such kits, suppliers sometimes try to push through low-quality timber. It would be more correct to select each log with a thorough check before purchase. Other features of the material, heat and waterproofing, are also important, so northern coniferous wood is ideal for building a bathhouse.
Types of timber
The timber can be profiled or solid . What kind of timber to build a bathhouse from is up to you to decide. The profiled timber has polished protrusions and grooves along its entire length. Such timber logs are tightly connected to each other, leaving no room for precipitation to penetrate. The main disadvantage of such timber is its low fire-fighting properties, so it must be treated with special compounds.
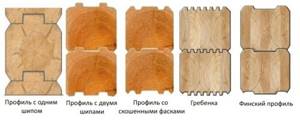
Types of profiled timber
For the construction of a bathhouse, ordinary timber is also used. The only disadvantage of such timber is its not entirely aesthetic appearance. If this is confusing, then the outside walls, after shrinking the bathhouse, can be covered with a block house or metal siding.
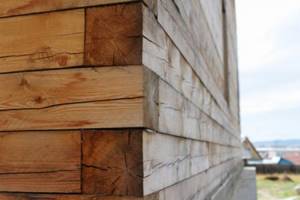
A wall made of simple timber does not always look perfect
Profiled timber is more expensive than regular timber without treatment. And only you can decide which material to purchase. Construction of baths from profiled timber is faster in terms of time. A simple beam is more economical, but then it will need to be externally improved.
Another type of material is laminated veneer lumber . It causes a lot of controversy in the construction of houses, but when building a bathhouse it is better not to use it. And not because it is an expensive building material. There is simply not enough practical experience, and therefore there are no reviews. It's better not to take risks.
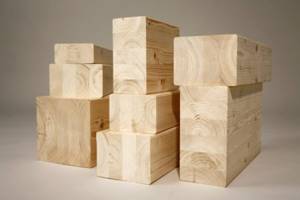
Glued laminated timber has a beautiful and smooth appearance, but is not suitable for building a bathhouse
How is the quality of timber determined?
High-quality timber has a perfectly flat and smooth surface. It is strongly recommended to refrain from purchasing material with distortions or any other damage - when laying the crowns, all deviations will clearly appear.
Mainly visible criteria:
- Geometric dimensions. A good beam has the correct geometric shape: opposite sides and diagonals of equal length. A small shift is allowed, but not more than 3 mm.
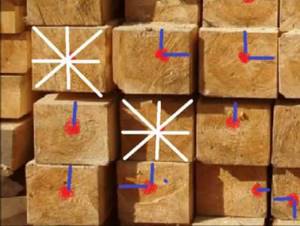
The diagonals of the timber must be equal
- Bend . A slight bend in the beams is acceptable, but such beams are more difficult to lay in the wall. Improper drying and storage will bend even the most perfectly cut material.
- Wave . The most common defect when sawing timber is the so-called “wave”. The reason for the appearance of defects is the negligence of sawmills, as well as problems with equipment. On band sawmills, a faulty belt or disk “jumps,” which leads to the formation of a wave.
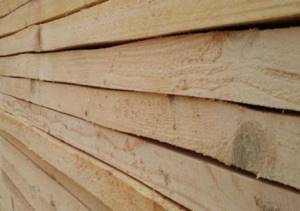
A wave when sawing timber is an obvious defect
- The wane (otherwise called the edge or bark) is more of a “cosmetic” defect than a defect. Such beams can be purchased for building a bathhouse if you plan to sheathe it. Such lumber does not affect the service life of the bathhouse.
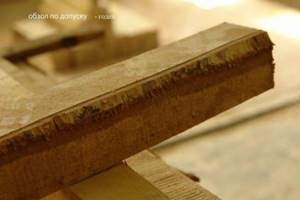
A small wane on the timber is an acceptable defect.
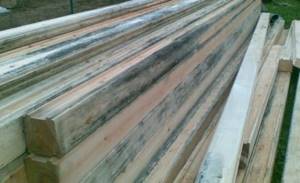
- Loose, brown rot is unacceptable, as are large resin pockets on the wood.
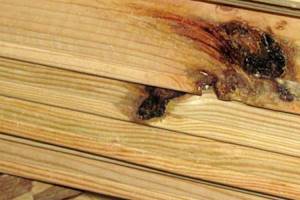
Brown rot (top log), tar pocket (bottom log)
- Blue, fungus. Blue discoloration on the wood means that the timber is susceptible to fungal disease. Such beams can be used to build a bathhouse in a garden plot, but only after good drying and antiseptic treatment. Hydrocyanic fungus itself is not dangerous, but it can be a conductor for putrefactive fungi.
Fungal infection of wood looks like blue discoloration on the surface of the logs
- There should be no noticeable signs of damage by beetles
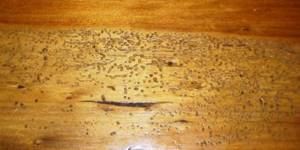
Damage to wood by bugs
Ordinary people don’t even realize that the quality of timber is enshrined in GOST standards. In GOST 8486-86, the above defects are considered defects. Many people still buy defective timber, since they can get a very good price for it. You can also build a bathhouse from it, making some effort to level it, seal large cracks and crevices, and saw off obvious imperfections. We hope you have already decided which timber is best to build a bathhouse from.
How to calculate the amount of materials
If you have decided on the design of the bathhouse, then you can determine the amount of materials needed to build the walls. Experienced builders can estimate by eye how many cubes of timber are needed for a bathhouse. To make your own timber calculations, use an online calculator. The timber calculator will help you calculate the volume, weight and approximate cost of lumber. The standard length of the beam is 6 m, and you determine the width and height of the beam yourself according to your needs. The thickness of the timber varies from 100*100 to 200*200 mm. The ceiling height in a timber bathhouse is 2-2.2 m.
Calculating the amount of timber using an online calculator
Total expenses
Every owner before construction wants to know how much it costs to build a bathhouse. Let's together calculate the monetary costs of building a bathhouse measuring 3*6 meters. The calculations will be approximate, since the cost of materials and services provided varies depending on the area of residence.
- So, let's start with the strip foundation . If you are a “handy” man and can make the formwork yourself, secure the reinforcement and pour the concrete, then you will spend at least 15,000 rubles. The services of hired workers will increase the cost of the foundation from 30,000 to 35,000 rubles.
- Logging a bathhouse from timber - if you used an online calculator, you calculated the number of cubic meters and the cost. Installing walls with boundaries of 3*6 meters will cost from 70,000 to 85,000 rubles.
- Roofing will cost 15,000-25,000 rubles. This is an approximate calculation for a gable, uninsulated roof with a metal tile covering.
- Communications – you will have to spend about 30,000 rubles to supply electricity to the facility and inside the bathhouse.
The total minimum amount is 130,000–150,000 rubles, provided that most of the work is completed on our own. A log house made of profiled timber, ordered from a construction company, will cost 100,000 rubles. The cost of the bathhouse, including installation of the stove and finishing work, is 250,000 rubles. This is the average price for a typical bathhouse measuring 3*6 meters. Therefore, assembling a bathhouse from timber yourself will save you about 100,000 rubles.
Choosing a foundation for a log bath
The foundation for a timber bath can be anything, as the structure will be quite light. You can choose a pile foundation, screw, strip or on pillars. Even for building a two-story bathhouse from timber with your own hands, strip and columnar foundations are considered the most optimal.
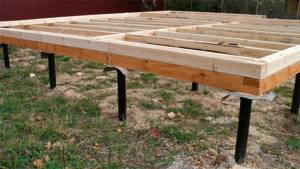
Columnar foundation
A columnar foundation will cost you little, which you can do yourself without any special skills.
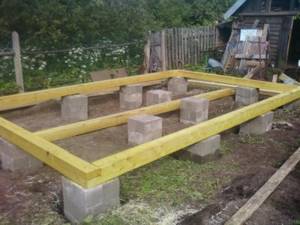
The column foundation is installed simply and quickly
Along the perimeter of the future bathhouse, holes are dug to a depth below the freezing point of the soil. In central Russia this is 70-80 cm. The distance between the pillars is no more than 2 meters, the diameter of each hole is 0.25 m. The pillars should be located at each corner of the building, as well as at the intersections of the walls. If the pillars are made of brick, then fill a “cushion” of concrete at the bottom of the hole. It will give stability to the pillars and prevent them from sinking into the ground. If you are planning a columnar foundation made entirely of concrete, then you must first reinforce the structure. The height of the posts from the ground is 50 cm. Concrete supports must “stand” for strength for 4 weeks. Next, the foundation is waterproofed, and you can build a bathhouse.
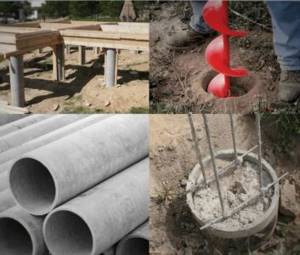
Foundation made of asbestos-cement pipes
Asbestos-cement pipes are often used as a base for a bathhouse. They are easy to install and do not require formwork. The distance between the pipes is 1.5 m, the recess is 0.8-1 m. After reinforcement, the pipe is filled with concrete.
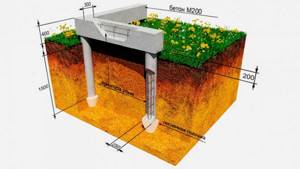
Strip foundation
Make markings on the ground around the perimeter of the future bathhouse using pegs and rope. The width of the strip foundation is 25-30 cm. The depth of the trench should slightly exceed the freezing layer, this is approximately 0.7-0.9 m. Formwork is made from boards, the height of the formwork above the ground is 50 cm. Crushed stone and sand, 10 cm each, are laid at the bottom of the trench layer. To ensure the strength of the foundation, reinforcement is made of metal rods.
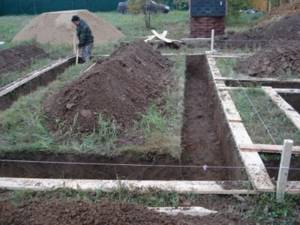
Marking the strip foundation for a bathhouse
Next, the trench is filled with concrete flush with the formwork, the edges are leveled. Concrete should gain strength within 3-5 weeks. Only after this can waterproofing be carried out and the first crowns installed.
Foundation waterproofing
To protect the bathhouse from dampness from below, it is necessary to lay a waterproofing layer between the first logs and the foundation. Apply pre-melted bitumen to the surface of the entire foundation. Place a sheet of roofing material on top of it. After the bitumen has cooled, repeat again: a layer of bitumen, a layer of roofing felt. This way you will get reliable waterproofing of the first row, protect the crowns from rotting and extend the service of the bathhouse for several decades.

Waterproofing the bathhouse foundation
Before laying, the main beams must be additionally treated with an antiseptic. Usually used machine oil is used and the surface of the timber is impregnated with it. This is a cheap, but at the same time very effective way to protect wood from dampness. The oil creates a water-repellent film, which helps protect the wood from rotting for a long time.
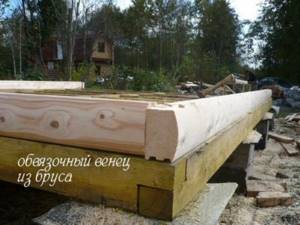
Processed first binding crown
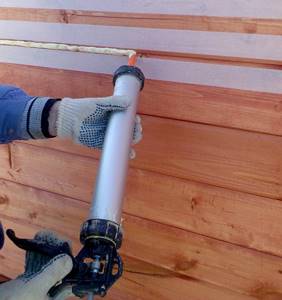
The final stage is to caulk the cracks!
When the beams are laid, prepare for a fairly long wait - on average, it will take up to six months for the frame to shrink. Therefore, lay strong boards on top of it, on top of which spread a thick film or slate... The main thing is that the wood does not get wet, but at the same time it is important to ensure good ventilation. When the structure has stood for a sufficient time, you should begin caulking - sealing all the cracks. For this purpose, there are both proven insulation materials such as moss, tow or felt, and modern sealant designed specifically for these purposes.

The use of sealant significantly speeds up and simplifies the work, however, it is up to you to decide which method to use. Usually they start caulking from the bottom crown, gradually moving upward - it is important not to overdo it so that the beams themselves do not move! With a ready-made frame, things will go faster - the construction of a bathhouse from timber with your own hands has just begun! Next in line are insulation of the bathhouse (warm floor and ceiling), ventilation system, installation of a heating system, but these are separate topics for discussion.
- Author: Mikhail Malofeev
Rate this article:
- 5
- 4
- 3
- 2
- 1
(1 vote, average: 4 out of 5)
Share with your friends!
Features of installation of crowns
The entire construction of the bathhouse depends on how you install the first row of timber. This is why so much importance is attached to the laying of the first logs. The beams at the base of the bathhouse must be perfectly level. Considering that they bear the weight of the entire building, choose the thickest logs measuring 20x20 cm. Subsequent rows can be made from 15x15 cm timber.
How to lay the first crown
Do not secure the lower crown, which is laid directly on the foundation; it will be held in place by the weight of the structure. This will also make it easier to replace it when needed, without disassembling the bathhouse. Make sure it is laid correctly and evenly using a square and level.
In order for the lower logs to serve as long as possible and not become covered with fungus, they are laid on slats. This gasket promotes air exchange between the layers. Along the entire foundation there are slats (see picture) no more than 1.5 cm thick. The distance between the slats is 25 cm. Insulation is laid in the free space between the slats and the timber. Do not use foam, it absorbs moisture and will only damage the sauna.
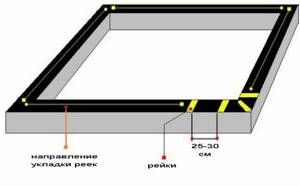
Installing slats before laying timber
It is advisable to make the first two or three rows of timber from larch. This wood becomes harder over time and is not susceptible to rotting in a humid environment. Hardwood is more expensive than spruce or pine, but anyone can buy a few logs.
The beams of the lower crown are connected to each other by end notches. If you purchased a ready-made bathhouse kit, then the timber already has precise cuts. To carry out this routine work correctly, it is recommended to make a template with which you can make the same connections. When making them yourself, make sure that they clearly match the template. Before joining the beams, the cuts are lined with inter-crown insulation.
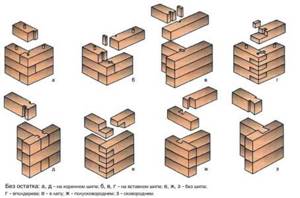
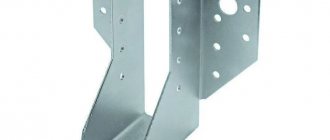
Types of notches - corner connection of timber
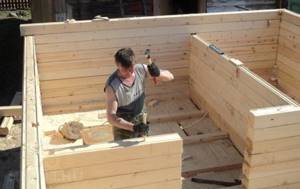
Subsequent wall assembly
Subsequent crowns are assembled in the same way, securing them together with wooden dowels. They are a wooden stick with rounded edges. They are inserted into pre-drilled holes in adjacent beams in increments of 1-1.5 m. They are drilled through a pair of beams. The diameter of the drill should be approximately 5 mm less than the diameter of the dowel.
Using dowels, the row of timber is connected to the bottom row
It is good to fasten the beams with a “Strength” spring unit, which looks like a screw with a compression spring built inside. Thanks to this fastening system, there will be no gaps between the parts - after all, the beams will press against each other with all their might. Although this method is expensive, cracks and deformations of the entire structure can be happily avoided.
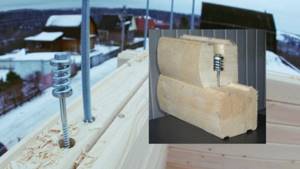
Assembling timber on metal dowels “Knot Strength”
Place inter-crown insulation on top of the first beam. Traditionally jute or moss is used. By the way, you can harvest moss yourself in the forest, which will save you a lot of money. Tow is also often used for insulation between logs. If you are laying moss or tow, leave allowances along the edges of the timber. After the bathhouse is built, you will need to carefully caulk (tuck with a spatula) the overhanging edges into the space between the beams.
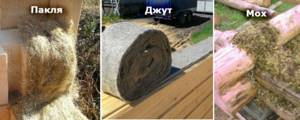
Intercrown insulation - moss, jute or tow
All subsequent crowns are laid in this way. The last two rows do not need to be secured. They will then have to be removed to install the ceiling beams. Ceiling beams can only be installed after wood shrinkage has been completed.
How to assemble a bathhouse from timber with your own hands? Construction stages.
So, for the construction of a bathhouse, the best option is to choose planed timber , which has high aesthetic and performance characteristics, at a very affordable price.
But before starting construction, you should prepare a project and calculate the required amount of material. It should be borne in mind that its purchase should not be made in parts, but for the entire facility at once.
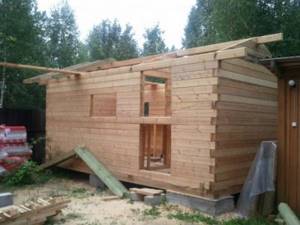
Therefore, when large bathhouses are built from timber, even several units of vehicles can be used to transport the material to the site, but after delivering the timber to the site, it is necessary to resolve the issue of its storage.
It is not recommended to dump it in a heap, but it is necessary to first prepare a site for it and install it from available materials: logs, beams, boards, a small podium in order to avoid contact with the ground.
In addition, spacers should be installed between the rows of timber to provide a gap of about 1.5–2 cm for ventilation.
Foundation for a house made of timber
A bathhouse made of timber is a fairly light structure, so it does not require a powerful foundation. And since there is no need to construct a basement, the best options for it would be to choose a pile-screw or columnar type of foundation. But a monolithic-tape type, shallow-depth type, is also quite acceptable.
The choice of base for a bathhouse is also influenced by: the geological features of the site and the climatic features of the region. But if a small bathhouse is being built from timber , then it is easiest to make a strip foundation with your own hands, for which you should prepare a trench slightly wider, approximately 10–20 cm, than the lower embedded frame and 50–60 cm deep, taking into account the fact that the freezing depth is no more than 40–50 cm.
But if the soil freezes much deeper, then you should lean towards the pile or columnar type. These two types of foundations can be completed independently, just like a strip foundation, without the use of special equipment, although, of course, screwing in screw piles manually takes much longer, but is quite within the capabilities of two or three workers.
An important element of these types of foundations is the installation of a grillage, which acts as a load distributor on all elements and connects them into a single structure. It can be made in various ways, but in the case of building a bathhouse from timber , it can be a monolithic grillage made of concrete, or also arranged in the form of a frame made of logs or timber, with a cross-section of at least 300×300 mm.
In the case when a bathhouse is built from timber with an attic , in which recreation rooms, billiard rooms or sports facilities can be located, it is likely that a more massive and durable foundation will have to be built.
But regardless of what type of base was chosen, before proceeding with the installation of the first crown, it should be properly waterproofed using special compounds, mastics and/or roofing felt.
In addition, for the same purpose, it is recommended to lay transversely thin slats up to 2 cm thick along the perimeter of the strip foundation in increments of 30–40 cm in order to provide additional protection for the lower crown from moisture.
This technique also allows for additional thermal insulation of the bath, for which you can use conventional insulation or, which is more reliable and effective, polyurethane foam.
At the foundation construction stage, you should think about and arrange structural elements and technological openings for installing water supply and drainage - an important system of any bathhouse.
Installation of the first (mortgage) crown
As a rule, the beam for the first crown should have a larger cross-section, so if, for example, a beam for a bathhouse has a size of 150×150 mm, then for the embedded crown you should separately purchase a beam with a cross-section of 200×200 mm.
Most often, products for the first crown are made from larch, a wood that is practically not subject to rotting, even in a humid environment, or oak, known for its high strength.

Additionally, it is recommended to coat the lower crown beam with an antiseptic. As a rule, the lower crown is not fixed, and its stability is guaranteed by the weight of the bathhouse, since, even under reliable protection, it is quite vulnerable to moisture; after a while it may need to be replaced, which is quite feasible.
After this, another important stage of work should be completed and the logs should be installed, which will become the basis for creating a subfloor.
Project of a bathhouse made of 6x6 timber with an attic, video:
How to prepare a bathhouse from timber for shrinkage
Shrinkage of a log house is the drying out of the wood, as a result of which the cross-section of the timber decreases. Therefore, the higher the moisture content of the wood at the time of construction, the lower the ceiling in the bathhouse will become. Knowledgeable craftsmen advise building a bathhouse from timber in two stages. First install the foundation, build the walls and finish with a rough roof, i.e. make a rafter system and cover it with roofing felt. In this form, the assembled bathhouse is left to winter and shrink for six months. And in the second year, begin finishing work: install windows and doors, cover the roof with the main roofing material, install a stove, and so on.
But not everyone has the strength and means to immediately install rafters for the roof. Therefore, it is enough to lay 40-50 mm thick boards on the last row of the bathhouse and cover them with slate or roofing felt. In this form, the bathhouse will last for six months. Ruberoid will protect the structure from rain and snow. Next season you will be able to assemble the roof and carry out other finishing work.
In order for the shrinkage of the building to be minimal, the natural moisture content of the wood upon purchase should reach 14%. Do not hesitate to ask to measure the moisture content of the timber in front of you; every self-respecting seller has a special device for determining moisture content. The bathhouse shrinks slightly the following year; this must be taken into account when installing windows and doors.
How to make a bathhouse from timber with your own hands correctly?
You can significantly make your task easier and speed up the construction process if you do not order timber separately, but immediately purchase a complete kit for constructing a bathhouse, according to a finished project.
In this case, you just need to strictly follow the instructions and lay the timber in strict accordance with the plan, which describes in detail where and in what place, in which row of the log house this or that element should be installed.
Otherwise, you need to plan everything yourself, including marking and manufacturing elements of the required length, taking into account that the standard length of planed timber is 6 m, although you can purchase products of other sizes.
Before starting work, you should make sure that the planed timber has undergone special treatment with antiseptics and fire retardants, but if this is not the case, you will have to perform this operation yourself.
Further, if we are building a bathhouse from planed timber , the process of constructing a log house will look like this:
- Inter-crown insulation made of jute, tow or other material is laid on the first crown, observing the necessary overlap at the edges of approximately 7–10 cm, and in order to fix it, you can use a construction stapler or small nails;
- the timber of the second crown is laid and they are fastened, for which it is recommended to use wooden dowels or metal pins;
- to install dowels or pins (pins), it is necessary to drill holes so that it passes completely through the beam of the top row and enters at least a third into the bottom row, the pitch should be approximately 1.2–1.5 m;
- the next stage is laying insulation on the second crown, installing the third row of timber, and so on until the very top;
- It should be noted that the last two crowns do not need to be secured initially, since they will have to be removed to install the ceilings, which are recommended to be installed only after the frame has settled.
Bathhouse made of 4 x 4 timber with a terrace, video:
To ensure better thermal insulation, it is recommended to make baths from timber using a corner joint with a root tenon according to the principle of the so-called warm corner, which will significantly reduce heat loss during operation.
Also very popular when working with planed timber are other types of joints, including “in the bowl”, “in half a tree” and “in the paw”.
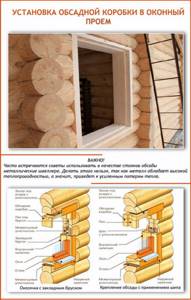
The construction of window and door openings, as a rule, is carried out simultaneously with the assembly of the log house, although subsequent cutting is also allowed after the structure has settled. And the actual installation of structures is carried out before the start of finishing work, when shrinkage processes will not lead to deformation of window frames and door frames.
In addition, before installing them, it is recommended to make a so-called casing (or frame), a special structure independent of the walls of the log house, which does not allow the window to deform even in the case of quite serious shrinkage processes. This is especially true if a material with natural moisture is used for construction.
The construction of internal partitions, for which planed timber with a smaller cross-section can be used, is usually carried out simultaneously with the assembly of the log house. This is necessary in order to embed them into the outer crowns, which will ensure the necessary strength of the entire structure.
But many reviews from owners who built a bathhouse with their own hands indicate that the partitions can be installed even after the main work associated with the construction of the log house has been completed, but always before the installation of the ceiling.
Do-it-yourself bathhouse made of timber 150x150, video:
Shrinkage of the log frame and installation of the roof
A log house made of planed timber will require at least six months to shrink, although some owners are making various attempts to minimize the process both in scale and in time.
For this purpose, special shrinkage jacks are used, with the help of which parts of the structure are periodically lifted for leveling.
Another option is to treat the ends of the timber with special compounds, which, by normalizing the humidity in the material, prevent excessive shrinkage and additionally serve as protection against the development of putrefactive processes.
The correctly chosen time for installing the log house will also help to correct and optimize the shrinkage process. And this is winter, since in the warm season, with low humidity, the tree intensively loses moisture, which leads to uneven shrinkage or even the appearance of cracks on the timber.
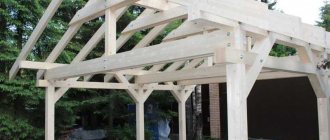
After the end of the shrinkage period, you should caulk the walls and begin installing the rafter system for the roof, which can be single or gable in shape, although other options are allowed, for example, if there is an attic floor, a multi-slope or dome system is used.
The first step is the installation of rafters and installation of sheathing, which, depending on the chosen roofing material, can be either solid or regular, step-by-step. But before you begin laying the top covering, it is necessary to lay a layer of vapor and waterproofing, as well as a layer of insulation sufficient to reliably retain heat in the bathhouse, preventing it from escaping outside.
There are no special restrictions as a roofing material, but on the condition that materials with a large weight are not used. The best option would be: metal tiles, ondulin, slate, corrugated sheets. But often the choice of roofing, as well as its color scheme, is determined by the architectural style and roof material of the main house.
Installation of windows and doors in the bathhouse
Openings for windows and doors are marked at the beginning of the construction of the bathhouse. To do this, you first need to leave small gaps in the crowns where doors and windows are installed. The dimensions of the gaps depend on the dimensions of the products being installed. After completing the construction of the bathhouse, you will simply use a chainsaw to make openings for installing doors and windows.
Openings for windows and doors when building a bathhouse from timber
The door block is installed on a row of frames located at floor level, with the obligatory use of a plumb line and a building level. Only after carefully aligning the door frame horizontally and vertically can it be secured in the opening. Window blocks are mounted in the same way, at the required height and in the planned locations. Be sure to leave a gap of at least 80 mm above the window and door units, filled with insulation. This gap is necessary for subsequent shrinkage of the bath.
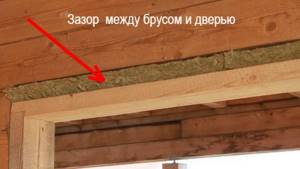
The gap between the upper door jamb and the beam is laid with inter-crown insulation
Choosing a roof for a timber bath
After installing the walls, door and window blocks, the roof is installed. It can be single-sloped or double-sloped. The cheapest is a pitched roof. It is low cost and much easier to install. For small stationary baths, as well as transportable ones made of timber, this method is considered optimal.

A pitched roof is the easiest to implement.
Installation of a pitched roof is done using transverse joists. They are fixed at an angle to allow rainwater to drain. If the bathhouse has only one floor, boards are nailed onto the logs, on which the covering is placed. It can be roofing felt, slate or corrugated sheeting.
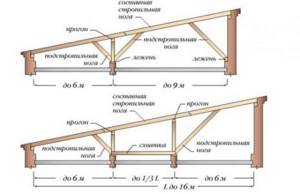
Installation diagram of a pitched roof
Gable roofs have a more attractive appearance, but their design is quite complex to install. This roof is perfect when the bathhouse is large or has an attic or veranda.
A gable roof has a more complex structure, but a more attractive appearance.
Ordinary slate is often used as a covering. To give the bath a beautiful appearance and special attractiveness, the roof is made of ondulin and metal tiles. After laying the roofing material, the next stage of bathhouse construction is the insulation of the roof. See the article “How to build a roof with your own hands.”
Thermal insulation of a timber bath
After the bathhouse is ready, it is necessary to insulate it. The roof is insulated with covering or fill materials, the cracks between the logs are caulked, and a concrete screed is made on the floor. A winter bath needs additional thermal insulation; the inside is lined with aluminum sheets and covered with clapboard.
How to properly caulk a bathhouse
After shrinkage, cracks have formed between the beams, which need to be caulked with the material that was used as inter-crown insulation. How to caulk if it is moss or tow? We twist the ends of the hanging moss or tow and tuck them into the space between the beams. If required, add more insulation: roll it into a bundle and drive it into the gap using a wooden spatula and hammer.

Caulking the cracks of timber with tow
If you used tape jute as an interventional sealant, you can skip this point in the instructions - your log bathhouse most likely will not need additional caulking. However, experts still recommend studying the condition of the structure. If you find noticeable cracks, be sure to caulk. To do this, fold the jute and force the material into the gap, followed by compaction.

Caulking cracks with jute material