Most of the territory of the Moscow region is flat terrain, with rare hills, mostly flat landscapes. Therefore, the concept of “geoplastic”, until recently, was practically not used in the vocabulary of most landscape designers.
In reality, spatial planning of the area is a real art, allowing the gardener to feel like the architect of his site. Such work can be called “the aerobatics” of landscape design, since linking different spatial objects on one site, such as terraces, grottoes, voluminous flower beds, and doing it harmoniously is not a simple task, but it is feasible.
What is geoplastics? And why is it being done?
Geoplastics is the vertical planning of a territory for the purpose of artistic transformation of the relief. Simply put, this is the creation on the site:
- artificial earthen ramparts;
- hills;
- terraced slopes;
- grottoes and other similar changes to the natural landscape.
Designers and architects usually resort to geoplastics in order to advantageously play off existing unevenness on the site (if the landscape is initially hilly), or to emphasize the most characteristic and picturesque motifs of the natural relief. If the landscape of the site is initially flat, then completely new forms of artificial relief are created.
The goals of such landscape transformations can be either purely utilitarian (hide outbuildings, the wall of someone else’s house or an industrial landscape) or aesthetic (break the feeling of monotony of the relief, create the illusion of privacy, complete immersion in the natural environment).
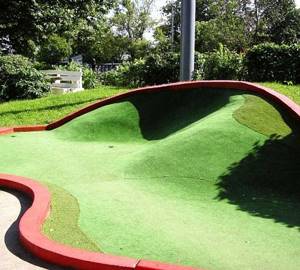
Geoplastics makes it possible to create a landscape of a personal plot with completely unique elements, for example, to design a children's playground in the form of a fairy-tale landscape with rocks, castles, ruins, caves, etc.
However, the advantages of geoplastics are not limited to this: another attractive aspect of its use is the complete waste-free work. For example, instead of transporting soil removed from a pit when building a house or digging a pond, it can be successfully used to build an artificial hill. Construction waste remaining after the construction of structures can be used in the same way.
By the way, unlike our latitudes, in Europe the culture of transforming the terrain is very developed and is at a high level. Here they not only think about waste disposal, but also use the changed topography to collect rainwater, drain the soil, protect certain parts of the garden from the wind - that is, create an environmentally sustainable environment. And driving through well-groomed European towns, we often have no idea that former landfills are hidden under the picturesque hills with beautiful houses.
So, if you have construction waste left after the construction or renovation of your home, do not rush to take it out - you can use it to make a wonderful mound on your site, with a gazebo on top.
Why are artificial hills needed?
First of all, with the help of such a design technique, you have a wonderful opportunity to hide those places on the site that are unlikely to please the eye of the observer: a not very elegant garage or barn, an old landfill or a blank concrete fence. Do you remember the small mounds that skillfully hide cellars or buildings for household tools? Previously, almost no estate could do without them. However, even now such relief elements have a right to exist. And by placing a small gazebo on the top of a hill, you will have an ideal place to relax and contemplate the surrounding landscape.
Changing the terrain of the site. How to do it right?
Before you start “improving” the site and changing its topography, it is important to take into account three rules:
- Firstly, creating an artificial relief is a rather risky undertaking, because it is not always possible to harmoniously fit hills and depressions into the usual plane so that the effect of an unnatural landscape does not arise. Therefore, before erecting artificial mountains in front of your house, you should think carefully and imagine how harmonious they will look;
- Secondly, the creation of geoplastics can be quite expensive due to its labor intensity - all work is carried out with the filling or cutting of soil, the construction of stairs, ramps, retaining walls and other large-scale “destructions”. All this significantly increases the overall costs of landscaping the site after building a house.
However, despite the complexity of constructing artificial relief, small changes to the landscape (for example, creating a mound, a shaped flower bed, or building a small retaining wall) can be done with your own hands.
The main rule that must be followed in any such work is the so-called “principle of zero balance of earth masses,” which means equal volumes of excavations and embankments. Simply put, there should be one hole for every hill. And this is the third rule of competently changing the terrain of a site.
Let’s look at what work is included in the geoplastics of the site in more detail. Let's start with the simplest object - artificial hills.
Geoplastics in landscape design: creating the most common forms
Despite the complexity of technological techniques, you can create geoplastic forms yourself on your own site.
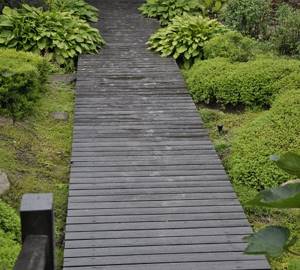
Do-it-yourself geoplastics in landscape design for novice gardeners can consist of making artificial hills, boulders (suitable for owners of flat areas) or terracing the area, creating a unique staircase (relevant for owners of hilly areas).
Viewing the finished works of professionals who will form an idea of the future design and its feasibility in the garden will help you think through and correctly form the image of the future relief. Photos of geoplastics in landscape design presented below will inspire you to create a beautiful topography.
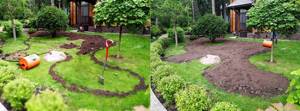
How are artificial hills created on a site?
They can be created from literally anything. As mentioned above, when constructing artificial hills, you can even use construction waste accumulated on the site:
- First, a pile is formed from broken bricks, pieces of concrete and gravel, with a wide base at the bottom and a narrower one at the top. In order for the slide to better hold its shape, it is advisable to reinforce it on top with a metal mesh;
- After this, the hill wakes up with a layer of sand that fills all the voids;
- Then a layer of soil;
- Then it is sown with grass. If you want to give your masterpiece a “marketable appearance” as quickly as possible, you can use a rolled lawn - in this case, in just 1-2 days you will be able to enjoy the beautiful view opening from the top of the hill.
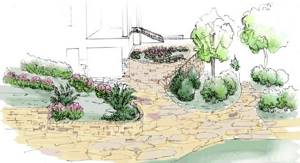
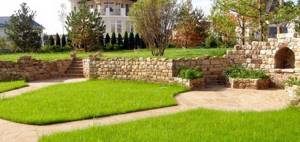
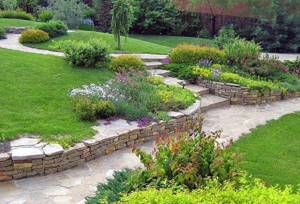
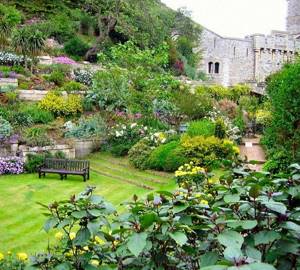
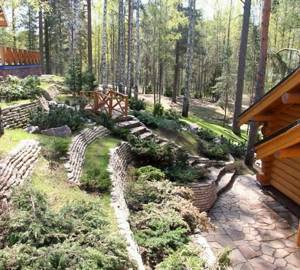
Another important element that geoplastics cannot do without is the construction of retaining walls.
How are retaining walls created?
On a site with a slope or complex terrain, retaining walls are required - they allow you to connect areas of different heights and prevent soil erosion. On a flat area, retaining walls will help diversify the landscape, imitating natural terrain.
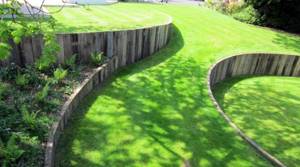
Several retaining walls, standing one after the other and forming mini-terraces, look especially impressive. In such three-dimensional flower beds you can plant:
- herbaceous perennials growing in nature among stones: bergenia, dwarf ferns, etc.;
- During repairs and finishing, the uppermost wall can be decorated with abundantly flowering plants, such as Japanese quince or cotoneaster;
- and lovers of minimalism will certainly like laconic, completely identical topiary forms, planted with ground cover plants of the same type or even just grass.
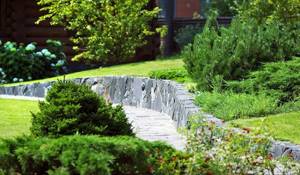
The retaining walls themselves can be constructed from several materials. The most common option among homeowners is concrete and brick supports lined with tiles or natural stone. You can also build a completely stone wall, consisting of large boulders held together with mortar.
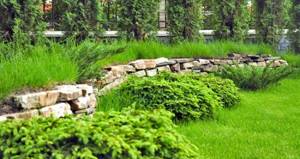
And for arid areas, where there is no danger of the support being eroded by rain and melt water, the so-called “dry masonry” method is suitable:
- To do this, carefully selected stones (limestone, sandstone, slate, granite) are placed tightly together without a special solution;
- Regardless of the material chosen, it is necessary to lay a foundation at the base of the building: for a wall up to 60 cm high, a crushed stone cushion 20-30 cm thick is sufficient, and for support above 1 m, the foundation must be at least 70 cm, and for structures more than 2 m high, a special reinforcement.
True, most landscape designers do not recommend building too high or too long walls: instead of one high one, it is better to build 2-3 lower ones, in a cascade, one above the other, and it is advisable to cut through the long wall with architectural elements, such as stairs or niches.
As for the external decor, most often the wall is decorated with brick, natural stone or wooden beams, “antique”.
In order to create the effect of old masonry, during landscaping work you can leave special niches in the wall, which are filled with soil with seeds of hanging plants: nasturtium, petunia, lobelia, sweet pea. Such an artificially “aged” wall will give your garden a resemblance to the abandoned park of a medieval castle.
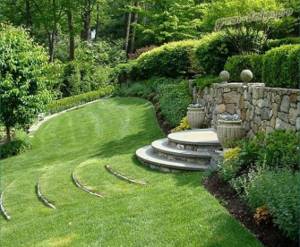
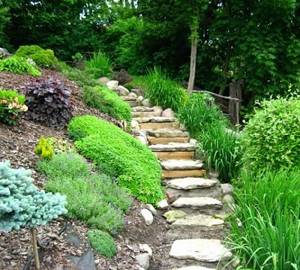
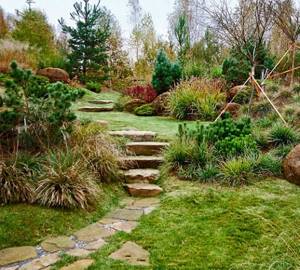
Creating steps and stairs on the site
If you have decided to diversify your garden with reliefs with height differences, you cannot do without garden stairs that serve to move from one level to another.
Depending on the style of the house and site, and the wishes of the owner, they can be made from a variety of materials. For example, for a capital regular garden, concrete steps are suitable. The only caveat of such structures is the price: heavy concrete stairs require a reinforced foundation, the construction of which can only be entrusted to specialists.
A more affordable option is stairs made of wood, soil or natural stone. You can even build such steps on the site yourself.
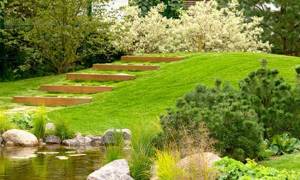
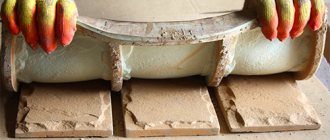
The simplest steps and stairs in the areas are the so-called “bulk” ones. The shape of the steps in such structures is maintained by wooden boards, called risers, pre-attached to two side boards (sidewalls).
In general terms, the process of building a bulk staircase looks like this:
- Niches for steps are knocked out and dug into the slope;
- Then the sidewalls with risers are laid on them;
- Then soil or sand is poured behind each riser, flush with the top of the board. And in order to prevent the board from bending under soil pressure, pegs are driven into the inside of the riser;
- As for the final decor of the future relief staircase, it is best to choose the material used in the design of the retaining wall - this simple technique will emphasize the unity of the design ensemble of your site.
Well, one last point. In order to make it comfortable to walk on the stairs, it is important to maintain certain proportions: the steps must be at least 75 cm wide and 15 cm high, and the tread length must be 33 cm. Most often, developers build stairs so that one flight consists of 8 steps , then it ends with a platform measuring at least 1.5 m2 and, if necessary, continues again.
Plot
18 votes
+
Vote for!
—
Vote against!
Land owners are often dissatisfied with this flat and boring appearance around the house. And really, how can such a monotonous relief please the eye? But don’t despair, geoplastics will come to the rescue. Her goal is to change and embellish the area, while everything looks natural, natural and unusually beautiful.
Table of contents:
- What is geoplastics used for?
- Hill design stage
- Forming the base for the hill
- Creating hills
- Landscaping, planting plants on hills
- Make your own slopes
- Do-it-yourself terracing
- Other types of artificial relief
What is geoplastics used for?
Geoplastics is a way of artistic improvement of a garden, an exceptional opportunity to make your garden plot more expressive by modifying the topography of the place.
In other words, any change in natural relief will be considered geoplasticity. For example, the well-known flowerbed also applies to this method of improving a plot of land. But in our time, its main task is to form earthen hills and slopes in places where they are absent. It is recommended to apply this solution on your site after first weighing all the pros and cons of the planned project. Spontaneity is not welcome in this matter.
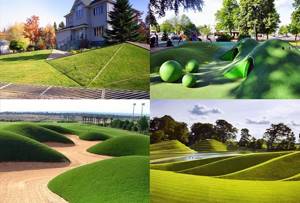
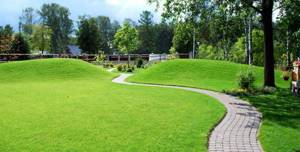
People use geoplastics for several reasons. First of all, creating relief artificially allows you to play with space. Especially if a whole chain of hills is formed, which smoothly transition from one to the next, and delight the eye not only with the wonderful green color of the grass, but also with the correct selection of plants that have decorative value.
Without taking into account the creation of a visual effect, hand-made elevations allow solving quite practical problems in the household. For large areas, geoplastics is a great way to divide the area into separate zones. In addition, the hill (if the height reaches 2.5-3 m), planting it with various plants, will help hide the place for rest from the gaze of inquisitive people passing by. In addition, it will provide excellent sound insulation, which is important when locating a site near a railway, highway or other infrastructure facilities. Also, inside the elevation it is possible to design a so-called “glacier” (a cellar in which, regardless of the time of year, a low temperature is maintained, allowing for the storage of various products) or another room necessary on the farm, which the owners of the site want to disguise it.
The creation of artificial types of relief on the site contributes to changes in the microclimate. For example, adjustments are made to the temperature of the area, its wind regime, hydrological data of the soil and its structure. In short, the diversity of relief entails an expansion of the climatic range in the area. For those who are interested in floristry, the hills make it possible to plant new types of flowers, the cultivation of which was impossible under previous conditions.
As topographers say, a hill is a relief related to positive forms. There are forms that are considered negative: if we take forms from geoplastics as an example, then they will include pits created artificially.
Another highly popular part of geoplastics is terracing - the formation of platforms on existing slopes that look like wide steps, limited by retaining walls of different heights.
Hill design stage
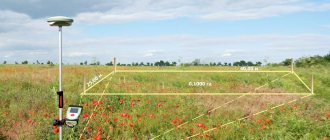
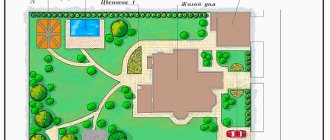
Having made the final decision that the site needs the construction of a hill, you need to start modeling either on a piece of paper or on a gadget, depending on personal preferences. To start designing a hill, you first need to draw up a plan that reflects the topography of the site down to the smallest detail. Nowadays, specialists in the field of landscape design prepare a whole folder of documents - layout drawings, a landscaping plan, as well as a computer layout of the territory. If you have the desire to design an elevation, you can do it yourself.
To understand the original location of the relief and the exact distances between some objects on the ground, it is divided using rods into separate sections in the form of 3x3 m squares, while the heights of all rods above ground level must be equal. Next, using a meter ruler and a building level, we take measurements of the relief and reflect them on the layout. After completing the preparation of the topographical diagram, we plot the features of the planned hill on it.
We place the hill on the plan, taking into account aesthetic views, and at the same time remember that such outbuildings must also meet the following criteria:
- functionality;
- reliability;
- durability;
- heights and angles of inclination must be in accordance with the proportions of the territory.
An important point is the slope of the hills on the south side; it should be illuminated as much as possible by the sun's rays.
Having brought the modeling of the contours of the hill to full readiness, we transfer them to the site using rods and signal tape. We remove the soil layer along the marked lines, then begin to form the planned hill.
Forming the base for the hill
When creating a hill, you will need earth, drainage, and a small number of elements necessary for reinforcement.
Drainage will be required when working with one of the parts of the hill, namely the retaining wall: the so-called body of the hill consists of it and the soil, and crushed stone must be laid between these layers. Also, you need to lay a drainage pipe, which is used to avoid the accumulation of water. We install it at the base of the wall.
When you plan to plant plants on a hill, drainage is indispensable. In this case, a high-quality drainage cushion is created at the base of the hill. In addition, drains will also need to be laid at the foot and throughout the entire area of the slopes. These works are so important because of the change in the hydrology of the area due to the construction of the hill. Underground water flows at the foothills begin to slow down, which in turn causes water stagnation.
Almost all waste after construction can be elements for reinforcement; for example, broken bricks or rings of concrete are suitable for us. Reinforcement is in every sense a mandatory step, which will strengthen the hill and prevent it from “sliding” in the future.
To reduce costs, the soil needed to form the hills can be taken from the site. For example, land removed during the construction of roads or terraces. In such cases, the volume of soil layer is sufficient for this purpose. To make it more clear when building a terrace of 100 sq. m. Soil is sampled to a depth of 70 cm. This means we get 70 cubic meters. land that is suitable for raising land. But it is worth considering that peat cannot be used! It changes its volume depending on the humidity level.
It is forbidden to create a base from humus, because it rots in a short period of time, which subsequently causes subsidence of the hill. Also, you should not use the soil that was mined when digging a pit. In such soil, the percentage of clay in the composition is too high, which will interfere with the drainage stage. Vegetation at such an elevation will not be able to take root, due to the fact that the clay is waterproof.
Creating hills
If you plan to import soil, the best option would be hills in the garden made of sand or sandy loam.
To calculate the required amount of soil, use the formula:
O = (P1+P2):2*P, where:
- O-volume of soil,
- P1 and P2 – cross-sectional areas,
- P – distance from one to another cut.
We lay the soil gradually, layer by layer (the thickness of each is approximately 26-31 cm). Do not forget that the slopes of the walls of the planned hill should not be more than 45 degrees, otherwise difficulties may arise during the landscaping stage and directly when caring for the plants. Some experts advise that when laying layers, water each of them with water, and then eliminate the gaps that form. In reality, it is a waste of water.
We form an artificial topography of the garden, and then compact the soil with a vibrating plate or vibrating tamp. But we use this method only for short periods of work. Ideally, you need to leave the raised area for natural, natural shrinkage. But in this case it will take about 4-6 months.
At this point, the creation of the hill can be considered perfect. You can also learn more about how to create slopes and hills in the garden, the video is at the end of the article.
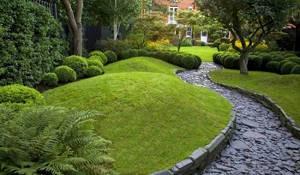
Landscaping, planting plants on hills
If you simply plant plants, then later on the slope of the hill they will wash away and slide down. In order to avoid such consequences, it is necessary to make reinforcement using geogrids or, in the case where the slope is small, you can use a geogrid. When landscaping a hill, a rolled lawn is most often used; it is pressed tightly to the soil and is fixed with rods for the first time.
If you want to create a natural lawn, sow seeds into geogrid pockets. Why is it necessary to landscape a hill? The thing is that a lawn or any other type of plant perfectly strengthens the soil. Also, vegetation on slopes in the garden takes root better due to soil drainage, which prevents water stagnation.
Make your own slopes
People who have natural slopes in their garden are very lucky. But what about those who don’t have them? Firstly, don’t be upset, because this type of relief can be created using solely your own strength.
The technique for forming a slope is very simple. In addition, it is almost identical to the instructions for creating a hill. The materials required will be soil, drainage and reinforcing elements. The only tool needed to make slopes is a shovel.
To begin with, we design the planned slope (for this we perform all the same steps as when designing a hill). After drawing the lines directly on the site itself, we begin to “dig out” our slope. We make the first recess by 30 cm, and then every half a meter we go deeper by 5 cm. The best option would be to level the resulting slope using a rake for a smoother transition. Next, you need to carry out drainage and install a pipe to drain the water. Don't forget about the reinforcement stage. The final work will be compacting the soil.
Your slope is ready, but to improve the aesthetic appearance and service life, we recommend terracing.
Do-it-yourself terracing
First, let's figure out what terracing is. Terracing is the installation of platforms on slopes that look like wide steps. Such areas are often intended for growing various fruit plants or other economic crops. In addition, terracing helps protect the soil from soil erosion and prevents the washing away of the fertile layer of soil. This method is known and widespread in almost all countries of the world.
Terracing creates a unique landscape design for your site. In addition, this method can be used when constructing complex types of terrain. For example, slopes in a ravine, river banks, soil changes.
With proper planning of elevation changes, they will become original features of the area.
There are three main principles when terracing:
1. It is imperative to organize a surface pipe system for water drainage that has a short length;
2. It is necessary to decide in advance where the entrance for the car will be located;
3. Design how recreational areas, landscaping areas, buildings and other structures will be placed.
When installing terraces yourself, you need to do the following work:
1. Cutting.
2. Formation of terraces to give them the final surface appearance.
The connection between the terraces is created by paths, ramps, and stairs. To prevent the slopes of the terrace from collapsing and to make it possible to lay paths, use retaining walls. For an even better effect, plant trees or bushes; their roots prevent soil erosion.
When terracing, we recommend placing the platforms in a horizontal direction. The best time of year to create terraces is autumn or early spring.
Also, remember that the terrace has several varieties, the choice of which depends only on your preferences:
- ridge;
- trench;
- stepped;
- bench-shaped;
- terrace-ditch.
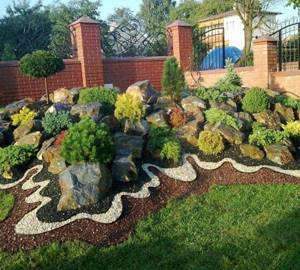
Other types of artificial relief
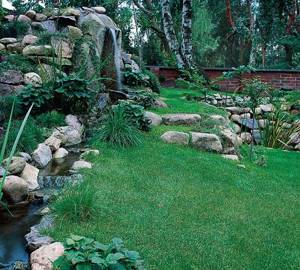
Hills and slopes are not the only options for garden design. In addition to them there are:
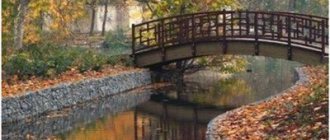
- artificial reservoirs;
- alpine slides;
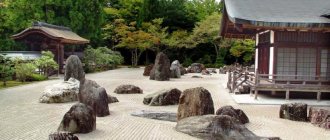
- rock gardens;
- rockeries;
- landscape labyrinths;
- fountains;
- artificial small waterfalls.
After reading this article, land owners will not ask questions about how to create hills, how to make slopes in the garden with their own hands and how to improve them. Now everyone can independently create their own unique and inimitable garden landscape.