What is it for?
A well is a source of high-quality drinking water. However, it is vulnerable to being hit by:
- dust , dry leaves, insects, small animals;
- precipitation : rain, snow, hail;
- melt or rain water flowing there along with garbage.
Sometimes there is a need to protect children from falling into it. In some cases, the well is closed to prevent strangers from taking water from it.
To protect it and ensure the purity of the water, it is necessary to build a kind of well house.
In addition to its practical significance, it is important to take into account how pleasing it is to the eye and how it harmonizes with the surrounding landscape.
Features of use
If there is a well in the yard, you need to keep it clean. It is important to understand its difference from a conventional plumbing system, which is that although water is taken from a well, it is absolutely forbidden to drain it there. In particular, you don't need to:
- Wash dishes over a well.
- Wash and drain the water in the immediate vicinity.
- Just pour even completely clean water into it.
If such a need arises, to do this you need to move away from the well at a sufficiently large distance.

Don’t spit in the well, it will fly out and you won’t catch it - modern classic Source sadovayaferma.com
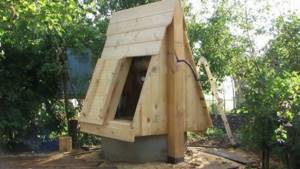
Step-by-step instructions for making a roof for a well
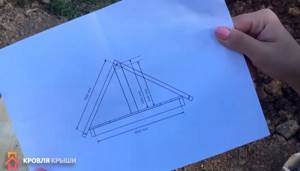
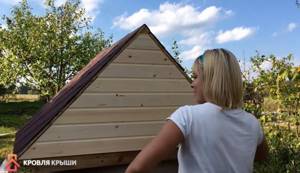
The roof is gable, the total area of the slopes is 2.4 m2, strapping for fastening vertical elements from boards 50 mm thick. You need to start with the base for the roof (framing).
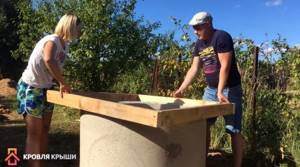
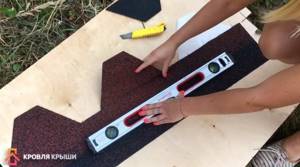
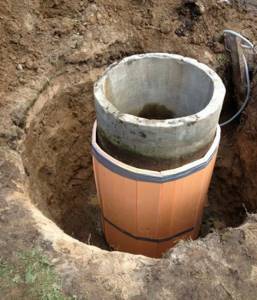
Step 1. Measure the diameter of the reinforced concrete rings of the well, allow a margin of 1–2 cm.

Measuring the diameter of the rings
Prepare four sections from a timber 5 cm thick and approximately 10 cm wide, the length of each should be equal to the diameter of the rings in the outer circle.
Step 2. Make a square from the segments.
Square made of boards
It is recommended to first fix the boards with ordinary nails, and then try the square onto the well. The fact is that concrete circles do not have an ideal shape; you will have to hammer the base into place with a hammer; nails will allow the dimensions to increase slightly. After fitting, you need to make marks for the position of the base and begin to increase its strength.
- At the corners of the structure, screw four metal perforated angles with a wall thickness of at least a millimeter using self-tapping screws. The surfaces of the square must be galvanized.
- Cut four short pieces of timber to make the braces. They also need to be nailed to the corners of the square. At the same time, pay attention that the braces do not reduce the size of the structure on the sides; the distance between the braces should be 2–3 cm greater than the outer diameter of the rings.
The structure is reinforced with braces
Important. When strengthening the base, make sure that the original dimensions are not violated.
Step 3. Secure the base to the well rings. This is a very important technological operation. The fact is that these points will not only support the weight of the roof, they must withstand additional wind and snow loads.
Fixing the base
For fixation, it is recommended to use durable concrete dowels. The diameter is at least 10 mm, the length must be 50 mm greater than the thickness of the slats. A total of 8 dowels must be used, two on each side of the square. Once again, please note that the fastening must be as reliable as possible. If in doubt, you need to provide additional vertical supports in the lower part, secure them with dowels to the rings, and rest the upper end against the structure.
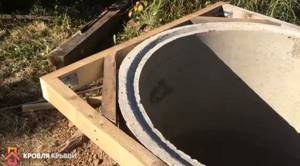
Step 4. Hammer the upper surface of the supporting frame with boards approximately 20 mm thick, aligning it in the same plane with the edge of the ring.
The surface is covered with boards
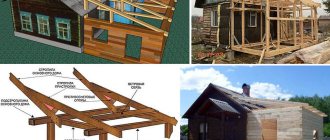
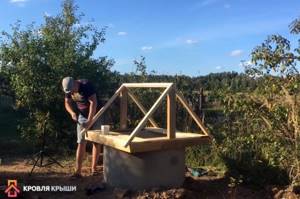
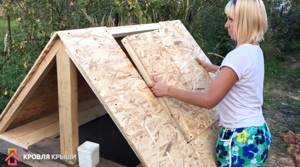
At this point, the fabrication of the base is completed, and you can begin installing the roof. The roof consists of several elements, each done separately and according to its own rules.
Roof diagram
Roof assembly
Step 1: Make the vertical supports for the roof frame. The height of the elements is approximately one meter. They should be made from the same powerful timber as the harness. In the upper part of the supports, a cut is made at an angle of 90°, 45° in each direction from the axis of symmetry. The frame slats will lie on the cut planes.

Connection of supports
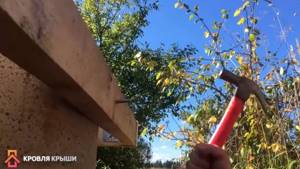
The lower part of the supports is attached to the base with metal angles; to increase rigidity, nails approximately 100 mm long can be driven into the sides. Carefully hammer in the hardware, do not allow cracks to appear in the lumber.
Well roof frame
Step 2. Attach the roof frame slats to the vertical supports. They must be the same length and fixed with nails or self-tapping screws.
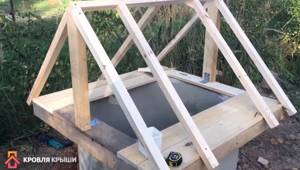
Lathing under OSB
Step 3: Attach the batten to the roof ridge. It is installed in special slots between the side ones and is also secured with self-tapping screws or nails.
Practical advice. After fixing each new frame element, the strength of the structure should increase significantly. Check it with your hands, apply significant force from different sides.
As soon as fluctuations are detected, the cause must be immediately identified and eliminated. There is no need to hope that the roof will then become stable on its own; miracles do not happen.
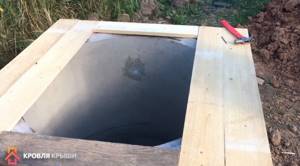
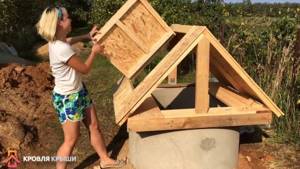
Step 4. Decide on the dimensions of the well doors, attach two thrust slats to the front slope of the roof at the required distance. On the reverse side, it is enough to nail one strip to fasten the roof sheathing. Install it in the middle of the slope.
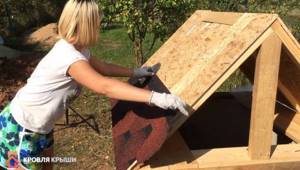
Step 5. The roof of the roof will be made of bitumen shingles; a continuous sheathing is required under it; we recommend using a moisture-resistant OSB board. Immediately cut out a piece and make a door; you will have to make a special frame for it. Choose dimensions such that it fits freely into the opening prepared in the slope.
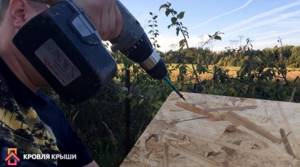
OSB fastening
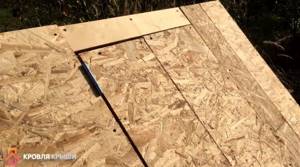
Practical advice. OSB boards have a smooth surface on one side and an ordinary rough surface on the other. A smooth surface is considered moisture resistant and is recommended to be used as a roof covering. Such recommendations are not suitable for wells.
The fact is that moisture constantly evaporates from the water surface, and when the temperature changes, condensation appears on the roof slopes. Nail the slab so that its smooth varnished side faces the well, and the rough side faces the roofing. There is nothing wrong with violating manufacturers’ recommendations; you have to choose the lesser of two evils. In the future, the rough surface of the slab will be carefully and hermetically sealed with bitumen shingles; this will not affect the life of the structure.
Door fitting
The door is hinged
Board nailed over the door
Prices for OSB (oriented strand boards)
OSB (oriented strand board)
Installation of bitumen shingles
Buy a package of soft tiles. As a rule, it has three square meters, and we only need 2.4 m2 for the well roof. It is easy to work with bituminous shingles; an ordinary mounting knife is used for cutting. In terms of installation manufacturability, it is superior to metal coatings; it is for this reason that the material was preferred in our particular case.
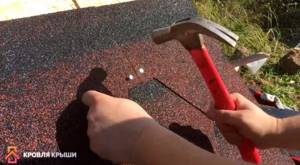
Step 1. Open the package of asphalt shingles, take one shingle and estimate its position in the first bottom row. Prepare the first shingle. To do this, you need to cut off the petals from it, leaving only an even strip.
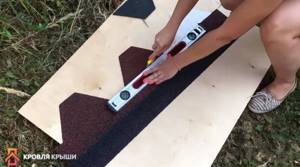
Trimming shingles
By the way, the same strip then needs to be nailed to the ridge of our roof; you can cut out two parts at once.
It is necessary to cut bitumen shingles under a metal ruler and preferably from the reverse side. The fact is that due to this position, the knife blade becomes less dull; it does not constantly scrape along the stone surface.
It is best to cut bitumen shingles using a ruler.
Step 2: Begin installing shingles according to the manufacturer's instructions, which are included in each package.
To increase the durability of the well roof, the base can be finished with any bitumen mastic. But if it is not there, then the roof will serve for quite a long time, the main thing is not to violate the recommended technology.
Laying bitumen shingles
Fixing shingles
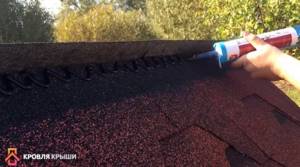
Applying sealant

Bonding bitumen shingles on a ridge
Step 3. Sew up the gables with clapboard, take measurements for each board. The roof was made without special precision; deviations of 1–2 cm are acceptable. During the cladding of the gables, the gaps close and become completely invisible.
The pediment is covered with clapboard
Step 4. Nail wooden wind strips along the ends of the roof.
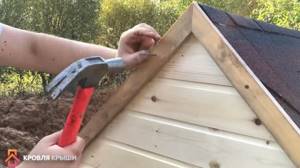
Wind bars
It is advisable to cover these places with metal strips and secure them before installing the bitumen shingles. This way the ends of the OSB are more reliably protected from the negative effects of moisture. If there are no metal strips, then you can use slats, but before fixing them you need to treat the open ends of the OSB with any waterproof impregnation. It could even be ordinary vegetable oil.
Step 5 . Paint your woodwork with durable exterior paint.
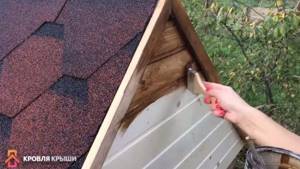
Painting lining and planks
Step 6. Carefully cut the covering along the contour of the door. Don't rush, the cut should be as even as possible.
Step 7. Screw the handle to the lid.
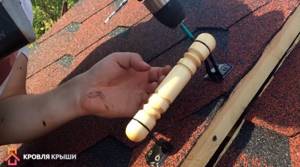
Fixing the handle
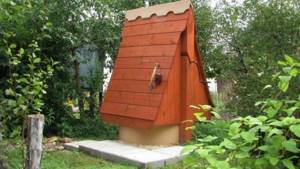
This completes the process of making a basic roof for the well. We have given an example of the simplest execution. You can, of course, make a complex roof with decorative elements, high and large, from expensive lumber, etc. If the well is located in front of the house and plays an important role in the landscape design, then such significant material costs are justified. And if it is located behind the house or household outbuildings, then secondary attention can be paid to the design, and primary attention can be given to the cost and functionality of the structure. The article gives advice on making the second version of the roof for a well.
Prices for popular models of screwdrivers
Screwdrivers
Device
Usually it is a deep round hole, the walls of which are reinforced with concrete rings placed one on top of the other. At the bottom there is a filter layer through which groundwater seeps.
Additionally, a mechanism for lifting buckets of water must be provided. Traditionally, a winch is used for this purpose, on which a chain with a bucket is wound.
A cover that protects the well from debris, dust, various objects, birds and animals is a mandatory part of this design. But there is an exception here. Not all wells are used to obtain drinking water; there are some, the water from which is intended for technical purposes (for example, for irrigation). Such wells may not have a roof.
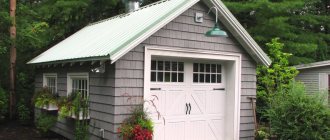
If it is located in the courtyard of a summer house, what is important is how it looks and how harmonious it is with the surrounding environment. Therefore, a beautiful house is usually used for such wells. In some cases, owners provide the ability to lock it with a key.
In winter, the water in it can freeze. To make it possible to take it in winter, insulation can be installed in the well.
If the well is planned to be used year-round, then it is better to do the insulation during its manufacture Source vodatyt.ru
Open and closed well houses
There are two options for designing a well: using an open house and a closed house. The first option is a small canopy in the form of a roof over the well, and a ring is made around it.
Such houses are good for those who do not want to spend money and time on complex buildings. However, if you want to use well water in winter, it is better to neglect this type of house, or insulate it additionally.
Closed structures are much better at preventing water from freezing in winter. Such houses represent a full-fledged frame in the form of a house. For better insulation during construction, you can use a layer of foam or insulation.
This type of house will not only save water in winter, but also provide better protection against debris in case of strong winds. But it will require time and more building materials.
When building a canopy, an additional cover is usually made, and you also need to know that the roof must be larger in size than the well itself.
How to choose
There are many different options for decorating a roof on a well. It is important to know their features in order to be able to choose the one that is most suitable.
Open or closed
If you prefer an open design, it will be cheaper. However, you need to decide how you plan to use the well during the winter period. If this is not required, then an open design will be suitable in this case.
If water from a well is needed in winter, it is advisable to take measures to prevent it from freezing. To achieve this goal the following will be useful:
- Use a special polystyrene insulating coating for wells.
- Make the lid from not one, but two layers of wood, with the boards in the second layer lying perpendicular to how they are located in the top layer.
A good solution for insulating a well would be to install a well house. If you make it solid and fill the cracks with insulating material (for example, foam), it will protect the well from frost even more effectively.

Most well houses provide the possibility of additional insulation Source x-show.info
See also: Catalog of companies that specialize in the installation of metal structures.
What material to use
Sometimes it can be difficult to choose the right option from the many available. But in some cases the solution may be simpler.
One of these situations occurs when the well is close to the house. In this case, it may be a good decision to make it in the same design style as the house.
Several situations are possible here. For example, if the house is wooden, then a house made of this material may also be suitable for a well.
It's another matter if the house is built of brick. In this case, following this rule will not work. A similar situation arises if the house is plastered. In such cases, you can make a well house in the style of the surrounding area.
Sometimes you need to decide how to cover the roof of a well - wood and metal - which is best suited for this structure.
Let's assume the house is made of wood. In this case, at first it will look beautiful and stylish. However, gradually time will take its toll: it will become increasingly gray in color and lose its appearance, of course, if the necessary care is not provided.

If you don't take care of the well, its appearance will become worse and worse Source pinterest.at
To maintain the condition of such a structure, you need to remove the old paint from it at least once a year and repaint it.
If this looks tedious for the owner, you may prefer a decorative well house that is made of metal. In this case, two options are possible:
- all metal house;
- made on the basis of a metal frame covered with siding.
Why is there a house above the well?
The main purpose of a well house is to protect drinking water from dust, debris, leaves, branches, insects, and summer heat. Gardens and vegetable gardens in spring and summer are often sprayed with chemicals that can end up in an open well. This is also taken into account when creating its protection. Water in a closed well will not freeze even in very severe frosts.
In addition, a well house can simply decorate a site if you approach its production creatively, creating some kind of artistic creation. Many craftsmen decorate such structures with carved figures, decorate them with natural stone, tiles and other materials. The structure, made in the form of some figures, wooden log houses, towers and other exotic buildings, will give the entire site unusualness and mystery.
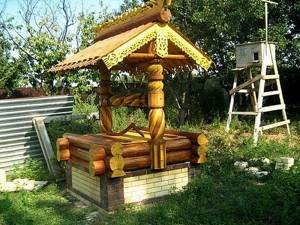
The photo shows a version of a finished well house made of logs
And now let’s get down to close consideration of the question of how to build a house for a well with your own hands.
Design options
There are a small number of basic design types. Below they are discussed in more detail.
Open house
In this case, the structure does not have walls. The roof rests on two pillars. Its dimensions must be significantly larger than the well opening.
There are two main mounting options for racks:
- They can stand attached to a concrete ring;
- the racks can rest on a wooden structure built around the well.
In the first case, in order to install the racks, they first make a strong wooden frame, which is fastened with cross beams. It is placed on the concrete ring of the well. Wooden posts are placed on this frame.
It must be made of thick enough timber so that this structure can securely hold the racks and roof.
Real craftsmen try to make racks not only durable, but also beautiful Source yandex.ru
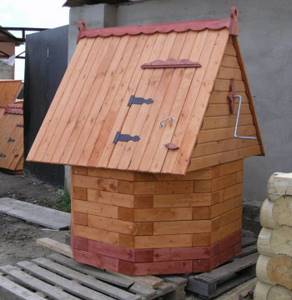
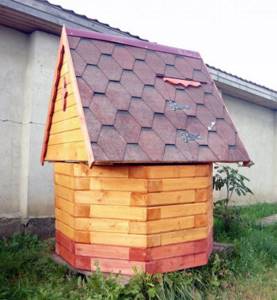
Ideas for houses for a well, materials, drawings, production
There are various forms of houses, let's look at the most popular ones.
Option 1: Open visor
This option consists of a simple metal or wooden canopy on two posts. To which the gate is attached.
Option 2: Gable house
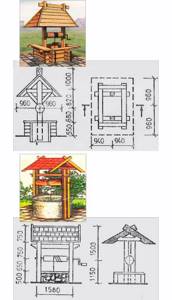
First, a drawing is made based on the well ring. The diagram must display all elements taking into account their dimensions. The more accurate the drawing, the lower the likelihood of errors when creating a structure.
They purchase building materials and prepare tools. The list of the latter includes:
- electric plane;
- roulette;
- jigsaw;
- hammer;
- circular saw;
- Phillips screwdriver;
- hacksaw;
- nail puller;
- building level.
To create a well house with a gable roof, you will need the following materials:
- wooden beam (sizes 50x50, 50x100)
- log for the gate;
- boards and door fittings;
- edged boards;
- screws and nails;
- roofing felt or slate.
Don't forget to purchase an antiseptic. It is necessary for processing wooden parts. They must be sanded beforehand.
After everything is prepared, you need to follow the step-by-step assembly algorithm.

It includes several stages:
- Clear the area around the well, level, pour and compact crushed stone, first larger, then smaller (15-20 cm thick).
- Construction of the frame. The base is made from timber (section 50x100 mm). The perimeter of the future structure should be larger than the diameter of the well ring. Attach two support posts with the same cross-section to the frame with metal plates and connect them with a block (50x50 mm). Attach to the sides using 4 posts (50x50 mm), cut them at an angle of 45 degrees for a better fit.
- For strapping, use an edged board (width 12 cm, thickness 4 cm). The next step is to fill the resulting gaps with boards. Leave the side where the door will be located unchanged.
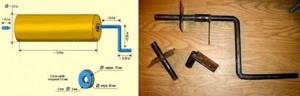
- Making gates. To do this, sand a round beam with a diameter of 20 cm and a width of 4-5 cm less than the gap between the vertical posts. Make holes in it on both sides with a diameter of 2 cm and a depth of 5 cm. The same, but through, drill in the racks and insert metal bushings there. Hang the beam on steel rods with a diameter of 24 mm. Bend the left one at a right angle, leave the right one in the same form. This will make it convenient to collect water. To prevent the gate from deforming, use metal wire. Attach a chain from which the water container will hang.
- Install the assembled system onto the frame. Attach the jibs (they act as amplifiers), install the sheathing, and lay the roofing material. The latter can be replaced with slate.
- Installation of door leaf. To make it you will need boards (20 cm wide) and screws. Secure the resulting canvas with beams (25x30 mm). All that remains is to mount the fittings and hang the finished door.
- Decorate the house as you wish.
Design options
Once the base of the structure is made, it can be designed in various ways. As a result of the correct choice of the way in which this should be done, the well will acquire not only practical significance, but also aesthetic and design value.
Roof finishing
The roof can not only be made from neat, beautiful boards, but also decorated with carved wooden parts.
Unusual options for this part of the structure may also be used. One of these options involves a folding design made of thick glass. It is structurally made in the form of a cover over the well, which opens on door hinges mounted on the well frame.
You can provide a semicircular metal roof, decorated with curlicues made of metal.
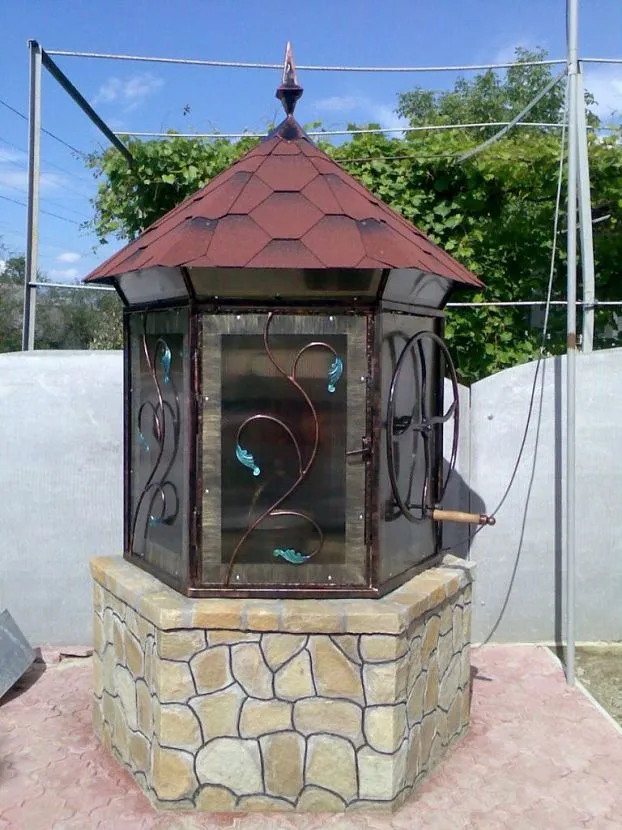
Decorative finishing of a well with forged elements Source dozor.spb.ru
It is possible to design this part of the well in the form of a hexagonal pointed structure.
Sometimes when choosing what to cover a well with, a soft roof can be a good choice.
Concrete ring frame
Using a stone around the concrete ring, create a beautiful stone wall that completely hides it. This can be done in various ways. For example, an imitation of a small door made of wood in a stone fence may look beautiful.
It is possible to use logs in the form of a log house in a folk style. Sometimes such a frame is made not quadrangular, but hexagonal.
An option can also be used when, using wooden planks coated with varnish, a design is made that resembles a wicker basket. To do this, they are laid out horizontally at each level so that they look like a polygon. In this case, at each next level above the corner there is a flat part of the board.
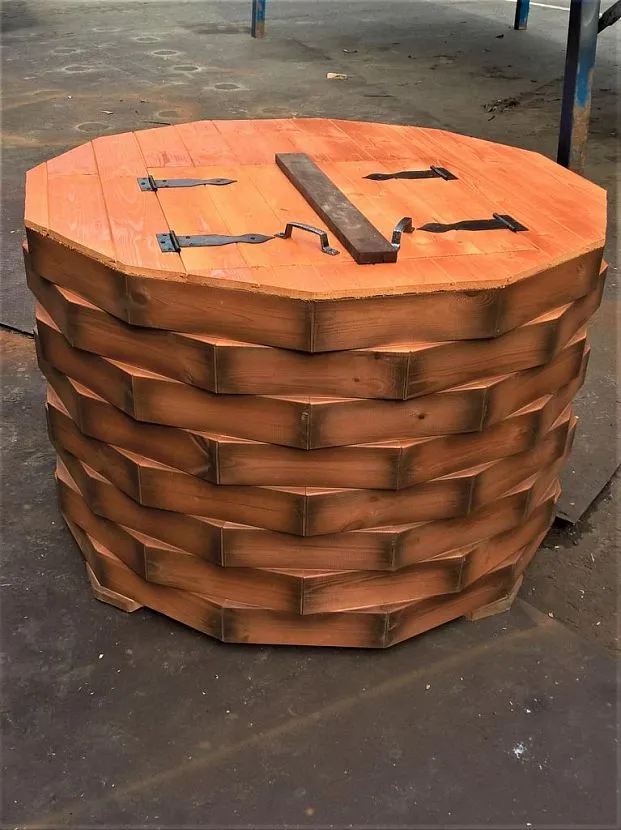
Decorative finishing - a well in the form of a basket Source stroim-dom.radiomoon.ru
Using an unusual gate shape
This part can be made, for example, in the form of a steering wheel of a sailing ship, or simply in the form of a wheel with spokes installed perpendicular to each other.
Required tools and materials
The traditional material for the manufacture of any well shelter is wood. It is easy to process, can last a long time, and looks beautiful.
For construction you will need the following building materials:
- wooden beam with a section of 5 x 5 and 10 x 5 cm;
- edged board, block house, wooden lining. One of these materials is selected, which will be used to sew up the house above the well;
- roofing material (siding, corrugated sheeting, roofing felt, metal tiles, polycarbonate, euro-slate and other types of roofing). The material should not be too heavy to be easily supported by the supports;
- log and metal rod for making gates;
- antiseptics, varnishes, paints. Necessary for processing wooden structures;
- door hinges, handle, latch;
- screws and nails;
- metal corners of short length (for fastening wooden elements together);
- 2 metal bushings (pipe sections);
- chain with bucket;
- door or materials for its manufacture.
To build a house for a well with your own hands, step-by-step instructions assume the following tools:
- circular saw or woodworking machine;
- building level;
- electric jigsaw or plane;
- hacksaw;
- roulette;
- screwdriver;
- hammer.
Video description
For beautiful examples of well design, watch the video:
Closed house
If it is made entirely of metal, then you can decorate it beautifully by simply painting it in a certain way.
This can be done in various ways:
- It will be beautiful if some kind of picture on its walls For example, it could be a landscape.
- You can paint the metal base in such a way that the house will resemble, for example, a wooden structure.
For a closed house, you can use decoration made of wood. For example, a wooden house made in the Old Russian style will look beautiful.