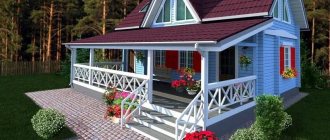
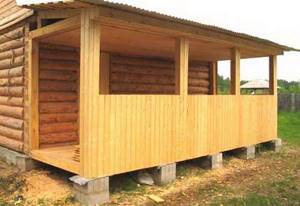
Have you had a wooden country house for a long time, but often have thoughts about changing or remodeling the building? Try adding a veranda. The construction of the structure will help change the exterior of the house and improve the pastime. Of course, when starting construction, think through the details and prepare the tools. It is important to make design documentation, select materials, determine dimensions and shape in advance. Decide what the veranda is needed for and what function it will perform. The veranda is closed or open in the form of a canopy.
Designing a wooden veranda
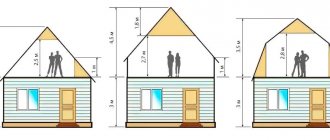
The design stage is needed in order to determine what to complete. Will there be a closed veranda or an open one in the form of a gazebo (terrace)? Where to build a gazebo: in the backyard or in front of the house. But, we must not forget the fact that on the south side, where the sun actively shines all day, the veranda will become very hot. But, if you build a room in the northern part, you need to take care of insulating the veranda.
To prevent the construction of a veranda from becoming a problem, draw up a competent plan and project of work. The company's specialists can help in choosing construction technology and developing the technical part of the plan.
DIY brick veranda. Popular material
Constructing a brick veranda has a number of advantages. On hot days, this room remains cool. The material does not require special care, has a long service life and is fireproof. The brick structure has exceptional reliability and strength.
If such a room is additionally insulated and double glazed, then, if there is heating in it, you can pleasantly spend time on the veranda at any time of the year.
Due to the fact that the brick structure has a significant mass, it is imperative to organize a reinforced foundation.
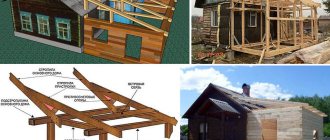
What are the stages of construction of a wooden veranda?
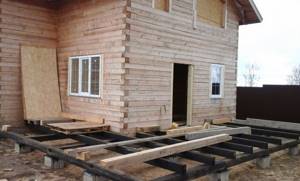
It is important to know that if the main building is made of wood, you need to wait for the wood to settle. Or use another option - construction through a jumper, which allows the erected structure to move. Then solve the issue with the foundation. Which one to use and how to fill it so that the structure does not depend on the main foundation. It is recommended to build a veranda on a pile foundation. The diameter of the pile foundation pipes is 108 millimeters, enough to support the terrace. The advantage is that the pile foundation is not affected by groundwater.
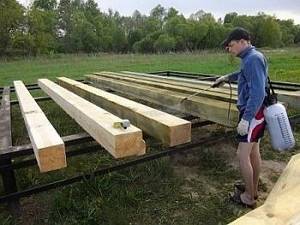
The best material for building a wooden veranda will be a profiled block measuring 150x150 millimeters. If the room will be used in winter, choose a larger beam, 200 by 150 millimeters or double beam with insulation 300 by 150 mm will do. In a situation where it is planned to add a veranda to the house, select the same material from which the main building is made.
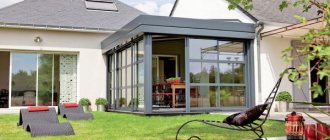
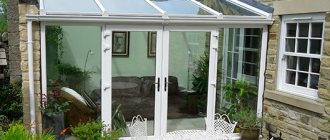
DIY polycarbonate veranda: a modern solution
Polycarbonate is a modern material that successfully competes with traditional materials.
Polycarbonate - a modern material
Polycarbonate is a very durable material and, therefore, its manufacturers rightly claim that it is safe to use. The material has good flexibility, and its deformation does not require special thermal preparation or devices; it can be worked with at any temperature. The cost of the material is relatively low. If we compare it with glass, the price difference between these materials is significant.
Due to a significant increase in the deformation coefficient, temperature changes have a negative impact. For specialists, this factor is nothing more than a certain inconvenience when glazing. The linear expansion of the material can be leveled by increasing the gaps between the frame and the glazing material.
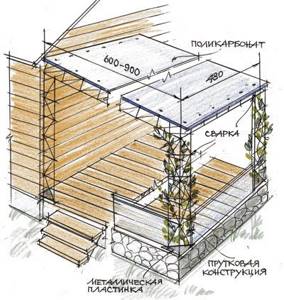
Sketch of a polycarbonate veranda
Polycarbonate scratches easily, which can lead to rapid clouding. In addition, with prolonged exposure to ultraviolet radiation, the material may take on a yellowish tint. In order to prevent this phenomenon from occurring, a protective film is used, which, in addition to its main function, additionally strengthens the polycarbonate.
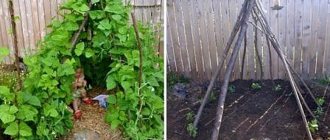
How and from what can you inexpensively build a veranda at your dacha?
We would like to build a small summer veranda at our dacha ourselves.
How and from what materials will this be easier to do? It is important that this construction is not inexpensive. A veranda is a very comfortable, practical addition that protects the entrance to the house from rain and snow. An extension to a house is often unheated (in accordance with building standards), lightweight, and does not require a solid, expensive foundation.
The cheapest option would be a frame construction of a veranda made of beams (100x100 mm). You can save on the size of the structure, but take into account the glazing; the area of the veranda will depend on the size of the window frames.
- make a project or at least draw a drawing of the future veranda by hand,
- mark the construction site using pegs with a cord,
- Dig holes under the support pillars; they are placed under each corner post on a sand cushion. The pillars can be made of brick, concrete, if the pillars are wooden, they must be treated with bitumen,
- the lower frame is laid on the foundation columns,
- vertical posts are installed, which are fastened to the frame using self-tapping screws and staples (the outer posts are attached to the wall of the house using anchors),
- install a window sill beam (cross beam) between the posts, it serves as a support for the window and gives rigidity to the frame, as well as to the structure as a whole,
- the top frame made of timber is laid on the installed racks, secured with staples, nails and tenons,
- provide a doorway, it can be on any side, as convenient for the owner,
- rafters are installed, it is better to make the roof pitched and should be flatter,
- the ends of the rafters are attached to the horizontal beam using nails and tenons. The roof of the veranda should fit closely under the slope of the roof of the house,
- a dense sheathing is made on the rafters from unedged boards,
- roofing material is laid on the sheathing, then lay sheets of slate or other inexpensive roofing material,
- lay an edged board (30-40 mm), necessarily treated with an antiseptic, on the joists,
- the window block is installed at a level between the top trim and the window sill beam, secure,
- caulk the cracks,
- install the frame, glaze,
- install the door frame in the doorway, first secure it with the upper anchors, keep the horizontality of the threshold and verticality of the posts level, then secure the lower anchors.
Cover the building with a block house, clapboard or other cheap material (plastic or durable moisture-resistant plywood).
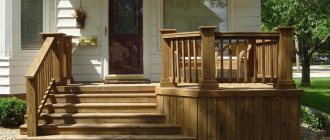
Options for decorative design of the extension
A do-it-yourself frame veranda for a house is a great opportunity to try yourself as an architect and think through non-standard options for the design of an extension. But it is important to remember that finishing plays not only a decorative, but also a protective role. The frame extension needs to be protected from the effects of negative natural factors, so it needs several types of treatment:
Foundation for the veranda
Monolithic columnar foundation for a veranda
The extension is a lightweight building, so the foundation for it does not have to be massive; usually a simple and reliable columnar foundation is used.
Let's consider the technology of its device:
- On a measured building area, the black fertile layer of soil is removed and the surface is leveled.
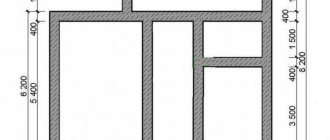
- In the corners of the future veranda, holes are dug with a depth of at least 60 cm and a width of 50*50 cm. The same holes are dug along the long sides with a distance between them of no more than 200 cm. If the width of the veranda is more than 300 mm, then the pillars must be placed inside the perimeter.
- At the bottom of the pits, make a sand cushion 15–20 cm thick and compact it thoroughly.
- The holes are filled with concrete, leveled horizontally and smoothed.
- After the concrete has set, its surface is covered with a layer of waterproofing material and columns of the required height made of brick or foam or cinder blocks are placed.
- The dimensions of the supports are made “in brick” with the obligatory bandaging of the rows.

Brick foundation for veranda
Important! The height of the pillars depends on the level of the finished floor on the veranda, which is recommended to be 20–30 cm below the floor in the house. Then the roof falls under the canopy of the main building, which makes it easier to connect the two buildings and reduces the risk of leaks.
- For monolithic columns, formwork is made over the holes and poured with concrete to the design height of the foundation.
- The columns are covered with a layer of waterproofing (plastered and coated with bitumen).
- If there are voids left - sinuses, then they are covered with dry soil, gravel or crushed stone.
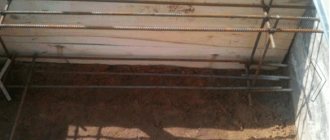
- To install a metal frame into the foundation when laying or pouring concrete, embedded elements are installed to which the lower frame will be attached (pieces of reinforcement protruding 10–15 mm above the surface, plates or corners).
- There is no need to build a foundation under the metal frame. If the cladding involves the use of lightweight materials, for example, polycarbonate, then concrete preparation with a thickness of 10–15 cm on a leveled and compacted surface may be sufficient.
Using the prepared foundation, you can begin the construction of the veranda frame, which comes in two types.
How to build a veranda - step-by-step instructions for the craftsman
Foundation
If the foundation has not been laid, it should be built in accordance with the selected type. As a rule, a strip or column type foundation is constructed. If the area of the planned construction is swampy, then the use of piles is necessary. In order to select it correctly, the combination of the following factors should be adequately assessed: the material used, the type of foundation of the main structure, the characteristics of the soil and its slope.
The strip foundation is made of concrete, blocks, brick, stone. For its installation, a cushion of sand or gravel is provided. In most cases, it is not connected to the house and is erected as a separate building.
For lightweight structures, a columnar type foundation is constructed. These include structures made of wood or polycarbonate. Brick or reinforced concrete pillars are installed on a sand bed. They are waterproofed, after which the joists and floors are laid.
Columnar foundation
Frame
As a frame for the structure, you will need a beam with a cross-section of about 100x100 mm or logs of the appropriate size. The lower belt of the harness must be made of dense wood, preferably oak.
Veranda frame
Connections in the corners of the structure are made in half a tree. The bottom trim must be made with a double layer of material. Lags are inserted into it to organize the floor. The racks are fastened using spikes to the lower belt of the strapping with fixation with nails and staples. It is possible to replace beams made of solid material with prefabricated racks made of boards. The strapping of the upper chord is fixed to the racks and later the rafters are mounted on them. Fastening occurs in the same way - using spikes and nails.
A horizontal beam is fixed to the wall of the main building. It, as well as the racks that are adjacent to the wall, are strengthened with anchors.
It is important that the roofs of the veranda and the house meet, with the latter going under the roof of the main building.
Roof
The roof of the veranda is made of a pitched roof with a greater slope compared to the roof of the house. It is desirable that the roofing material of the veranda and the house be the same. This optional requirement is due to aesthetic considerations. The choice of roofing material is not a fundamental issue.
It should be understood that the use of a metal profile sheet will require sound insulation measures.
The construction of the roof begins with the installation of the sheathing. For this purpose, unedged boards are used, laid in a horizontal plane at certain intervals. Roofing material is placed on the sheathing. The small slope of the veranda roof makes it necessary to lay it with a slightly larger overlap than is usually done. Experts recommend organizing waterproofing using roofing felt.
The boards that will make up the floor are laid on logs that were previously prepared. The boards must be at least 40 mm thick. Before starting work, the material is treated with antiseptic. Upon completion of installation, the boards are painted.
To circulate air masses, ventilation holes are installed in the underground.
Window installation
The veranda has windows that are larger than those in the main building. This is due to the fact that the room is intended to be used in the warm season, when the sunlight is sufficient to illuminate the room. The location of the window sill board should be at a distance of about 500 mm from the floor.
Most often, windows have single glazing. The frames can be mounted on racks, which will result in a showcase type of glazing. The gaps are eliminated using construction foam, which is then covered with platbands.
Walls
The choice of wall material depends on the preferences of the home owners and the requirements described above for the design of the veranda.
The easiest option for do-it-yourself installation is to use tongue-and-groove boards, which are connected to each other in the same way as lining and attached to the racks.