What is it suitable for?
A variety of types of pebbles will highlight the style inherent in your summer cottage. If the cottage is decorated in a Mediterranean style, then it will be necessary to lay out various mosaic patterns, highlighting many shades and changing the size of the pebbles. When decorating a site in country style, it would be appropriate to use plain gray raw materials of a small, or better yet, very fine fraction.
These tracks have practical applications
When the house is decorated in high-tech style, you can complement the existing main approaches to housing with thin paths made of small stones, dividing different areas of your garden according to their intended purpose. If there is a pond or alpine hill on the site, large pebbles and paths paved with them will be an excellent completion of the landscape design.
Pros and cons of the material
Like any material, pebbles have their positive and negative sides. Among the advantages: the ability to combine different sizes of mosaic elements, any shape of the path, the ability to use other materials.
The disadvantages include the decorative purpose of the path. Unfortunately, it will not be able to withstand heavy loads, so this type of path can only be used in the country. It is difficult to maintain the path in the winter season, if such a need arises.
Paving technology
If all the prescribed points are observed, any summer resident will be able to lay pebbles on his site:
- We will mark the path. We determine the width ourselves. Usually it is from 0.9 to 1.5 m. The terrain may not always allow this, then the minimum width should not be less than 50 cm. We use pegs and a cord.
- According to the marked width, we dig a trench to a depth of 20 cm. More or less depends on the size of the pebbles: the larger they are, the greater the depth, and vice versa.
- We lay geotextiles in two layers on the bottom. Its use will protect the path from the germination of weeds.
- We pour a layer of sand, and after that - crushed stone. We fill the volume of the trench with a sand-gravel mixture to two-thirds of the depth and be sure to wet it. The installation of such a cushion is necessary so that later during operation the track does not have cracks or other defects.
- We will install tiles or curb stones along the edges of the trench. The entire area is filled with a ready-made solution of cement-sand mixture, in a ratio of 1:3/3.5. Using a level, check the horizontalness of the filled surface.
- We lay the pebbles using a board and a hammer. We put it halfway into the solution, which is still damp. The stones are placed as close to each other as possible. They can be installed either lengthwise or flat, depending on the design.
- We will take measures to allow the solution to harden slowly: cover it with film and water it periodically. This must be done so that our path does not have cracks.
See also: why geotextiles are needed for garden paths.
After finishing the work, the path should stand under the film for several weeks and dry.
When performing this work you will need:
- shovel;
- rake;
- a beam whose length will correspond to the width of the path;
- level, construction corner;
- brush;
- hammer.
Material selection
To determine the material of the path, it is important to know that pebbles can be:
- marine;
- river;
- artificial.
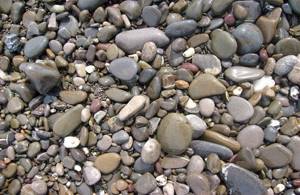
Sea pebbles differ from river pebbles in a variety of sizes, colors and shades. River has a solid gray-brown tone and a smaller fraction. By size they are distinguished:
- small – up to 2.5 cm;
- medium – 2.5–5 cm;
- large – more than 5 cm.
Let's select the required faction. If we give preference to the production of colored mosaics, then artificial stone of medium or large fraction would be more suitable. And if only the functional use of the path for its intended purpose is important, then small river pebbles will be enough. Using natural material will make it last longer. If there is a pond in the immediate vicinity, you can use pebbles taken directly from the river. This way you can save on the purchase of basic raw materials.
Direct installation
Before starting work, you need to make sure that all sections of the future path are horizontal. The installation work is carried out in a wet solution, so everything must be done before the mixture hardens. When doing mosaic laying, it is necessary to lay out the design next to the future location. If the pebbles have different colors and sizes, you should first sort them. When laying wet without patterns, the pebbles are placed very tightly. Using a plank and a hammer, level the surface of the future path.
If they are making a mosaic, then a sketch of the design, which is located nearby, is applied to the solution. While the mixture has not hardened, the drawing is carefully transferred to the planned location. Aligned with a hammer with a lath. When laying pebble mosaics, there is no need to clearly align each stone parallel to one another. If the drawing is done perfectly straight, it will lose its naturalness, so don’t waste your energy. For round mosaic shapes, start paving from the middle. This will allow you to maintain sufficient symmetry of the pattern. When using stones of different sizes, try to work out the larger elements first.
When laying, the mortar between the stones may be unevenly distributed. To avoid this, you need to smooth out all these irregularities with a brush. After everything is done, you need to thoroughly water the laid path and cover it until completely dry.
Stone garden paths
A path made of natural or artificial stone is an excellent option for zoning a house area, as well as decorating it. With the help of such a convenient path, you can freely move around your garden plot independently and with your equipment.
Paving stones are laid in several ways - arc, random and row. The result of the master’s work is a relatively flat surface that is convenient to clean at any time of the year. The stone path is easy to tidy up. In the fall, it is enough to sweep away fallen leaves from it, and in winter, clear it of snow and ice with a shovel. The stone can withstand heavy loads, so you can safely use it for car parking or driveways to your house.
If you prefer to use only natural raw materials as laying materials, then the following will suit you:
- granite stone,
- bottle,
- sandstone,
- slate.
With a small budget for construction work, you can limit yourself to artificial options for stone materials. For their production, high-quality cement, filler (expanded clay, pumice, ceramic chips) and a plasticizer (an additive that allows the particles of the mixture to bind together) are used. Artificial stone can be given any shape, and in terms of its qualities it is not inferior to its natural counterparts.
The downside of a stone path is its cost. Even if you replace natural stone with artificial stone and save on it, you will still have to spend money on preparing the site for installation.
Several factors must be taken into account:
- soil type,
- groundwater level at the construction site and many others.
The simplest option will require you to lay the stones on a bed of sand and fix them with a coupling solution. In more complex cases, it will be necessary to construct a concrete screed, on which the stones will then be laid.
Another quite important point. The stones may have unevenness. Such a relief surface of the path will contribute to the accumulation of water and dirt during rain, so it is necessary to carefully consider the drainage system near the stone path and, possibly, model the relief and angle of inclination of the surface for better water drainage. All this will require not only a lot of time and effort, but also significant financial investments.
Care instructions
A properly laid pebble path is practical and requires minimal maintenance. After heavy rainfall, especially after winter, it is recommended to treat the seams of your walkway with a special impregnation to increase the elasticity of the cement coating. If this is not done, then over time the cement mixture will crack and the cracks will fill with earth or sand. If you did not use geotextiles when arranging the path, then after some time you will have to deal with removing weeds from your paths. If certain sections of the path are destroyed, they must be repaired using building mixtures and glue.
Now your site will have modern pebble paths that will allow you to keep the street and house clean and tidy in any weather. The appearance of the estate will become more solid and neat.
Garden paths made of pebbles
River and sea pebbles are an excellent material for creating paths in the garden or near the house. According to the Chinese philosophy of Feng Shui, round stones are ideal for creating paths around the house. Pebbles can be used as a primary or secondary material, combining them with stones, concrete and wood. This material is relatively inexpensive. With its help, you can create original design solutions, while varying the width of the path and its shape.
But there are also a number of disadvantages:
- When laying, you will have to dig a trench and reinforce it with curbs.
- If you lay pebbles using the bulk method, then walking along such a path will not be entirely comfortable.
- The pebble path needs to be systematically trimmed and new material added.
- You can strengthen the pebbles with a concrete mixture, but then the labor intensity and cost of the work will increase significantly.
- It is advisable to use a pebble path for zoning space, but it is not intended for heavy loads.
Dear readers, we talked about popular options for constructing house paths and paths in the garden. Choose the most optimal one and decorate the space around you with original designs made from natural and artificial materials!
How to create an ornament
Patterned paths are the most beautiful. Pebbles are exactly the material from which magnificent ornaments are easily obtained.
- First you need to make a template of the ornament according to the sketch.
- Before paving begins, this template is laid on top of the mortar poured into the formwork.
- Sort the stones by size, shape and color.
- Pebbles can be laid not only flat, but also edgewise.
Some craftsmen recommend creating separate fragments of the future path, and when they harden, laying them in the prepared “bed” of the path. Moreover, the bottom of the “channel” is covered with sand and compacted tightly.
See even more examples in the video:
Types of pebbles, where and which one is better to use
Pebbles are small natural stones, rolled with water and polished by the wind. Its characteristics are determined by its origin, size and color. In nature, the process lasts from several decades to centuries. Modern technologies make it possible to obtain pebbles through artificial processing.
According to the characteristics, the following types are distinguished:
- Marine,
- River,
- Decorative.
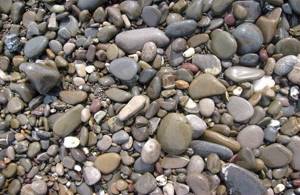
The color of the pebbles depends on the type of natural stone:
| Breed name | Color |
| Marble | White, black, red, golden, yellow, green |
| Granite | Grey. pink |
| Caspian | Predominantly sandy in color, flat in shape |
| Decorative | Any size and color, because it is processed by painting and sanding |
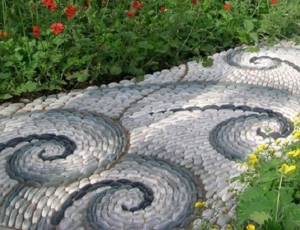
Pebbles of different colors and prices are suitable for landscaping. Decorative material sells from 10 rubles. for 1 kg. Each type of pebble is used in the construction of paths. As a bulk material for decorating landscape compositions - flower beds, tree plantations, ponds.
