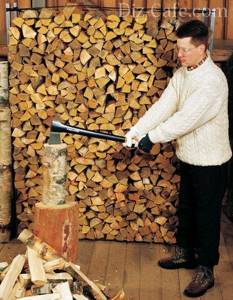
The ax is rightfully considered the “king” of carpentry tools. A real carpenter, who is professional in his craft, knows how to make an ax that is ideal for a particular operation. The master, as a rule, has several axes, always ready for work. However, this tool is needed not only by carpenters, but also by ordinary people living outside the city in private houses, as well as city dwellers who go to their dachas in the summer or on weekends. Every owner has to chop wood to heat a stove in a house or bathhouse. In order for this process to go faster and not cause troubles in the form of a flying ax, a dull blade or a broken ax handle, you must be able to properly prepare this tool for work and maintain it in “combat readiness” throughout its entire service life. The shape of the ax can be different. It is important to properly mount the ax, wedge it, and then sharpen the blade at the desired angle.
- 2 Selecting a workpiece and making an ax handle
- 3 How to attach an ax to a handle?
- 4 How and at what angle is an ax blade sharpened?
- 5 How to properly store an ax?
Buying an ax or how to choose the cutting part?
When purchasing an axe, or rather its piercing part, you should pay attention to the quality of the metal used to make the tool. Look for the GOST sign on the ax, which confirms that the metal meets state standards and requirements. Be on your guard if this sign is replaced by TU, OST or MRTU. In this case, the manufacturer can make changes to the technology. Soviet-era axes, distinguished by high quality metal, can be purchased at flea markets.
The quality of the metal can also be checked experimentally by taking two axes and hitting the blade of one of them with the blade of the other. A lower quality product will have nicks after impacts. The quality of the metal is also checked by the characteristic sound that is produced when the ax is tapped. In this case, the tool must be in a suspended state.
You should also pay attention to the following points:
- a well-drawn blade should not have any bends or dents;
- conical shape of the eyelet;
- alignment of the eye and the blade of the ax;
- small thickness of the butt and perpendicularity of its ends to the blade.
Don't be upset if you can't find an ax that meets all the above requirements. After all, the identified deviations can be eliminated by sharpening the burrs, boring the eye and giving the butt a symmetrical shape.
Material on how to make a device for carrying firewood will also be useful:
Selecting a workpiece and making an ax handle
The length of the ax is selected based on the height and strength of the master. The quality of the wood also plays an important role. Lightweight axes, weighing about 800-1000 g, have handles from 40 to 60 cm long. For heavy tools (1000-1400 g), the length of the ax varies from 55 to 65 cm.
Recent Entries
5 working ways to use tar in the garden 7 indoor plants that help you get married even in adulthood Indoor plants that can bloom in trouble
The force of the blow depends on the length of the axe. The longer the ax handle, the easier it is to chop wooden logs. The strength and height of a person also matters
Not every type of wood is suitable for making an ax handle. For this purpose, a true master searches the entire forest before finding a suitable tree. Most often, a blank for an ax handle is made from the root part of a birch tree, or better yet, from growths on its trunk, which are distinguished by their special twisted and very dense wood. Instead of birch, you can use maple, oak, acacia, ash and other hardwood deciduous trees. The workpieces must be dried well in natural conditions, which will take a lot of time.
On the prepared blank, the contours of the future ax handle are outlined according to the selected template. There should be a thickening at the end of the ax handle, designed to “braking” the hand in case the tool slips. Then the excess wood that is outside the contour is removed with a knife, an ax with a perfectly sharpened blade, a chisel or a jigsaw, which is much faster. After fitting the ax on the ax handle using a mallet, and making sure that these parts fit tightly, you can continue further finishing of the tool handle. Glass is used for scraping, and fine-grained sandpaper is used for grinding.
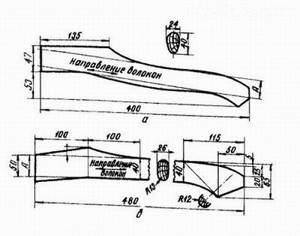
Above is a drawing of an ax handle (a) that meets the requirements of GOST 1400-73, and below is a marching ax handle (b) with an area of unbroken fibers of 40 mm
Important! If the ax easily fits into the eye, this means that the master made an error in the calculations and drew the template incorrectly. In this case, even a driven wedge will not correct the situation, ensuring a short, tight fit of the ax on the ax handle.
DIY hatchet: video
My grandfather taught me to make an ax handle using an ax and a knife from a birch log - no more tools were required. First we work with an axe.
We take a log and give it a more or less rectangular shape. We narrow the front part (where the ax will be mounted) from below - in the shape of a triangular hole in the axe. Then, retreating 15-20 centimeters, we cut the back side, making a notch for the handle (in the diagram this cut is designated R280. From the opposite end we also cut a rest for the hand.
We have a rough ax handle ready, and now we take a knife and bring the shape to perfection.
Well, here’s a video of how this can be done in a more equipped workshop.
A wooden handle for an ax (axe handle) is a responsible product, and therefore, during its manufacture, a lot is taken into account - the material (type and moisture content of wood), the direction of the fibers, the type of ax (carpenter's, carpenter's or cleaver). The safety and ergonomics of the finished ax depend on the correct manufacture.
For carpenter's and joiner's axes, the ax handle is made depending on the weight of the piece of iron. For axes weighing up to a kilogram, the handle length is 40-60 centimeters, for one and a half kilograms and above - 55-65 centimeters.
The most suitable wood for ax handles is birch, oak, ash, and maple. Any wood for an ax handle must be dried for at least a year in natural conditions (not dryers) in the shade of well-ventilated rooms.
Read also: How to charge a car battery with a charger at home
We don’t have oak, ash or maple; they won’t talk about the quality of axes made from them. But I made dozens of axes out of birch, and that’s what I’ll talk about. By the way, those who worked with ax handles made of different types of wood claim that only birch “does not dry out” the worker’s hand, due to the viscosity of the fibers.
Harvesting birch for the handles of axes, hammers, knives and other hand tools is carried out in winter, or at least in early spring before the sap begins to flow.
The root (butt) part of the tree is used. A birch block is split into blocks. It is split and not sawed lengthwise, in order to see the natural direction of the fibers, and in accordance with this, further make blanks.
Bars with a cross section of approximately 70-80 mm are cut out of the blocks. by 120-150 mm. and put it away to dry. During the drying process, the birch will shrink across the fibers and the workpiece will become smaller. Dry the workpieces for at least two years in a ventilated area without exposure to sunlight (usually an attic)
We fugue the well-dried workpiece on one side and check for cracks. If everything is in order, we deduce the total thickness of the two layers to be 45 millimeters.
Place the workpiece on the surface and orient the template relative to the fibers
The templates of the axes, their dimensions - length, thickness, cross-section at the main points, also differ in the purpose of the axes themselves -
On the end part of the workpiece, we outline the shape of the ax eye with a pencil along its inner part, aligning it with the exit of the fastening part according to the template.
Now it performs rough processing of the workpiece according to the template. This can be done with another ax and a wide chisel; I simply cut it out along the contour with a jigsaw. And there are fewer chips, there is no load on the tree from impacts, and it looks more cultured.
We round the corners of the handle, in the upper part of it in a semicircle, and towards the bottom a little into a cone. It is this “inverted drop” shape that is most comfortable for the hand. Now let's put the piece of iron on the ax handle.
The attachment of the ax is made “under tension.” The ax handle is pre-sawed under the wedge (wedges) to a depth of two-thirds of the width of the eye with a through drill at the end of the hole, along the cut.
Wedge, I personally make it for a birch ax from resinous pine boards. Holds up great. One wedge is enough if the birch handle is very well dried and does not dry out anymore.
Having planted the ax, twirl it in your hands, using a large file to remove those places where the ax handle does not lie comfortably in the palm of your hand. Don’t worry that you will deviate from the “standards” and “templates” if you are making the ax for yourself. Let it be at least three times unsightly, but if it fits perfectly in your hand, then you will be less tired and your productivity will increase, and the mood from working with an ax, which is an extension of your hand, will be good.
After the ax handle is ready and mounted. Treat it with linseed oil, preheating it. I only soak carpenter's axes in hot water. Carpentry is almost always indoors. I simply wipe the handles of the cleavers several times with light transformer oil.
Well, of course, every carpenter and joiner, over time, develops for himself the most optimal shape of the ax, with the desired placement of the center of gravity, length and thickness of the handle. There are a lot of options, as well as artists. However, GOST did not bypass this most necessary tool -
How to attach an ax to a handle?
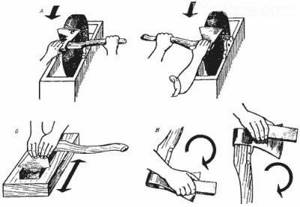
Below is an operation algorithm showing how to place an ax on a turned and polished ax handle. This is one possible way:
- Fit the top of the ax handle to the eye of the axe. At the same time, plan off the excess wood with a knife. You should not use a file, as it “sweeps” the wood.
- On the ax handle, placed in a horizontal position on the table, place the ax on top, and with a pencil put a mark on the handle to which it will be mounted. Divide the segment in half and put a second mark.
- Clamp the ax handle vertically in a vice with the wide end at the top. Take a hacksaw and make a cut to the second wedge mark.
- Buy a metal wedge in the store or plan a wooden analogue, the thickness of which should be from 5 to 10 mm. The length of the wedge made for an ax with your own hands should be equal to the depth of the cut, and the width should be equal to the size of the eye of the ax.
- Place a board on the table and place the ax on it, placing it upside down. Place the ax on the ax handle and start tapping it on the board. Then turn it over and tap the ax handle on the board, while the mounting process continues. Turning and tapping must be done several times. As a result, the ax handle will fit into the eyelet.
- Next, place the ax handle vertically and insert a planed wedge into the cut, driving it with a mallet halfway or almost to the end. Using a hacksaw, cut off everything that remains sticking out from above.
- Apply oil (motor oil, linseed oil, sunflower oil, etc.) to the ax handle, let the excess drain off and leave to dry. Wipe the ax and handle with a rag.
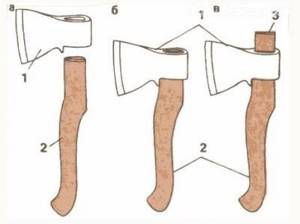
After fitting the ax to the ax handle, shown in figure (a), make its attachment (b) and wedging the handle (c): 1 - axe, 2 - ax handle, 3 - wedge
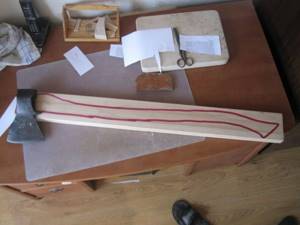
Making an ax handle step by step
The process of creating an ax with your own hands always takes place in strict sequence. First, the handle of the tool, called the ax handle, is made. When the length and shape of the handle are chosen correctly, the tool literally “burns”, demonstrating high performance and ease of use.
Try taking a stick with a regular round cross-section and attaching an iron base. You will quickly get tired, because holding such a tool for a long time puts a lot of stress on your hand. It’s another matter when the ax handle has a curved shape, the tail part is widened and slightly bent down. Thanks to this design, the axes are firmly held in the hands even with strong blows.
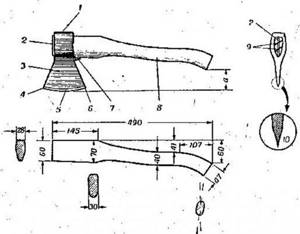
A traditional ax tool consists of wedges (2 and 9), a blade (3) and a butt (1), a toe (4), a chamfer (5) and a heel on the blade (6), a beard (7), and the ax itself (8). The number 10 indicates sharpening.
Prepare the material and cut out the first template
Since you and I need to make an ax handle from wood, we will take this material as a basis. The best proven structures are those made from birch and oak, ash and maple.
A wooden ax can be made at any time of the year, but it is better to prepare the material for it in the fall, even before frost sets in. The blanks are stored in the attic for at least a year; some experts advise drying them for five or even more years.
It is clear that if the taiga ax given by your grandfather was broken with your own hands on an impenetrable log, you can take fresh wood. This option will still be temporary, because after drying the volume of wood decreases. The ax head will begin to wobble and hold less tightly.
To prepare a good template, drawings of the future product are desirable.
When you have a cardboard template, it is much easier to transfer the contours of the designed product onto wood. The basis is a ready-made ax handle that you feel comfortable working with. It is traced with a simple pencil on cardboard and cut out.
Preparing timber for work
From the blank block to the careful hewing of the ax
- Before making an axe, you need to cut a block out of dried wood. Keep in mind that the length of the piece of wood should exceed the planned size of the finished product by about 10 cm. As for the width in front (placed on the canvas), ideally it exceeds the diameter of the metal eye by 2-3 mm.
- Place the finished template on the block and transfer its contours. Leave an allowance of 1 cm in front, and 9 cm in the tail part of the workpiece. Before you place the ax on the ax handle, you will strike more than a dozen blows on the handle. An allowance in the “tail” is needed to avoid splitting. Once the final assembly is complete, you can cut it off without any problem.
- Let's begin the main part of the work with the ax handle. In the upper and lower parts of the block, transverse cuts are made with a depth not reaching 0.2 cm from the contours. A chisel is used to chip away excess wood along the cuts; the final cut is made with a rasp.
- Use a regular file or rasp to round corners and create smooth curves and transitions. Sandpaper will help with the final sanding.
- It is too early to install the steel sheet - the wood is impregnated with a good waterproof compound. Flaxseed oil is suitable; drying oil has excellent properties. Apply a small amount of the substance to the ax handle and let it dry. Then the next layer is applied. The procedure is repeated until the instrument you personally made no longer absorbs it.
- The biggest mistake is to coat a wooden base with varnish or oil paint. However, nothing prevents you from adding a little dye to the drying oil (red, yellow). A bright instrument will never get lost in thick grass.
Read also: What pressure should be in the hydraulic tank
We also recommend reading
How did our ancestors choose the canvas for the ax?
Several hundred years have passed, but the method of buying good linen has not changed. Our ancestors knew how to make an ax out of wood and what kind of metal base to use. They always paid attention to:
- Steel quality. By the way, today this issue is resolved simply. Look for the GOST badge on the product - this will be an indicator of excellent quality. No OST and TU!
- Blade. An ideal blade has no cracks or dents, and is very smooth.
- Butt ends. They are strictly perpendicular to the blade.
- Eyelet shape. It is better when it is made in the form of a cone.
How to place an ax on an ax handle (video)
When the blade has been chosen, a completely logical question arises: how to properly place an ax on an ax handle and achieve a “dead” fastening? Start by drawing center lines at the end. There will be two of them, perpendicular and longitudinal. The groove to the depth of the eye must be cut exactly along the contour of the longitudinal line. The cut will be useful for wedging the ax handle.
Having placed the butt to the end, outline the contours of the eye on it - the center lines will be a guide. To trim the landing part of the ax, use a knife or plane. It is important that the ax handle does not protrude beyond the edges of the eye by more than 1 cm.
It is convenient to install the blade using hammer blows. Do this accurately, with effort, but without unnecessary pressure. You don't want your blows to crack the wood, right? As soon as the end goes beyond the boundaries, we check the strength of the fit and see how the canvas sits. It shouldn't slide off.
Knock out a wedge with a wedge or wedging method
You can strengthen the fastening of the metal part if you wedge it. To do this, a small wedge made of hard wood, such as oak, is driven into the end. Because of this, the dimensions of the landing part increase, and it is fixed “tightly”.
Some craftsmen use not one, but two or even five wedges. But as practice shows, even one additional fixation is quite enough.
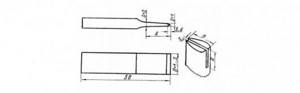
Wedging an ax. Drawing
How and at what angle is an ax blade sharpened?
To prevent the tool from causing trouble, you need to properly sharpen the ax blade. According to GOST requirements, the sharpening angle of a construction ax should be 20-30°. Carpentry tools are sharpened at a slightly larger angle of 35°. The recommended angles must be maintained, as thinner blades will get stuck in the wood. You will have to put in extra effort to pull them out. On knots, a thin blade can easily bend. The blade, sharpened at an angle of 35°, breaks the chips being separated from the main log and does not get stuck in the wood.
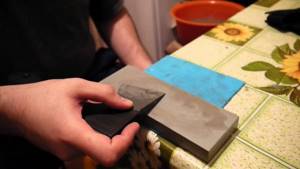
First, a “rough” primary sharpening of the ax is performed, during which it is possible to eliminate all chips, minor damage and large gouges with a rotating sharpening wheel. At the same time, a new clear cutting edge of the ax is being formed. Then the roughly sharpened blade is subjected to a “finish” sharpening. Grinding is carried out along the entire length of the blade on both sides with a fine-grained stone, which removes all burrs.
Three ways to sharpen an ax blade: a) sharpening wheel; b) a block, moistened with water; c) straightening with a whetstone moistened with machine oil
Important! The shine of the ax blade and the absence of burrs on the cutting edge indicate that the sharpening process was successful.
How to properly store an ax?
After work, it is recommended to put a cover made of thick leather, birch bark or other material on the ax blade. You can't leave an ax stuck in a log. A true master takes care of his tool, because the ax is an “extension” of his hands.
If you even once try to chop wood with a homemade ax, you will not be able to work with a shop tool. If you doubt your abilities, then use the services of craftsmen who know how to make a comfortable ax handle from a selected and dried workpiece.
- Author: marika
Rate this article:
- 5
- 4
- 3
- 2
- 1
(52 votes, average: 3.8 out of 5)
Share with your friends!
A proven way to sharpen an ax blade
Sharpening an ax is the initial task after your tool is made and ready for use. Only in this case will the product perform its main function.
To work with freshly cut wood, the sharpening angle in an ideal tool is 20 degrees, dry wood - from 25 to 30 degrees. The width of the chamfer is equally important.
Read also: Designation of a local view on a drawing
Sharpening an ax by hand
How to properly sharpen an ax on a regular electric sharpener
Prepare in advance a container in which you will cool the metal. Next do this:
- Hold the product in such a way that the blade can be directed towards the rotation of the disc. We hold the butt at an angle of forty-five degrees. This is the optimal sharpening angle, regardless of the type of tool and its features.
- To sharpen the axe, it moves smoothly along the circle. The chamfer is ground and the sharpening angle is sharpened.
- The final sharpening of the ax is always performed with a special sharpening stone. From time to time it needs to be moistened with water to cool the metal.
- If it is not possible to sharpen the hatchet with a block, it is replaced with a piece of plywood, which is covered with sandpaper.
Don’t forget that working with a sharp tool is always pleasant, while a dull ax means more additional and completely unnecessary effort, quick fatigue and not the best result. After the work on manufacturing and sharpening the ax is completed, a cover is put on the blade. This will extend the life of the product, and it will not need to be sharpened as often. The cover is made of leather, birch bark, or any other suitable material.
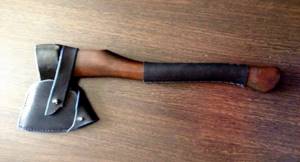
Case for ax
There is an opinion that the tool can be stored stuck in a log. This is a big misconception. Consisting of strong steel and an ax made by hand, the ax becomes an “extension” of the master’s hands. Try chopping wood with a homemade tool - and you will never want to go back to store-bought products.
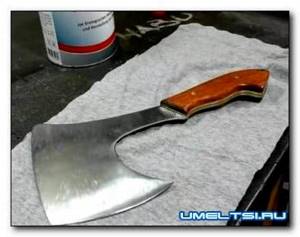
An article for those who want to make a hatchet with their own hands at home.

I used a video I found on the Internet as a basis, the idea is pretty good and the work will only take one day. You can also watch the video.
In the video, you can see a step-by-step process of making an ax made by yourself at home. Starting from marking the circular saw, the craftsman uses a grinder to cut the outline of the future axe. Then it is polished, a characteristic blade is made, and hardening is carried out. Next, the shape of the blade is formed, handles are made, and holes are drilled for attaching the handles. Epoxy resin and pins provide a strong attachment, the craftsman makes them perfect. While sharpening the blade, he checks how sharp it is. As they say, it is better to see once than to hear a hundred times.
Let me get ahead of myself, the result turned out wonderful, my wife still does not praise the kitchen hatchet.