Laying natural stone with your own hands
Since ancient times, natural stone, or, as it is called, wild stone, has been considered the best material for covering the ground in courtyards.
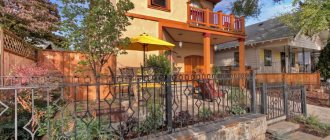
The planes covered with plastic represent an inseparable part of the landscape design. Laying wild stone on the site is a design component that complements and emphasizes the design of the landscape and architecture of the house, as well as a sign of the excellent taste and wealth of the owner of the house. Well, laying decorative stone with your own hands just requires careful and careful execution of the work. If all installation rules are followed, your paths will be beautiful and smooth years later.
Laying natural stone
Installation material
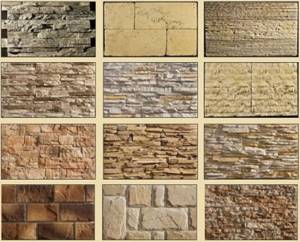
The optimal material for laying is considered to be flagstone, or rubble cobblestone , which has a slight thickness and an unedged border. The name “flagstone” itself speaks only about the outline (tiles of different thicknesses and different sizes), but not about its origin. Flagstone can be slate, lemesite, granite, quartzite, etc. The most famous version of flagstone is considered to be sandstone. There are a large number of variations of natural sandstone. This type of decorative cobblestone is rich in color shades: ranging from light gray to a shade of red. This helps create an entertaining and unusual ornament.
The advantages of rubble stone masonry are as follows:
- Its processing will not be difficult;
- It's durable;
- This is an environmentally friendly product;
- Has an affordable price.
The thickness of the flagstone reaches 30 cm . It is sold in small, irregularly shaped layers. Rubble cobblestones are distinguished by the simplicity of laying technology.
In addition to flagstone, it is customary to use paving stones (cobblestones resembling a cube or rectangular parallelepiped), limestone, tuff, shell, and granite.
Natural stone finishing is chipped or sawn. Firms engaged only in the production of building materials from cobblestones produce quite a lot of stones of various types, varieties and shapes. Therefore, when choosing them, as a rule, there are no difficulties.
Laying methods
You need to know that laying a path with wild stones involves several methods:
- The use of a reinforced concrete foundation with a thickness of about 17 cm. It is often used in places with heavy loads (traffic areas);
- For screening - the upper straight layer for coating costs less. The option has become popular among urban gentrification;
- For sand - a technique that is much more expensive due to the prices of the material. And also the sand cushion is characterized by a rather low resistance to deformation, which does not allow the use of materials on weak soil.
Preparation of masonry
Before laying cobblestones, you should make a calculation of the required material . Using a tape measure, the entire plane of the laying area is measured. Next, from this area the size of the surface where the stone will not be laid is calculated.
Don't forget about spare material. Due to the fact that the cobblestones are uneven, you should make a reserve of more than 10% of the tiles, because you will need to select the crumbling or flaking stone.
Afterwards, the soil and groundwater level are assessed. Do not forget that such work is carried out only by specialists. Due to the uneven shape of the flagstone, liquid may be retained. Therefore, you should think about the location of the drainage and drainage system in advance. However, such a procedure is not always necessary. You can simply pour a small layer of sand before laying artificial stone. If decorative cobblestones are needed for laying pedestrian paths or parking areas , you should use auxiliary soil compaction using a vibrating plate.
Layout technology
Cobblestone masonry is carried out using the seam method, i.e. the sheets are located at a distance from each other. If there is a small distance between them, use a seamless installation method (distance no more than 0.5 cm). The second installation option requires a lot of effort. In addition, you will have to spend much more material than with the first option, since all the material will need to be adjusted to the required size.
As a rule, artificial stone begins to be laid from the side rows . The outermost cobblestones should be laid on a base - cement mortar. The gap between the flagstones forms a distance of at least 5 mm, which is filled with medium-sized sand, compacted, backfilled and watered. Sand is poured between the stones to prevent vegetation from growing in these intervals. If you have certain skills in this, then laying artificial stone with your own hands will not pose a big problem.
It is customary to distinguish three technologies for laying decorative stone:
- The arc method is the most popular;
- Row method - laying, which produces smooth seams for one purpose;
- Any way.
Installation on walls
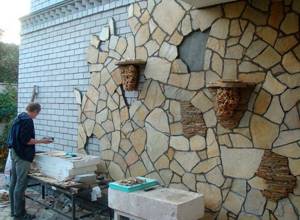
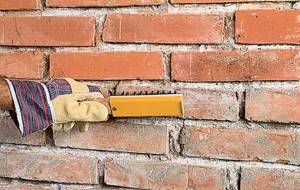
In order for masonry stone to look good on the wall, it is necessary not only to put in a lot of effort, but also to have skill . When natural cobblestone does not require an exact sequence of actions, granite tiles lose their appearance if the seams are shifted and the horizontal level is not maintained. Laying natural stone on the wall will help create an original interior that will indicate the aesthetic tastes of the owner.
To achieve the desired result, you should act according to the following technology:
- First you need to prepare the base for installation, the wall (you need to plaster it and cover it with a bonding primer);
- Do not skimp on adhesive for laying tiles;
- In order for the concrete solution to spread evenly, it should be applied to the wall with a ribbed spatula;
- Masonry should be done from bottom to top;
- Do not forget that marble and granite do not require any distance between each other; they are laid without seams;
- Having drawn a horizontal line of the first row on the wall in advance, start from the corner;
- In order to press the tile to the wall, you should tap it with a rubberized hammer, or press it well with your hands;
- Use a building level to control the horizontal and plumb position;
- Immediately after laying, it is necessary to check each tile to ensure that it lies parallel to the wall (apply a level to the laid row and look from above: if there is a gap, you need to level the slab by tapping with a rubberized hammer).
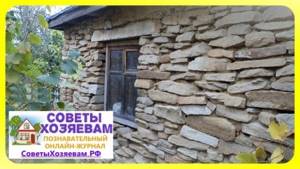
Wet and dry masonry
It is customary to distinguish between wet and dry masonry options. The technology of dry laying of artificial stone causes difficulties when working with natural torn stones, which differ from each other in thickness, height and width . In order to improve the reliability of the masonry, the free space between the cobblestones is filled with earth or building mixtures. This option is often used when constructing low hedges or curbstones.
Related article: Comparison of wall insulation
Wet masonry is used for the construction of tall buildings in the form of welded structures. This method of working with natural stone is quite simple and does not cause any difficulties.
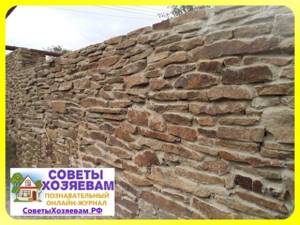
In most cases, natural cobblestones are characterized by a distorted, torn shape. Therefore, the laying of torn stone is facilitated by the good alignment of the cobblestones, which is manifested due to their unevenness.
Laying natural stone with your own hands is a rather complex and effort-requiring process . However, the end result is a neat and elegant path or platform made from an environmentally friendly product.
What is special about natural stone masonry?
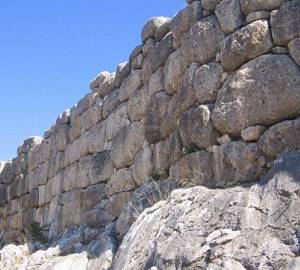
Masonry is the simplest fence or wall made of natural or partially processed stone. Different-sized stones, stacked in several rows or levels, are held together with cement mortar, special glue for facing stones or other binding building mixture. Suitable pieces of cobblestones and large stone blocks of the required size and shape are sometimes laid out in 2-3 rows and without fastening.
Masonry has several varieties:
- from bricks of various types;
- from stone sides;
- mixed type of masonry;
- masonry of wild stone - hewn and unhewn.
Looking at a pile of irregularly shaped rubble, it is not clear to a beginner how beautiful natural stone masonry can be made from this material. However, it was from it that people built the first fortifications, fences, houses and temples in ancient times. Today it is the cheapest building material that can be collected locally. Natural stone is used for construction or arrangement of:
- building foundations;
- fences and fences;
- basements and cellars;
- outbuildings;
- auxiliary walls and partitions;
- hydraulic structures;
- support walls;
- communications (sewage and hydraulic);
- garden buildings and fences;
- barbecue base.
Regardless of the installation method, a stone fence or other neatly laid stone fence looks quite attractive.
To use illustrative material and explanations, it is important to master several terms used by masons:
- bed (wide base);
- spoon (side);
- poke (butt);
- outer and inner miles;
- forgetting;
- facade;
- horizontal and vertical seams;
- spoon (in a chain) and bonded row (short side) - see the masonry drawing.
About do-it-yourself masonry
Fence made of natural stone
In construction, there is a gradation of masonry stones into artificial and natural (or natural). Artificial ones are made from concrete or ceramics. Natural ones are obtained by crushing or sawing various rocks.
Of course, the technology of masonry from crushed stones will be more complex, if only because of their different shapes and sizes, and even sawn blocks are quite rough. Despite this, natural stone is in demand in construction.
Reasons for the popularity of natural stone masonry:
- Aesthetics of natural stones. The natural texture of natural stone compares favorably with mass stamping, even of high quality.
- Economical. If you use inexpensive rubble stone (such as is used for foundation construction), natural stone materials are cheaper than artificial ones, and even taking into account the higher labor intensity, masonry from it is often more economical.
- Excellent performance characteristics. Over thousands of years, builders have selected the optimal combinations of stone materials, learned how to lay stone with their own hands so that structures made from it best meet climatic and operational requirements.
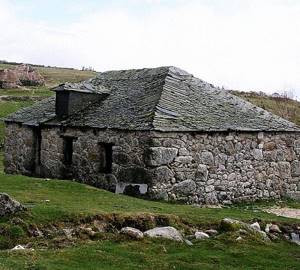
House walls made of natural stone
Do-it-yourself stone masonry is done using various types of binding solutions or “dry”. The second method is much more complicated, requiring labor-intensive, scrupulously precise cutting of stones. After all, only gravity “holds” such a wall together. Dry masonry blocks are usually of considerable size and weight. Currently, such masonry is in little demand. However, small auxiliary structures (sheds, retaining walls, → fences - the link tells you how to build a fence) in villages are, and in our time, built from small flat stones (“plasters”). For stability, such masonry is sometimes sprinkled with ordinary sand or dry clay.
The more common method of masonry is using masonry mixtures, or masonry mortars, which are usually based on cement. Contrary to popular belief, the task of masonry mortars is not to connect, not to interlock individual masonry stones with each other, but to ensure their tightest fit to each other. We can say that masonry mortars are used instead of undercutting to level the places where stones touch. From the above, a practical conclusion follows: it is pointless and even harmful to produce a mixture for masonry that has a strength higher than the strength of masonry stones.
Alas, amateurs often try to make the solution “stronger” by using high grades of cement and a minimum of aggregates. The masonry does not become stronger, but even weakens, since, along with other reasons, “extra-strong” mortars create additional stress in the body of the masonry when setting.
Types of stones for paving paths:
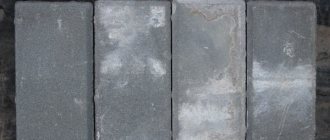
Flagstone is plates of natural stone of arbitrary (chopped-torn) shape. The planes are parallel and can be smooth, rough or embossed. The average thickness of the plates is from 10 to 50 mm. The most popular natural stone for paving. It is distinguished by its functionality and economical price.
Sawed, chipped stone. Tiles and paving stones are made from various species, which can be: sawn on four sides or only on two; chipped - this is when all the edges are naturally chipped, thereby creating the natural beauty of the stone.
Galvanized stone is one of the types of processing of natural raw materials. Natural slabs of stones remain with their edges of irregular shape, but at the same time the tumbling machine smoothes them out, making them not sharp, but rounded.
Rubble stone has different shapes and structures and is resistant to climatic influences. For a garden path, it is recommended to take a medium-sized rounded rubble stone.
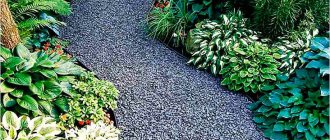
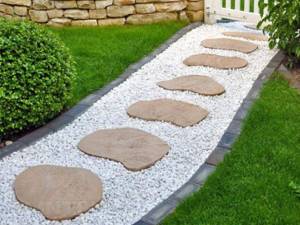
Pebble is a smooth, rounded stone. Garden paths made of pebbles (pebble to pebble) look great surrounded by greenery or next to water. Such paths are simply poured in an even layer or laid out in beautiful patterns.
Tools needed for laying natural stone
When learning how to lay natural stone with your own hands, you cannot help but study the tools that are needed for this.
1.
Container and shovel for mixing and (or) storing the solution. A shovel will also be needed to feed it onto the masonry. Buckets are often used to carry the mortar mixture.
2.
A mason's trowel is a “trowel” for applying and leveling the masonry mixture.
3.
Kirochka. They use it to tease, tap and knock on stones. If necessary, it can be used to hammer a nail for tightening laces, minor repairs to scaffolding, etc.
4.
A hammer with teeth - a bush hammer, for processing and chopping large stones.
5.
Tools for marking: tape measure, thin cord (“lace”) stretched for marking and orientation during masonry, construction angle, plumb line, to improve the accuracy of masonry, special slats - orders, for pulling laces.
In addition to the above, you may need additional equipment: a stretcher for carrying stones and mortar, wedges and chisels for splitting stone, etc. And, of course, you will need such devices as → scaffolding or scaffolding (the link tells you how to make a scaffold with your own hands).
Progress added power tools:
1.
An angle grinder (“grinder”) cuts stone faster and easier, although it requires special care in operation. Preferably a larger one, with a 180 mm disc. Of course, a stone-cutting machine is best, but that depends on who’s finances allow it and the need to use it in the future.
2.
Hammer. Useful for chopping stones. It successfully replaces the bush hammer, especially considering that today the trade offers various shaped attachments for these purposes.
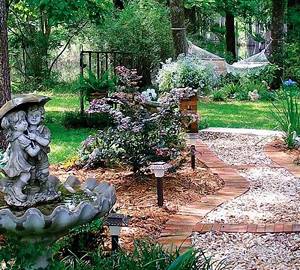
Garden paths made of wild natural flagstone
Flagstone is layers of natural stone that have strength and a natural pattern.
The ideal building material for the construction of garden paths is torn unedged stone, in other words, flagstone. It is easy to process, relatively inexpensive, and resistant to the external environment. This is an absolutely environmentally friendly material. This natural stone can be used to make not only garden paths, but also entire areas. To properly make a garden path, you need to know the laying technology, which, by and large, is not at all difficult.
Preparing the base for installation
Preparing the base for laying flagstone involves filling the entire contour of the pre-marked garden path with concrete, i.e. a concrete screed is made. While the concrete hardens, you can proceed directly to preparing the stones themselves, in our case flagstone.
Preparing flagstone for laying
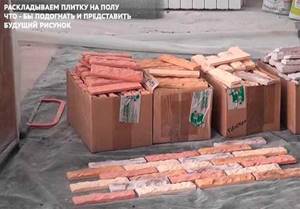
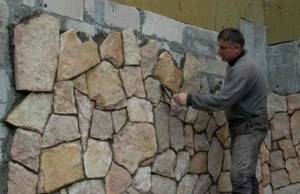
After the concrete has set and hardened, work must be carried out directly on the path. Using a stiff brush and a strong stream of water, the stones are thoroughly washed to remove clay and sand. Then they are dried and laid out next to the path so that each flagstone and its configuration are visible.
Marking the flagstone will allow you to avoid wasting time matching them to each other when laying garden path elements.
Then they begin to “dry” lay the flagstone on the path. Having determined a place that will be visible on the path, not covered by trees and bushes, they place the thickest, most beautiful and regularly shaped stone on it. Thick - because with the help of glue, all the other elements that will make up the future garden path can be brought to its height. The number “1” is written on this stone with chalk. This will be a kind of starting element. Then, as in a mosaic, the next stone is selected, which ideally matches the number “1”. It is placed next to the first number with a gap and “2” is written on it with chalk. Then, perpendicular to the line where the stones meet, they draw a line with chalk and write “2” on number “1”, and, conversely, write “1” on number “2”. This is done so that later, based on this risk, it can be understood that stone “1” borders on stone “2”.
Next, using the same principle, numbers “3”, “4”, “5”, etc. are selected. And each one is marked with its number and marks are drawn on the stones with which it borders. Then, when laying the elements of the garden path, time will not be wasted on matching them to each other. If necessary, the workpieces can be corrected using a grinder and special cutting wheels.
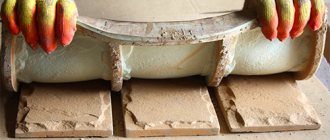
Proper laying of flagstones
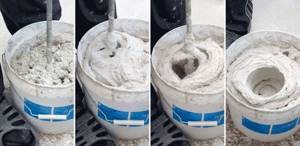
To properly lay out the stone, special glue is used. We must admit that this glue is quite expensive. When all the blanks have been received, they are carefully removed in the reverse order. The reverse side is lubricated with glue. To do this, use a hard brush. Then the concrete path is thoroughly swept, vacuumed and washed. The glue is mixed with sifted sand and cement, approximately in a ratio of 1:2, mixed and a mixture is obtained in the state of thick sour cream.
A mixture of glue and cement is applied to the path with a special trowel, leaving no cavities. If water gets into this cavity, it can crack the stone when it freezes. You need to lay the first workpiece on the solution and press it down as hard as possible so that there are no cavities left and all the excess glue is squeezed out, after which it needs to be collected with a trowel and sent back to the bucket. Then the same procedure is done with number “2”. Risks help us here; we don’t waste time, because the glue sets within a few hours. It is imperative to ensure that the surface of neighboring stones is at the same level. So gradually, stone by stone, you will get a very beautiful and living path.
The next day, use a brush and plenty of water to clean the path. It is advisable to spray the path with water for several days until the glue completely hardens.
By and large, it is possible to lay such a path from natural stone yourself. The main thing is to do everything correctly, following the technology, and have the desire. And then everything will work out!
Author: Ivan Andreevich Borodin
1stones.ru
- Arranging garden beds at the dacha
- DIY flagstone
- Paving paths in the garden
- Do-it-yourself flagstone laying
- Flagstone garden paths
- DIY flagstone path
- DIY flagstone garden path
- Arrangement of paths in the garden
- Construction of garden paths at the dacha
- Arranging a warm bed
- How to make paths in greenhouses
- Paths made of plastic
- DIY paths in the garden made of stone
- Do-it-yourself paths in the country
- DIY paths in the greenhouse
- Garden path material
How to lay natural stone with your own hands
Natural stone masonry
Do-it-yourself stone masonry is done in two main ways:
•
in → formwork (the link tells you how to make formwork);
•
laying with separate stones.
The first method is actually a type of → rubble concrete. The stone is placed in formwork or simply in a trench layer by layer, poured with a solution that has high mobility (to achieve the required qualities, it is better to use plasticizers, and if the amount of water is increased, then only slightly).
Gives a quick but rough result, suitable for → laying foundations (the link describes how to make and pour a foundation) and walls of outbuildings, as well as for constructing structures that will subsequently be plastered or tiled.
The second method is more complex and time-consuming, but gives an excellent result, both in terms of the density of the masonry and its appearance. In addition, the masonry mixture (mortar) with this method of masonry is consumed much more economically.
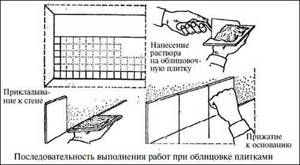
How to lay a stone with your own hands can be illustrated using the example of ordinary → bricklaying, but with a significant addition - when laying stones of different sizes you need:
The stone is selected by eye according to shape and size, applied dry to the masonry site and, if necessary, trimmed with a pick. After adjustment, the stones are placed on the mortar. If no special aesthetic qualities are required from the masonry, do not spare the mortar; lay a thick layer to smooth out the unevenness of the stone.
Related article: How to properly install vapor barrier on walls
The solution is applied with a shovel and distributed with a trowel over the installation site. The stones are pressed into the masonry mass, knocked down, “planted” with a pick to the desired level.
The most difficult thing is maintaining the evenness of the masonry, both vertically and horizontally. Since it is impossible to achieve an exact match with a stretched cord, they are guided by the most protruding edges of the stone, considering, as it were, a general match.
Do-it-yourself stone masonry is difficult in that it requires a good eye and experience. Of course, you won’t be able to work at the speed of an experienced mason right away, but you will learn to work at acceptable quality, taking your time and carefully selecting stones, after laying five or six cubes.
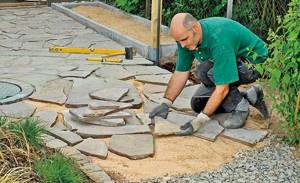
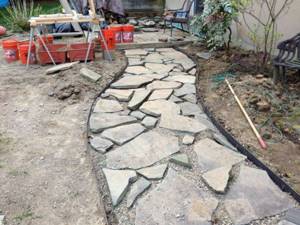
Method 1. Stone garden path on a sand or gravel-sand base
Laying natural stone on a sand or gravel-sand substrate is perhaps one of the most popular, relatively simple and reliable ways to create a garden path that will look very picturesque anywhere in the dacha area.
Track markings
First of all, thoroughly clean the area for the future path, remove various debris, growing plants, roots, etc.
Mark the contours of the future path, which can be winding or straight. To do this, use a tape measure, level, wooden pegs and twine to mark two opposite sides of the alley. Tie the rope low, and align the cord to a single level, focusing on the height of the future masonry.
Driving stakes every 0.5-1.0 m, mark to the end of the area. Make sure that the segments between opposite wedges along the width of the path are the same throughout the entire length of the path.
If you are planning a border, when marking, do not forget to take into account the space for the edging.
Preparing the base
Depending on the planned load, you can make a preliminary gravel-sand or sand cushion. In principle, ordinary sand under a stone is quite enough for a country side path, but if the soil is “unstable” or loads are expected, it is recommended to also make a gravel base.
So, in the first case, along the marked lines, dig a flat ditch of 5-10 cm for a sand cushion - this is quite enough for a flat stone, which is much easier to lay. But for rubble stone, when choosing the thickness of the substrate, be guided by the depth of the largest stones.
Then fill the trench with sand. Moisten the sand with water and lay it in an even layer, carefully compacting everything. Try to keep the backfill as even as possible.
In the second case, the ditch is dug deeper - 15-25 cm. Place any large bulk material at its bottom in a layer of about 7-12 cm. This can be crushed stone, gravel, slag, brick fragments, etc. The gravel bed also needs to be well leveled, moistened and compact. Place a layer of sand evenly on top of the crushed stone as described above.
Laying stone
Now carefully begin to place the stones in the sand, as if pressing them into the surface. Press the stone into the sand harder, and to level the material you can tap it with a mallet.
Constantly check the horizontal position of the masonry with a nylon thread or level. If necessary, add sand under the natural stone or remove excess. It is recommended that the top of your stone path be higher than the “horizon” of the ground to prevent rainwater from accumulating on the surface.
If the stones are relatively small or medium-sized, it is better to lay them end to end or with a small distance of 1-3 cm. But for large stones or stone slabs it will be more beautiful if you leave gaps of 5-8 cm or even more between them.
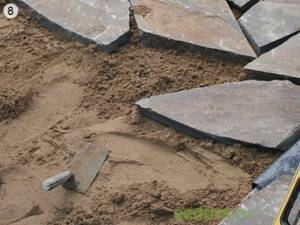
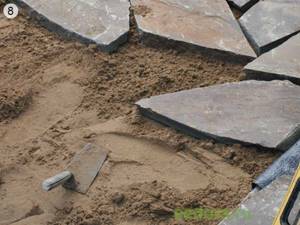
Sealing seams
You can fill the sections left between the stones with vegetable soil and sow a special decorative lawn in the cracks.
Another alternative is to fill the space between the slabs with small material like decorative pebbles. Sand is also used for seams, only the distance between the stones in this case should be small, up to 3 cm.
For greater reliability, the gaps can be sealed with liquid cement mortar (this is especially recommended for rubble stone or small flat stone). Mix sand and cement in water in a ratio of 3 to 1 and carefully work the sections between the stones with a trowel. Narrow cracks are easier to fill with a plastic bag or bag with a hole. Before laying the mortar into large cracks, you can add small hewn stone, leaving gaps of no more than 3 cm. If the mixture gets on the stones, remove it with a rag.
The jointing should be either convex, slightly above the level of the path, or flat, below the level of the stones. “Recessed” seams are not allowed, as water will accumulate in them, and cracks will appear in winter.
After laying natural stone, it is recommended to pour water on top. Finally, install curbs if necessary.
Safety precautions when laying natural stone with your own hands
As you can see, doing masonry with your own hands is quite a traumatic job. This is mainly associated with chopping and cutting stone, which necessarily requires:
•
safety glasses, or better yet, a shield that covers not only the eyes but also the face;
•
durable gloves or canvas mittens;
•
reliable, serviceable tool.
Stones often have significant weight, and sometimes the center of gravity is unexpectedly shifted, which means haste in work can lead to serious injuries: various kinds of sprains, even torn ligaments, bruises. Try to be attentive and careful.
How to stick a decorative stone on a wall: step-by-step instructions
Hello, dear DIY repair enthusiasts! Those who plan to use decorative gypsum stone for cladding structures will find it useful to become familiar with the installation technology for this type of finishing.
Tools and materials
The set of tools and auxiliary materials depends on the chosen principle of laying decorative stone. You may need:
- tape measure, pencil, level, regular and notched spatula;
- hacksaw and miter box;
- flat file (if you intend to create the effect of uneven edges of the masonry);
- jointing crosses (to imitate smooth masonry of bricks or stone blocks);
- brush and foam sponge;
- a rubber hammer, a construction mixer and a container for preparing construction adhesive from a dry mixture;
- pastry syringe or bag (for filling masonry joints).

When purchasing decorative stone, you must also purchase:
- paint in the color of the stone;
- jointing mixture or paint of a suitable tone for painting seams filled with assembly adhesive;
- primer for gypsum stone;
- primer for walls or other bases (selected based on the characteristics of the material);
- glue;
- acrylic impregnation for gypsum stone or colorless water-based varnish.
The interior stone is laid using glue intended for gypsum products. This glue is sold in the form of a dry mixture or working solution, ready for use. Universal adhesive “Crazy Velcro”, made on an acrylic base, which will reliably fix gypsum tiles on any surface, is also perfect.
Preparatory stage
With the help of decorative stone you can cover the whole or part of the wall, corners, arches. If you want to decorate local areas of the surface, to create the effect of uneven edges, it is most convenient to first lay the tiles on the floor. This will help you visualize what the masonry will look like and fit tiles of different widths that imitate stone together. The outermost elements must be cut one after another with a hacksaw - this will ensure that the seams of the even rows of masonry shift.
To make “ragged” edges of the stone, use a file - it will easily grind off the gypsum material. Don’t forget to clean the processed ends that will remain visible, from dust and paint them in the color of the selected stone.
For cladding external corners of building structures, the tiles should be specially prepared. Using a miter box and a hacksaw, one of the inner corners of the tile is cut at an angle of 45 degrees; it is with these cuts that the elements are joined together, forming an aesthetic angle. Don't forget to cut some of the tiles to length.

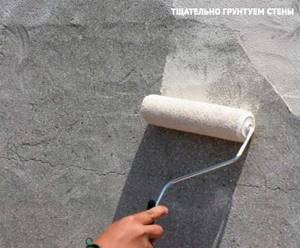
Walls or other structures to be finished with decorative stone must have a perfectly flat surface. Leveling is done with plaster or putty; you can use plasterboard or OSB boards. If the base is wood material or the structure is subject to vibration loads, mount the gypsum stone with elastic acrylic adhesive to prevent the masonry from cracking.
To prevent the adhesive for gypsum stone from losing moisture, which is essential for gaining strength, it is important to carefully prime the surface under the cladding, as well as the tiles on the back side. Gypsum absorbs moisture intensively, so it is better to treat the finishing material twice with an interval of about an hour. The primer will not only reduce absorption, but also remove dust from the surface and improve their adhesion to the glue.
Paste a VALID AdSense code in Ads Elite Plugin options before activating it.
Instructions for installing decorative stone
If you decide to use a dry mixture for the mounting mortar, please note that gypsum glue sets quite quickly and is best mixed in small portions. The reliability of the glue directly depends on compliance with the technology for preparing the working mixture - strictly follow the proportions of water and bulk composition specified by the manufacturer, the sequence of actions when mixing the material and the temperature regime.

To ensure that the masonry is level, level markings are applied to the wall. First of all, the lowest row of tiles is installed; it should be positioned strictly horizontally. Thin decorative stone can be glued directly above an already installed baseboard. Another option is to leave a gap of 3 - 4 mm above the finished floor and subsequently fill it with elastic decorative mastic of a suitable color.
Continuous cladding of large surfaces is most often performed using a technology similar to laying tiles. Apply a gypsum adhesive mixture to a section of the wall, then remove excess material with a notched trowel and level it. The tile is applied to the wall and pressed evenly; for better adhesion to the wall, it can be tapped with a rubber hammer. Excess glue that appears should immediately be carefully removed with a foam sponge.
Gluing stone with acrylic glue is done differently: the glue is applied with a notched trowel directly to the back side of the gypsum tile, which is then pressed tightly against the wall. Using this principle, you can also install tiles using gypsum adhesive when you need to cover individual areas of the surface.
Decorative stone can be glued with a continuous sheet without gaps or using plastic crosses. In the second case, the seams will need to be filled with a colored jointing mixture or the same gypsum glue, using a pastry syringe with a nozzle of a suitable size. If necessary, the seams are painted with a thin brush with paint for gypsum stone.
Related article: How to attach a TV to a wall without a bracket
If there are traces of dried glue on the surface of the masonry, scratches or chips appear, paint them over with paint in the color of the stone, which should be purchased when purchasing the facing material.
As a final touch, I recommend covering the surface of the decorative stone with a colorless water-based varnish or a special acrylic-based product. This will add attractiveness to the finish and make the material more resistant to moisture and abrasion.
Video on the topic “How to stick a decorative stone on a wall”:
“Dry” and “wet” stone laying
Builders practice “wet” and “dry” masonry using a mortar based on:
- construction glue;
- sand-cement mixture;
- clay kneading
It is better to lay hewn stone of the same size on 2-3 levels without any mortar, carefully adjusting each block according to the shape of the adjacent material.
Garden and park hedges with dry stone masonry look very natural, especially if the back side is covered with earth to resemble natural terraces. The stone is gradually overgrown with growth and a picturesque landscape is obtained, reminiscent of the ruins of an ancient fortress or castle.
In “dry” masonry there is only a large stone of arbitrary shape, close to cubic. It is more important not only to fit each stone to each other, but also to calibrate the building material so that a wall is formed in width and height. If a stone fence is made to be filled with earth from the back side, then it is important to level only the front surface - using a plumb line. In the same way, you can make low laying of ceramic stone.
The largest stones are laid on the lower level, but the rows must be maintained, as with wet masonry. Such work is somewhat reminiscent of a puzzle connecting fragments, and dry masonry is no different. The voids or seams between rubble or stone blocks can be filled with compacted soil if it is low masonry in the form of a garden border or fencing for a flower bed. The bottom row of stones is sometimes partially dug into the ground, like a foundation.
For buildings more than half a meter high, only wet masonry is used, based on one of the types of binder mortar. If natural stone is used for low hedges in mixed-type agricultural buildings, for example, as the basis of adobe masonry, then it can also be fastened with a clay mixture with the addition of dry cement. This guarantees the masonry durability and stability.
Important: It is not recommended to mix sea sand into the stone masonry mortar. Preference is given to well-sifted river sand - it has the best characteristics for adhesion and mixing, and does not emit salt.
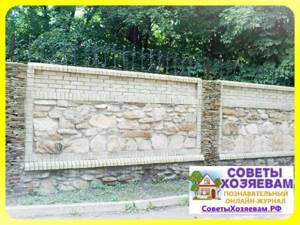
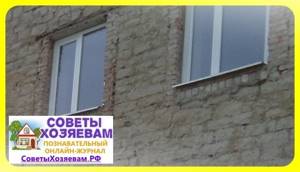
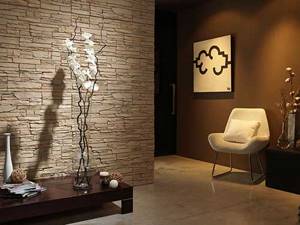
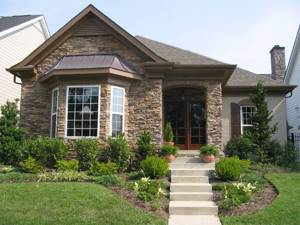
Wild stone on the facade - my home, my fortress
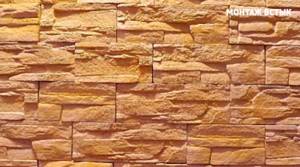
Among the many options for facade cladding, wild stone is one of the most spectacular: the status and solidity of the family is visible at first glance, it is durable and very decorative.
It also goes well with other types of finishes, be it plaster or siding. Doing this kind of finishing with your own hands is difficult and time-consuming, but it is quite possible, especially taking into account the advice in this article.
Flagstone for the facade: choice
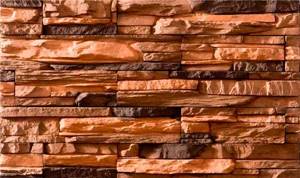
For facade cladding, experts recommend laying flagstone of the following types:
- sandstone - color from cream to light brown, durable, resistant to adverse weather conditions;
- limestone - the mineral most often found in the middle zone, white or light gray in color, unfortunately, intensively absorbs smog and dirt, and loses its decorative effect;
- tuff - depending on the deposit, it can be from cream and light pink to brown, it is very decorative and durable;
- slate - layered structure, color ranges from white to black, depending on the composition there are golden, green and purple stones;
- granite is an especially durable material with a grain structure ranging from white to black;
- pebbles
All these stones have a wide range of colors; tuff cladding is the most decorative, but it is also cost-effective compared to other options. Wild stone is characterized by:
- environmental friendliness;
- high strength;
- low water absorption;
- resistance to temperature fluctuations;
- excellent sound and heat insulation;
- lack of deformation and light fastness;
- frost resistance;
- hardness;
- hygiene;
- ease of processing and installation;
- durability.
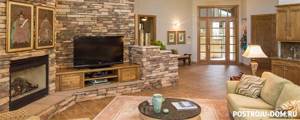
When choosing stone cladding, you need to take into account the overall color scheme of the building. It is not recommended to completely cover the facades; finishing of individual areas looks more decorative: the base, terraces, protruding elements - bay windows, staircases, fireplace chimneys.
Laying methods
According to their purpose, paths can be of different types, for example, a small path in the corner of a garden, or a large road along which a car will drive. In order for the track to serve for a long time and faithfully, you need to correctly calculate the load on its load-bearing parts. Depending on the purpose, the type of installation is chosen, because the paths experience different loads that must be provided for.
Laying a path on a sandy base
This method is considered the most elementary, however, it can only be used for small paths where most people will walk. It is definitely not suitable for the roadway or for places where there is a load.
Laying a flagstone path on a sandy base
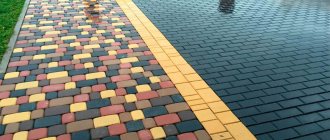
In order to make a path, you must first mark the expected location of its location. To do this, you can drive pegs into the ground or stretch the cord along the contour. Then a trench is dug. In order for the path to have a natural look, sharp corners must be avoided. The trench should be several centimeters deep than the stone itself. The base of the trench is leveled and filled with sand. The sand layer should be several centimeters. To make the sand lie more tightly, you can pour water on it. Stone slabs are laid on top of the sand. There must be a distance between the plates; it is necessary in order to make seams. A couple of centimeters are enough for this purpose. When the stone is laid, you need to fill the rest with sand. You can fill these voids with grass; to do this, instead of sand, you need to pour in soil and seeds of the desired vegetation.
Laying a flagstone path on a sandy base
Laying stone using a sand and gravel pad
This method has proven itself well when used on clay soils. The trench should be deeper than for sand; curb blocks or boards should be installed along its sides. Untreated boards cannot be used; they must be primed. The sign indicates that the base is laid in the same way as the base is written, the distance for the seams.
Laying a flagstone path with a sand and gravel cushion
Paving tiles on a concrete base
This method is universal because it is suitable for paths of any thickness, can withstand almost any load and is suitable for any type of soil. The disadvantage of this type of base is the labor intensity of its production. The trench must be at least four tens of centimeters deep, and to make the base, the edges must be reinforced with formwork. Soil and gravel are poured onto the bottom, then a reinforcing mesh is placed. Only after this can concrete be poured. The thickness of the concrete layer is three tens of centimeters. If expansion joints are not made, the base will crack.
Therefore, it is important to remember them. After pouring the concrete, you need to leave it to harden.
This will take several days. When the concrete has hardened, flagstone can be laid on it. For masonry, you can use special construction adhesive.
Purchase of materials, required tools
Before purchasing materials, you need to determine whether you will lay the cladding with glue or mortar. To determine the need, you need to accurately measure the surface area, and purchase building materials 10–15% more than required for adjustment.
If the wall is high, you will need additional plaster mesh and dowels to secure it, and for cladding wooden surfaces, you will also need waterproofing material for external use (geotextile or bitumen-polymer roofing material).
To work you will need tools:
- laser construction level, tape measure and plumb line;
- trowel, notched trowel, spatula;
- containers for mixing glue or solutions;
- drill or construction mixer;
- rubber hammer;
- perforator;
- grinder for cutting stone.
Also, do not forget about special clothing and safety glasses when working with an angle grinder, and scaffolding for working at heights of more than 4 m.

Surface preparation
Before carrying out work, the surface must be prepared: cleaned of dirt, deposits, oil and gasoline stains. If it is necessary to veneer a wooden surface, the wall is first cleaned, sanded, impregnated with a fire retardant and antiseptic, primed and waterproofed with a moisture-proof film or a special composition for wood, and reinforced with a metal mesh. Metal surfaces are first cleaned of rust, a mesh is attached and plastered.
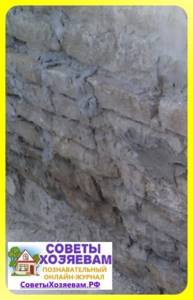
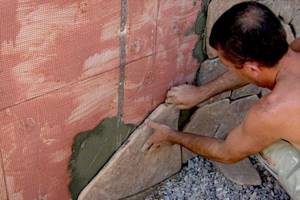
Wall cladding technology
How to lay natural stone? The stone is placed on the wall using glue or cement-sand mortar; however, the large weight of the cladding requires special glue with increased adhesion and load-bearing capacity. There is a sufficient range of adhesives for laying stone on the wall of different brands and price segments.
The glue is diluted exactly according to the manufacturer's instructions. It is also important to observe the temperature regime: cladding made at sub-zero temperatures is likely to fall off in the spring when the solution thaws.
After purchase, natural stone is calibrated: flaking or cracked stones are discarded, and high-quality stones are divided into small, medium and large fractions. Since the flagstone has different thicknesses (from 1 to 4 cm), before cladding, the flagstone is laid out on a horizontal surface, stones are selected that are suitable in size and adjusted if necessary.
Basic layout rules:
- larger slabs are laid out below;
- Narrow longitudinal cracks and gaps 2-4 cm wide should be avoided;
- serial ligation of stitches is required;
- keep the seams 5–15 mm wide.
Then the stones are folded in the reverse order.
The next stage is the actual laying of natural stone, in accordance with the previously completed layout. The glue and solution are diluted in two consistencies: thick and thinner. The liquid composition is applied with a brush to the back surface of the flagstone, thoroughly covering all irregularities. Thick mortar is poured onto the wall surface and leveled with a notched trowel. Then the flagstone is laid in place, pressed and tapped with a special rubber hammer for a better fit.
When facing with wild stone, you don’t have to match the individual seams between adjacent cobblestones; however, when laying granite or tuff tiles with clear geometric dimensions, you must strive for the minimum size of vertical and horizontal seams and ensure horizontal laying. To do this, cords are stretched along the wall to be finished every 40-60 cm, and the verticality is verified with a plumb line.
When facing the facade with large-sized granite tiles with special grooves, a mesh with special hooks is stretched onto the wall or metal profiles are mounted on which the hooks are secured. The hooks are inserted into the groove at the end of the tile.
When facing walls with pebbles, the selection of stones is simplified, but the labor intensity increases.
After finishing laying the wild stone, the seams are jointed and filled with special mastic for outdoor work. A correctly selected fugue color will make the seams between individual stones invisible.
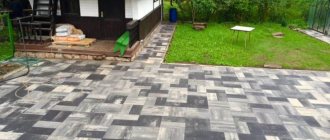
Laying methods depending on the type of base
Owners who plan to build paths in their summer cottage with their own hands need to choose the material for the future foundation correctly. It can be sand, concrete or crushed stone.
In addition, it is worth knowing about two types of masonry:
- Suture. The flagstone is selected so that 24 hours after paving, the gaps between the elements are no more than 1 cm.
- Seamless. Each stone fits closely to the other by cutting off excess parts with a grinder. The pattern of the path turns out more natural and beautiful than in the first version. However, the process is labor-intensive and will require a lot of time.
Having a plan of paths on the site, it is necessary to fix it on the ground. Straight paths are marked using rope and pegs. Winding ones can be marked using a watering hose, laying it along the edge of the intended path. Pegs are also driven in along the hose.
Excavation must be carried out to a depth slightly less than the required thickness of the road surface. This is done in order to compact the surface of the base of the track after excavation. The width takes into account the size of the curb, if any.
Natural stone paths can be laid in several ways.
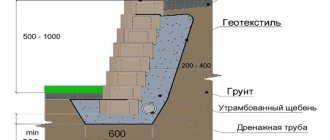
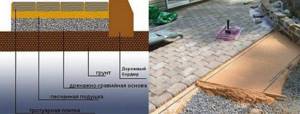
Geotextiles are laid over the compacted soil to prevent gravel from penetrating into the ground. A gravel cushion (10–15 cm) is poured onto it, which is carefully compacted. The next layer is medium-sized sand (5–10 cm), which is also compacted or spilled with water to compact it.
1 - compacted soil; 2 - geotextiles; 3 - gravel 10-15 cm; 4 - sand cushion 5-10 cm; 5 - natural stone 4-6 cm; 6 - border made of stone or concrete
When laying the stones, you need to press them down a little and beat them with a rubber mallet. The path should be at least 4–5 cm higher than the planning level of the land plot. A slope must be made, preferably on both sides of the path to drain water.
To prevent the stones from spreading to the sides, a strong border is made. In addition, it is advisable to fill the seams between the stones with a cement-sand mixture. To do this, you can make a cone from a thick bag. A small hole is made in the corner and the solution is carefully poured out so as not to stain the stones.
Such a path can be made without cement-sand mortar. The seams between the stones are filled with sand using an ordinary mop. The sand is simply swept from the stone into the seam and carefully compacted.
The sequence of installing the base under the stone in this option fully corresponds to the first. A layer of cement-sand mortar with a composition of 1(C):3(P) is laid on a compacted sand base.
1 - compacted soil; 2 - geotextiles; 3 - gravel 10-15 cm; 4 - sand cushion 5-10 cm; 5 - masonry mesh; 6 - cement-sand mixture 2-4 cm
When laying road stone, it also needs to be pressed a little into the mortar and adjusted with a rubber mallet. Such a path will withstand winter heaving of the soil if the groundwater is close to the surface of the site. But in this case it is good to provide drainage.
354a218a270046dc67849d957bd89443.jpe 746536e207e1c01c902d6f582e1e19e5.jpe
44edc26a99389baffd720d9cd584e48e.jpe
The stone can be laid on a sandy base according to the principle of the first option, but with a wider seam. Next, the seam is filled with fertile soil. Lawn grass is sown in it, which subsequently combines very beautifully with natural stone.
The base for the road surface remains almost the same as in the above options. It is advisable to lay another layer of geotextile on the compacted sand layer so that the gravel does not mix and does not go into the sand.