A children's hut on the street can be built from any available materials. A simple shelter for entertaining can be created even from plants and not just in the yard.
First, let's look at the photos of types of huts for children that you can easily make with your own hands:
How to make a hut at the dacha from fabrics: simple and stylish
At your dacha you can build a children's hut from fabrics. You will need the following materials:
- dense fabric with an area of 2 by 4 meters;
- several wooden support posts (installed at a distance of 2 m);
- rope 2.5 m long;
- To stretch the fabric, several hooks are inserted into the ground.
The rope is tied to wooden posts and tensioned. The fabric is hung across the rope. The corners are tied to hooks.
Hoop

You can build a tent from a hoop and a piece of fabric.
To work you will need:
- aluminum hoop or bent iron pipe;
- strong rope;
- piece of fabric.
The fabric is placed on the hoop, the edges are sewn. It is necessary to tie the fabric to the hoop so that it remains motionless. The tent is tied to a tree or other place.
The stepladder is used as a frame. You can cover it with colored fabric, a blanket and create a secluded place for children's entertainment. The staircase is placed in a convenient place on the summer cottage. The mobile design is easy to install and assemble. You can put up a tent in your house or in your yard.
Newspaper tubes
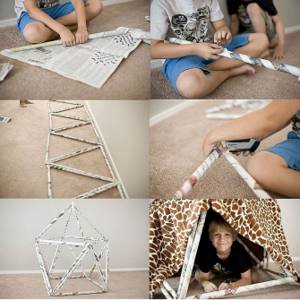
The frame is made of newspaper tubes and covered with fabric. The structure is moved indoors in bad weather so that the paper does not soften in the rain.
The edges of the paper tubes are stapled to hold them together.
Wigwam made of plastic pipes
A children's hut made of plastic pipes resembles a wigwam. The pipes are connected at the top with a rope, and arranged at the bottom. The result is a triangle-shaped structure. It is covered with fabric. The edges are hemmed at the top. A space for entry is created at the bottom.
How to build a hut from wood
From the branches
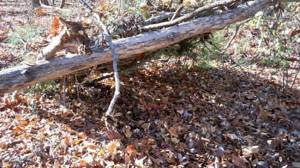
At the dacha it is easy to build a hut from branches for children. The shelter is built in several ways. You will need a lot of long thin branches and strong rope. The thickest branches are stuck into the ground and joined at the top to form a cone-shaped structure. The remaining branches are laid out on top, if necessary. The top is placed under the tree and tied to a branch for stability.
Another way: branches are placed around the tree. The same cone-shaped structure is created. The trunk is used as a support. The further structure resembles the previous method.
Video on how to build a hut for children from branches with your own hands:
From the boards
A strong and durable hut is assembled from boards. First, a frame is assembled from long bars up to 5 cm thick. For cladding, a thin board of any width, approximately 1 cm thick, is used.
Self-tapping screws are used to fasten parts.
Paint or varnish is applied when the structure is ready.
- measuring device and a simple pencil;
- wood saw;
- screwdriver
How to build a hut from boards for children:
- 4 bars are placed in the corners and connected at the top;
- a connection is made into a groove according to the markings so that the angle between the supports is the same;
- the connected supports are placed in the desired position;
- the boards are attached to the corner beams in a horizontal position parallel to each other;
- the ends are trimmed to create a regular triangular structure.
The finished structure is varnished several times. A new layer is applied after the previous one has dried.
The structure will stand in the yard at the dacha all year round. You can move it if you do not bury the supports in the ground.
Gable hut
One of the options:
A gable hut made of boards is easier to build. The supporting frame is covered with fabric on top. Edged boards 50 by 20 mm thick are used for construction. Self-tapping screws are used for connection.
- 10 beams 2 m long are cut;
- 2 rectangular frames are made;
- marks are made on the side posts at a height of 60 cm from the ground;
- the remaining beams are fastened along these marks;
- at the same distance from the first beams, 2 more pieces are attached in parallel;
- the frames are connected at the top and moved apart at the bottom;
- the fabric is stretched over the gable structure and secured at the bottom with a stapler.
The structure will be quite strong. You can put it in front of the country house. The hut is easy to disassemble. The fabric does not need to be removed, just connect the lower ends of the beams. The product is placed under the wall or put away in a convenient place.
Lean hut
A shelter is made with the 1st inclined wall acting as a roof:
- 2 trees located nearby or 2 thick bars dug into the ground are used;
- the crossbar is installed on top, screwed with self-tapping screws or hammered in with nails;
- several poles are applied to the crossbar at an angle;
- the fabric is stretched over the frame, tied to boards or nailed with a stapler.
You can create an original deck using pine branches instead of fabric. The frame for this is strengthened with several horizontal crossbars so that the structure can support the weight of the flooring.
Video on how to make a lean-to hut for a child with your own hands:
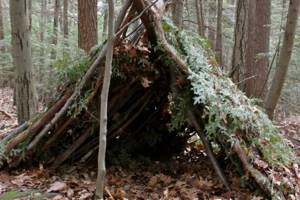
A hut made of branches. Types of huts made of branches and their construction
Communication with nature has always been useful for any child. In Soviet times, schoolchildren often went on hikes and spent time in tents. But it is worth noting that the era of forest tourism is no longer so widespread, since computers have appeared, distracting the modern generation from the joys of life in nature. It is for this reason that parents often have questions about how to make a hut correctly. After all, this is how you can tear your baby away from the monitor.
Definition and purpose
A hut is an artificial structure that can be quickly erected in any camping conditions or just for fun in your yard. You can use boards, branches or tree roots as materials.
Such devices have always been made by mushroom pickers, hunters or gamekeepers to protect themselves from sudden rain, as well as in cases where they had to do without the benefits of civilization for a long time.
Articles on the topic (click to view)
In addition, many children often build them for their games. It is worth noting that with great pleasure they not only build structures, but also spend a lot of time there, imagining that they are in the headquarters of a secret organization or the control room of a spaceship. Modern children need to be taken out into nature as often as possible so that their eyes can rest from the TV, and their bodies can rest from sitting for a long time in one (usually incorrect) position.
The hut will interest the child, and communication in nature will improve the baby’s well-being and teach him useful skills. It’s quite easy to build a hut for children with your own hands.
Main types
There are several types of huts. All of them will differ in their design depending on the simplicity, as well as location. There are the following options:
- Single pitch hut. This is the simplest structure that can be made from branches and leaves that will rest on a tree.
- Gable. Externally, this variety will be very similar to an ordinary tourist tent. It consists of a frame, which is covered with branches, moss, and spruce branches.
- Circular. The most difficult option is in the form of a tent. Outwardly it will be very reminiscent of an Indian wigwam. It is necessary to build around a tree or a stake driven into the ground.
There is also another type that is installed in a recess below ground level. This is a dugout, the living part of which is located in an insulated and covered pit.
Composition of structures
Absolutely any hut consists of certain elements . This is just the basis, which can be supplemented from your own experience:
- Skeleton This is a frame that must be assembled from poles.
- Lining material. Typically any moss, straw or branches are used.
- Fasteners This can be done using tape or nylon threads. On a hike, they usually use available materials: freshly cut tree bark, dug up roots and bundles made from grass.
These structural elements will be required in all types of huts. It is worth noting that the lining material should be quite reliable. Otherwise, it will let water in when it rains.
Making buildings
While hiking, the question may arise about how to build a hut in the forest. Therefore, it is better to understand this matter as early as possible.
Each type of hut has certain assembly stages that should not be disturbed so that it does not fall apart too quickly. To begin with, you can try to assemble a lean-to structure, since this is the simplest structure that can be erected within a few hours.
Lean hut
For assembly, use various branches that can be found nearby. Usually such huts are built in the forest. What the assembly looks like:
- First you need to find a high, dry place. The structure should stand at a distance of several meters from a thick tree with strong branches.
- A strong pole approximately 2.5 m long should be cut down. It will be laid on the branches of the tree so that the height from the ground surface is about 1.5 m.
- Using strips of bark, roots or tape, it is necessary to tie the ramp poles, which will rest against the ground, to the made crossbar.
- The resulting frame should be tightly covered with thin branches, foliage, and then spruce branches.
- At the ends of the hut it is necessary to hammer the pegs well, and then lay the branches tightly.
- In order not to lie on the cold ground, you need to build a warm floor using spruce branches or ordinary grass. The insulation layer should be approximately 30 cm so that the person does not freeze.
To prevent it from being cold inside the canopy, it is necessary to light a fire near the entrance, behind which a reflector is installed - a fence made of stakes driven into the ground, as well as branches intertwined with each other. Thanks to this structure, heat will pass inside the structure.
How to make a hut for children from different materials
You can dig 4 wooden beams into the ground or use nearby trees. A strong rope is pulled around the trunks. This creates a rectangular base onto which you can stretch the fabric on top and sides.
You can make a hut for a child with your own hands at the dacha from a variety of materials and plants.
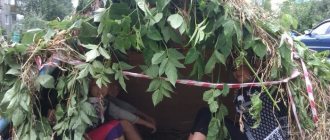
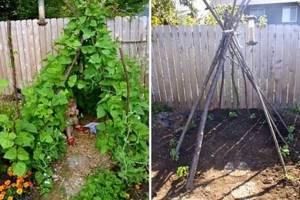
From living leaves
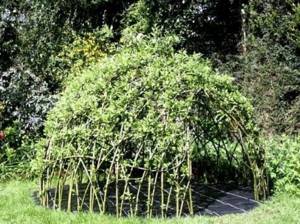
Living gazebos are created from garden plants. You can connect willow branches to each other. They take root well in the ground and grow quickly.
A green halabuda can be made from a wooden frame and climbing plants. During the flowering period, children can have fun in a beautiful shelter made from natural materials.
From sunflowers
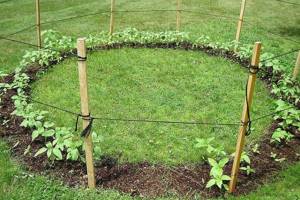
The structure will grow before the eyes of children. Sunflowers are used as support. In the spring they are planted in a circle, leaving a place for shelter in the center. The area inside the circle is not planted with anything. It would be good if grass grew in this place. The tops of the sunflowers are connected with a wide ribbon. A thin rope will damage the plant.
The fabric does not stretch if the leaves provide good cover. A blanket or travel mat is placed on the floor to protect against moisture and cold.
Attached hut
Near the tree you can build a shelter with support from long branches. A rectangular structure covered with fabric leans against a fence, wall or other vertical object. It turns out to be a single-slope attached hut.
What is a hut?
A hut is a house that is located on a tree or on the ground in the bushes. In the summer, my friends and I often build huts not far from my house. Now we have five huts.
Where does the construction of a hut begin? First we decide where we want to build a hut, on the ground or on a tree. Then we look for bushes or trees near the house. After we decide on a place, we completely clear it, remove all branches and leaves, and build a roof from branches. Then we begin to arrange the hut, placing various objects there that we bring from home or find on the street. After this, the hut becomes very cozy, just like home.
After we set up the hut, we start spending time with each other there. Sometimes we just sit and talk, sometimes we climb a tree. In one hut we have a swing, we take turns riding on it. But in the hut we not only relax. In order for the hut to survive for a long time and not collapse, you need to take care of it. I go there every day and check for branches and leaves. If there are, I remove them with a large branch, which we use as a broom. In some huts we have a small vegetable garden. Blackberries and bluepod mushrooms grow there. There are always chores to do in the hut. We don’t sit there idle, we are always busy with something.
To protect the hut from destruction, it is better to put up a fence. This will help drive wild animals away from the hut. If the hut has a roof, then you need to make a good reinforcement of the roof in case there are a lot of leaves or snow. In winter you can also build huts, but I rarely do this.
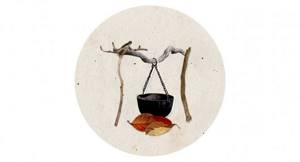
My coolest hut is in the bushes on the ground next to a tree not far from my house. It's still unfinished. We started building it with my friends Nastya and Sasha. First I found a good place near my house. Then we cleaned it up well. We did not make a roof, but there is a small roof when moving from one room to another in the hut. There are only two rooms in our hut. This is a nursery and a hall. But we are planning to add a kitchen and a bathroom. My friend Pasha brought a sofa to the hut. Another item we have there is a cauldron - this is a large saucepan without handles. We cover the cauldron with branches and red leaves and pretend that it is a fireplace with a fire. Over time, we want to make a wire fence there to keep wild animals away, since this summer, for example, a fox came there.
DIY children's hut in the forest
A gable hut is built in natural conditions.
The horizontal crossbar is placed on vertical supports. Several long straight branches are placed on the crossbar at an angle on both sides. Horizontal crossbars are attached to them in parallel to support the weight of the deck.
Leaves, moss, branches, spruce branches and other suitable materials that can be found in the forest are poured on top.
But you can build a hut with your own hands in the forest using other methods.
Tent hut
The tent shelter is made from thin long rods without extra branches and leaves. They are lined up in the shape of a cone, tied to each other with a rope, and attached to the trunk. The top of the rods is covered with leaves, branches, moss, grass, etc.
The fire is lit if the size of the structure is large enough. A hole is made at the top so that the smoke comes out through it. The flame should be small; it is better to use leafy branches for kindling.
Shelter in a recess
A temporary shelter is made in a hole in the ground. It turns out something between a dugout and a hut. The recess is lined with branches on top. Grass, leaves, reeds and other covering material spread upward. The same is done inside for insulation.
Winter shelter
In winter it is easy to build a hut in the forest. You need to have warm clothes and a sleeping bag with you so as not to freeze while spending the night or having fun in such a shelter.
- a location on a hill is selected, snow is removed;
- Coniferous spruce branches and several long strong branches are harvested.
- spruce branches are removed from the lower parts of the trees;
- the needles are laid out on the floor so that the branches do not stick out;
- long sticks opposite each other in the shape of a rectangle around the future shelter;
- in parallel, long strong branches that can withstand the shelter are laid out on a rectangle;
- Coniferous branches and spruce branches spread over the frame.
The warm structure allows you to hide from the winter cold and even organize an overnight stay in the forest.
Gable hut
Let's look at how to make a hut in the forest with your own hands with a gable roof. Cut down a couple of strong poles with spears at the ends. Drive the sharp ends into the ground at a slope. Bring the stags together at the top. The result should be the shape of an isosceles triangle with a base in the form of soil.
Place the end of a long pole on the slingshots at the top point of the structure. Secure the connection with rope or wire. Place the other end of the pole against the soil.
By following these steps, you can get a stable hut frame. All that remains is to prepare the ribs of the structure. Place all kinds of branches on both sides of the inclined pole, clearing them of leaves and protruding twigs in advance. If desired, connect the edges of the hut with a cross rope.
Place a layer of spruce branches or coniferous tree branches tightly on the formed walls of the shelter. The main task is to make the walls monolithic, without cracks or holes. Place bedding inside the hut. Light a fire in front of the shelter entrance.
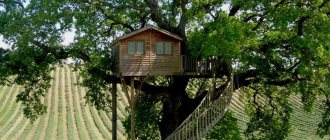
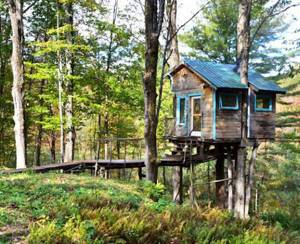
Tree house
Photos of treehouses:
A suitable tree is selected. The trunk must be strong, it is advisable to find a triple branching closer to the base.
First, the height of the future shelter is determined. The structure on the tree must be reliable, so it is made according to the drawing from durable materials.
Useful video on how to draw a hut:
- it is necessary to create a rectangle of strong boards on which to lay the floor;
- 4 bars 50 by 50 mm are placed vertically in the corners;
- the boards are attached to the beams in parallel. This is how walls are built;
- for strength, the walls are sheathed with several boards diagonally;
- when the walls are ready, a shelter is placed on top;
- There is a rope ladder clinging near the entrance.
Wooden parts are fastened with nails for reliability. Self-tapping screws are not recommended because they cannot support weight.
Video on how to build a treehouse:
How to make a treehouse with your own hands
The second step after installing the beams parallel to each other is to install additional supports. They should be placed on adjacent sides of the trunk. They should be placed perpendicular to the previous two. They should also be higher and ultimately form a cross. At this stage of construction work, it is important to think about safety. It is recommended to tie the beams that will be attached to the tree with cables or ropes to the upper branches.
After this stage has been completed, you can begin installing the rectangular frame, which will become the basis for the floor in the treehouse. The supports for such a platform will be four beams installed lower than the first two, parallel to each other. In addition, the installation of these wooden supports must be carried out at an angle of 45 degrees.
The next step in the construction of the facility will be the arrangement of the floor. In order to build it, you can use any wood products. It is recommended to use ordinary nails as fasteners. At the same stage, you need to think about placing a place for a hole through which in the future it will be possible to get into the treehouse.
How to make a hut at home: not complicated ideas
Furniture is used to build children's shelters at home. Large cardboard boxes will make the structure stronger.
Option 1
- chairs are placed in a circle so that they do not fall on children;
- the frame is covered with a large blanket;
- an open hole is left for passage;
- the blanket is pressed on top by books and other heavy objects;
- a sign with the name can be hung at the entrance;
A miniature fort can be built if there is enough space in the room.
Option 2
A small house is made from pillows and a blanket. It is more convenient to use sofa cushions. The densest materials are used to build walls. To keep the structure stronger, the pillows must be placed and not placed on the wide side.
The top of the structure is covered with a blanket. A warm blanket or pillows are placed on the floor. The back of the sofa can serve as a support for such a structure. Pillows are placed on the sides and covered with a blanket on top.
Option 3
A real nursery is constructed from indoor chairs, clothespins and sheets.
- the blanket is laid out on the floor;
- a chair is placed at each corner;
- a sheet is clung to the chairs.
A soft blanket is used for greater comfort. The shelter is placed in this form or reinforced around the perimeter with pillows and chairs.
Option 4
A miniature wigwam can be built at home.
- chairs are placed around the perimeter;
- the sheet is attached to the backs with clothespins;
- a stick is placed vertically in the center so that the sheet rises higher and stretches;
- pillows, books and other heavy objects are used for strengthening.
Various flashlights, laptops, toys are transferred into such a structure.
And finally, some more pictures of children’s huts:
Summer has come - the time when adults and children go to nature to take a break from the bustle of the city and enjoy clean air. Those who want to experience nature more deeply do not take tents with them, but prefer to build a hut on the spot. However, not all people have this skill - everything happens for the first time, and if the company does not have people who have already built a hut before, then the process without additional information can drag on and ruin the whole mood.
Depending on the means available to build a hut, the methods vary. In this article we will look at options for building the most commonly used shelters in nature, namely, a halabuda, a hut in the forest, a house made of branches, a house for children and an Indian hut.
Hut in the snow
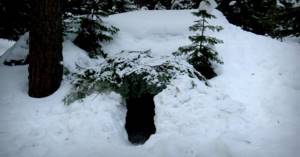
How to make a hut in the forest with your own hands from snow? Look for a large snowdrift on a hill. Dig a trench in the middle. Compact the walls thoroughly with your hands. Place even branches close together on the floor of the recess and make a covering of coniferous spruce branches. Place transverse poles on the walls of the snow hut. Cover the roof with pine branches and then with a thick layer of snow. Make sure there are no gaps in the structure. Cover the entrance behind you with the same snow so that the structure is warm and cozy for an overnight stay.
Halabuda
Halabuda on a tree is a real dream of many adults and children. Depending on the goals, time spent and execution, the halabuda can be either a temporary or a strong building that will last longer than one season and is ideal for a mini-headquarters for children. If you are planning to make a halabuda for yourself, then you will get a wonderful corner for close communication with nature.
If you decide to build a tree house for your children, then it is very important to choose the right materials. They must be as light as possible , which means the use of iron and cement is excluded. The following materials can be used for basic construction:
- Various weavings (from vines, reeds, young shoots);
- Strong ropes;
- Plywood;
- Boards.
The selected tree on which the house will be placed must be stable, strong, fairly tall and spreading with strong horizontal branches. Before building a house, the tree needs to be tested. To do this, several people must climb to the planned level of the halabuda , whose total weight will be approximately the total weight of the children or people who will use the halabuda. Next, you should jump on the tree and shake it, simulating a storm.
Pay attention to the stability of the tree. It should not wobble or crack. If the conditions are met, then proceed directly to the construction itself. If you need the house for one season, then you can build only the floor and roof. In such a building, a strong net can serve as the floor, and polyethylene as the roof. If you are planning to make something like a house, then the halabuda should be carefully planned and, ideally, made as a model before construction. After this, the main parts of the halabuda can be constructed either directly on the tree from the very beginning, or on the ground and raised onto the tree later.
Hut
Now let's look at how to make a hut in the forest. Trees, branches, and leaves are used to build the house. The easiest option would be to use a tree felled at an angle, which can be used as a support for the building. Before erecting a hut, you should make sure that the tree is securely fixed and will not fall on you under the weight of the branches. The construction of a hut involves weaving additional branches into the branches of a tree to protect it from the wind. If there is no fallen tree, then you can cut down a small tree and tie it by the base to the bough of a large tree, and then cover the gaps with other branches.
Similar articles
In the warm season, if you have a sleeping bag, the structure can be single-pitched - only one part of the structure is closed, which is a canopy at an angle of 45-60 degrees. For the construction, you can use a pole consisting of a strong long branch placed between the branches of two adjacent trees. Further, as in the case of a fallen tree , large branches lean on one side at an angle. The top of the canopy can be sprinkled with leaves. Such a hut reflects heat well from the fire and protects from the wind on one side. If necessary, it can easily be expanded into a full-fledged house from additional branches.
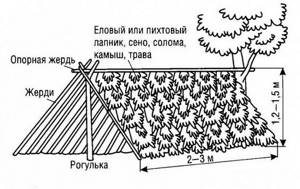
Lean hut
How to make a hut in the forest with your own hands? The simplest option is to organize a lean-to shelter. It is enough that there is access nearby to spruce branches that can be plucked from low trees.
Proceed according to this scheme:
- Look for a tree fallen at an angle. Make sure the soil in this area is dry. Assess how stable the trunk is, which will serve as the basis for the future structure.
- Cut out a whole row of strong, even poles about 2.5-3 meters long. Place such crossbars at a slope on a fallen tree.
- Cover the formed frame with spruce branches. Move from bottom to top. This way, water will flow down the flooring during rain without getting inside the hut.
- To avoid having to lie on cold soil, cover the space under the pitched roof with the same spruce branches, dry leaves or grass. It is advisable to make the pillow about 30 centimeters wide. The heat emanating from the body will be retained in the air layer and will not go into the soil.
House made of branches
Such a hut can be built both in the country and in the forest. There are several options for constructing such a shelter, but, in any case, you will need a lot of long branches and strong rope. In the first case, the main strong branches are stuck into the ground in a cone shape and firmly attached to each other at the top with a rope. After this, others are added to the supporting branches, but only if necessary. If the building is located in the forest, then it is advisable to tie its top to a tree to give it stability.
The second option for building a house from branches differs in that the branches will be located around the tree trunk, which will serve as its support. Otherwise, the construction method is similar to the first, with the exception of the absence of the need to tie the top of the hut, since the support is already there.
Children's hut
On vacation, adults want the children to have fun and, at the same time, so that they do not run away and are nearby, in sight. For this purpose, you can build a house with your children, which will then become the main playground.
All of the above methods are suitable for a children's hut. In particular, you can build a halabuda on the ground, and not on a tree. Such a halabuda can be constructed from any available means. If you are at the dacha and don't want to bother, you can simply take out 2-6 chairs (depending on the number of children, so that everyone can fit inside) and cover them with a blanket or several, interlocked with clothespins. Alternatively, you can stretch the fabric for the halabuda, using branches of a low-growing tree to secure it.
The other options listed above can also be simplified, since for children the very fact of having a shelter is more important than often its design or functionality. However we should not forget that children are restless and often awkward, which means that the structure itself must be perfectly fixed so that children do not inadvertently knock it over while playing.
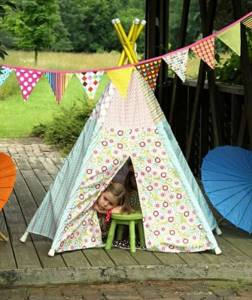
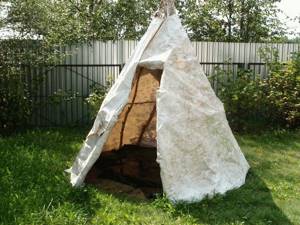
Indian hut
The main difference between a Tipi, or Indian hut, is that in the center of the structure there is a hole for the smoke from the fire to escape. You can spend several weeks in such a hut, or even more if waterproof fabric was used during installation. In the case of constructing an Indian hut more as a short-term decorative element than a full-fledged place to live, ordinary fabric will do. For construction you will need the following materials:
- Beams are large strong branches without leaves or branches;
- Rope for fastening;
- Textile;
- Paints for painting a hut.
Building such a house is quite simple: a regular hut is built using beams without additional branches. Next, the beams need to be covered with a single piece of fabric, leaving the top of the hut uncovered. After this, the fabric of the hut can be painted, imitating traditional painting. In real Tipis, the lower part symbolizes the earth, and the upper part symbolizes the air. The drawing can be chosen based on this. If you are vacationing with children, you can entrust them with painting the hut. This will help children feel involved in the process and will captivate them for more than one hour if the structure is quite large.
Outdoor recreation is always a great time, especially when you know that you will definitely not be left homeless under any circumstances. With the skills to build a hut, nothing will hurt you to relax on a hike being light, without a heavy bulky tent on your shoulders. At the dacha, such a skill will help to captivate children and give parents a break, which will allow everyone to spend their free time with pleasure.
Children love to retire to play in secluded places, which can be located in various parts of the summer cottage. The shelter chosen by the child is not always liked by adults. Some parents simply shout at their children, while others suggest building a hut, but only where it would be appropriate and safe. The construction of a temporary shelter will certainly interest young summer residents. While having fun, children will get their first experience in building a hut, which will definitely be useful to them in adulthood. The choice of hut design depends on the availability of materials and time for its construction. There are many options for constructing a hut, ranging from classical methods used by people since ancient times, and ending with original ideas inspired by the objects and plants around them.
How to choose the right place?
A person, being in the wild, very carefully chooses a place to build a temporary shelter. It is prohibited to build a hut near mountain rivers, in lowlands, in open clearings near single trees, under rocky slopes, etc.
At the dacha, of course, choosing a place is much easier. Usually the structure is placed near fences, trees or dense plantings to protect the inhabitants of the hut from drafts. It is desirable that children can easily reach their shelter without going far into the garden. A caring parent's heart will tell you where it is best to make a hut house for your beloved baby.
Stage 2
At the next stage, pick up a shovel: dig a ditch in a circle one bayonet wide, about 2 m in diameter and approx. deep. 40 cm. At the same time, leave a place that will later serve as the entrance to the hut. So that children can quickly and easily climb into and out of the hut, the opening width should be approx. 70 cm.
Tip: to get an even circle, stick a small straight stick into the ground in the center of the future hut and tie a rope to it. Tie the other end of the cable to the shovel so that the distance between the stick and the shovel is at least 1 m. Guide this “compass” around the stick and, at a distance of several centimeters, stick the stick into the ground again to mark the line of the circle.
Options for huts for middle-aged children
All huts can be divided into three groups:
- free-standing structures (gable, single-slope, wigwams);
- attached-type shelters (single-pitched, wigwams);
- dugout huts located in a recess.
If you were building a temporary shelter in the forest, your choice of design would be determined by the type of terrain, weather conditions, and time of year. The family usually spends time at the dacha in the summer, so to build a simple shelter it is better to choose free-standing structures or attached ones.
Teenagers who vacation in villages with their grandparents love to build dugout huts. Children keep the location of the dugout hut in the vicinity of the village a secret, but vigilant adults should always know where and what their charges are doing, but not show it to them explicitly. For a dacha, the option of constructing a hut-dugout is not very suitable.