- Barbecue stoves: functional and decorative country attribute
- Brick barbecue oven: determining the location
- Tools and materials for laying brick barbecues
- Calculation of the amount of materials for a brick barbecue
- Preparing the base for a barbecue oven
- Masonry mortar for outdoor brick barbecue
- Arranging a barbecue oven: the key to reliable and durable masonry
- Forming the bottom and erecting the walls of a brick barbecue
- Optimal brick barbecue projects for a summer cottage
- Diagram of an open barbecue grill
- A simple brick barbecue complex for beginners
- Barbecue project with pipe and work surface
- Barbecue ovens: photos of the best solutions for a summer cottage
- Video: barbecue ovens, street barbecue options
Barbecue stoves: functional and decorative country attribute
A barbecue oven is the dream of most summer residents. What could be better than relaxing in the fresh air with the whole family or a group of friends? And dishes cooked over an open fire undoubtedly differ in taste and are healthy. The article provides useful information necessary to understand the details of making a barbecue oven with your own hands.

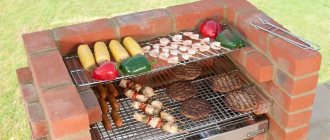
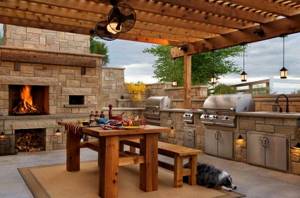
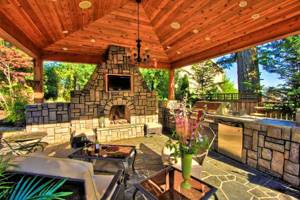
A barbecue is not only a device for preparing delicious dishes, but also a decoration for the area.
Types of furnaces
Let's figure out how the designs of barbecue, barbecue and grill differ, the difference between them is not big, but still present:
A barbecue is a metal or brick box with a grill or skewers installed on top. The height level is not adjustable, resulting in temperature dissipation just below the grate height.
Natural draft is created by holes cut in the barbecue box. Cooking of food occurs thanks to the heat of the coals coming from below, so you need to carefully monitor the side facing the hearth, turning the skewers in time.
Food in the grill is also cooked over coals, laid out on a grid or strung on skewers, but the oven is in any case locked with a lid. Thanks to this, foodstuffs are cooked evenly because they are fried on all sides at once. To burn the fire in these furnaces, channels are used to inject air and remove flue gases.
A barbecue roaster has one to three walls around the hearth, which prevent the heat from being dissipated by gusts of wind. The walls, when heated, create additional sources of heat, thus organizing uniform cooking on all sides, so food cooks quickly.

The risk of overexposure to food, unlike a barbecue or grill, is insignificant - the absence of a lid implies visual control over the cooking process. Adjusting the height of the skewers or grates above the fire also helps with this.
The barbecue does not contain air supply channels, so the air does not move, however, a chimney pipe up to one and a half meters high is provided for the removal of flue gases.
The last option is the most appropriate, so next we’ll look at how to make a barbecue oven with your own hands.
Brick barbecue oven: determining the location
Before you start building a brick barbecue with your own hands, you need to decide on its location. Here you need to take into account that the building should be as far as possible from the neighbors’ site. It is also necessary that there are no flammable structures, wooden buildings, tree planting, etc. nearby. It would be advisable to select an area that can be provided with water supply, electricity, and on which a gazebo or recreation area can be built next to the structure.

It is not advisable to place a barbecue very close to the house, or next to flammable objects.
As a rule, the presence of a barbecue implies that there will be a constant crowd of people near this device. If you decide to install a brick barbecue in a gazebo, landscape experts recommend not planting the surrounding area with grass or flowers. It is better to fill the area with decorative gravel, stones or tiles. In this case, the area located near the barbecue will have a neater and neater appearance.
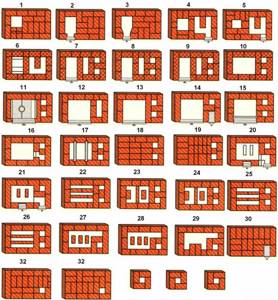
Various brick barbecue ovens: projects, photos, drawings
When you can’t settle on just one brick barbecue project, photos, diagrams, drawings of barbecue masonry can help you decide on your choice.
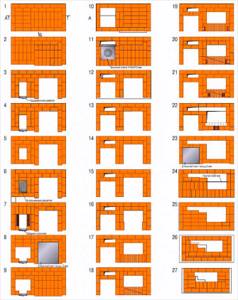
Study the selection of illustrations we have prepared to understand which of the projects you prefer. Pay special attention to the complexity of the proposed design: will you be able to carry out this or that project with your own hands?

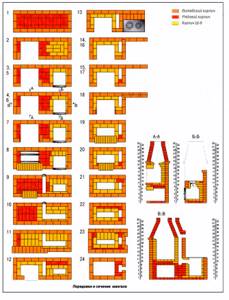
Photo 6. A fragment of instructions showing how to build a barbecue oven out of brick. A barbecue laying procedure like this makes the work much easier, especially for those who have never built a brick barbecue with their own hands. Drawings, so try to choose in order.
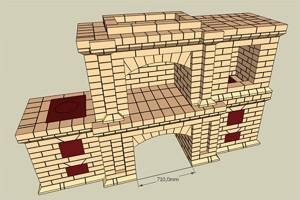
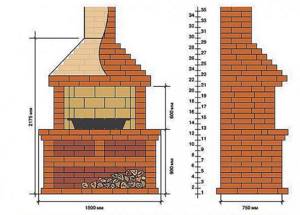
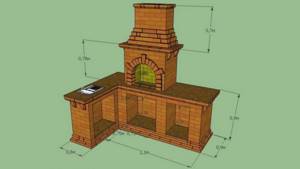
Photo 7. Graphic diagram of a brick barbecue. It will be quite easy to build a brick barbecue for your dacha with your own hands using this project.
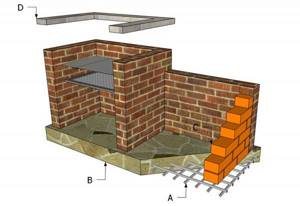
Photo 8. Computer model of a brick barbecue: order and construction diagram. It will be easier to build a barbecue with a more detailed diagram, but even such a drawing speeds up the construction of the structure.
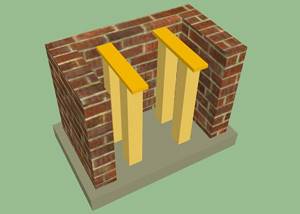
Photo 9. Computer-generated approximate diagram of a brick barbecue. Masonry drawings attached to such a plan will give accurate information about the size of the structure and the procedure for its construction.
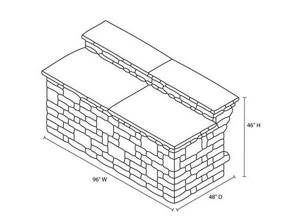
Photo 10. Schematic sketch of a pedestal for a barbecue project. Drawings with dimensions are necessary, no matter what type of stove you choose - stone or brick, small or large, complex in design or not.

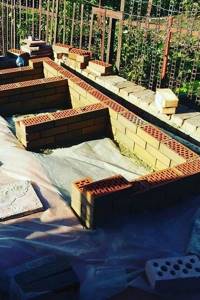
Photo 12. A novice stove maker lays barbecue bricks in rows with his own hands. The photo was taken at the stage when the foundation is already ready and several rows of bricks have already been laid.
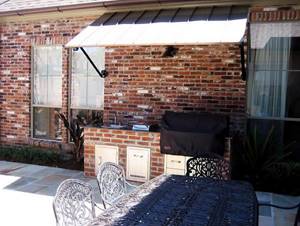
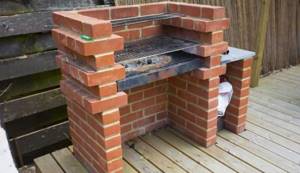
Photo 13. Small outdoor barbecue made of brick. The drawings of such a structure are extremely simple, however, if you decide to build a brick barbecue with your own hands, an order that describes in detail the laying of bricks is also desirable in this case.
h
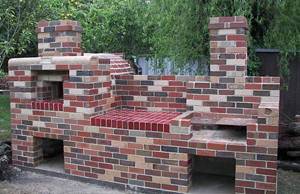
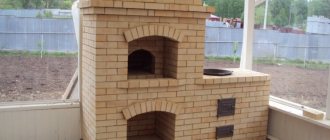
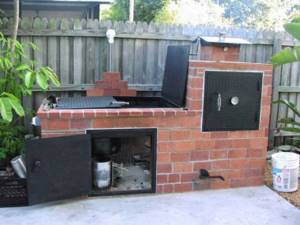
Photo 14. Brick stove with two pipes. On our website you can see the most unusual barbecue projects. A photo of this model, for example, shows that a stove for barbecue and shish kebab, built with your own hands, can resemble the outline of a stove from a Russian hut.
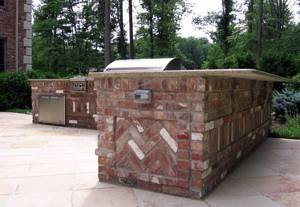
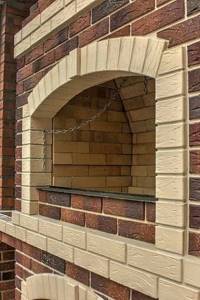
Photo 15. There are a wide variety of types of barbecues for a brick cottage. The photo shows an elongated model folded at a corner. It is noticeable from the side wall that the original brick barbecue laying scheme was used.
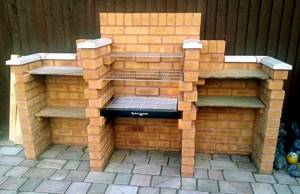
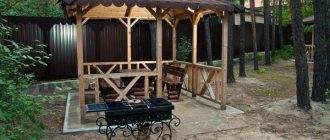
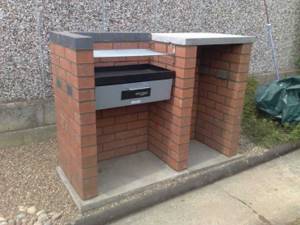
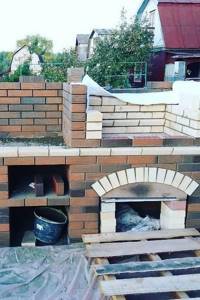
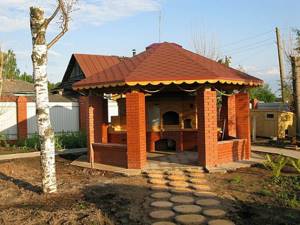
Photo 16. Near the plank fence there is a cottage barbecue made of bricks, built by the owner of the site with his own hands. This structure consists of three simple sections. It is clear that a rather unusual layout of the brick barbecue was used.
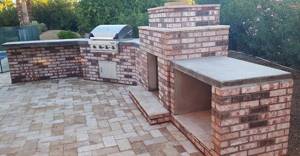
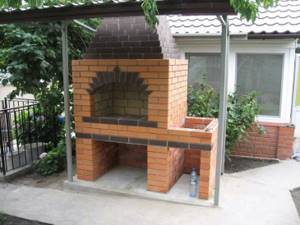
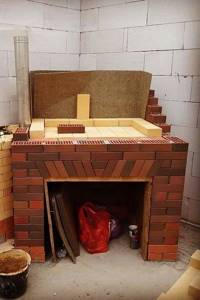
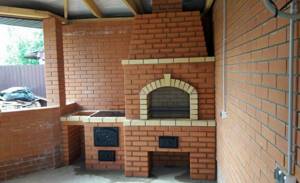
Photo 17. Brick structure for preparing various dishes in the open air. To build even such a relatively simple barbecue oven with your own hands, ordering the brickwork may be necessary.
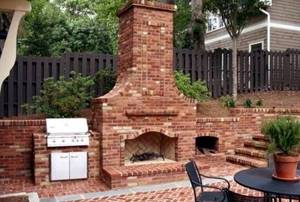
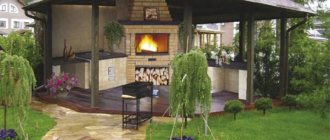
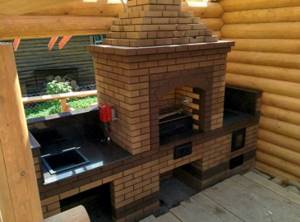
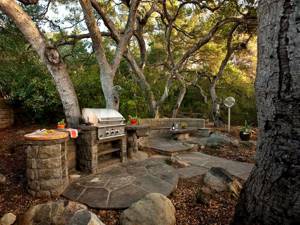
Photo 18. Backyard of a country house with a barbecue area and a stove with a large chimney. To build such a rather complex brick barbecue with your own hands, diagrams with detailed dimensions and sequence of actions are simply necessary.
Tools and materials for laying brick barbecues
To build a barbecue oven for a summer house, you will need tools for laying mortar, a plumb line in two dimensions (vertical and horizontal), a level, a rubber hammer, a grinder, and a saw for wet cutting bricks. You should also prepare the appropriate disks. A sieve (for sifting sand and clay), buckets for mixing the solution, and nylon thread for ordering are useful as auxiliary tools.
Homemade hot smoked smokehouse: (read more)
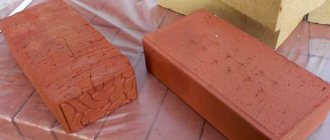
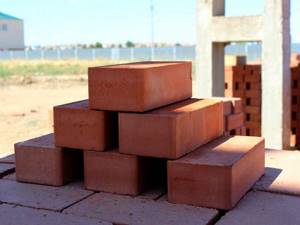
The materials you need to purchase are red and fireclay bricks, ready-mixed masonry or clay. For the foundation you will need cement, gravel, river sand and reinforcement (for laying in the base of the structure). The amount of materials is determined by the size of the future barbecue. To build the formwork you will need boards.
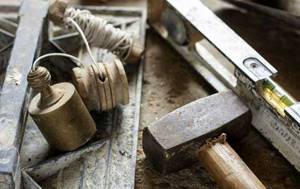
To build a barbecue you will need a hammer, a level, a grinder and a plumb line.
On a note! When purchasing materials, be sure to reserve 15%. This is the volume that can be lost in the event of a defect during construction.
Depending on what the brick barbecue oven project involves, you may additionally need steel sheets, doors, dampers, grates, blowers, mounts for skewers and other oven castings.
Calculation of the amount of materials for a brick barbecue
When the foundation is strengthened, you can proceed directly to the laying. To avoid delays in construction due to shortages of materials, calculations of consumables should be carefully carried out. The first thing that will help in laying a brick barbecue is drawings of the future structure. When planning the size of a building, it is worth considering not only the possible free space, but also personal preferences. The oven must be suitable for your height. In addition, it is necessary that the working surface combines convenience and safety of use.
Next, you should take into account the dimensions of the brick: length is 25 cm, width is 12 cm and height is 6.5 cm. The width of the mortar joint must be included in the calculations. It is quite natural that the amount of brick is determined both by the size of the stove and its functional features. In addition, it is necessary to take into account the type of chimney and the height of the chimney.
When calculating the number of bricks, it is necessary to take into account the thickness of the mortar joint.
Making a barbecue oven out of brick with a chimney
Let's look at step-by-step instructions for laying a brick barbecue.
Required Tools
- Master OK.
- Rubber mallet.
- Basin or trough.
- Construction mixer or shovel for mixing.
- A long strip with a flat surface on which you can check the quality of work as it is being performed.
- Roulette.
- Building level.
Material selection
For the street, facing and solid ceramic stones are suitable. It is recommended to use fireclay indoors - it can withstand high temperatures better and conduct it worse. The furnace cools faster outside than inside the house.
Preparation of masonry mixture
Mix cement with sand in a ratio of 1:3. To make the mass more mobile, you can add lime or a special additive that increases plasticity.
There is another recipe for masonry mortar. Clay is poured into a basin and filled with water. After 5 days it is mixed, adding a little sand and cement.
Installation of walls
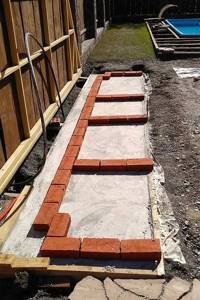
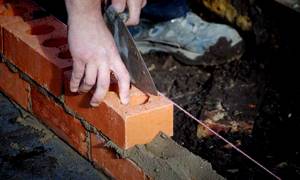
It is better to first lay out the first row without mortar, as shown in the photo gallery. This is necessary to ensure that the dimensional calculations are carried out correctly and the number of prefabricated elements corresponds to the length and width of the entire structure. To mark the seam, leave 1 cm gaps.
The base is a reinforced concrete foundation. The bricks are laid lengthwise. Each subsequent row is shifted so that the seam falls on the center of the product located below. It is difficult to break ceramics into two equal parts. It is better to make a cut using a grinder with a concrete disc. The solution is laid in an equal layer of 1 cm. To check, use a reinforcing rod with a cross-section of 1 cm or an order - a lath with dimensions marked on it. Every three tiers are checked with a tape measure and a building level. To correctly align the prefabricated element, tap its sides and top with a rubber mallet.
Instagram @besedkibarbecue
Instagram @ofensteinbbq
If it is not possible to bandage the corners, they are reinforced with wire or perforated tape.
Installing jumpers
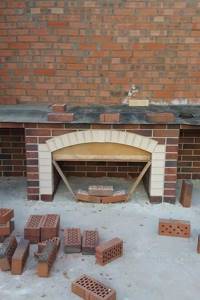
When the walls reach the calculated height, horizontal supports are placed on them under the hearth and tabletop.
Methods for creating supports
- The row is placed on a metal plate embedded in the sidewalls. You can make a groove in the blocks and place them on steel angles, folded sides together. The sides should face up. They are placed in gutters facing the bottom. A profile with a cross-section of 45x45 mm has sufficient strength. Its edges should not protrude beyond the masonry. The depth of the slot is taken with a margin - steel expands when heated and can destroy ceramic products.
- Hollow products are strung on a reinforcing rod or frame and fastened with a cement-sand mixture.
The spaces between the jumpers can be used to store firewood or kitchen utensils. Drawings and photographs of a brick barbecue will help you find a solution for how else to use this area.
Instagram @kamin_mangal_moscow
Instagram @ofensteinbbq
Firebox layout
It is located at the level of the jumpers. The bottom is supported by steel profiles. They are embedded in the walls. The hearth is a vault or rectangular chamber made of fireclay bricks. The binder is a special heat-resistant solution. It is sold in powder form. To properly dilute it with water, you need to study the instructions. The bricks are placed horizontally in two rows with bandaging protecting the bottom seams. Instead of bricks, you can make a concrete screed underneath.
The walls of the chamber are erected simultaneously with the external ones - this makes it more convenient to carry out work. A gap of 1 cm is made between them. It protects the outer coating from high temperatures, and the inner one from cracking due to uneven thermal deformations. Prefabricated elements are connected lengthwise.
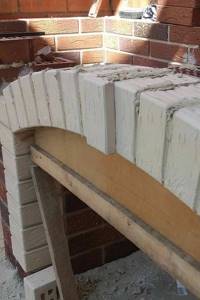
To create an arch, you will need a circle - a metal or wooden arch. It is fixed in the opening, and a row is installed on top, repeating the shape of the arc. The top brick is placed last in the opening. The neighbors lean on it and therefore do not fall. The arch is protected from the inside by a fire-resistant layer.
f865172a8d51505597d87f00badffcfb.jpe
31db132402594f30ca59ae1999e499ab.jpe
Instagram @kladkakamina
Instagram @kladkakamina
Instagram @mangal_kamin_rostov
Pipe construction
No fireproof materials are required. The rows are arranged offset inward by a third of the width, creating an elongated pyramid. At a certain level they switch to even vertical masonry.
The ribbed inner surface is more difficult to clean, so sometimes the ribs are cut off or covered with flat panels.
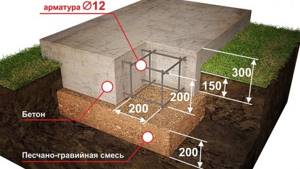
Preparing the base for a barbecue oven
The correct foundation is the basis of a balanced masonry. To prepare a place for the foundation, it is important to remove the fertile layer of soil and, if necessary, deepen the pit by approximately 20-25 cm. The area of the foundation should exceed the dimensions of the planned structure by 50 cm around the entire perimeter. The size of the site primarily depends on personal preferences: you need to decide whether there will be a gazebo nearby or whether the foundation is needed only for the stove itself.
The bottom of the base should be thoroughly leveled, and then covered with a 15 cm thick layer of crushed stone. At this stage, it is important to maintain the symmetry of the base. It is imperative to compact the surface with a vibrating plate or (if it is not available) a tamper - metal or wood.
Depending on the type of foundation chosen, further actions vary. If a paving slab or paving stones is chosen as the base, the coating is covered with fine sand. It is recommended to reinforce the slab foundation with a rod 10 mm thick. It is laid lengthwise and crosswise in increments of 20 cm. The intersections of the rod should be secured with plastic clamps or tied. In addition, reinforcement can be done with a ready-made mesh and poured with concrete. Before pouring the solution, it is advisable to repeat checking the bottom for horizontalness. The surface of the base area must be leveled: it must be level in all directions.
The foundation is reinforced with a rod or solid mesh and filled with concrete.
You can continue building a brick barbecue oven with your own hands after 1-2 weeks (depending on the average daily air temperature). If the temperature was above 20 °C, one week will be enough. At an average daily temperature of 17 °C, you will need to wait two weeks. Typically, the time interval is maintained only when laying the stove yourself. Builders tend to be speed-oriented and do not always comply with these requirements.
DIY brick barbecue
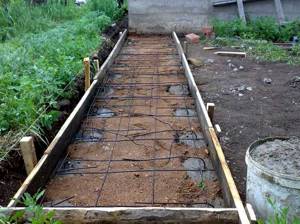
Construction always begins with the construction of a foundation, most often a monolithic strip foundation that does not require deep digging. For this:
- A trench is dug along the entire perimeter of the structure being constructed to a depth of at least 40 cm;
- A mixture of gravel and crushed stone is poured onto the bottom, which must then be thoroughly watered and compacted;
- Reinforcing bars are laid in such a way as to form a mesh. This will ensure sufficient strength and reliability of the poured base. Horizontal level is carefully controlled using a building level;
- The concrete is poured directly. It is preferable to use a composition containing M300 cement for this purpose.
The poured composition must be compacted, preferably using a vibrator. In the absence of special equipment, sufficient compaction can be achieved by tapping the side boards of the formwork.
Subsequent work can begin only after the base has completely hardened. As a rule, this takes about two days . In this case, sequentially:
- Lay out the pedestal;
- Set up the oven;
- Lay out the pipes;
- A set of final works is carried out.
Building a pedestal
A carefully planned order when developing drawings will allow you to correctly lay out the pedestal. Brick laying is done in a checkerboard pattern at a distance of 4 cm from the edge of the base.
For those who are building a barbecue with their own hands for the first time, the step-by-step instructions will be very useful, which outline the number of bricks laid in each row. During the work process, it is important to ensure that all laid layers are horizontal and vertical.
The dimensions of the pedestal may vary. Most often, a barbecue for a summer house has a “leg” of 0.5–0.6 m by 0.6 m . The height of the pedestal is about 0.6 m, but the height of the home owners must be taken into account: it is possible to add a couple more layers, but no more.
An excessive increase in the height of the “leg” can negatively affect the stability of the structure as a whole, since it is quite narrow. This is important to know for anyone who has just started to figure out how to build a barbecue.
Firebox
After the pedestal, the firebox is laid out. As a rule, its width is about 6 bricks with a depth of 3 bricks . Considering that the facing brickwork is laid on top of the fireclay brick, the fireclay brick is laid in two rows. Reinforcing bars are provided in the floor areas to ensure sufficient strength and rigidity of the structure.
If the design features of the furnace provide for the presence of a concrete base near the firebox, then it must be reinforced. To do this, a special frame is installed before pouring concrete.
At this stage, it is also worth filling with concrete all voids inside the pedestal. After this, there is a break in work for a period of time sufficient for the poured concrete to harden.
Pipe
Fireclay bricks are traditionally used to construct a chimney. It is laid on a clay solution. A special tooth is provided on the back side of the furnace , which serves to enhance traction. A valve is installed inside.
When the pipe is ready, a chimney roof : columns half a brick high are formed in the corners, on which a concrete slab 5 cm high is installed. Other options are possible, depending on the overall design of the stove.
Now you can begin the final stage. At this stage decorative finishing to ensure the attractiveness of the structure being built. For this you can use not only facing bricks, but also natural stone.
The latter is able to ensure the durability of the structure being built. The concrete countertop is also poured, if provided, and lighting is supplied.
Masonry mortar for outdoor brick barbecue
The strength and durability of the entire structure is largely determined by the quality of the composition for pouring the foundation. For this type of building it is recommended to use clay mortar. If you don’t want to purchase a ready-made mixture, you can make it yourself. The advantages of using a homemade solution are undeniable. Firstly, such a stove is subject to repair work if necessary. Secondly, the cost of a homemade solution is much lower than the price of a ready-made mixture from a store.
To prepare a high-quality clay solution, you will need fine river sand, water, fatty clay, cement or table salt. There are no universal proportions in preparing a clay-sand composition. Only experimentally can you choose the optimal consistency. This is primarily due to the fat content of the clay. The fatter the clay, the less it crumbles when dried.
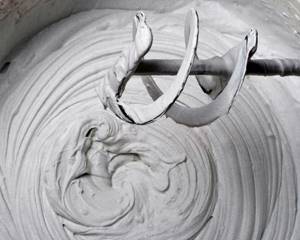
You can buy ready-made mortar for bricklaying or make it yourself.
On a note! Raw brick has an optimal content of clay and sand, combines perfectly with brick masonry and serves as an ideal basis for masonry mortar. Using this material will reduce the time required to calculate proportions and prepare the mixture.
To perform further work, you will need two sieves with cells of 1.5 × 1.5 mm and 3 × 3 mm. The sand should be sifted through a fine sieve to separate it from impurities. This will allow you to make a thin layer of masonry mortar. To sift the clay, you need to first soak it in water to the consistency of thin sour cream, and then strain the resulting mixture through a fine sieve. Add sand to this mass, mix the solution and again pass the whole mixture through a sieve with 3x3 mm cells.
Sand should be added gradually - at the rate of 1 liter of sand per bucket of clay mixture. Using a smooth wooden plank, you can check the elasticity of the resulting solution. To do this, you will need to dip it into the prepared mixture and look at the thickness and consistency of the adhering layer. A layer 2 mm thick will be optimal for masonry. The resulting solution should be soft and elastic to the touch, eliminating lumps and clots.
To increase the strength of the mixture for a brick barbecue oven, it is recommended to add 100-250 g of table salt per 1 bucket of solution. Cement can be used as an alternative to salt. However, it must first be diluted with water to the consistency of thick sour cream and mixed with the mixture. For 1 bucket of solution you will need 0.75 liters of this cement mass.
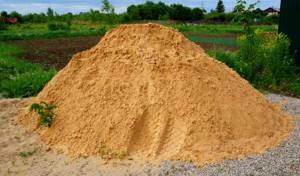
To prepare the solution with your own hands, you will need fine river sand.
The approximate consumption of the mixture for 100 bricks is 20 liters (with a masonry joint width of 5 mm). The type of brick used and the thickness of the joint are important here. You need to be prepared for the fact that in some cases the solution consumption may increase to 35 liters.
Arranging a barbecue oven: the key to reliable and durable masonry
Professional builders use the term “ordering” in two meanings, which a beginner should also be aware of. In the first case, ordering is a schematic representation of the future structure in rows. This scheme allows the beginner not to get confused when laying, and the master - to significantly save time when implementing similar projects. Diagrams, drawings and photos of a barbecue grill help to visualize the final result or make adjustments at the construction stage.
In the second usage, the word “ordering” refers to a device that controls the height and horizontality of each brick row. This device will provide the so-called architectural balance, extend the service life of the building and act as a guarantor of safety when using an outdoor barbecue. In addition, it will help calculate the required amount of material and eliminate unnecessary costs.
The first ordering option is a schematic representation of the structure in rows.
The order consists of two vertical slats on the sides of the wall. They are attached to the bottom rows (at least two rows). To avoid damaging the brickwork, it is recommended to use staples instead of bolts for fastening.
Control of the masonry is carried out using notches made at intervals of 77 mm along the height of the batten. This figure is calculated as follows: the thickness of the connecting seam (12 mm) is added to the height of the brick (65 mm). If the seam width differs from the specified one, the notch interval will change in proportion to this indicator.
Note! When making notches, measurement accuracy plays a decisive role. If the spacing on the slats does not match even by 1-2 mm, the horizontality of the structure will be disrupted, which will affect the quality of the brick barbecue.
Between the notches of the opposite slats, a mooring is stretched - a strong nylon thread or lace. The tension of the rope is extremely important: it should not sag, otherwise it will not be possible to control the horizontal position. If a level is used when laying the first tiers, in the future its function will be performed by a berth. This principle of masonry control gives an advantage not only in quality, but also in the speed of work.
The second ordering option is a device for controlling the height and horizontality of bricks during laying.
For convenience, you can use an order of three or even four brick walls. Thanks to this principle, you can easily control the symmetry of the structure, the accuracy of the angles and the horizontalness of the masonry simultaneously along the entire perimeter.
There are ready-made control devices on sale, but you can make the order yourself from scrap materials. You just need to take into account that a homemade device is only suitable for one-time use and does not guarantee accuracy for subsequent use.
Forming the bottom and erecting the walls of a brick barbecue
After the foundation has completely hardened, you can begin to form the so-called “leg”. In this case, the masonry is carried out in a checkerboard pattern. Usually eight rows of bricks are laid out so that the height is 60 cm. Of course, these data are arbitrary and vary in accordance with the barbecue drawing.
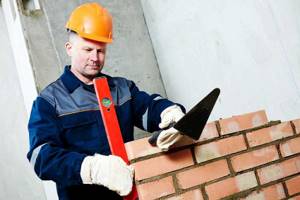
In the process of erecting the walls of the barbecue, you will need a building level.
Next we move on to creating a firebox and building a wall. The firebox can be made of reinforced concrete. Its approximate size is 80x80 cm. To carry out this work you will need formwork. Be sure to wait for the structure to dry completely. In some versions, the barbecue firebox can be constructed from metal.
When building walls, brick laying is done according to the same chess principle as when laying out a “leg”. It is worth noting that the front side remains empty. At this stage of construction, it is important to provide places for attaching the grill or skewers.
On a note! When laying the walls of a barbecue oven with your own hands, be sure to take a break from work for 1-2 days every 4-7 rows. This will allow the brick to dry out and the mortar to settle.
Where to begin?
Before starting construction, it is imperative to decide on the location. It must be fireproof . The barbecue area at the dacha should be located at a sufficient distance from the buildings located on the site. In this case, it is necessary to take into account the wind rose : this will minimize the risk of an accidental fire at home or other buildings.
There is a similar article on this topic - How to make a barbecue from brick and metal?
You should definitely take care that there are no dry bushes or trees nearby that could catch fire as a result of accidental sparks. Most often, the stove is located right in front of the house or cottage.
Once the site has been selected and its area has been specified, we can begin to develop drawings. At this stage, the design features of the future barbecue are carefully thought out, taking into account general recommendations. For example, a barbecue grill should not be located below 65 cm from the floor.
The height of the grill should be chosen so that it is convenient to use. The barbecue oven is located 10 cm below the grill.
When developing drawings, it is worth considering such little things as location:
- Firewood and/or coal;
- Tweezers, spatulas, metal brushes and other items that may be required during operation of the oven;
- Shelves and their size.
You can provide a grill if you plan to cook kebabs on skewers. In this case, the constructed structure will allow you to prepare all possible types of meat dishes.
When working on the design of a structure, it is necessary to take into account the features of the stylistic design of all nearby buildings. In this case, the built barbecue will be able to harmoniously fit into the surrounding space, becoming a real decoration of the garden plot if the stove is located outside.
Video - rustic style barbecue:
When developing drawings, in addition to design features, it is mandatory to draw up a diagram for laying a brick barbecue. This is done in order to eliminate possible errors during the work process.
BBQ photo:
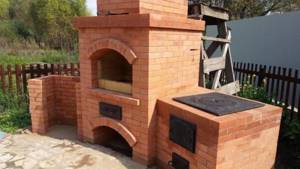
photo of brick barbecue
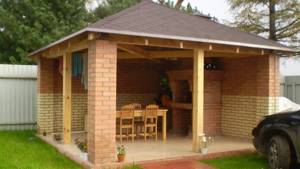
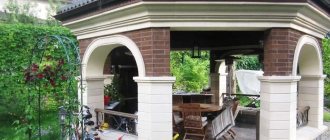
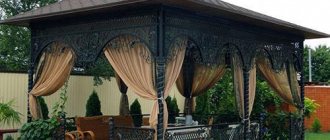
photo of gazebo with barbecue
photo of a country gazebo with barbecue
Optimal brick barbecue projects for a summer cottage
It is not always possible to resort to the services of specialists to make a brick barbecue at your dacha: the price sometimes does not correspond to the volume of work. Many people like to arrange their own site - without the help of strangers. That is why this article offers the simplest do-it-yourself barbecue oven laying plans.
Brick BBQ with gazebo, work surface and dining area.
How to build a large brick gazebo with a stove - practical tips
https://youtube.com/watch?v=abZRz8ClENg
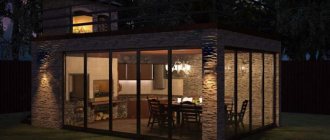
The desires of modern summer residents are quite comparable with the growth in the general well-being of Russian citizens. For many people, having just a country house, a greenhouse and a bathhouse on their property is no longer enough. In addition, the plots have increased in size - the traditional six hundred square meters are a thing of the past, now country estates range from ten to fifteen hundred square meters, and since not everyone wants to do only agricultural work at their dacha, there are many who also want to relax, the arrangement of recreation areas is increasingly taking place the minds of the owners of summer cottages. For some, a light metal gazebo with a modest table and stools is enough, while others are not averse to acquiring a fundamental and multifunctional structure, which can rightfully be called a brick gazebo with a barbecue oven. Let's consider options for constructing this facility on a summer cottage.
Like any serious construction, the construction of a complex engineering structure, such as a brick gazebo, requires careful preparation with the mandatory design of all elements of the future structure.
First you need to decide on the type of gazebo, for which the most reasonable thing would be to familiarize yourself with photos of gazebos with barbecues, and after analyzing the options you like and comparing the possibilities, begin designing a specific structure that takes into account the characteristics of the site and the functional purpose of a particular gazebo, if possible adding to standard projects individual traits.
Foundation structure
After choosing a project for a brick gazebo with barbecue, you need to prepare the area (for which the site is leveled) and make a foundation. Since the load on the load-bearing structures of the gazebo will be significant, and the stove itself is heavy, the foundation must be made of concrete, for which, depending on the characteristics of the soil, select the desired type of foundation:
strip foundation - poured along the perimeter of the future building with depth to a certain distance. When installing a strip foundation, the block under the furnace is poured separately. This type of foundation is suitable for dense soil that does not cause deformation.
If the soil is heaving or swampy (subject to subsidence), it is necessary to make a foundation in the form of a monolithic slab, which will prevent the destruction of the structure from possible soil movements, since the entire structure will move along with the foundation slab.
Types of barbecue
The very concept of barbecue is of American origin and in its meaning is a device for cooking food over coals. We are more accustomed to the definition of barbecue or grill, but for a good product it is much more important to prepare it correctly and tasty, and the name is secondary. In addition, the process of cooking in a barbecue occurs a little differently than on a grill, so the name also has a certain meaning.
A barbecue oven can be a complex structure with several compartments - a hearth, an oven, a metal grate and a chimney. Perhaps even a spit device. Some projects include a tandoor. A real barbecue oven also includes several additional shelves for storing prepared foods and kitchen utensils necessary for preparing various dishes.
BBQ order
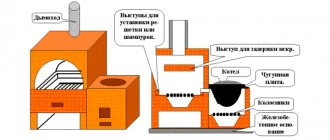
When making a barbecue stove with your own hands, the drawings are drawn up taking into account the order of the barbecue, that is, the clear arrangement of each row of bricks depending on the requirements for the purpose of the stove, the composition and quantity of materials (the brick itself) and the geometric dimensions of the structure (taking into account all compartments of the stove, including the chimney) . An example of the order is shown in the figure.
BBQ with cauldron
For variety, you can build a metal cauldron into the barbecue oven to additionally cook pilaf or vegetables. The design of the oven will allow these dishes to be cooked in the hot atmosphere necessary for quality stewing.
Since the hemispherical shape of the cauldron creates a higher temperature (and allows it to be maintained longer), the principle of long-term cooking of some dishes is maintained remarkably well, and a barbecue with a cauldron can just become that special element of a summer kitchen that no one else has among neighbors and acquaintances.
Diagram of an open barbecue grill
This design is the simplest to implement. When laying a barbecue for a brick cottage, it is recommended to use a material that is not afraid of high temperatures and does not absorb moisture too much. Stove or solid ceramic (it is a little cheaper) brick is best suited. Before laying out the first row, you should take care of waterproofing. Roofing material or waterproofing in two layers is suitable for this purpose. You can repeat the procedure (only one layer) after the first row of bricks.
In the barbecue of this design, the masonry is carried out using a clay-sand mixture with the addition of cement. It is very important to maintain horizontality and adhere to the width of the mortar joint. For an open grill it is 3-5 mm.
The masonry scheme is quite clear; it looks like an inverted letter “W”. This form is maintained until the 6th row. Then the masonry continues on half of the structure and, accordingly, has a U-shaped appearance.

Project for a small outdoor brick barbecue.
The first and subsequent odd rows start with a whole brick, and the second and subsequent even rows start with half. Pay attention to the 6th and 10th layers: here you need to place the brick sideways and turn it across the main masonry. In total, the design has 13 rows. The length of such a barbecue will be 181 cm, width - 90 cm. You can visually see what a barbecue made of bricks of this type looks like in the photo.
Bricklaying
Arranging a brick barbecue is the most difficult stage of the work. Each row of bricks must be installed as written in the project. The diagram is shown below. If desired, the scheme can be changed by making, for example, a smaller brazier or chimney.

On average, it will take 7 to 14 days for the barbecue foundation to fully harden. After this we lay the waterproofing. If the construction of the stove takes place in a gazebo, then the first row of bricks should be installed at floor level. If the first row of bricks is not at floor level, then lay out another row of bricks. Only after this can the subsequent rows of bricks be laid. You can see more information about masonry from the video.
It is very important to draw up a diagram or project for the barbecue. In order for the project to succeed, it is important to constantly check the verticals and horizontals of the walls. In addition, it is very important to control the thickness of the solution. In order for the seams between the barbecue bricks to be even, it is necessary to prepare a small reinforcement rod with a diameter of 8-10 mm. Place the rod on the edge of the brick and apply the mortar. Excess solution is removed using a trowel. The rod can be removed after laying the brick and tapping it.
In order to make a combustion chamber for a barbecue, you need to use refractory bricks. Laying refractory bricks is done using clay and sand. It is better not to use a solution that contains fireclay. For it to completely harden, a very high temperature is required, which a regular grill or barbecue will not provide.
After laying the brick, the barbecue can be decorated and decorated using materials that are not afraid of high temperatures. Forged products can be used to decorate the stove. Forging easily withstands high temperatures and fits perfectly into any exterior.
A simple brick barbecue complex for beginners
Approximately such a complex consists of 275 pieces. bricks If desired, it can be simplified somewhat by reducing costs and making the chimney from sheet metal (rather than brick). This oven consists of 18 rows up to the chimney and 10 rows up to the barbecue grill. We start, as in the previous version, with waterproofing. Up to the 6th row we form a hole for the grate. Next, the masonry is carried out according to the diagram. In the 8th and 23rd tiers, a steel sheet 5 mm thick is installed. In the 11th row, it is planned to install a square cast-iron slab measuring 41x41 cm.
To visually represent the layout of a barbecue oven, we recommend using a schematic sketch. This will make it easier to navigate the rows. Be sure to follow the rule: if the bottom brick is laid lengthwise, then the top two rows must be laid longitudinally.
Even a beginner can make a simple brick barbecue complex with a seating area.
Barbecue project with pipe and work surface
This barbecue oven is a little more complex in its design, but if you have a diagram, even a beginner can make it. Please note that the fire chamber in this version has a straight arch. Technically it is much easier to perform than the vaulted version. The dimensions of the barbecue are optimal for a summer cottage. The height of the structure is 217.5 cm, while the frying chamber is raised by 90 cm.
So where to start? Since brick absorbs moisture well, two layers of waterproofing should be spread on the prepared and dried foundation, and then the laying process should begin. Here it is important to strictly adhere to the pattern and control the width of the connecting seam.
On a note! To control the width of the seam, you can use reinforcement whose diameter is equal to the required thickness. It should be placed on the edge of the brick, the area should be filled with mortar, and the excess should be removed with a trowel. After tapping, the reinforcement will not allow the brick to fall below the level. After completing this procedure, the rod is removed and placed on the next row.
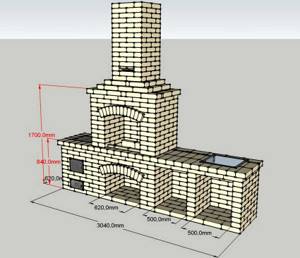
Project for a brick barbecue measuring 1.70 x 3.04 m with a work area and a pipe.
The first row is laid out continuous. Up to the 5th layer, the masonry is U-shaped. To lay a continuous row of bricks (for example, the 6th and 7th rows), you can lay three strips of metal 0.5 cm thick and 4 cm wide. One strip is laid on the edge of the structure, the rest in the middle of each brick layer. From the 8th to the 10th row, the masonry is made in the form of an inverted letter “W”.
It is worth noting that the 12th tier uses bricks sawn lengthwise. The size of the 12th and 13th continuous rows will be slightly larger than the rest. This is how the decorative belt of the outdoor barbecue oven is laid out.
The laying of subsequent layers is carried out using fireclay bricks in a U-shape up to the 21st row. It is recommended to use the same solution composition. Next, the vault is laid out. Already after the 22nd layer it begins to narrow. From the 30th row the vault turns into a chimney. The 30th and 31st layers are alternated until the required height is achieved. To narrow the structure, each next row should be laid out half as much as the previous one. The chimney, like the firebox, must be made of refractory brick. Instead of a brick vault, you can construct a metal box to remove smoke. The DIY barbecue is ready.
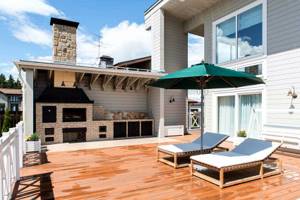
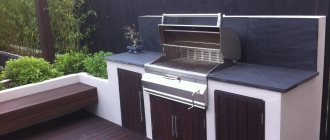
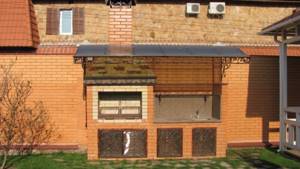
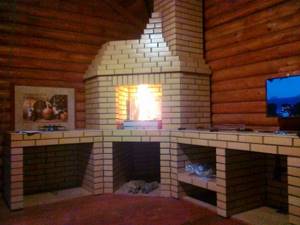
White brick barbecue under a roof with a work surface.
You should know that using the complex for its intended purpose is possible only a few days after completion of construction. The solution should dry thoroughly. Otherwise, when starting a fire, the walls of the structure may crack.
This device can be equipped with additional functions by forming an auxiliary working surface. It will be convenient to place kitchen utensils, dishes, cut food, etc. To build it, you need to dig a pit and pour the foundation parallel to the side wall. When the surface is dry, you can begin laying bricks. You will need to form six rows. To create a countertop, you can use a board, a sheet of thick plywood, a tile covering, a marble slab, etc.
Self-construction
If you decide to build a barbecue on your own, you can’t go wrong. This is a significant saving of money on the services of specialists, and besides, you will be able to build the object exactly as it is shown on your diagram.
Most often, brick is used for barbecue ovens. This is an inexpensive building material, holds heat well, and is resistant to the vagaries of the environment. Brick is universal and does not cause difficulties in work.
If you need to build a Russian/Finnish oven or tandoor, you will need fire-resistant clay or silicate stones. Pieces that are not in contact with fire can be built from rough bricks.
Often barbecues are made from cobblestones. In this way it is possible to create a massive structure. The cobblestone has a natural appearance, the brazier looks organically on the summer cottage. A significant disadvantage of such stone is its uneven shape, which makes it difficult to build walls.
Other alternatives:
- The stationary concrete structure retains heat well. Using mortar, when installing the formwork, you can set the desired shape for the stove. Unlike brick, concrete is not as noticeable in appearance, requires maintenance, and is more expensive.
- The roasting pan and cooking compartment can be made of cast iron (retains heat well), and the dampers reliably prevent sparks from getting out.
- A chimney or hood can be made of metal. The main thing is that the material is resistant to moisture. If you plan to use a pipe rather than a chimney, choose brick.
Thanks to a wide variety of materials, you can choose the optimal solution.
Simplified version
In order not to invent a bicycle, you can build the simplest design. The work process will be possible even for those with minimal construction experience. The materials we will use are bricks (about 100 pieces). You will also need a metal sheet and a grill. They should be identical in size.
Brick luggage will protect against accidental fire
Workflow Features:
- Prepare a flat, solid area.
- On the finished surface we lay out a circle of bricks laid flat with gaps between the stones of about 50 mm. This will allow air to pass from below.
- Carefully lay out four more rows. The masonry should turn out “in a dressing”.
- A metal sheet is installed on top of the fifth row. A fire will be built on it, wood and coals will smolder.
Such a design should be considered as a temporary option, for example, for the summer.
From scrap materials
Most often, old gas cylinders are used to create a barbecue. First, you need to rinse them well and check whether there are any flammable components left inside. We mark the place of the drink - this is where the lid of the structure will be. Using a grinder, cut off the top part of the workpiece, trim off all excess. You can clean the cut areas using a sanding machine.
It is necessary to adjust the part on which the firewood will be laid out in the future. It is not necessary to fasten it too tightly; if necessary, you can easily remove this element from the cylinder. We take the cut top and mount it on the base of the grill. We attach small spacers along the edges to create a gap. Now you can attach the hinges so that the barbecue door can be opened easily. We fix them together with bolts.
We make small holes at the bottom of the cylinder so that the ash can pour out through them. We attach the handles to the structure using bolts. Clean the surface.
All that remains is to make a stand for the barbecue. To do this you will need a square pipe and a sheet of metal.
Stationary option without chimney
A monolithic barbecue will last longer, and it also has a more aesthetic appearance than temporary stoves. The construction of such a structure includes a number of nuances - at a minimum, the construction of a foundation will be required. Calculate the length and width depending on the chosen location.
There are three main ways to lay a load-bearing structure:
- The fastest and easiest is to use a reinforced concrete slab. The top layer of soil is removed. The thickness of the slab determines the depth. A “cushion” of sand and gravel is formed at the bottom, its thickness is approximately 5 cm. All this is compacted, then the slab is laid. The method is quick, but as practice shows, a crane may be needed for proper shrinkage.
- The reinforced concrete slab is created on site. A pit 300–350 mm deep is dug, and the same “cushion” is created. Formwork is installed, reinforcement is performed, and concrete is poured.
- The most popular option is a strip foundation. It is built according to the U-shaped principle. The laying is carried out to a depth of 45–50 cm. Again, a “pillow”; a reinforced concrete base is poured onto it.
Next according to the plan is laying the walls. We will use different types of bricks. The firebox and the part that will be affected by fire are made of fire-resistant stone. You can use fireclay or solid brick. The rest is made from facing or block material.
You need to start work when the foundation is dry and strong. We cover it with waterproofing. The height of the firebox is on average 0.6–1 m from the ground. Once two rows of the base have been laid, we install another 5 rows of ordinary bricks. When the firebox starts, we use refractory stone. Next we lay out the bonded row. There should be an inner side. We form a firebox bath from two rows of refractory material and duplicate the butt row. There will be skewers with meat here. We lay another row of bricks and again make a bonded row. This will be the support for the grid under the grill.
Stationary stove with pipe
Complicated design - with a chimney. Here the work process is more complicated, and more material is needed. But such a structure looks solid and is a convenient place for barbecuing.
In addition to the foundation and masonry, another stage is added - the construction of the pipe. As stated in GOST standards, the dimensions of the smoke intake should be as follows: per 1 m³ of firebox, 960 cm² of pipe area, plus the height of the chimney.
We buy a cone or make it ourselves from metal. It can also be laid out with bricks. Do not forget that such a cone should gradually narrow. We recommend using a special fireclay composition for masonry.
When the firebox is ready, additional accessories can be installed. For beauty, use facing bricks. The result should be a single design.
Barbecue ovens: photos of the best solutions for a summer cottage
In numerous photos and diagrams you can see various options for making a brick barbecue. The barbecues shown in the photo can be easily modified to suit personal needs and the characteristics of a particular site. You can modify the work surface, add decor to the design, or you can even come up with your own barbecue design based on existing examples. When building a brick barbecue oven, the drawings and photographs posted on the pages of this article will help you choose the right option and save time.
The size and design of the barbecue can be selected depending on the area and taste preferences.
Now even a beginner will understand how to make a brick barbecue oven with his own hands. If you follow the above recommendations, the process of making a barbecue will take place without any possible difficulties or additional material costs, and the end result will delight you and your loved ones for many years.
Cold smokehouse: photos, videos, how to make it yourself (read more)
Barbecue from a gas cylinder
Not everyone can afford to buy a barbecue or grill in a store. Therefore, many people are thinking about making it themselves. The cheapest and easiest way is to make a barbecue from an old gas cylinder.
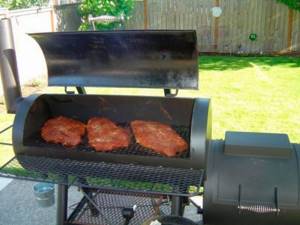
If you pay attention to the photo, you will notice that the design of this grill is quite large, about 120 cm. Therefore, you can easily cook more than one kilogram of meat or fish on it. Also, the advantage of this design is that the cylinder can easily be made smaller. To do this, you need to cut it, shorten it to the desired size and weld it back. An example of this work can be seen in the photo.
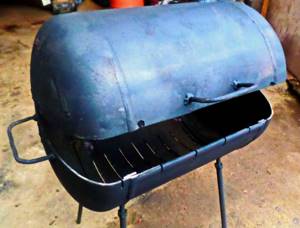
It is worth noting that a barbecue made from a gas cylinder is not a portable structure. Only two people can lift it and moving the structure will be inconvenient. Therefore, a barbecue from a cylinder can only be used at home.
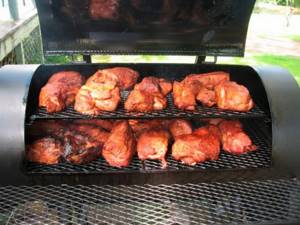
The advantage of this barbecue is its ease of manufacture. Finding an old cylinder from scrap metal will not be difficult, and it will take about two hours to make it. Thanks to the thick walls of the cylinder, it will not burn out from high temperatures and will last for a very long time. In addition, if you spend a little time and imagination, you can make a truly unique design. An example of this can be seen in the video.
There is an opinion that it is prohibited to cook food in a barbecue from an old gas cylinder, since some of the gases still remain. I would like to point out right away that this is not true. Before preparing food in this design for the first time, the container must be washed thoroughly with water. It is also recommended to heat the barbecue several times. After these steps, the oven becomes an ordinary metal structure that can be used for cooking food.